60 Gal Offset build - Technical questions

  • Some of the links on this forum allow SMF, at no cost to you, to earn a small commission when you click through and make a purchase. Let me know if you have any questions about this.
SMF is reader-supported. When you buy through links on our site, we may earn an affiliate commission.

HMWorks

Newbie
Original poster
Oct 11, 2023
4
5
Hi SMFs!

I've spent the last week or so reading through as many posts here on the forum as I could find. I am at a crossroads in designing my build, and would like to come to the hive mind for help.

I followed daveomak daveomak 's calculator to a T, and came up with what I think is a really neat design. However, after watching YouTube videos until I cannot see straight anymore, I am having a dilemma with my firebox door design.

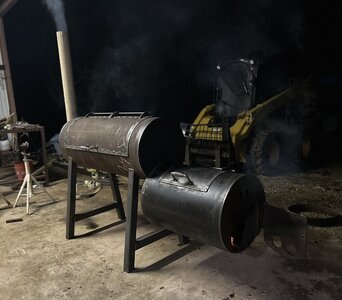
Many of the "top" builders have a very basic firebox design - solid door with latch to set opening and build a bed of coals on the bottom of the firebox.

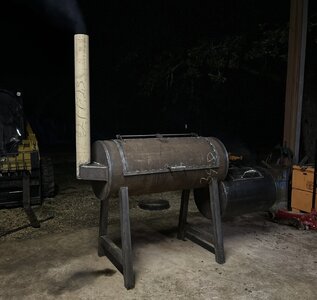
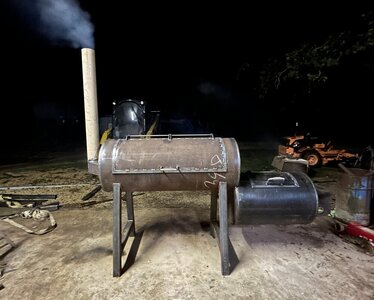
Following the advice of the calculator, I've got my air inlets at just over the recommended opening size (pic attached) with ~80% at the bottom and 20~ at the top (directly across from my cc/fb opening).

Which is the better design and why? Also, is it the consensus to build your coals directly on the base of the FB, or raise the fire in a basket/nest and allow your bottom air inlets to directly feed the fire?
 

Attachments

  • FB Door.png
    FB Door.png
    629.4 KB · Views: 103
  • Like
Reactions: JLeonard
The fire in my Franklin pit is built in the bottom of the firebox. And everyone else has taken a clue from Aaron Franklin in that regard.
 
The fire in my Franklin pit is built in the bottom of the firebox. And everyone else has taken a clue from Aaron Franklin in that regard.
Franklin's pit is one that I think many have tried to re-create. What I think is interesting about his pits though, is that they still have air inlets, where as many of the other higher end builds now have solid doors.

Why do you think that is? Do you ever get ash flying up into the CC from the lower air inlets?
 
I had an Old Country Brazos before the Franklin. It had a damper in the door and I always cooked with it 1/2 open. Never had any reason to vary that setting.

If I opened it up wider, or cracked the door open, it increased air flow into the cooker. And that smoker has this baffle on the exchange between firebox and cook chamber, that restricts the flow. So the increased air flow would shoot under that baffle and heat up the stack end of the cooker.

I found to get the best balance I could, was to have the damper 1/2 open. It might as well have been permanent.

And I would guess that the other back yard smokers are the same. If its a solid door, there's a sweet spot on how far to keep it open.

On Workhorse pits, there's speculation not denied by Jimmy Daniels, the owner, that the only reason there's a damper in the door is for insurance reasons. And I know that the heat can be moved around in those pits by how far the door is open.

Aaron says he spent a lot of time experimenting with different openings in the door to get the right amount of air flow in the cooker to burn a clean fire.

He also suggests to owners to experiment with opening the door. I've found I can use it like a thermostat. If I've built too big a fire and its running hot, I can open the door and it brings in cool air that lowers the temp in the cook chamber. How far it cools down, depends upon how far the door is open. I could run the pit with the door open but it would use a lot more wood than necessary.

That is exact opposite of running my Brazos. The analog temp gauge on the Franklin is down on the stack end . I open the door, the temp on that gauge drops as I get cool air mixing with heated air. On my Brazos , I open the door and the heat builds in the stack end. That's because the air could not exit as fast as it came in, the stack without a collector was an air flow bottleneck.

And no, I don't get ash in the cook chamber.

Aaron designed the pit for optimum air flow. Every little detail , the eliptical end cap on the stack end, and even the location of the grease drain, is to move air through the cooker.
 
Nice job! You got that done in about a month? Hmm maybe turkey, I hear there is a holiday coming:) I'd probably do a pork butt first, but with all the real estate I'd probably toss something else on also.
 
  • Like
Reactions: HMWorks
Thanks BigW!

It should have been completed much faster..but being the first pit there were a lot of learning opportunities.

I am already looking forward to building another with the things I've learned from this one. This forum is a great resource!
 
I used to own a Klose BBQ pit that I was willing to modify, and I added three small holes per DaveO with the ability to open and close them .... completely matched the calculator ..... at first, I thought, "Wow, how awesome, what a difference!"
After plenty of cooking, I realized that work was a waste of time and money, made zero difference in my ability to control my temperatures, and made zero difference in burning a 'cleaner' fire.
On that Klose, to burn my best fire and cook my best meat, I and to crack the door as required by the fire at that time of the day/month/year.

Today have a Millscale ( original Franklin boys ), which has a simple solid door. Sometimes the door is wide open, but many times it only cracked open an inch or two ....
Trust me, there is no way 'two large holes and three small holes' can be adjusted to exactly what your fire needs in the moment.

There is no shame in having the firebox door open, it doesn't mean your pit was designed poorly, as you note, the big boys know this ..... that is why they won't fuss with holes in their doors.
 
IMO, Aaron Franklin vented his firebox door to a setting that would provide the best convection on the stack end of the cook chamber.

With the Franklin door closed, the heat rises directly up once inside the cook chamber and hits the deflector/shelf ( which btw, Millscale also has one ) and he says that creates turbulence on the stack end. And turbulence = convection.

Then the heat goes to the top of the cook chamber, where its then pulled down around meats on the stack end of the grate. He's positioned the collector where its mostly below the cooking grate, so that the air flows under the meats also, not just across the top.

I've not tested it, but my strong guess is that opening the door and increasing air flow into the cooker changes all of that. I'd have to run a biscuit test to know. But Frankly, I've trusted Aaron with this stuff. He's tinkered with it enough to know how it runs best.

The baffle inside the Brazos really messed with air flow in the cook chamber. There was only 3" clearance between bottom of cook chamber and baffle. I think it had a venturi effect, same as holding your thumb over the end of a water hose. It restricted air flow into the cooker so much , that I think the velocity of the air flow increased and shot into cook chamber.

My evidence of this is burned bottoms on meats placed on the stack end, while the tops weren't nearly done. That's what first alerted me to what was happening in the cooker.

I had to cut down air flow using the damper in the firebox door, to get the heat in Brazos to rise immediately after it went under that baffle.

What I've read from Workhorse 1975 owners, is their cookers have a baffle but its not nearly as restrictive as the Brazos. Still they get a hot spot in the middle of the cooking grate. Some have moved the hot spot to the firebox end by closing off the damper on the stack. I have to wonder if same can't be achieved by shutting down air flow at the firebox door.
 
Thermal image of the Franklin. Can see where the heat rises and hits the shelf, then goes to top of cook chamber. Its cooler on top of the shelf. Can see the hot spot is right there where the " 133 " is at.

Just a note, I don't build my fire that close to the cook chamber. My fire will be closer to the firebox door.

Franklin Thermal Image.jpg
 
Last edited:
  • Like
Reactions: okiwen
Thermal image of the Franklin. Can see where the heat rises and hits the shelf, then goes to top of cook chamber. Its cooler on top of the shelf. Can see the hot spot is right there where the " 133 " is at.

Just a note, I don't build my fire that close to the cook chamber. My fire will be closer to the firebox door.

View attachment 682581
Whose thermal image, yours? It is awesome!
It perfectly matches what I know from my Millscale based on my laser thermometer, even showing the collector area left of the thermometer being hotter than the exact area where the thermometer is mounted.

What happens if you take a wide-open door to a cracked door on the Millscale?
( assuming your fire is ready for that ) .....
a.) The main chamber temp will immediately rise
b.) you will slow the fire down, not dramatically but enough to lower fuel consumption overall
c.) Your cook will taste better

Little custom mod I created for my smoker, I am always on the first or second notch ....
IMG_3089.jpg
 
  • Like
Reactions: okiwen
Came from Mad Scientist BBQ in this vid, which , having owned both a Brazos and a Franklin there's much to his conclusions that I don't agree with. And I don't think having even temps end-to-end is worth the loss of convection. I don't think Aaron Franklin cared if the temps were even.

I especially question his thermal image of the Brazos as there's been many people on the Old Country facebook group who've cut out the baffle and report that the first 12" of the cooking grate on the firebox end, is unusable.

He's running the Franklin at 275* and the Brazos at 233*, there's a lot of diff in air flow at those two temps.

 
What is rarely mentioned in a smoker build is matching the amount of smoker-firebox surface area to the size of the wood, and fire. Often in the past, large metal pits have given people the impression it is the metal holding the heat in, that makes a good temperature controlling smoker. Not exactly. Larger surface area smokers lose a lot of heat to the air. Larger heat loses require bigger fires which are easier to control.
Build your door with flexibility of vent area. Match wood size to pit size. I t is easy to bend extended metal to make different height fire grates. Test, and keep notes. Find what works for you.
Your smoker looks perfect to me. Very well done. You should be very proud.
Thanks for this info. Im looking at a custom build and was curious what stick size a 26 inch x 24 inch drum style firebox might take. Note.. I am seriously considering insulating the lower half myself with some firebrick from Lowes. So inside dimensions will be a couple inches tighter. Havent figured how the ash dump with work with the DIY firebrix.
 
SmokingMeatForums.com is reader supported and as an Amazon Associate, we may earn commissions from qualifying purchases.

Latest posts

Hot Threads

Clicky