Currently I am in the process of fabricating my first smoker. I have always dreamed of building my own monstrous smoker but have never had the time to. Luckily for me I'm a student in a welding program and one of the courses is a fabrication class were you have to design and build your own project
 . For me there was no question in what I was going to build, a smoker out of a 500 gallon LP tank. For those wondering, yes I may have no smoker building knowledge but I have been welding/ fabricating for over 6 years now in plants and structural steel; holding certifications in various processes.
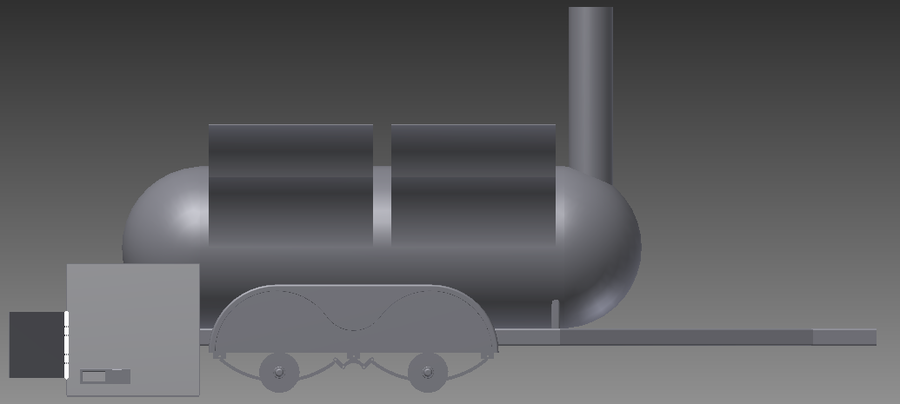
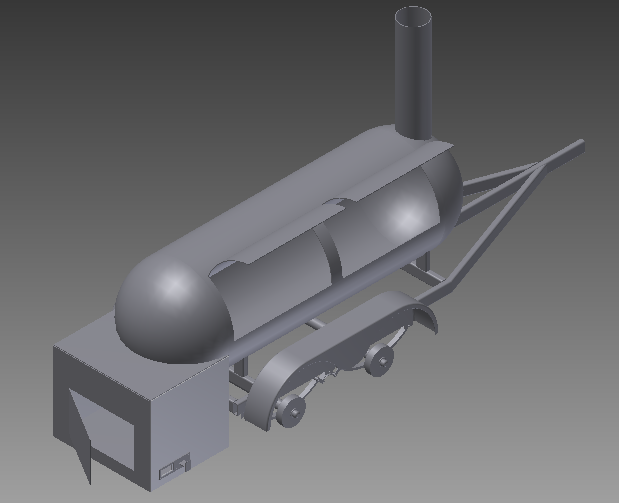
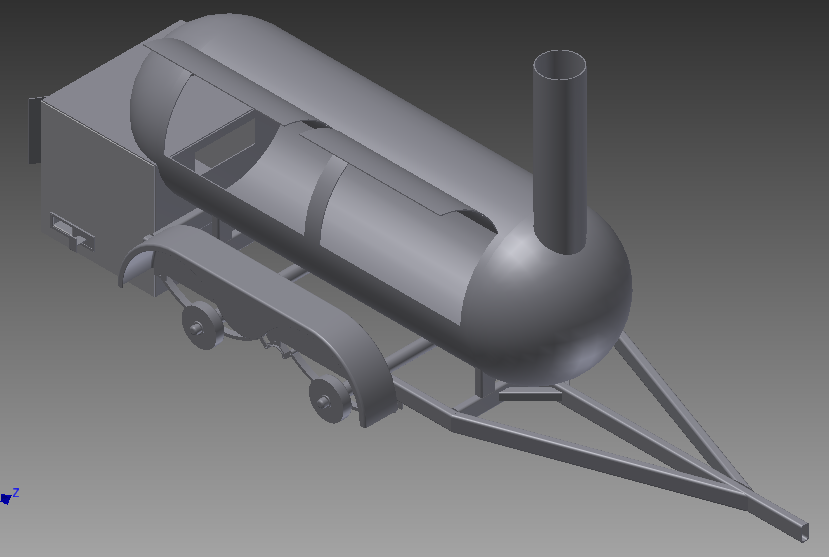
The first step of making this a reality was to spend countless hours brainstorming and looking threw forums at pictures to generate ideas. The next step was to take these ideas and put them into plans. I used Auto-desk Inventor to help that along by creating a 3-D model of my design. I created just the standard shell so i could use these dimensions to build the trailer frame, firebox, and cut the doors. Once past this stage i would custom fab the grates, vents, handles,etc... and then just add them into my drawling later.
From my dimensions I calculated that i would need 2- 2"x4"x24' 11 gage wall tubing for the frame and 1- 60"x120"x1/4" mild steel plate to make the firebox. I picked up a 500 gal LP tank from a local scrap yard for a mere 15 cents a pound.
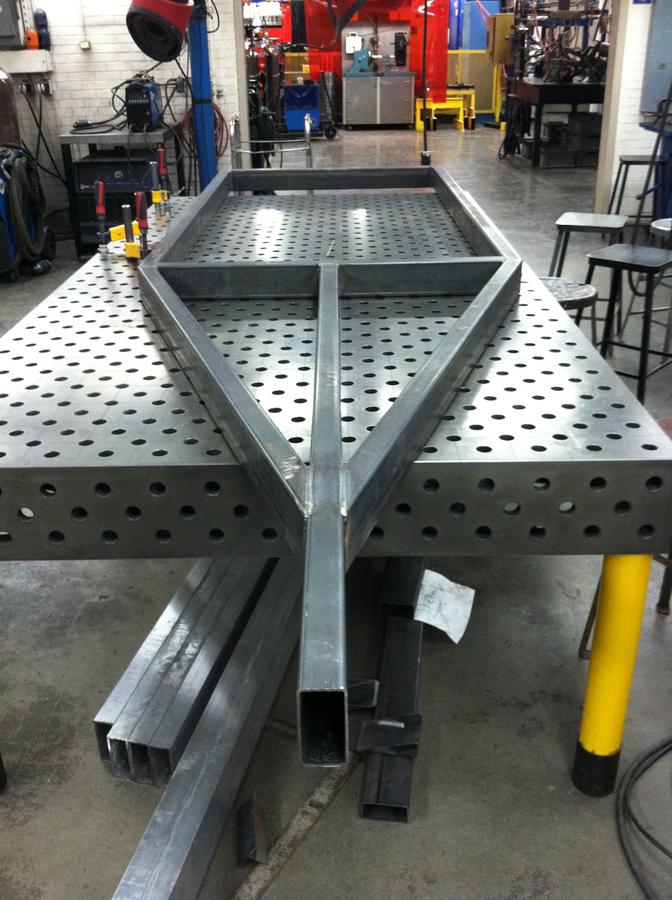
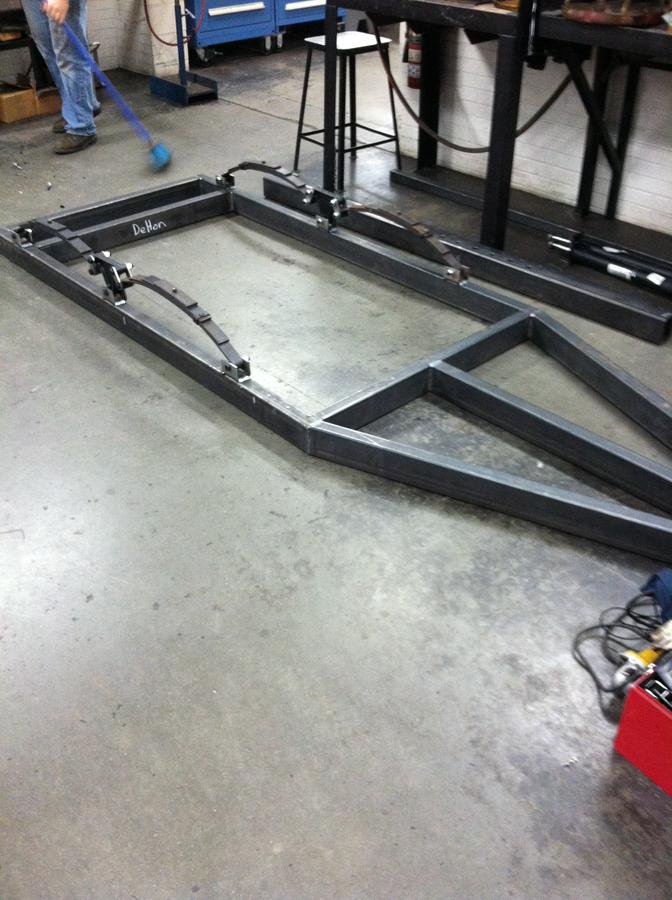
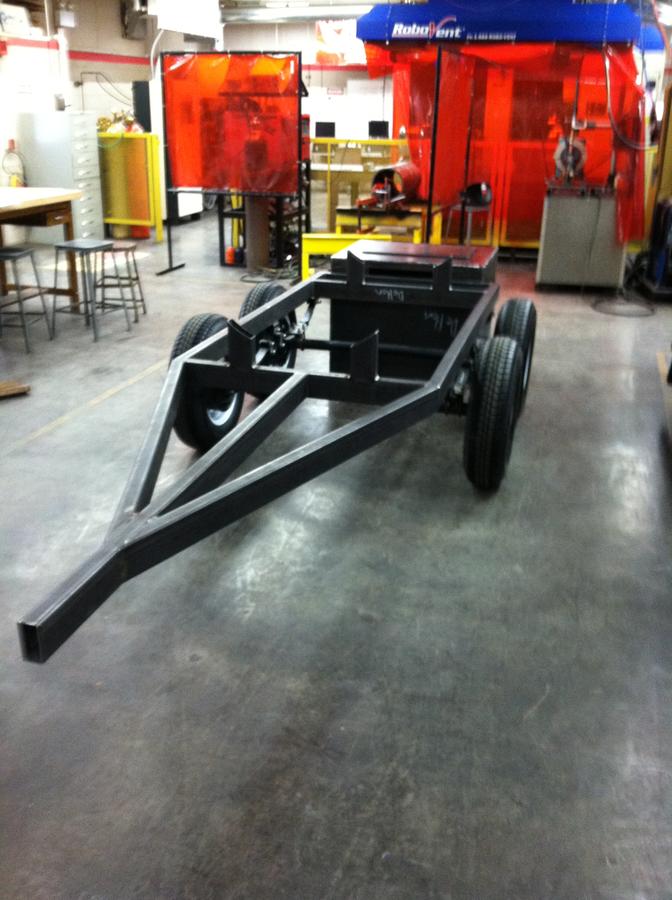
Once my materials arrived I decided I would start with the trailer frame first to get a base for what was to come. I managed to make all but two cuts on a horizontal band saw. The other two were 160 degree cuts for the tubes that meet at the neck (A frame) which I tacked sheet metal alongside the desired cut path and pushed it threw a vertical band saw. When all of my pieces were cut I set them all out on a layout table clamped them down and squared them all out.
From here I proceeded to make end caps for the two tubes at the back of the trailer and TIG weld them. Next I proceeded to MIG tack all outside corners of the frame to prevent distortion. Once tacked and measurement checked diagonally (corner to corner) I tacked all inside corners. After tacking inside and outside corners I TIG welded the top side of the frame cross supports and neck; I then flipped the frame and repeated. Finally I MIG welded all inside fillets, outside fillets.
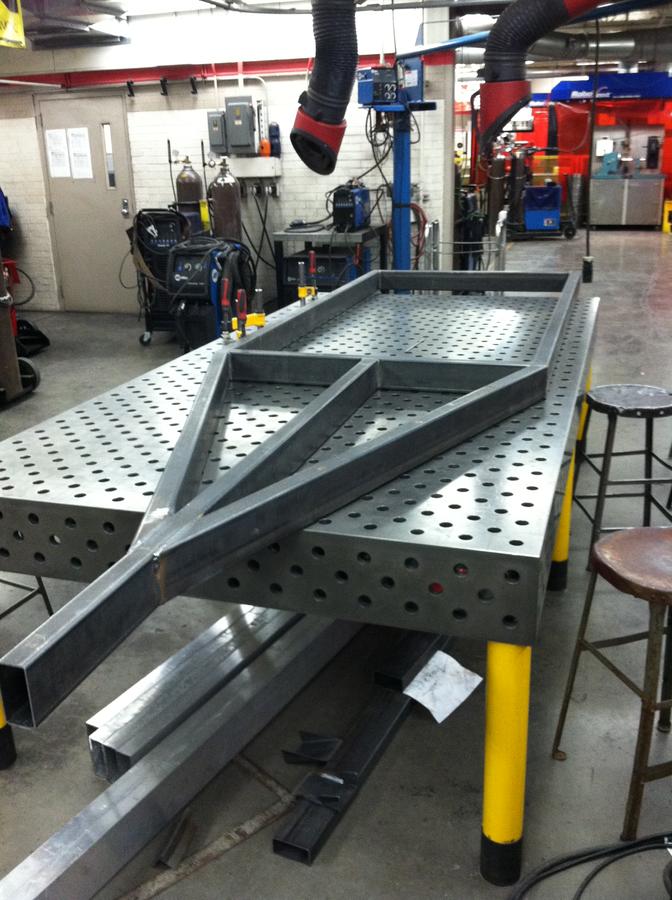
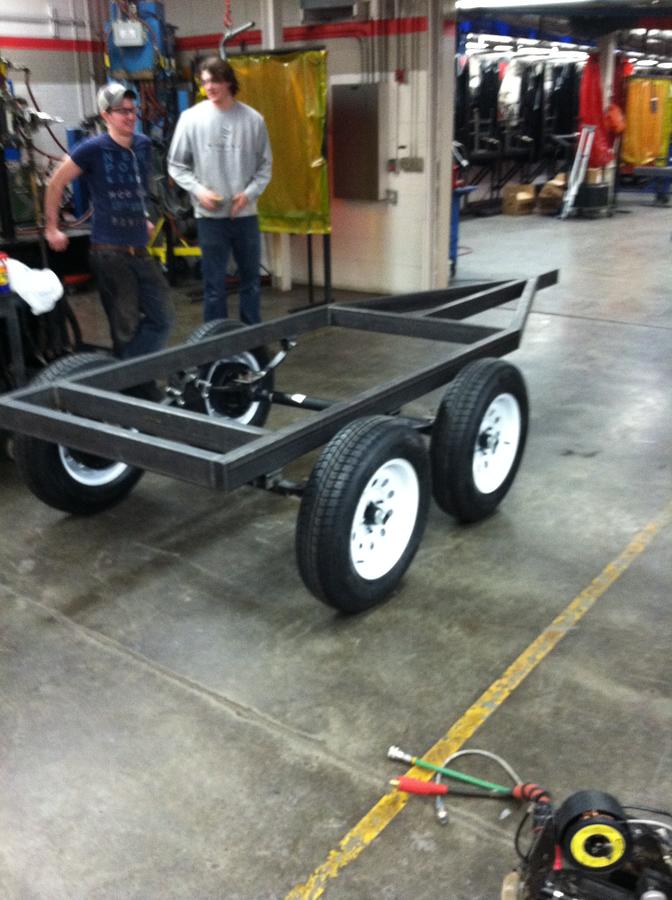
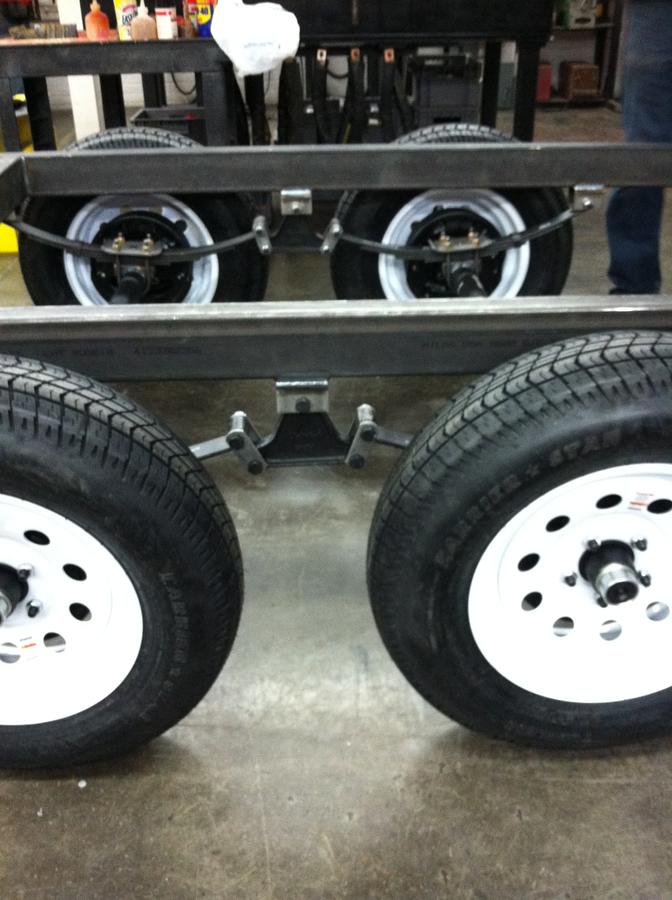
Before completing this step I called a local trailer parts distributor told them the dimensions of my frame 44" wide and weight load details. They recommended a single 2000lb axle, however knowing my actual weight i decided to go with a tandem axle to even weight. The bad deal with this was on new trailers every wheel has to have brakes in my state. This being said, they recommended 3500lb axles because the smaller brakes of the 2000lb would make it more costly as odd as that is. The day after finishing the frame my kit arrived.
The kit came with dimensions of how to space the leaf spring hangers and basic instructions; for mine it was 27.5" center to center of hanger. I laid out where i wanted to place each hanger (spaced to specs) and proceeded to weld them to the frame.
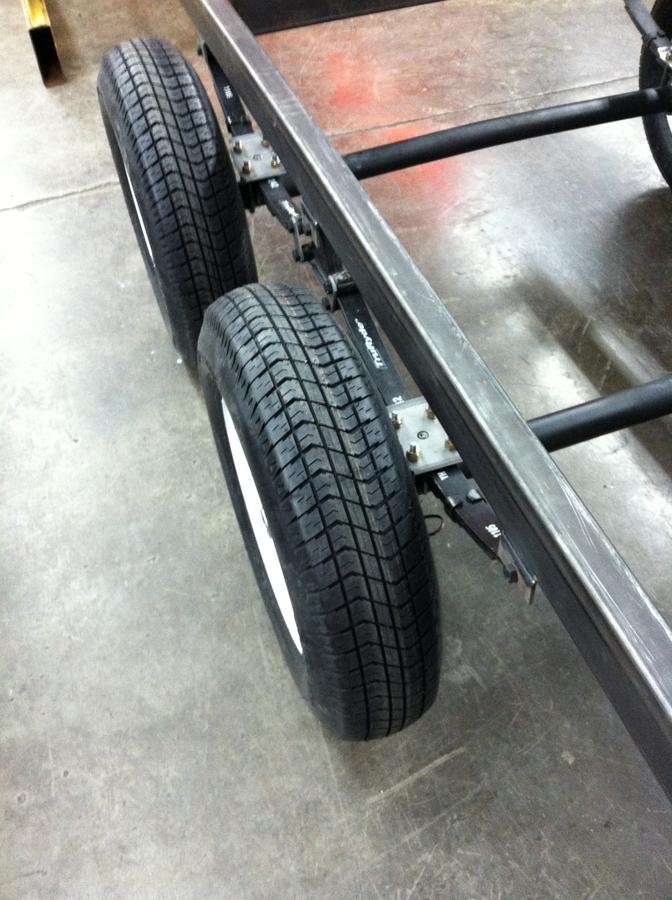
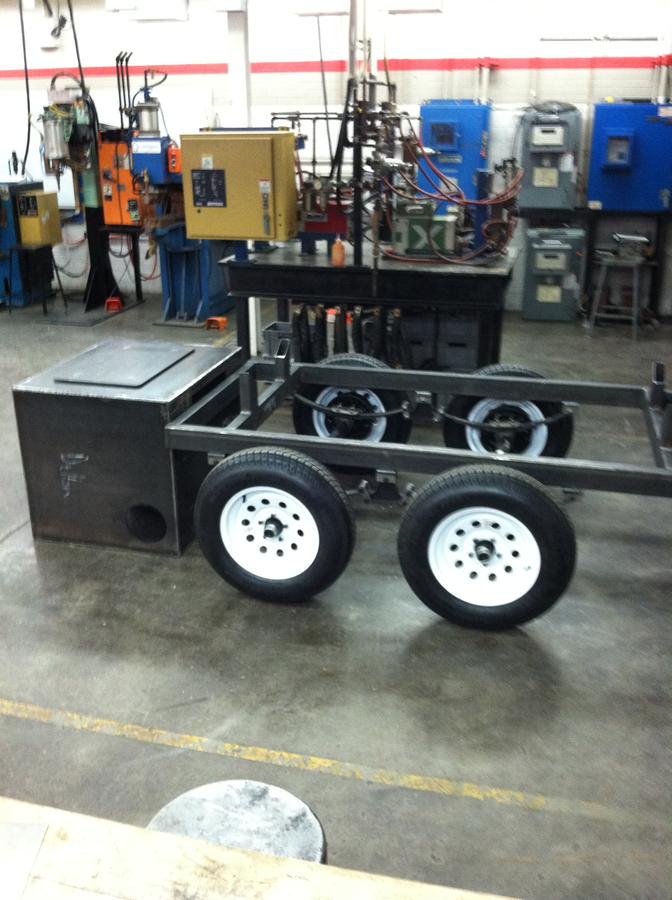
The next step was packing bearing and attaching the brakes/ hubs. Once assembled I then decided to run spring over for more ground clearance to account for the firebox hanging off the back; After tightening up the U bolts I threw the wheels on.
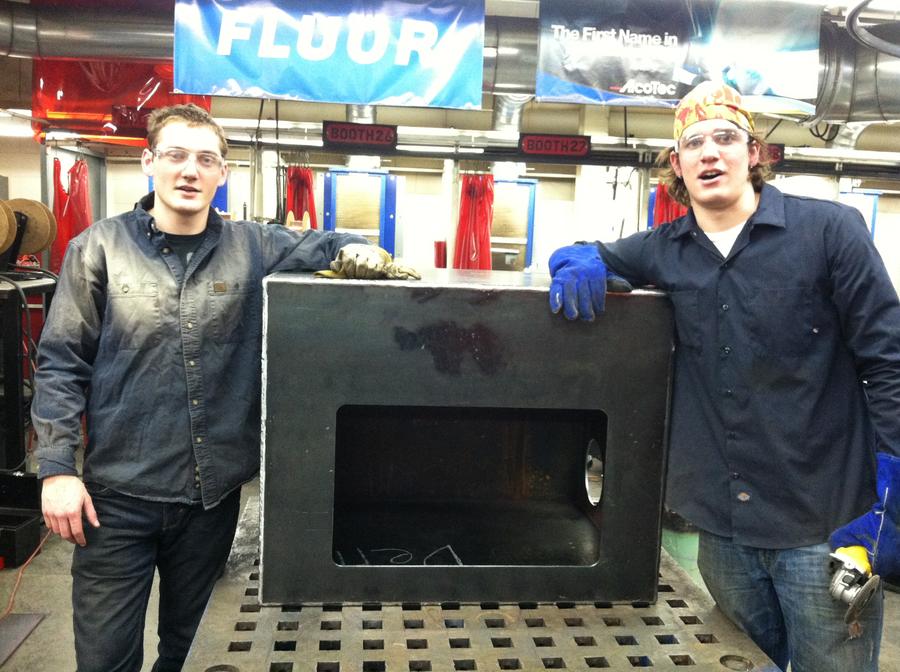
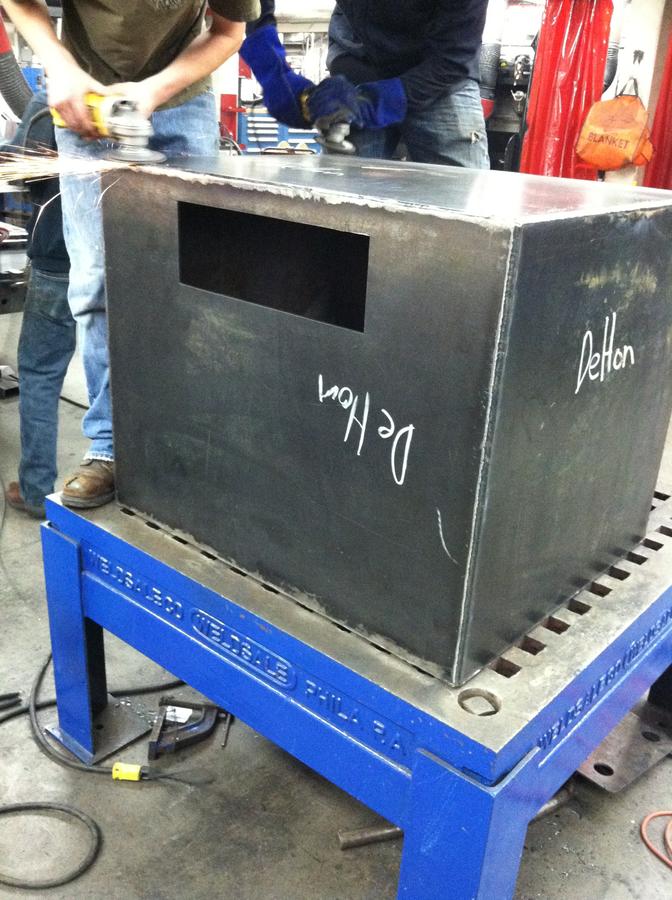
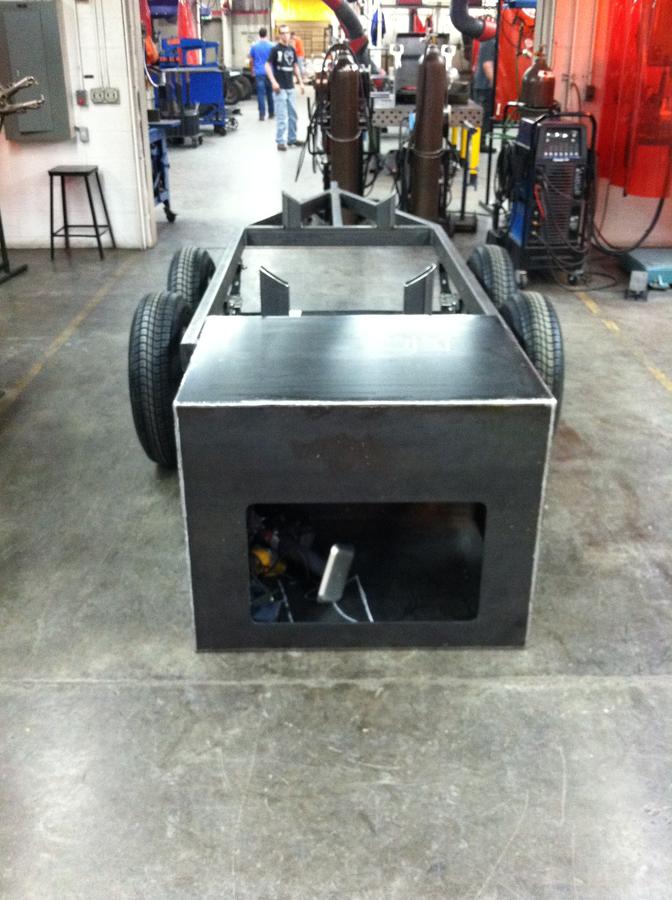
The day after getting my trailer on wheels I had to postpone finishing it because my 1/4" plate had arrived. This was the best/ easiest part for me due to the fact our school is lucky enough to have a cnc plasma cutting table, which allowed me to transfer my firebox drawings and sit while they were cut for me
. After being cut I set my pieces out, started with bottom and worked my way around tacking each piece a minimum of 4 places per outside corner squaring it as I went. Once all tacked I proceeded to flux core (FCAW) all outside corners in the horizontal position flipping the box as I went (with some help from guy on the right).
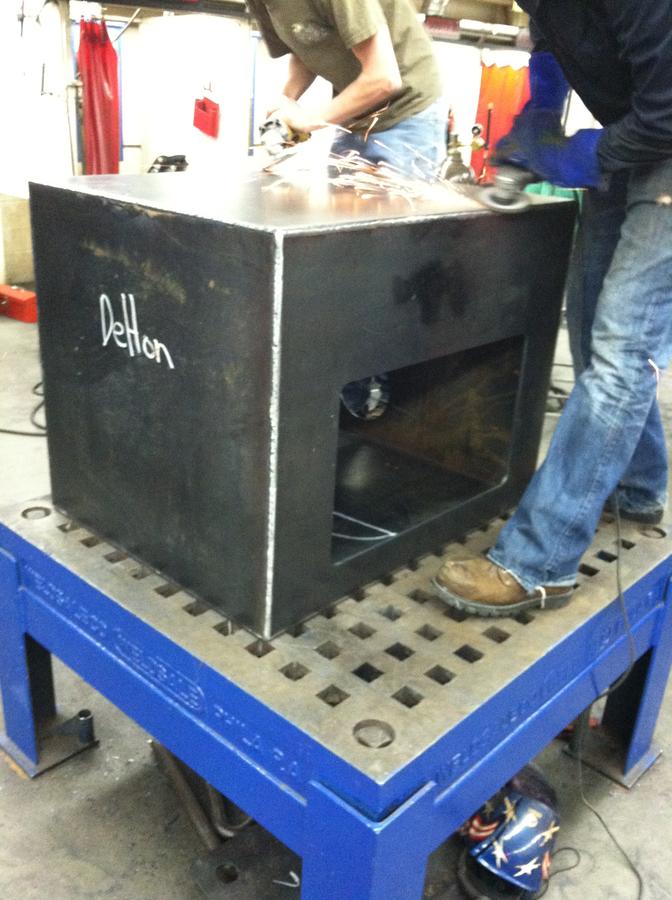
Rolling any sharp edges
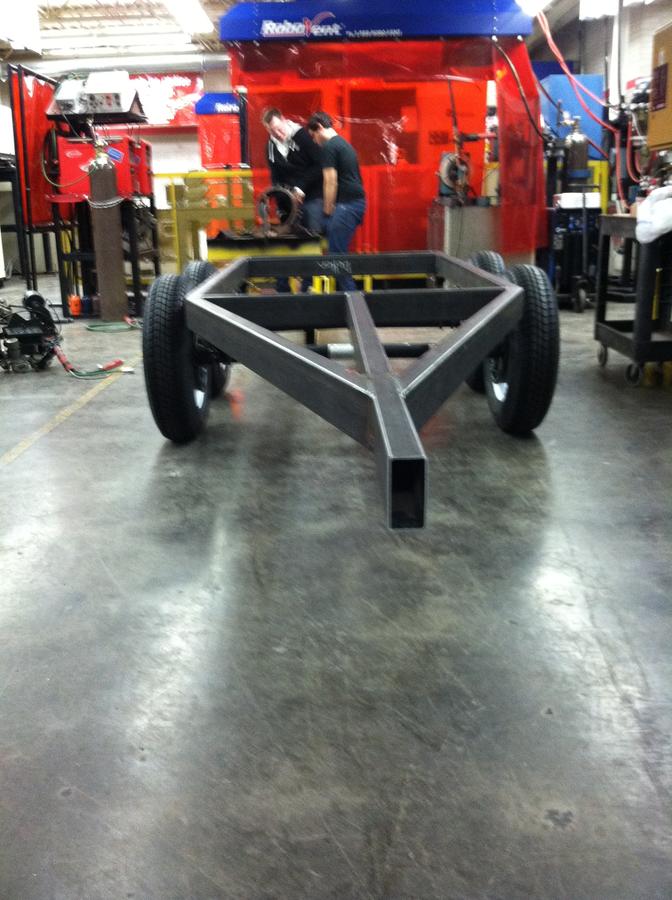
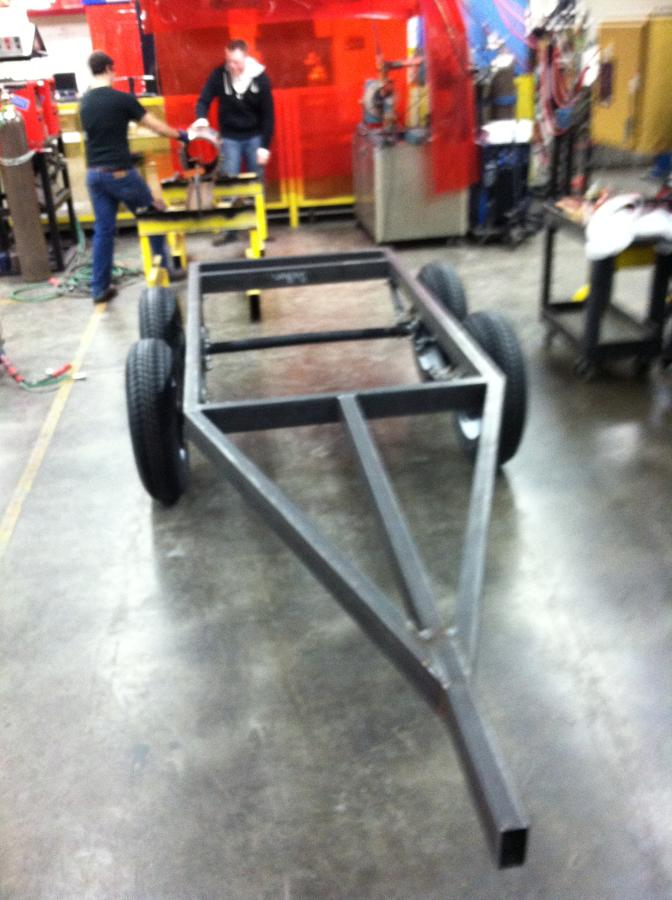
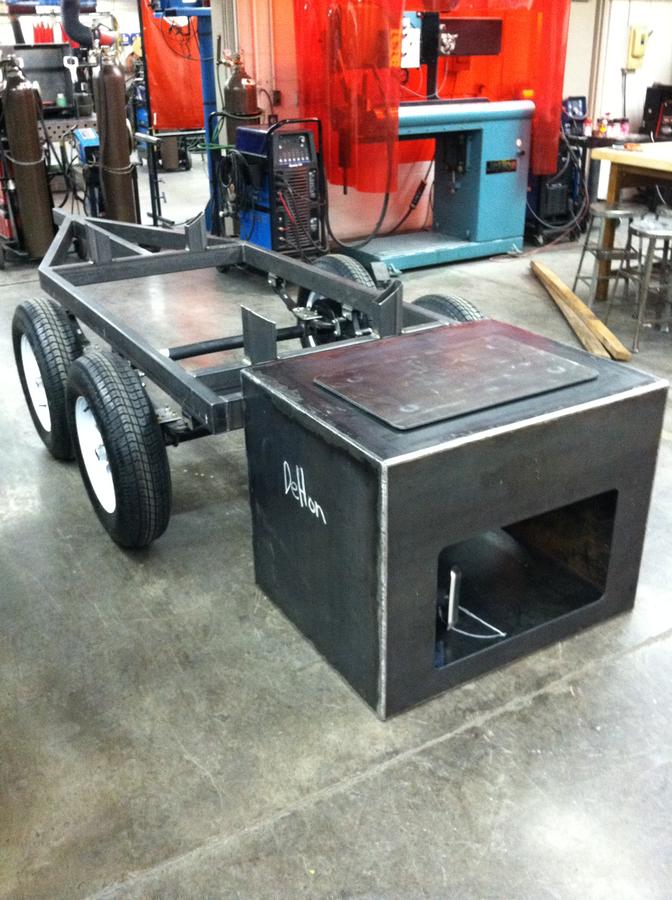
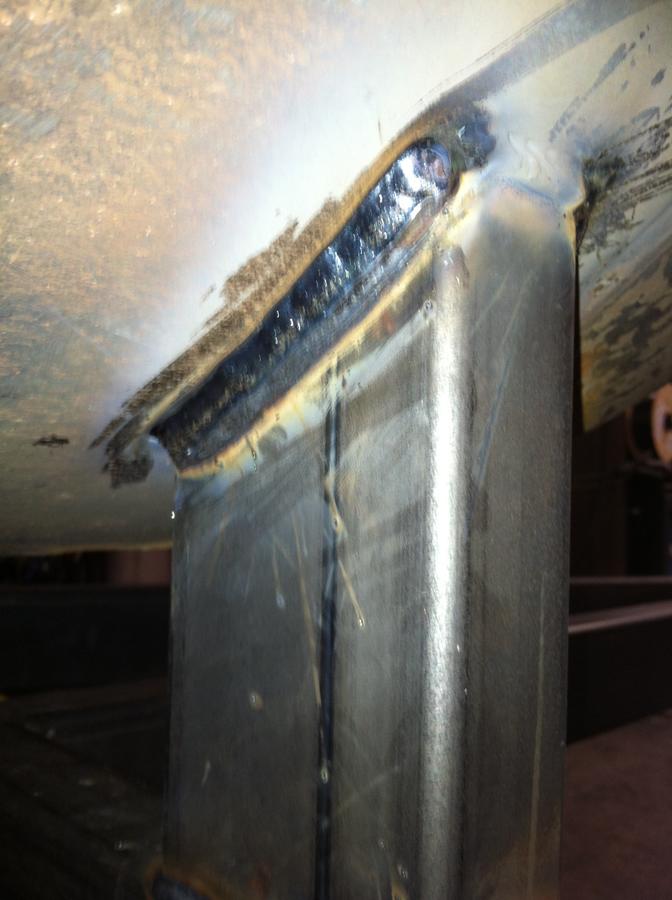
After finishing the welding/ flap wheeling on the firebox I redirected my attention towards the trailer. The next step was to cut the support feet for my tank, I decided to cut the factory ones off and make my own for looks and more firebox ground clearance. I cut them at 7 7/16ths", for the tank to be cradled I made a template to cut the needed radius of the tank (37" diameter) in them with a plasma cutter. After cutting the radius's I laid them out 10" from center of trailer to center of foot to match the tank exactly. Once laid out I tacked opposite corners of each foot and MIG welded them to the frame.
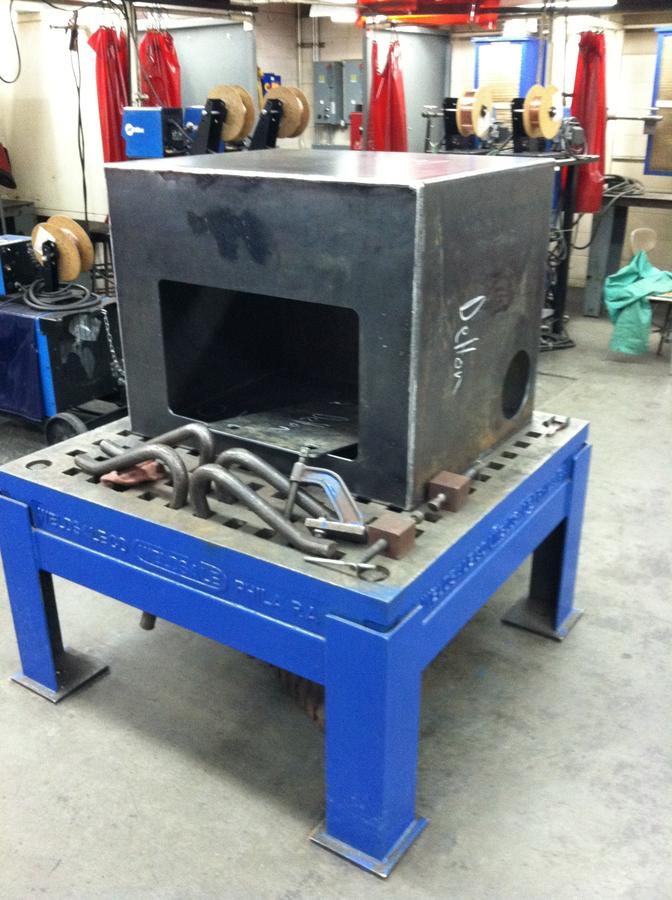
Firebox setting behind for reference size
I am sorry for not starting this build from day one but as a time reference this the third week of the build, 3 lab periods a week for 3hrs each. Given that there is total of around 27hrs of physical work into this project as of now. I will hopefully be setting the tank on by Monday or Wednesday next week. Feel free to ask questions or give input. I will do my best to keep you all updated, thanks!
New progress on build..........................
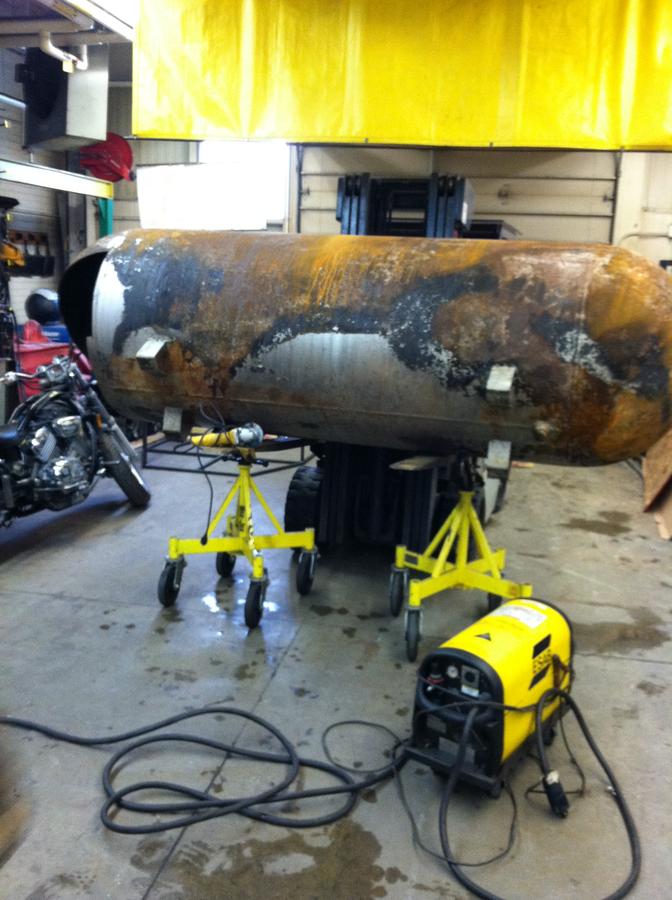
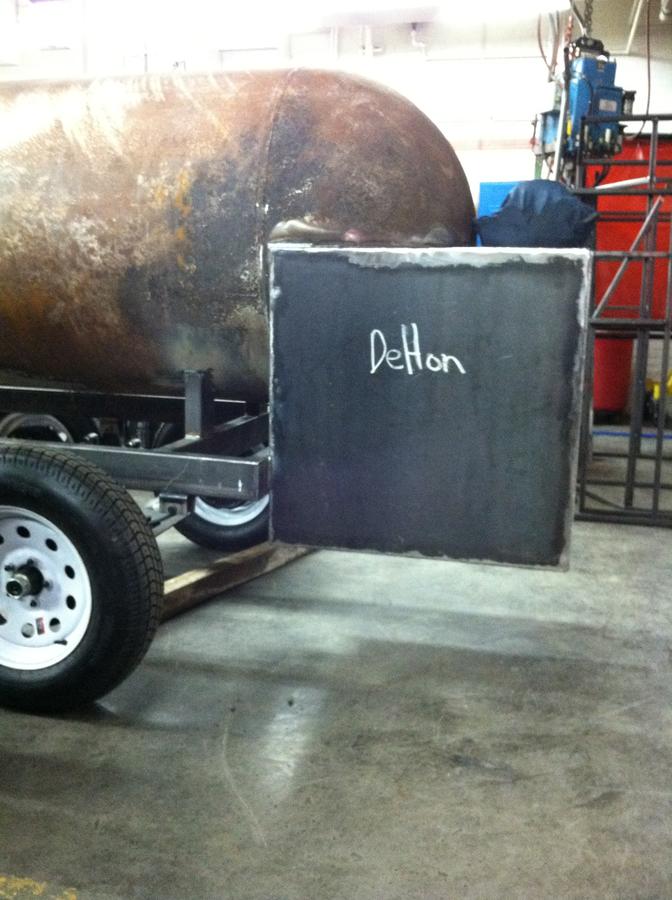
I was able to get my tank into the lab today.... I set the tank on pipe stands to cut the original feet off
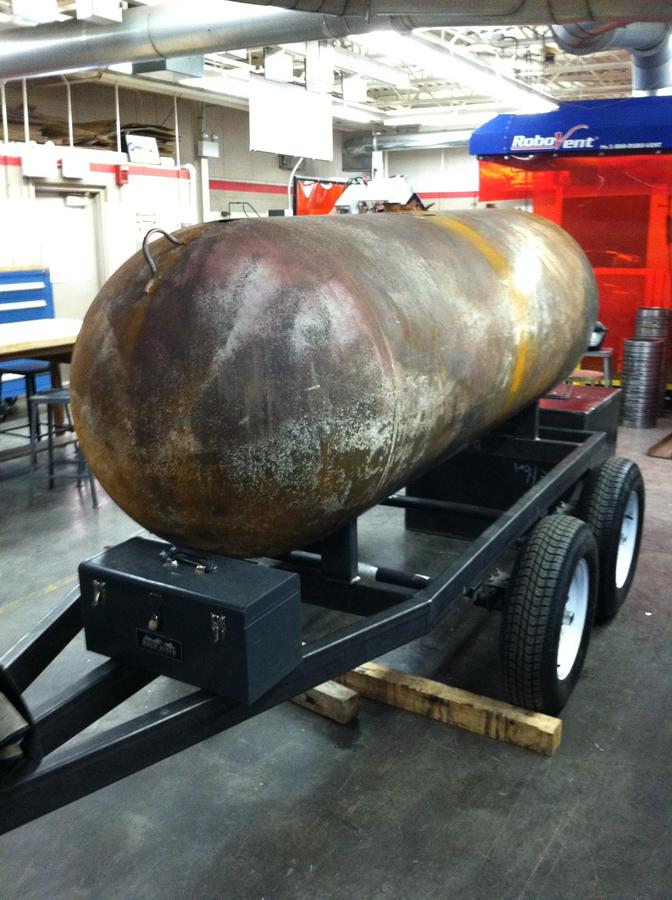
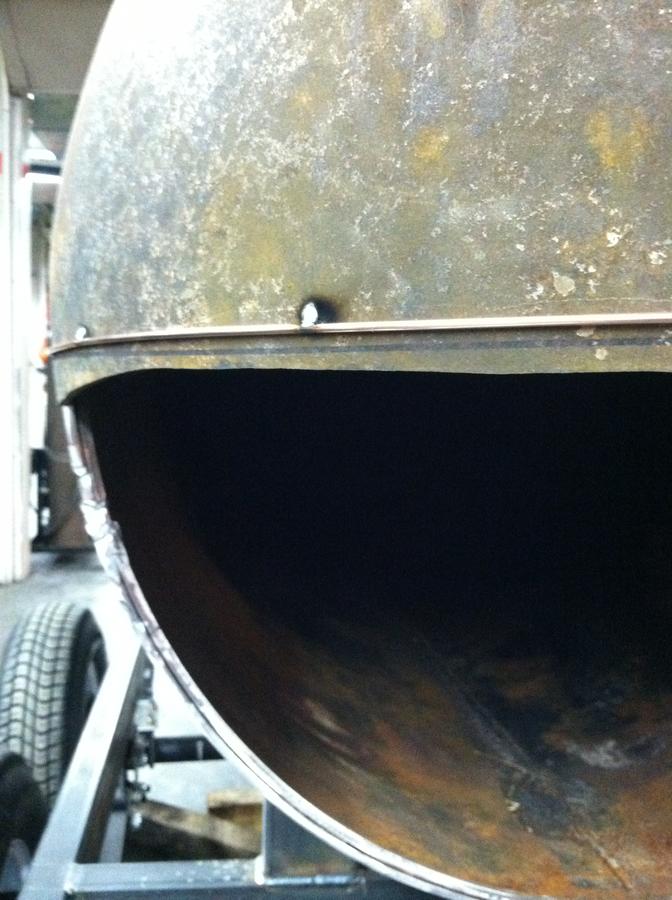
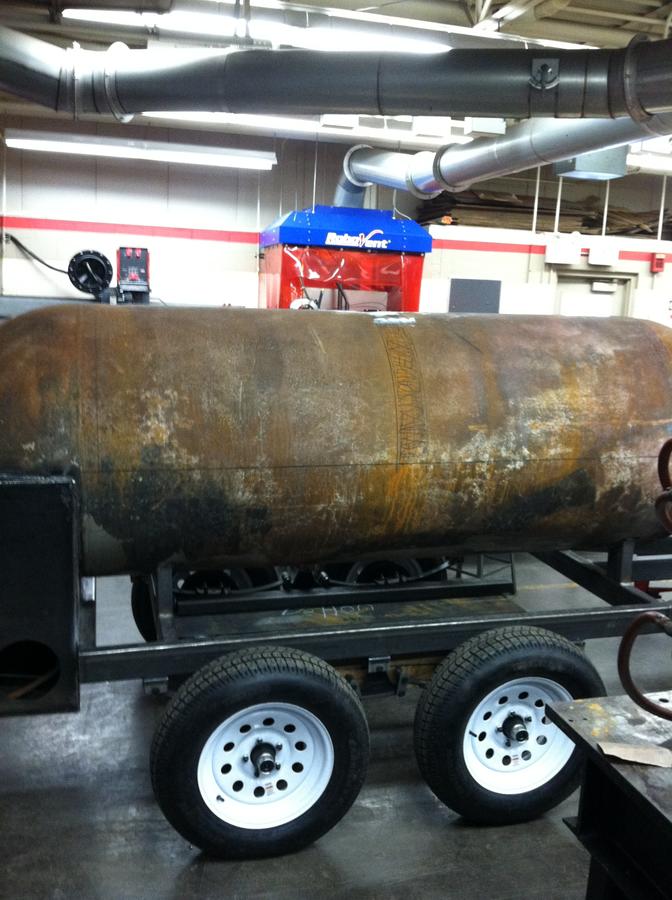
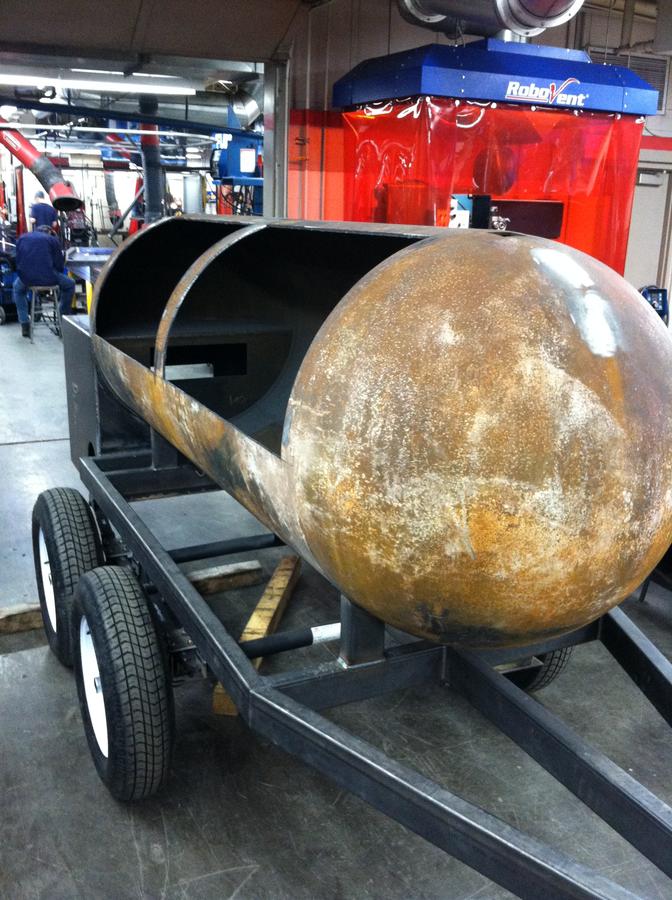
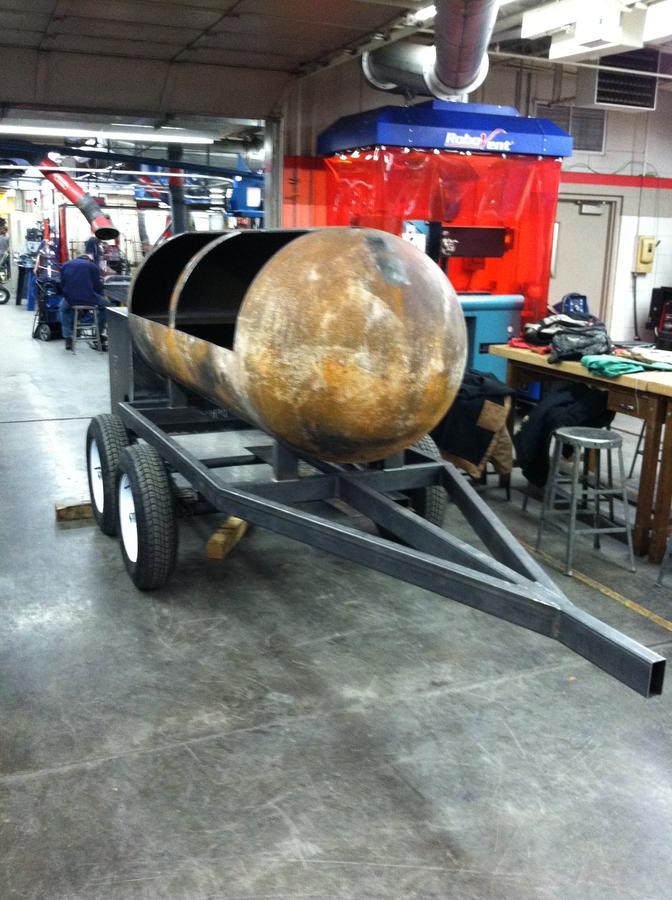
After cutting the feet off I moved it outside... wheeled the trailer out and proceeded to set the tank on....Once set wheeled it back in flushed the cut up with the back of the trailer frame and rotated the take so the bottom tank weld seam was dead center on the bottom. After lining it up I tacked the tank to the trailer feet.
Here are the current pictures
..................................................................................................................................................................................................................
New progress
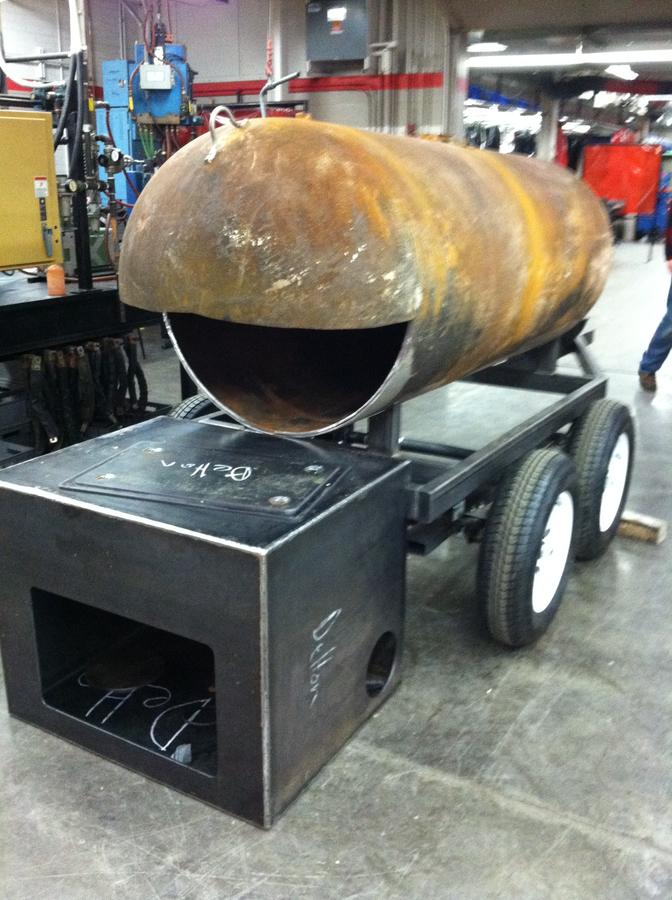
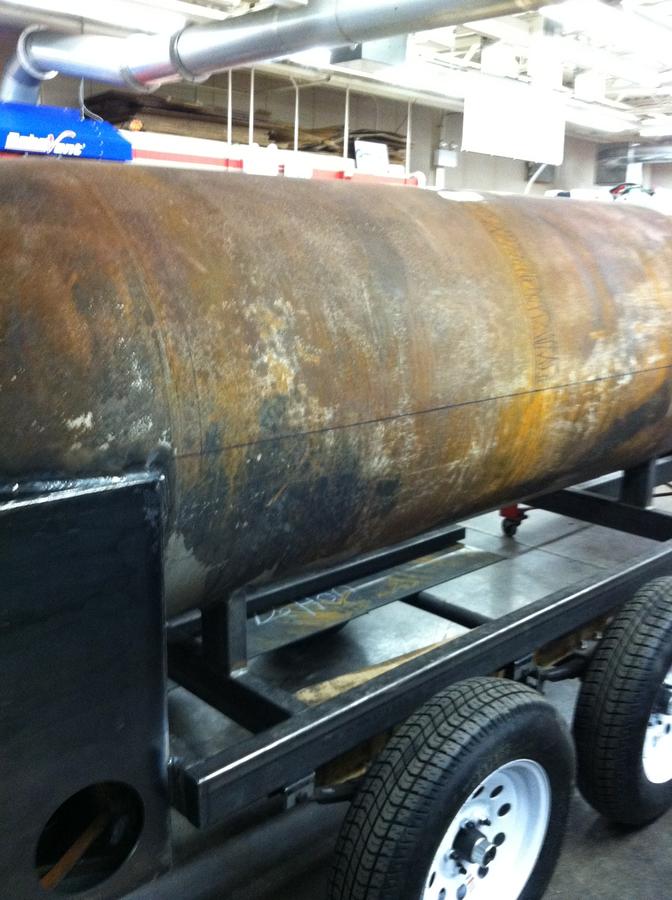
After squaring the back cut to the trailer back I three pass flux core welded the tank to the trailer feet.
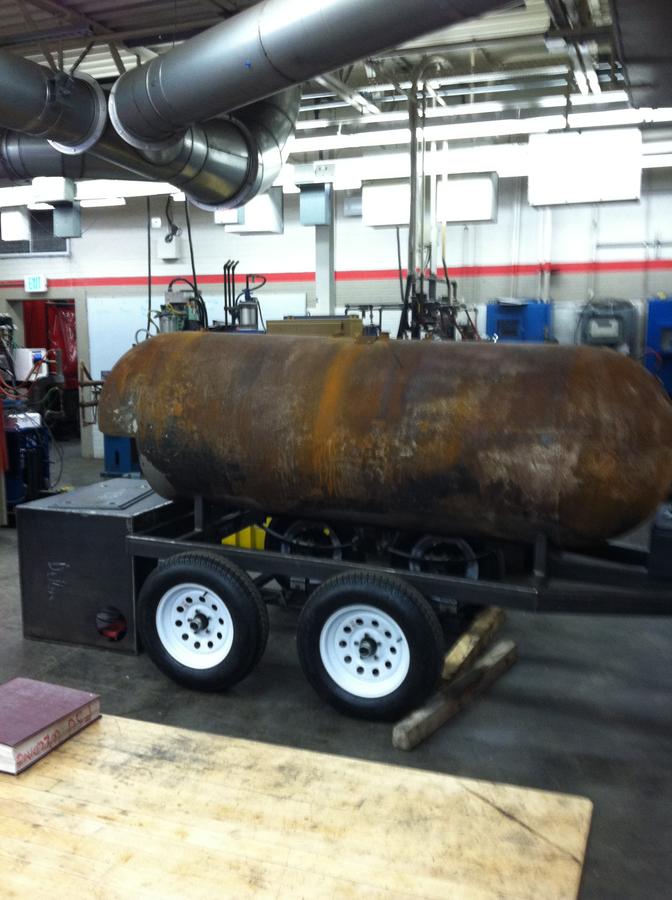
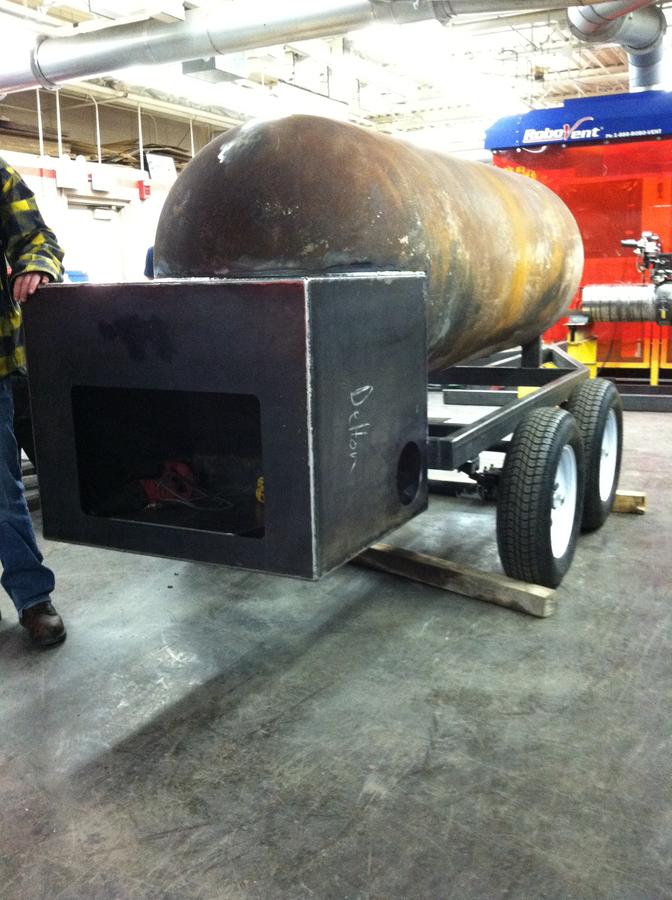
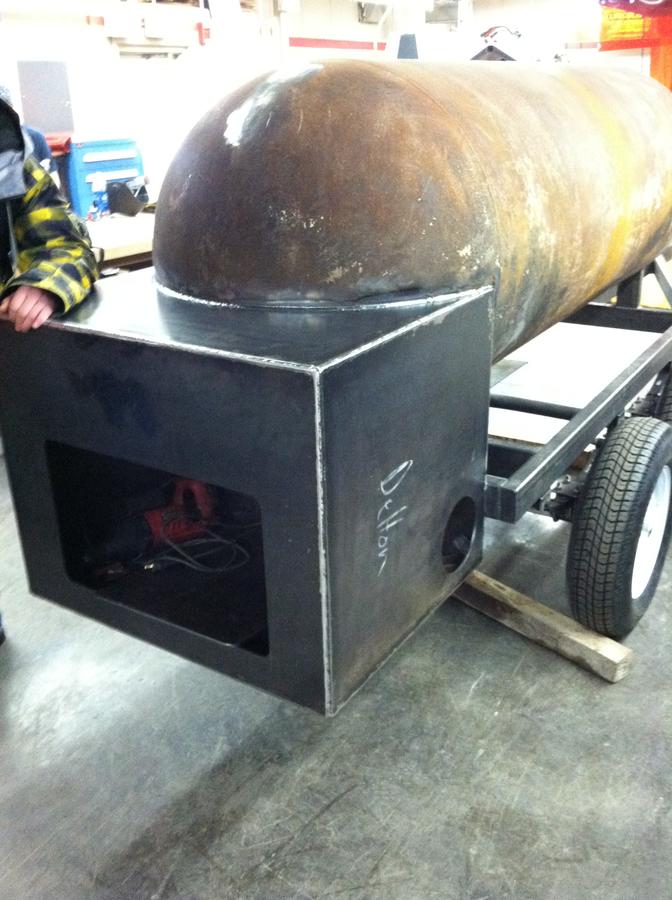
After welding the tank to the trailer.... I laid out the cut where the firebox would meet the tank..... I tacked two pieces of filler rod along the line to keep the cut as straight as possible....Then plasma cut the sliver off.
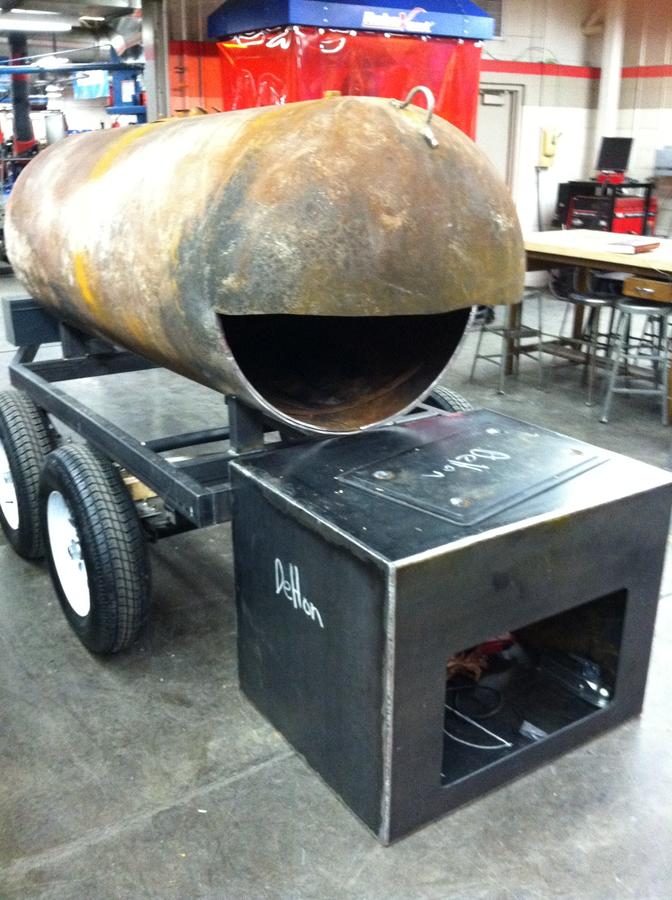
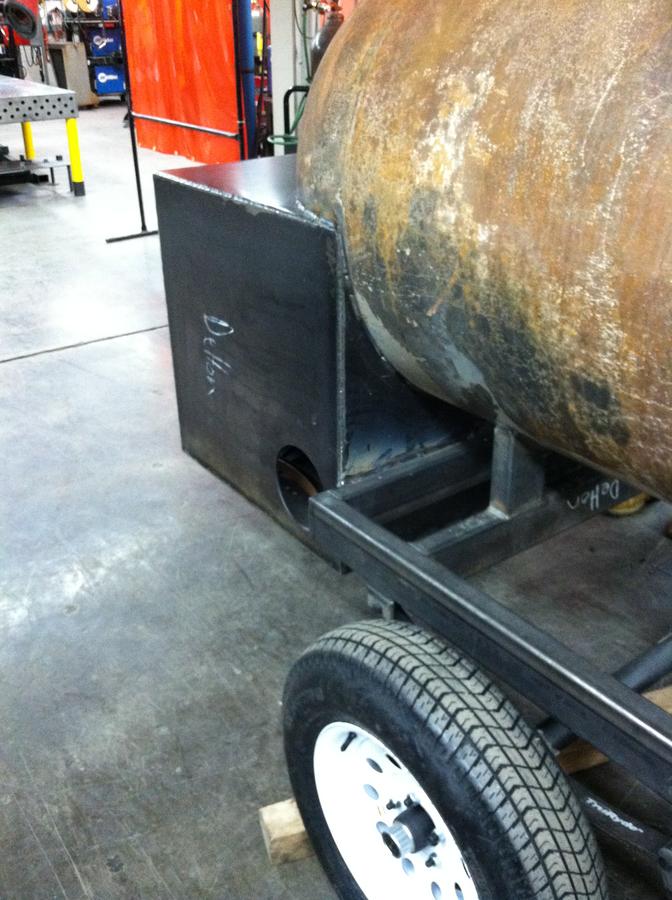
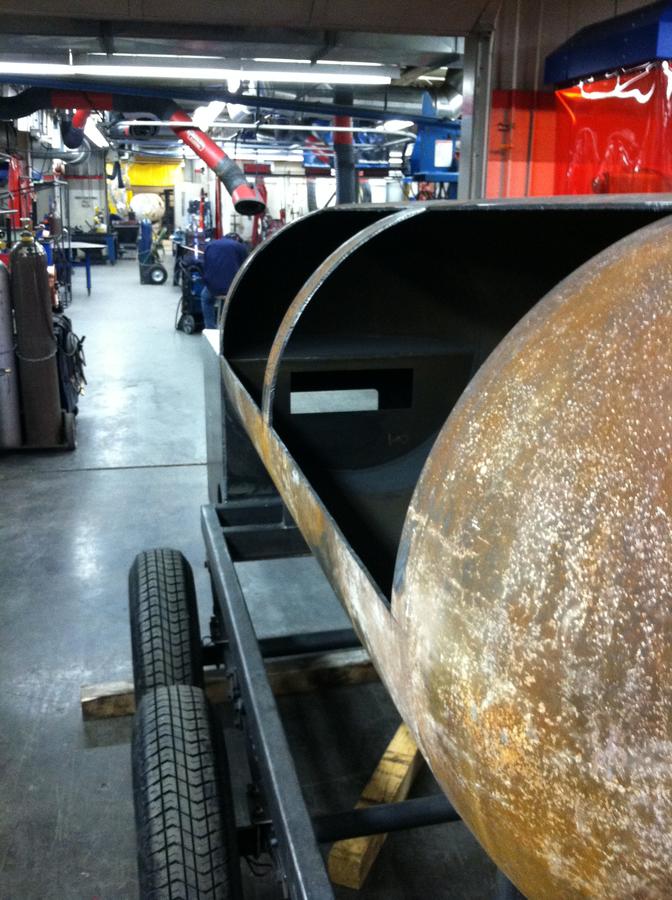
After making the notch completely square it was time to mate the firebox..... For this step I used a forklift to pick up the firebox and line it up with the tank/ trailer..... Once lined up I flux cored the firebox to the tank/ trailer.
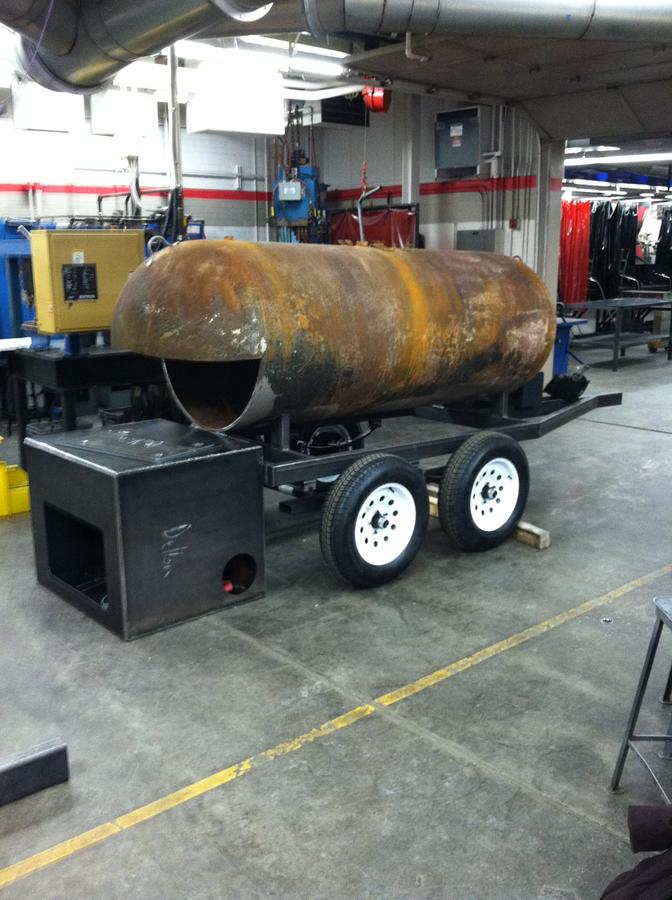
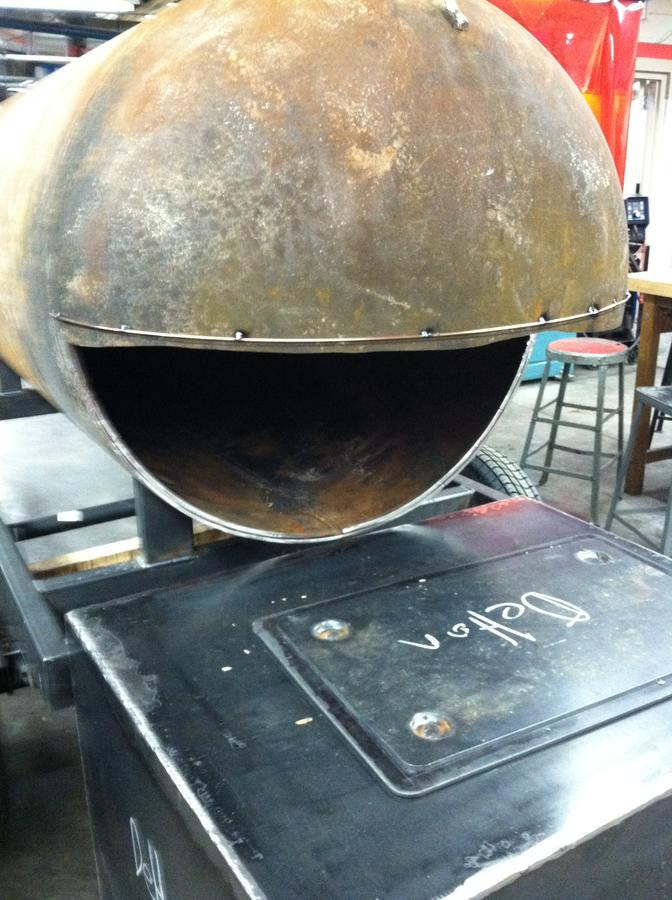
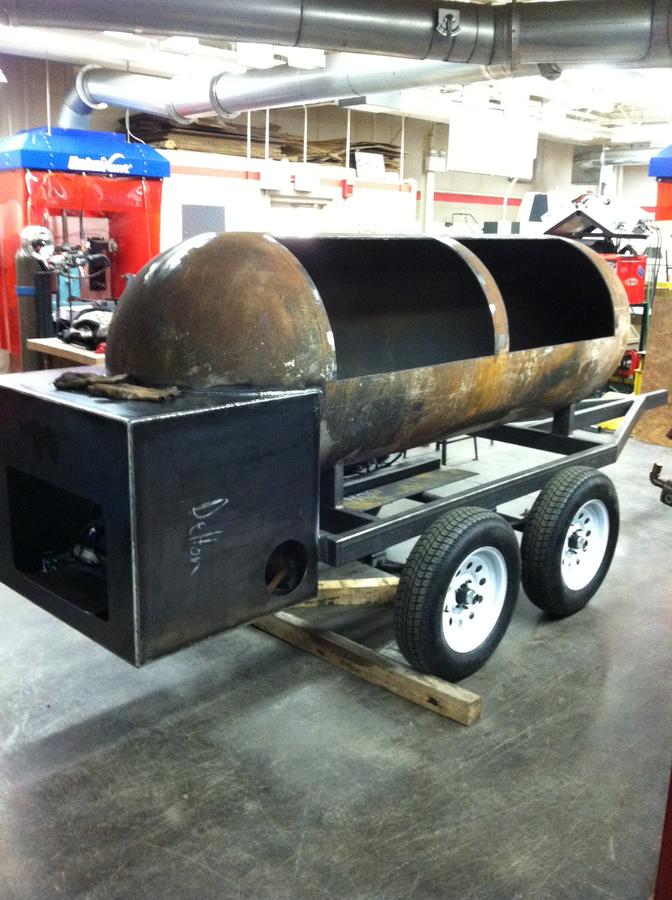
After welding the firebox on I laid out the cooking chamber door cuts using a pipe tape and a 8ft straight edge... 1.5in from weld, 37.5in wide x 25in circumference tall, 4.25in between doors, 37.5in wide x 25in circumference tall, 1.5in from weld.
The doors will hopefully be plasma cut this afternoon......
............................................................................................
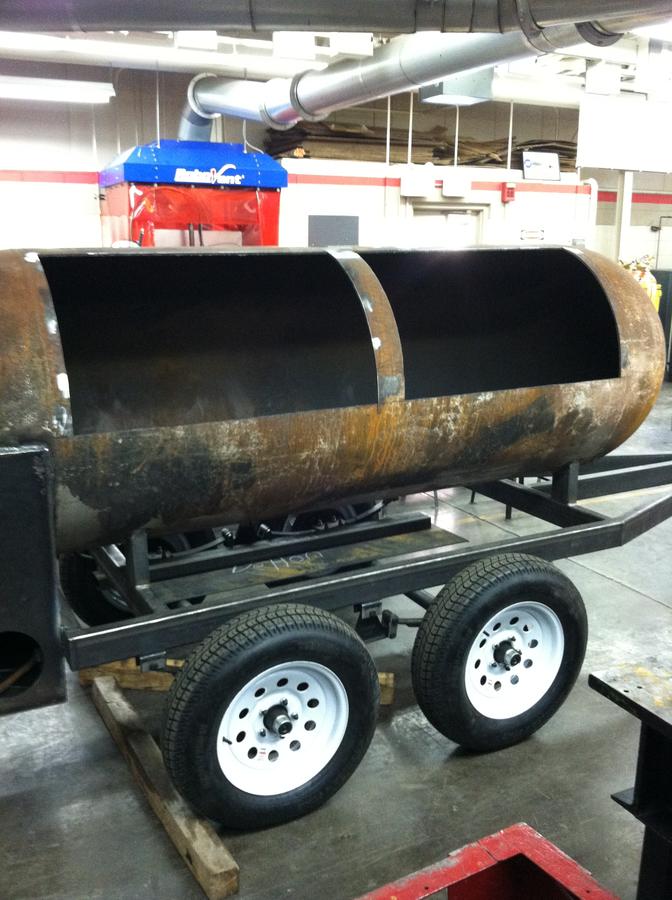
Todays progress...... plasma cut doors out...... beginning to take form

The first step of making this a reality was to spend countless hours brainstorming and looking threw forums at pictures to generate ideas. The next step was to take these ideas and put them into plans. I used Auto-desk Inventor to help that along by creating a 3-D model of my design. I created just the standard shell so i could use these dimensions to build the trailer frame, firebox, and cut the doors. Once past this stage i would custom fab the grates, vents, handles,etc... and then just add them into my drawling later.
From my dimensions I calculated that i would need 2- 2"x4"x24' 11 gage wall tubing for the frame and 1- 60"x120"x1/4" mild steel plate to make the firebox. I picked up a 500 gal LP tank from a local scrap yard for a mere 15 cents a pound.
Once my materials arrived I decided I would start with the trailer frame first to get a base for what was to come. I managed to make all but two cuts on a horizontal band saw. The other two were 160 degree cuts for the tubes that meet at the neck (A frame) which I tacked sheet metal alongside the desired cut path and pushed it threw a vertical band saw. When all of my pieces were cut I set them all out on a layout table clamped them down and squared them all out.
From here I proceeded to make end caps for the two tubes at the back of the trailer and TIG weld them. Next I proceeded to MIG tack all outside corners of the frame to prevent distortion. Once tacked and measurement checked diagonally (corner to corner) I tacked all inside corners. After tacking inside and outside corners I TIG welded the top side of the frame cross supports and neck; I then flipped the frame and repeated. Finally I MIG welded all inside fillets, outside fillets.
Before completing this step I called a local trailer parts distributor told them the dimensions of my frame 44" wide and weight load details. They recommended a single 2000lb axle, however knowing my actual weight i decided to go with a tandem axle to even weight. The bad deal with this was on new trailers every wheel has to have brakes in my state. This being said, they recommended 3500lb axles because the smaller brakes of the 2000lb would make it more costly as odd as that is. The day after finishing the frame my kit arrived.
The kit came with dimensions of how to space the leaf spring hangers and basic instructions; for mine it was 27.5" center to center of hanger. I laid out where i wanted to place each hanger (spaced to specs) and proceeded to weld them to the frame.
The next step was packing bearing and attaching the brakes/ hubs. Once assembled I then decided to run spring over for more ground clearance to account for the firebox hanging off the back; After tightening up the U bolts I threw the wheels on.
The day after getting my trailer on wheels I had to postpone finishing it because my 1/4" plate had arrived. This was the best/ easiest part for me due to the fact our school is lucky enough to have a cnc plasma cutting table, which allowed me to transfer my firebox drawings and sit while they were cut for me

Rolling any sharp edges
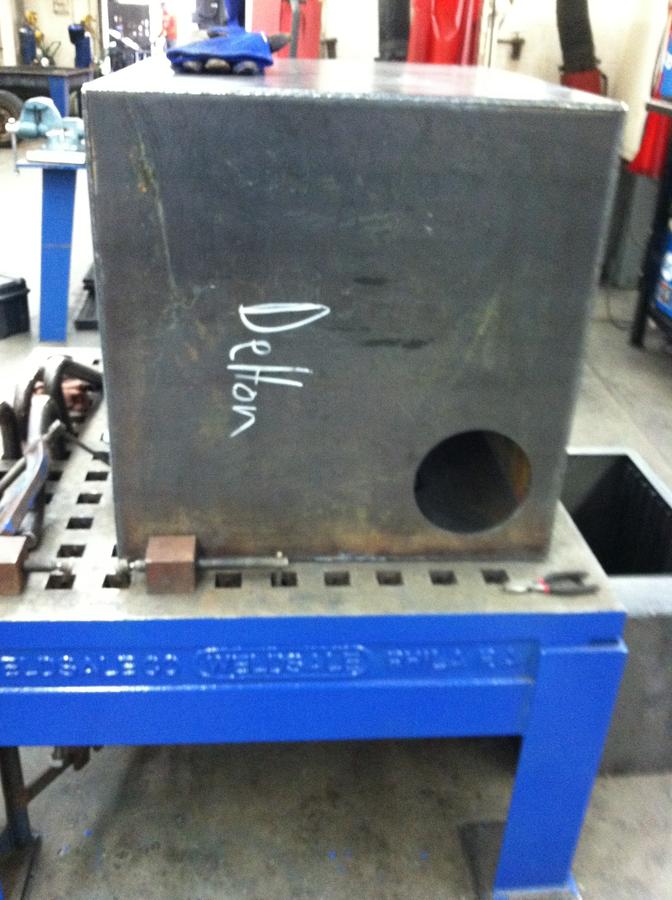
After finishing the welding/ flap wheeling on the firebox I redirected my attention towards the trailer. The next step was to cut the support feet for my tank, I decided to cut the factory ones off and make my own for looks and more firebox ground clearance. I cut them at 7 7/16ths", for the tank to be cradled I made a template to cut the needed radius of the tank (37" diameter) in them with a plasma cutter. After cutting the radius's I laid them out 10" from center of trailer to center of foot to match the tank exactly. Once laid out I tacked opposite corners of each foot and MIG welded them to the frame.
Firebox setting behind for reference size
I am sorry for not starting this build from day one but as a time reference this the third week of the build, 3 lab periods a week for 3hrs each. Given that there is total of around 27hrs of physical work into this project as of now. I will hopefully be setting the tank on by Monday or Wednesday next week. Feel free to ask questions or give input. I will do my best to keep you all updated, thanks!
New progress on build..........................
I was able to get my tank into the lab today.... I set the tank on pipe stands to cut the original feet off
After cutting the feet off I moved it outside... wheeled the trailer out and proceeded to set the tank on....Once set wheeled it back in flushed the cut up with the back of the trailer frame and rotated the take so the bottom tank weld seam was dead center on the bottom. After lining it up I tacked the tank to the trailer feet.
Here are the current pictures
..................................................................................................................................................................................................................
New progress
After squaring the back cut to the trailer back I three pass flux core welded the tank to the trailer feet.
After welding the tank to the trailer.... I laid out the cut where the firebox would meet the tank..... I tacked two pieces of filler rod along the line to keep the cut as straight as possible....Then plasma cut the sliver off.
After making the notch completely square it was time to mate the firebox..... For this step I used a forklift to pick up the firebox and line it up with the tank/ trailer..... Once lined up I flux cored the firebox to the tank/ trailer.

After welding the firebox on I laid out the cooking chamber door cuts using a pipe tape and a 8ft straight edge... 1.5in from weld, 37.5in wide x 25in circumference tall, 4.25in between doors, 37.5in wide x 25in circumference tall, 1.5in from weld.
The doors will hopefully be plasma cut this afternoon......
............................................................................................
Todays progress...... plasma cut doors out...... beginning to take form
Last edited: