Horizonal Offset Smoker Mods

  • Some of the links on this forum allow SMF, at no cost to you, to earn a small commission when you click through and make a purchase. Let me know if you have any questions about this.
SMF is reader-supported. When you buy through links on our site, we may earn an affiliate commission.
Years later I still refer to this thread... I just figured out why I need to drop my stack on my newest smoker!!!! Nothing like shared wisdom...
GALLERY]
 
I know this is an antique thread but...

THANK YOU !

Two of the mods have saved throwing away the Charbroil Offset. 

Namely, the chimney extension and deflector plate. 
I was able to put in a temporary fix that has my exhaust temp actually higher than my input from the fire box. 
FINALLY, have some control over the thing. 

I bent some flashing around the upper grill plate on the firebox end 

and cut a tin can from a can of peas to make the chimney extension. 

I will probably screw this up but here's a link to some pictures of the temporary mods on Flickr. 

Temporary smoker mods

The deflector image isn't very good, but the right end of the flashing is laying on the lower, charcoal grill. 

This thing has been mostly a disappointing headache to use until this weekend. 
 
I took my latest mods out for a spin this weekend with two 10 pound butts. An overwhelming success. I took it for a dry run the night before and it got to temp in about 45min and held a steady 225-230 without issue. The temp differential was less than 10° end to end on my CGSP. I did the usual mods; aluminum duct to extend the stack, lined the barrel with foil and dumped 7 lbs of lava rocks in for thermal mass and built a charcoal box. For the baffle/tuning plate I cut a cheap aluminum pan in half and fit it so that it was propped between the bolts holding the SFB to the main chamber and the brackets which hold up the fire pan (the firepan works as a good heat plate in a pinch if you flip it upside down and raise it so it covers the hole from the SFB BTW). I cut a arch I the middle to open it up a bit. Up against it I put a sheet of offcut 1/8inch steel that I drilled 1/2 inch holes in, 8 in the first half, 16 in the second. I put a water pan along the grill and with these mods held 225 for 12 hours with no issue!I had to load the basket every 2 hours I. the early morning cold but in the sun it was every 3 hours but what are ya gonna do? Can't afford those beauty Yoders yet.
GALLERY]
 
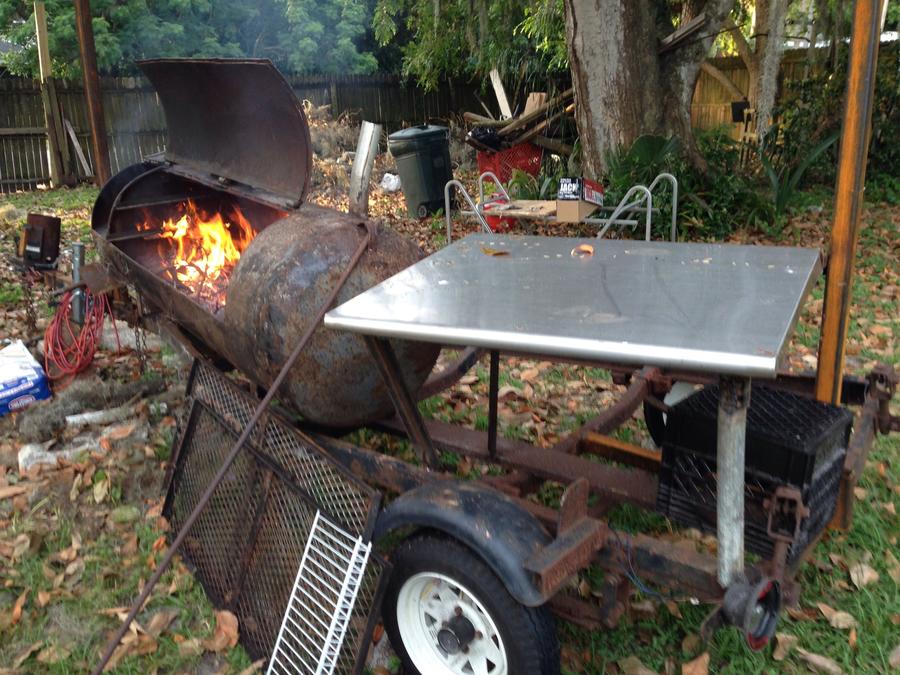
I have enjoyed reading the mods and getting ideas for bringing my offset back to life.  It had some very annoying issues that made smoking a pain, with not such great results when it came to ribs. Some of these will hopefully resolve the issues, along with the fantastic recipes and cooking methods you all have posted (thank you for those).  The mods I have decided on are as follows:

1. Use a charcoal basket and the Minion method - benefit will be longer burns, lower temp that is more controlled.

2. Raise the basket up higher than the supplied grate - will prevent smothering the flame from ash

3. Seal the firebox and grill chamber doors using fireplace cord - will reduce the loss of heat and smoke

4. Install an aluminum conduit to bring the chimney vent down to the level of the cooking grate

I am not one to over engineer anything, preferring to keep things as simple as possible.  So, to my questions:

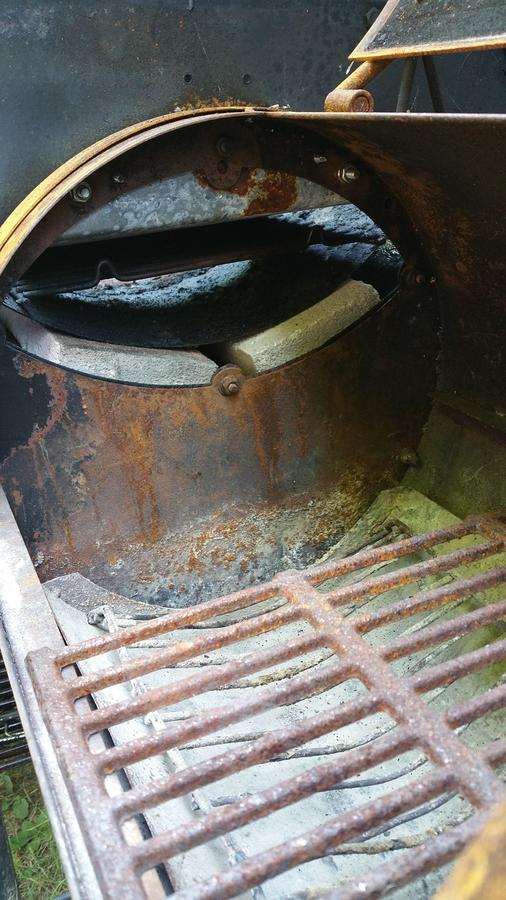
1. Other than to help increase the heat retention in the cooking chamber, do I need the bricks?  They will reduce the overall volume inside the smoker, limiting the capacity for smoke carrying "air", and causing it to flow quicker to the exit tube (fluids flow faster in tubes with a smaller cross section).  This seems like a waste since we want the smoke to slowly and languidly "flow" over the meat.

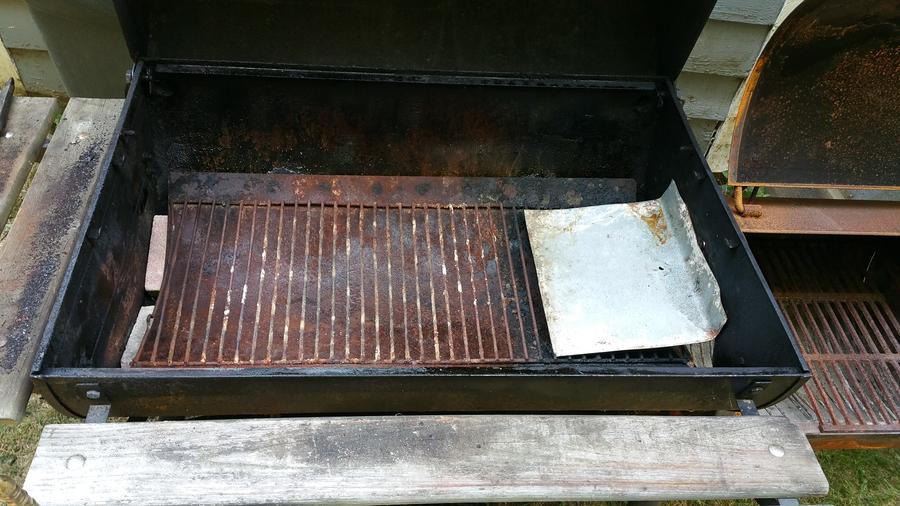
2. Once we add the down pipe to the chimney, bringing the exit to the level of the cooking grate, we will have created a "pocket" within which the meat will sit.  Since heat rises, the smoke will rise to fill this pocket before venting out of the chimney.  Do we therefore need the baffles/vented sheets under the meat?  It seems that this will direct a lot of the smoke and heated air a little too quickly toward the chimney, wasting the precious smoke.  I can see the necessity if the chimney is at the firebox end, but not if it is on the opposite end.

3. Now that we have that pocket of smoke above the grill, is there any value in reducing the gap from the firebox to the cooking chamber and forcing the hot smoke downward?  Currently, the gap is large enough so that the grill level splits it in half.  Surely we want to get the heat and smoke up into the pocket as quickly and directly as possible to create a more uniform temperature range across that smoke pocket?

Thanks for any feedback!!  I have more ideas, but thought 3 was a good start for a newcomer.
 
I have had a Medina River OS for a few years and have added a 1/8 inch deflector plate with 1/8 inch slits ground in. Also an expanded metal charcoal box sitting higher than the original charcoal grate.  I  now use a DIGIQ DX@ Temperature Control to control the air flow which helps tremendously.  Also I found natural hardwood charcoal briquettes, such as "Cowboy Natural Hardwood Briquettes", burn cleaner and longer than others.  With the mods and using the hardwood briquettes I am able to maintain an even temperature across the cooking chamber and only having to add more fuel about every 4+ hours. 

Great ideas and "Thanks" everyone.   I am always trying to keep the ""Q" hot!
 
I see how old this thread is, but that's the beauty of this forum. I recently started having major issues with my five year old char grilled pro smoker. Heat was so hot then so cold, seemed noting would work. I was about to drop another 300 on another smoker till I decided to give smf a visit and look for some possible solutions/mods. I had to replace all the bolts holding the Fb to the chamber and started reading about adding a baffle. I had a scrap piece of sheet metal hanging around which I bent and screwed to the inside as explained in this thread. I also took some advise on heat transfer. Instead of plate steel as described, I used some old heat brick from a wood stove I had around. The Charcoal adjustable tray in the bottom of the grill now sits on top of four of those bricks set ate the corners.
I must say, running this ol Smokey for about two hours the temp gouges set at either end read almost exact. The temp is so much easier to control. I did add a water pan in the bottom of the smoke chamber to also help distribute the heat. I'd say it's working well, really well. Thank you for posting these mods and helping a guy out. Saved me a few hundred bucks.
 
Angusl,
You're asking the right questions. Unfortunately in my limited experience I've found that it's pretty much trial and error as each of us has found different things work better or worse.
 
Can't tell you how much I've enjoyed reading all the mods.  Spend the summer in Ohio and winter in Texas.  My vertical charcoal smoker didn't make the trip, so decided to go with an offset for down here in TX.  Picking it up tomorrow.  Went cheap with the Char-Broil 816 inch Horizontal.  It was $46, and I knew with the mods I could find on this forum, I could make it work for the winter.

Will try and post pics once I see the guts and refer back to this thread.
 
SmokingMeatForums.com is reader supported and as an Amazon Associate, we may earn commissions from qualifying purchases.

Latest posts

Hot Threads

Clicky