Hi-Temp JBWeld repair

  • Some of the links on this forum allow SMF, at no cost to you, to earn a small commission when you click through and make a purchase. Let me know if you have any questions about this.
SMF is reader-supported. When you buy through links on our site, we may earn an affiliate commission.

steelhorsep

Fire Starter
Original poster
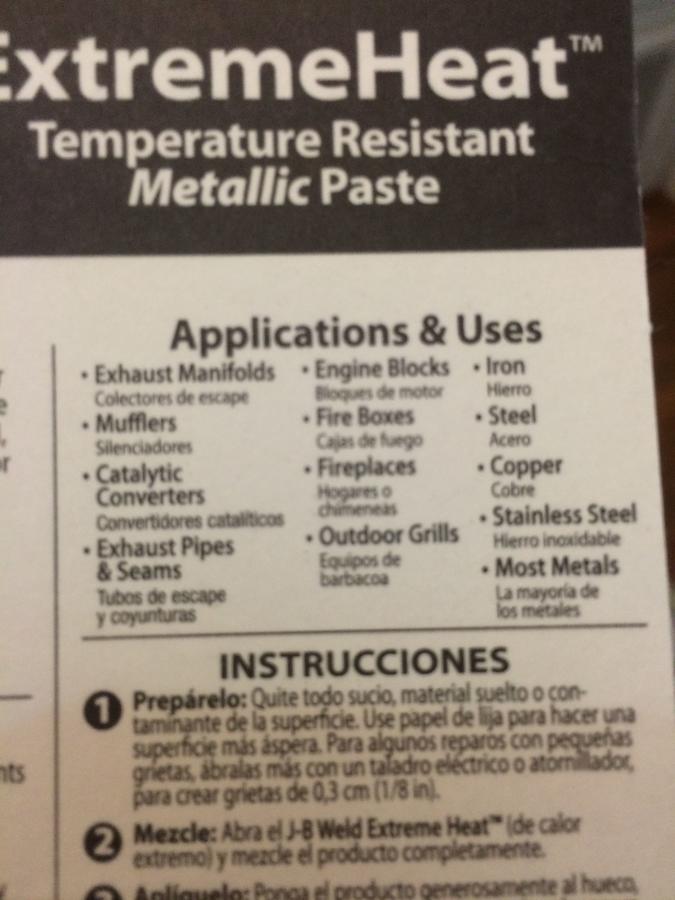
Anybody ever try Hi-Temp JBWeld for patching a small hole?

According to the manufacturer it can be used on firebox and/or grills and rated to 2400 degf.

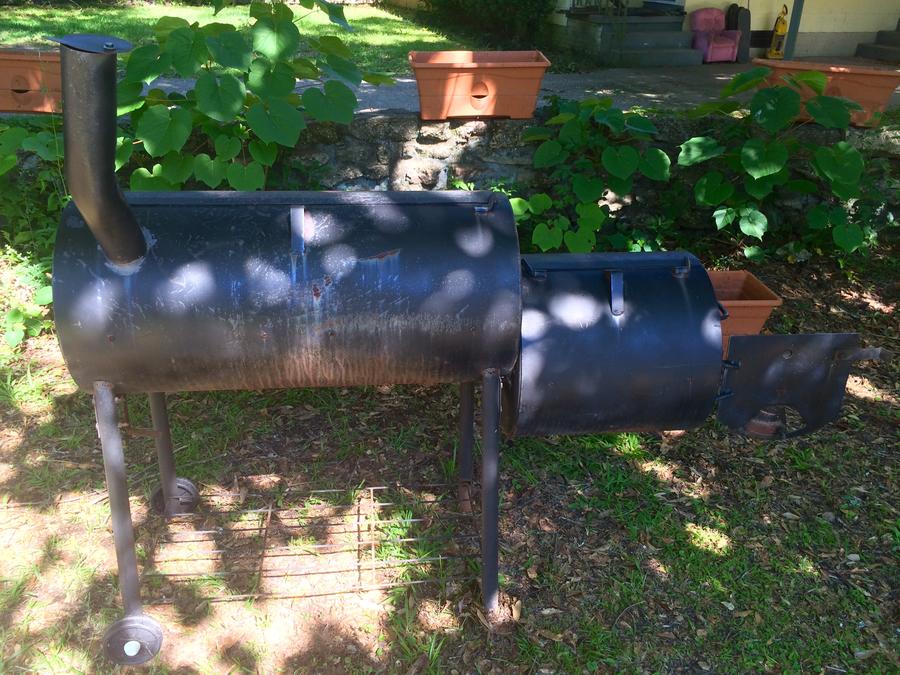
The hole on my unit is "dime-size" and on the grill side (not the firebox) and I don't plan to use that side for charcoal. I am only gonna smoke in this unit. It is a Brinkmann Pitmaster all-steel offset charcoal smoker. So the coals will be far from the welded area, over in the firebox, which should help avoid poisonous gasses.

 
Last edited:
Wow, thanks for that link. The "normal" JB Weld is one of the most unbelievable glues I've ever used. It is good up to about 500 degrees F, but I had no idea that JB also made something that is good to a significantly higher temperature. I recently repaired a broken plug receptacle at the bottom of an old Presto "Fry Daddy" using regular JB Weld. The repair is outside the fryer and below the heating element (around where the plug goes into the device, so it probably only gets to about 200-300 degrees). I've used it a few times and it is holding. The receptacle that I repaired is some sort of plastic or Bakelite, so its operational temperature is obviously way below the fryer temperature which can easily reach beyond 500 degrees near the heating element.

I've also used regular JB Weld on other cooking items, including a cracked Cuisinart food processor bowl. The bonding ability is pretty amazing.

The only two things I have found is:

1. When JB Weld gets hot, it does give off some odor. After a few uses, this diminishes and eventually disappears.

2. I suspect it would impart a flavor to food, if it were in contact with the food.

I have no worry at all about toxicity, after it has been cured, but because of the potential taste issue, I would not want it in contact with the food.

Now that I know about this high-temp version, I need to get some.

[edit] ... or not. I just looked at several YouTube videos about repairing engine manifolds with this stuff, and the repairs failed. Hmmm ...
 
Last edited:
ALRIGHTY then. I Decided to proceed with the JB Weld ExtremeHeat (World's Strongest Bond) "Temperature Resistant Metallic Paste" repair of my offset Brinkmann Smoker.

I will document, in this post, the process I used (w pics) to assist others who may need repairs and are considering using this product!

First let me say, this method is fine for small pin holes, and up to possibly dime-size holes but not recommended for huge gaping holes or crumbling metal.

Below are the holes I needed patching (see green grass thru holes in the rust on bottom of smoker). Later you will see I also added the remainder of the paste (leftover after patching holes) to the base of my smokestack , and the outside edge of the drum, where I noticed a couple of weakened areas. I didn't want to waste any product!

 
Step 1. Wash Smoker well. Brush and Scrape affected areas to remove gease, loose metal, and rust debris. Let dry a couple of days.

Step 2. Ordered JB Weld product (see pic) off Amazon for only $6.99! Received it in 2 days FREE Shipping with Amazon Prime!

Step 3. READ ALL of the Directions. That's easy as there are only a few steps (see 2nd pick below).

Step 4. Assemble necessary tools (ended up only using the industrial-strength duct tape and the putty blade/scapel in the pic)


More on next post. . .
 
Step 5. Tape off holes with industrial strength duct tape on outside of smoker. This will hold the weld in place until it dries! )see 2 pics of tape applied and also holes with white backround which is the tape applied)

Strp 6. APPLY JB Weld Metallic Paste as directed using a small putty knife. Note - make sure you stir product VERY well (getting all the hard stuff off bottom of container) BEFORE starting application. Product when received and opened was settled and separated in layers of adhesive floating on top and metal powder in bottom layer!

Make sure you Apply LIBERALLY to the holes to fill them, AND surrounding areas, to get a good seal and as much metal contact as you can. The putty goes on thick but then seems to spread out smooth on it's own, so you don't have to scrape it on too much! (See pic below of finished application).


The last 2 pics here show the other two areas I applied the remainder of the paste to (smokestack base and outer edge of smoking drum):


Final application notes on next post. . .
 
Interesting that you chose to apply the patch to the inside of the smoker. I would have done it on the ouside. Why? Because the surface area of JB Weld that will interact with the smoke is much, much larger when the patch is on the inside because the entire patch is exposed, whereas if it is placed on the outside, only the portion of the JB Weld that is over the pinhole will be exposed. Also, in my BBQ, the inside is all crusty and corroded, providing a much poorer surface for the bond, even after scraping, sanding, and other preparation.

So, if this works, then that is a pretty strong endorsement for the product.

I'm looking forward to more pics and, eventually, to a report of how it holds up after the first smoke.

BTW, after it has fully cured, I'd definitely "season" the smoker, without food, at full temperature, for at least two hours, just to get the material to "out gas." If it is similar to the regular JB Weld, I think you will initially smell it when first heated, but that smell will gradually diminish during the seasoning process.
 
GREAT IDEA. I think this will be Phase 1.

Phase 2 will be to patch it from the outside. This way I will have a COMPLETE SEAL of JB Weld on both sides of the steel "sandwiching" if you will the older rusted metal between non-porous, sealant to slow down the corrosion going on.

IMHO to just patch it from the outside would allow the weakened, rusted metal from the inside to continue fast corrosion and the plug of JB Weld would likely fall out in just a matter of time.

This unit I puchased off Craigslist for $50 must be at least 20 years old. I just want to
Get a few years out of it to try my hand at smoking b/f investing $600-800 for a good unit.


I will keep everyone posted. Limited time to work on it right now so it may be another few days before completion.

Also sanding, painting, and replacing other parts like the front shelf, handles, wheels etc.
 
To get the strongest patch you can't beat doing it on both sides: sort of a "pants and suspenders" approach to the problem.

I look forward to a report on how it works once you fire it up and use it a few times.
 
Well, the patch on my deep fat fryer failed. It's one of the few failures I've ever had with JB Weld, but it is quite clear the failure was caused by too much heat.

So ...

... I'm going to try this Extreme Heat stuff and see how it works. I can't get it locally, so it will be a few days before it arrives. I'll post back when I find out how it works.

$6,61 on Amazon! Finished my repairs today
 
I just finished using the JB Weld Extreme Heat. I love regular JB Weld and give it a 10/10. This, on the other hand, is total junk, and my repair is a complete and total failure. The stuff is brittle and just flakes off.

My advice: stay away from it.
 
Yes, it definitely needs heat. What's more, it isn't a two-part glue, like epoxy, and therefore appears to need air to set and dry. I'm still attempting to salvage my repair job and have baked the part at 150 degrees for many hours. I'm going to give it two more days and then try to tighten down the bolts that hold the two electrical prongs in place.

One thing that I suddenly realized, which will be a minor problem for me: this stuff is full of metal particles and is therefore somewhat electrically conductive. I am using it to repair where the two male prongs stick out of the opening at the bottom and mate with the plug. I measured the resistance between the two electrodes and it measures about 110 K-ohms. This will be in parallel with the heating element. The element measures 10 ohms, so there is a five order of magnitude difference between the resistance in the patch and the resistance in the heating coil. None of the patch is exposed to where anyone can touch it, and ohms law shows that the 110 K-ohms will only generate about 0.5 watts, something that will get lost in the 1,200 watts generated by the main heating element. So, while not ideal and certainly not something you could ever use on a product sold in the marketplace, it will be perfectly safe and OK for my use.

However, I am still very worried that the stuff will be too brittle to stand up for any length of time.

I'll report back in a week or so after I've let it set up for a few more days, and then actually used it for an hour of frying.

Here's the outside of the base, showing the two electrodes that the old-fashioned "appliance plug" will connect with


This second photo shows the inside. The patch is pretty ugly, although I did sand and smooth the part which matters (under the spade lugs).

 
SmokingMeatForums.com is reader supported and as an Amazon Associate, we may earn commissions from qualifying purchases.

Latest posts

Clicky