- Jan 6, 2011
- 26,253
- 4,708
Besides building new smokers I like to tweak old smokers. I cooked on one of these for years with out mod's. Just had to pay a lot more attention and be more attentive. But still turned out great BBQ. I came across this Mod and site and went to Lowe's and bought one and did most of these Mods. WOW what a difference. You can do this and not have a lot of money tied up in a real good smoker. This is pretty long with a lot of good pictures and information.
webbot bot="HTMLMarkup" startspan webbot bot="HTMLMarkup" endspan i-checksum="38380"
[size=+3]Brinkmann Gourmet Smoker Modifications[/size]
(Birth of the FrankenBrinkmann)
(I'm no web designer, so this is best viewed with screen at least this wide)

(FYI: This file loads 6 MB of images)
Quickie Foreword
I did a fair bit of research on smokers, and saw a huge and loyal following of the Weber Smokey Mountain Smoker. Older son's wife had found one of these in a bargain-price close-out sale in 2008, and he'd been enjoying it ever since. Then I saw how much the latest model cost. YIKES! No way was I going to spend that kind of money for a smoker! So I pretty much let the matter slip.
But older son had done some homework as well, and found a number of web sites that showed various modifications for the inexpensive Brinkmann smokers that could greatly improve their utility. He knows I love tinkering with "stuff" - and that I have a well-equipped shop in my home - and he figured if he bought me a Gourmet Smoker for my birthday I would have a good time tweaking it. He was right!
Ok, so the Gourmet Smoker is a modestly priced unit, and I didn't expect Audi features and performance for a Chevy price tag. So this is not intended to be a hatchet job on the Brinkmann Gourmet Smoker. It's just an observation of the "issues", and an application of various ideas, some of which I came up with, and others found while looking around the "InterTubes".
So, yes, there are a number of apparent - or at least perceived - short-comings found in the Gourmet Smoker design. The most glaring is a complete lack of control for inlet and exhaust flow. There are no dampers on the unit at all. The design has a single 2" diameter inlet air hole, and relies on a large gap on top between the lid and the body for exhaust. So there is no way to actually control the temperature within the unit, and the size of the gap - between 1/4" to 3/8" wide around the 53 inch lid circumference, depending on how one places the lid, would seem to let a lot of heat out of the top, likely wasting a lot of charcoal. And it would be pretty much impossible to come up with repeatable "settings", because that gap is never consistent - every time the lid is put down the gap will change in size and location. And finally, it is likely susceptible to wind effects.
The charcoal pan has no grating, so the bed of charcoal rests right on top of hooded slots punched in the bottom of the pan, which seems to ensure that the slots will get blocked up by the charcoal bed, and the charcoal would smother in its own ashes. The probability of fussing with a choked-out fire in a hot pan didn't sound appealing.
The base of the smoker stands on stubby legs - only an inch and a quarter tall. I would be using the smoker on a deck built with composite decking which probably wouldn't be happy being exposed to significant heat. Plus, if I add damper-control to the air inlet, it would be way down near the floor. I noted other folks stood their Brinkmann smokers on top of strategically placed bricks, but that seems like asking for a tip-over. I was pretty sure I could come up with something better.
The temperature gauge provides little useful information. There are no markings for actual temperature, just three ranges "Warm" "Ideal" and "Hot". When I read about the importance of establishing proper temperature for smoking, this seemed less than ideal.
So, I planned on adding a charcoal grate to the pan, adding taller legs, adding a damper-controlled exhaust vent in the lid, adding damper-controlled air intakes at the bottom, plugging up that gap around the lid, and adding a real thermometer with an actual temperature scale just below the top cooking grill.
Some of these may be overkill, perhaps even unnecessary, but none of the changes are, in effect, irreversible. And, anyway, I had recently run out of projects to keep me out of trouble :-)
As I wanted to show my sons what I was up to with this project, I took plenty of pictures and wrote up everything I did. The result is a step-by-step tutorial. If it gets used by others who are interested in making a fairly cheap smoker perform as well as models selling for 5 or 6 times the price, even better.
Before I made any modifications to the Brinkmann unit, I spent considerable time tuning the fit of the door and the lid. The top of the body had a horizontal crease about a foot in length, just below the top rim, likely caused when the top edge was rolled at the factory, and this caused the top grate and the lid to fit poorly. I straightened that out using a piece of wood cut to fit the proper curve of the body and used that to hammer out the crease.
The door fit pretty poorly, too, with large gaps along the top and bottom. But after some tweaking it fit nice and tight to the smoker body.
Here's a shot of my Brinkmann Gourmet Smoker before modification. You can see how low to the floor it sits, and the rudimentary temperature gauge.
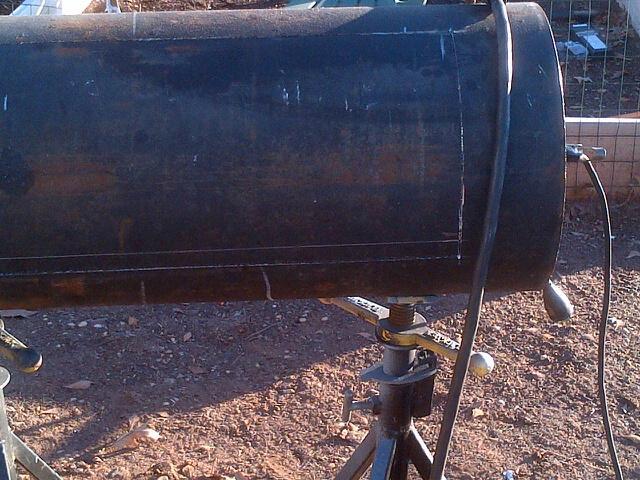
This picture shows the gap around the top lid. Assuming even a conservative 1/4" gap around the 53" circumference, there is at least 13 square inches of exhaust area - always open.
Here's the unmodified charcoal pan. I'll give Brinkmann credit for the hooded vent slots.
http://
Ok, we're off and running!
First task is to fit a raised charcoal grate to the charcoal pan. This seems to be a common modification, going by comments found in the multitude of smoker fan web sites.
I started by marking a line around the charcoal pan 1" from its bottom. Here's a neat way to do that accurately.
The circumference of the pan is 46", so I drilled three 1/4" diameter holes spaced 15 3/8" apart along the drawn line, and inserted 1/4-20 x 2" stainless steel bolts with SS washers and doubled ("jambed") nuts.
http://
I picked up a replacement Weber charcoal grate (Weber p/n 307440). This is 13.5" in diameter, uses heavy gauge steel wire, and it fit perfectly, allowing about an inch of space for ashes to accumulate without smothering the fire. Step one is done.
http://
Next up: fabricate taller legs.
Perhaps it's because I'm 6' 5" tall that I thought this would be a good idea. I actually didn't find a similar modification in the smoker group sites - maybe those folks are all short people :-) But it seemed simple enough to just go ahead and do it.
I found some aluminum bar at Lowes, 1/8" thick by 2" wide, that felt sturdy enough to work. I drew up a diagram (pdf here) showing the bends and drill holes, and then set about figuring out how to actually bend up the legs (I don't own a brake).
I used chunks of hardwood with my bench vise to put the first bend on all three legs. Then I used a 1/2" thick piece of wood as a spacer and put the second bend in by bending over the outside of the vise face, providing a roughly 1" wide "foot" on the legs.
A quick straightness check, then the final bend.
Checking the finished leg against the bending plan, and the set of three legs.
Next, I drilled two pairs of 1/4" diameter holes to attach the legs to the side and bottom of the base pan.
I should have used my drill press, as you can see the bit drifted on some of the holes. So, to avoid any fitting problems, I marked each leg 1 through 3, then used each leg to locate its mounting holes in the base pan, and marked the corresponding position for the mating leg on the pan. I positioned the new legs to more or less hide the original legs from view (I could have removed the original legs, but then I'd have to fill their mounting slots to block the air flow through them, and that just wasn't worth the effort). Then I drilled 1/4" diameter holes in the base pan.
Side mounting holes
Bottom mounting holes
I then used 1/4-20 x 1/2" stainless steel screws to mount the legs to the base pan. Side screws were inserted from outside, bottom screws were inserted from inside. I used washers in front of the nuts for all screws, and also put washers under the screw heads for the bottom screws to avoid any chance of tear-out through the thin sheet metal.
Everything lined up perfectly. And the result is absolutely solid, stable, and level!
http://
Next: fabricate an exhaust vent and damper control.
My older son's Weber has a single round exhaust damper located near the top of its lid. With three 3/4" diameter vent holes it provides a maximum of 1.3 square inches of exhaust area. I drew up a similar damper control (pdf here) based on 1" diameter holes (Why 1"? Because that's the size of my smallest metal hole cutting saw!) which will provide up to 2.3 square inches of exhaust area.
Then I used some light gauge aluminum sheet (I used 20 gauge - 0.0320 inch thick) and traced the outline of the damper four times (for the top exhaust damper and three bottom air intake dampers). I used a punch to mark the centers for the 1" diameter holes along with the 1/4" diameter hole in the middle that the attachment screw will pass through.
Then I cut out the damper holes using a 1" metal cutting hole saw.
I cut out a damper with tin snips, and drilled the 1/4" diameter center hole. Then I placed the damper upside-down on the family room carpet, and used a small rubber mallet to form the damper in a slight "dish" shape so it would sit "flat" on the domed smoker top. Then I bent up the three control "arms" as shown.
Next, I positioned the damper template on the smoker top, a couple of inches away from the handle location, and center punched the damper hole centers and the mounting hole center. Then I removed the template and cut the damper holes using the 1" hole saw, and drilled the 1/4" mounting hole.
Then I attached the damper, using a 1/4-20 x 1/2" screw, with a backing washer and a pair of SS nuts. Et voila!
http://
Next: install a real thermometer.
A common complaint with the Brinkmann unit is the lack of a degree-graduated thermometer, and adding a real thermometer may be the most common modification. So I picked up an inexpensive "candy" thermometer that has a 6" long probe and a 100F-400F range, with a highly visible scale. After thinking about how to mount it, I came up with the idea of using a threaded brass feed-through - basically, something you'd often find on a table lamp to hold the lampshade. I found a 1" long, 3/8" outside diameter threaded feed-through with brass nuts at the local hardware store that would do nicely.
The thermometer probe is 1/4" in diameter, while the inside diameter of the feed-through is 5/16", so I will fill the feed-through with high temperature RTV, then drill a 1/4" hole through the middle after it cures. This will provide a good seal, but still allow the thermometer to be easily removed and reinstalled if needed.
I drilled a 3/8" hole in the smoker body, locating the hole just below the top grill rack - 1 1/2" below the top of the body - and centered above the door.
Then I installed the feed-through so it is nearly flush with the outside of the smoker body, and securely tightened the two brass nuts front and back. Then I inserted the thermometer. The length of the feed-through holds the thermometer level quite nicely.
Next: adding bottom dampers
Older son took some measurements from his Weber Smokey Mountain smoker (he has the 18" model which is similar in size to the Brinkmann). We determined that the Weber provides a maximum of 4" of air inlet area, based on three dampers, each having three 3/4" diameter holes. The stock Brinkmann smoker has a single 2" diameter inlet hole, providing just over 3 square inches of air intake area - not too different from the Weber.
But there is no control provided for that hole, and my son felt the intake controls on his Weber were very useful - and more critical than the exhaust damper. With the new legs in place, a simple but easily reached pivoting damper control over that center hole wouldn't be feasible, so I decided to provide a similar setup to the Weber for my Brinkmann: three rotating dampers, each with three 1" diameter holes (1", again, because I didn't have a 3/4" diameter hole saw bit), which would provide up to 7 square inches of inlet area. It's probably WAY WAY overkill, but what the heck - I can always close the dampers WAY WAY down.
I modified the damper design used for the top exhaust control to remove two of the control "arms", and increased the third arm to 2 inches in length. This would extend the control arm out from under the base pan, making it easy to adjust. Also, as the base pan has a flat bottom, there was no need to "dish" these dampers - they just needed to be flat.
I removed the new legs from the base pan, then I placed the template in the first of three locations on the underside of the base pan, and positioned it so the control arm could be moved from fully open to fully closed while still remaining visible and easily reachable from above. Then I punched the centers for the three vent holes and the mounting hole. I repeated this for the other two damper locations.
Then I chucked the hole saw into my drill press and started cutting holes, and then drilled the mounting holes. After deburring all those holes with a Dremel tool and small grinding drum, I mounted the dampers, using 1/4-20 x 1/2" SS screws, with backing washers and doubled nuts.
And while I was at it, I cut a scrap piece of the aluminum sheet to cover up the original intake hole, and used a pair of pop-rivets to hold the cover in place.
When I put the charcoal pan inside the base pan, I realized the intake damper mounting screws were sticking up too high and the charcoal pan wasn't resting on its rim. So I reversed the damper mounting screws so the heads were inside and the nuts and washers were below the base pan - similar to the bottom leg attachment screws.
Here are close-ups of one of the intake damper controls. At the left, the damper is in the fully closed position. At the right, the damper is in the fully opened position. I'll paint small vertical white stripes corresponding to these settings, plus a few intermediate settings (1/4 open, 1/2 open, 3/4 open), once I've finished all the modifications to this smoker and give it a good cleaning.
http://
Next: Minding The Gap!
I found a smart way to close off the gap around the smoker lid-to-body interface in my wanderings around the web. The person who came up with the idea ("wasilvers" - in a posting on the web discussion group "The Smoke Ring") used fiberglass rope, which is typically used as seals for stove (eg: wood stove) doors. He cemented the rope to the outside lip of the smoker lid, just below the slight bead formed in the lid. The rope he used was wide enough such that when the lid was placed on the smoker body, the rope rested on the top of the body, closing off the entire gap.
I picked up a Rutland kit at our local Aubuchon that included 7 feet of 1/2" diameter graphite impregnated fiberglass rope and a tube of furnace cement, and after experimenting with the rope taped around the lid of my Brinkmann, this seemed to be a brilliant solution.
The paint used on the outside of the Brinkmann is quite shiny - and slippery enough that I doubted anything would securely stick to it. So the first thing to do was to roughen up the paint where the cement would need to go. Rather than make a mess out of the nice green factory paint job by skidding around the lid with a hand-held electric drill, I chucked a narrow wire brush wheel in my drill press, clamped a wide extension to the drill press table, placed the smoker lid on the extension, and adjusted the press so the brush would hit the bottom of the bead around the edge of the lid. Then I turned on the drill press, and rotated the lid around a few times so the wire brush could chew at the paint and roughen it up enough that the cement could stick to it.
There's no "tack" to furnace cement, so I decided the easiest way to keep the rope in place while the cement cured was to cut it to a length that would put it in slight tension when placed around the lid, and then splice the two ends together with a paperclip, which I stuck in the rope ends, pushed out through the sides, and bent the ends back towards the splice. Once the cement cured I'd remove the paperclip.
You can just see the bent ends of the clip in the picture below, one just below the tip of the tube, the other to the left of the tip about two-thirds down the side of the rope. When I cement the rope down I'll be sure to keep those paperclip ends exposed so removal will be easy.
In the next picture, you can see the roughened paint just above the raised bead on the lid, as well as the looped rope below the bead. I was ready to put some disposable gloves on and start applying the cement to the roughened paint strip.
No pictures of the cement: my gloves were quickly covered with the black, tarry stuff, and there was no time to mess about removing the gloves to take a picture - the cement starts curing rather quickly. So, just imagine a black ring of goo where the roughened paint strip is.
Here is the finished lid: I rolled the rope loop down over the raised bead and pressed it into the cement, made sure it was at a uniform height all the way around the lid, then quickly cleaned up the mess I had made before taking this picture.
Once the cement had hardened, I removed the paperclip by cutting off one of the hooked ends then drawing it out by the other.
And then the acid test: does the lid fit to the smoker body as expected?
Yup! There's a nicely consistent fit all the way around the lid! And there is more than enough penetration of the lid down into the body that there is no chance that it will slip off. I think this is going to work just fine!
http://
Finally: Gilding the Lily
I had some left-over aluminum from the legs mod, and it didn't take long to come up with a use for it: adding a pair of handles to the base pan! Seemed like a reasonable idea, and it was raining, so what the heck. I whipped up a template (pdf here) that generally matched the handle design that the three stock handles were based on, then started cutting.
I first cut a pair of 9" long pieces from the scrap strapping, then ripped them both to end up with 7/8" wide pieces. Then I marked the bend points, and made the 90° bends in my bench vise, followed by the 110° bends, which snug up to the base pan circumference.
I had a length of 1.25" diameter dowel left over from a previous project which would work for the handle grips. I cut two pieces 3 5/8" long, then ripped them down the middle, along the grain, using my band saw. Then I drilled the handles and grips: to attach the handles to the smoker base, I would use left over 10-24 x 3/8" screws and nuts that came with the smoker, so those holes are 13/64"; for the grips, I would use 8-32 x 1 1/8" screws and nuts, so those holes are 11/64". Then I counter sunk the holes on both sides of the grips using a 3/8" drill bit to match the diameter of the 8-32 screw heads and nuts.
With all of the handle holes drilled, I assembled the grips to the handles. I then used the assembled handles to locate and mark the two pairs of mounting holes in the smoker base pan, making sure not to interfere with the bottom dampers or the legs, while also staying comfortably below the lip of the charcoal pan. The 13/64" diameter holes ended up being 2 3/4" below the top edge of the base pan.
Once I cleaned up the burrs around the holes I attached the assembled handles using 10-24 x 3/8" screws and nuts left over from the original smoker assembly. Looks good, should work just fine.
As shown above, I painted small white stripes at each of the intake damper locations, indicating (from right to left) fully closed, 1/4 open, 1/2 open, 3/4 open and fully open damper position. This should make it fairly easy to replicate the ideal smoking configuration - once I figure out what those settings want to be.
With all the modifications completed, I then disassembled the unit and touched up all the holes I had cut using high temperature paint, to help prevent rusting. The next morning I reassembled the smoker, then took it outside and sprayed the entire interior with a can of PAM, and then let that more or less dry out for a few hours. Then it was all ready for a test run!
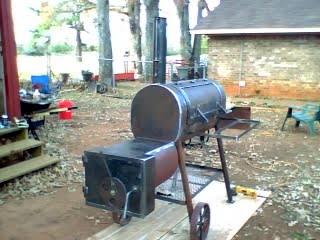
So, what does this FrankenBrinkmann look like now that I'm all done tweaking it?
Ready for lift off!
http://
So, how does it work?
This shot was taken about an hour into a 2 hour test burn. (btw, there's actually almost a foot of space between the smoker and the railings). I filled the charcoal pan about half full using Royal Oak charcoal, then dumped a half-full Weber lighter of fully lit coals on top, tucked two foil-wrapped packs of hickory chunks on the sides, put the smoker body in place, filled the water pan with boiling water, put the lid in place, and set all bottom dampers and the top damper to half open. In short order the temperature was up around 275°, so I closed down the bottom dampers to 1/4 open. 20 minutes later the temperature was down to 220°, as seen above. One more tweak of the intake dampers and it settled in at around 230°. A nice plume of smoke developed out of the top damper, but there was no smoke coming out around the fiberglass rope, so that was working very nicely.
I let the smoker run for about a half hour more at those settings. I could feel the wetness in the exhaust plume out of the top vent so the water pan was doing its thing. After a while I shut all the dampers to see if I could kill the fire completely, and indeed, in about 20 minutes the temperature had fallen below 125°, and continued to fall until the thermometer had bottomed out. A while later I lifted the body off and checked the coal bed, and there were no hot spots, and quite a bit of unburned charcoal remaining, so I emptied out the water pan, put the body back on and left it all closed up.
Bottom line, this beast can now be predictably controlled. It will take some runs with a full fuel load and a load of meat to really understand what the optimal settings are, but it is clear that it can be throttled up and down at will. So the entire effort appears to have been very successful - so far!
Right! So Let's Cook Some RIBS!
I picked up a package of four pounds of trimmed spare ribs and a bag of apple chips, then looked around the web for rub and sauce recipes. It was my good fortune to stumble onto the Amazing Ribs web site (www.amazingribs.com) and after giving it a thorough read decided to use the "Meathead's Magic Dust" rib rub recipe with the "Kansas City Classic BBQ Sauce" recipe, along with the recommended cooking process (found here). I prepared the rub and gave the ribs a thorough dusting on both sides, then put them in the 'fridge overnight.
The next day, a bit after Noon, I took the ribs out of the 'fridge to warm up, made up three foil-wrapped packs of apples chips, and set a gallon of water to boil on the stove while I set up the smoker. I loaded a full charcoal pan of Royal Oak, started a half-filled chimney of glowing coals, dumped those on top of the charcoal pan, set the smoker body in place, then filled the water pan, put the top grilling grate in place, then put the lid on, set the exhaust damper to half-open, the bottom dampers to quarter-open, and let the temperature settle in at 230°, before loading the ribs, meaty side down. Then I popped in a chip pack, and in a few minutes the smoke started rising through the exhaust damper.
The smoker required very little attending over the next three hours, just a few gentle bumps on the intake dampers to keep the temperature hovering around 230°, and replacing the chip pack when the smoke died down. So, while the ribs were merrily smoking along, I went back to the kitchen and prepared the barbecue sauce.
After the three hours, I removed the ribs, made the foil "boat" as directed, put a cup of apple *sauce* in the boat (didn't have any apple juice but what the heck - apples are apples, right?), laid the ribs on top, then sealed up the boat and laid it in the smoker. I dialed up the temperature to around 250° - a bit higher than before, just to get the liquid within the foil to simmer. I let that run for an hour, then removed the ribs, discarded the foil, then set the ribs back on the top grate, dialed down the temperature, and let it run for a half hour. Then I removed the ribs, removed the water pan, put the ribs back, brushed on the sauce on both sides, and dialed up the temperature to 350°. I turned the ribs over after five minutes of sizzling the first side, then removed them five minutes later once the other side was sizzled.
Here's what the ribs looked like just before I brought them in for eating!
The smoke ring is visible in these pictures. You can also see the moistness remaining in the meat. And OH MY GOD were they good! With just the two of us, we still plowed through all but a few ribs, accompanied with my wife's home-made coleslaw and cornbread.
It was so good it should be illegal!
Conclusion: An unqualified success! The modifications did everything I could have hoped for, providing an easily controllable smoker, that ran for almost 6 hours at optimal temperatures for each stage, and there was still plenty of unburned charcoal remaining.
The next weekend we had my mom over (for Mother's Day) and I smoked up another five pounds of spare ribs, using the same recipes and cooking procedure. It would be a good check to see if the first run was a fluke :-) My younger son also came by to say hello to his mom and grandma and to check out the smoker. Running the smoker was even easier than the first time as I knew the optimum settings for the controls, and as the smoker just purred along for hours at 225° my son was duly impressed. The ribs came out just as awesome as the first run and everyone thoroughly enjoyed them.
One last modification I may do, using the left-over bits of aluminum strapping, is to fabricate an extra set of grill rack brackets to give me the option of placing the bottom grill rack higher up in the smoker body. The original design uses the same brackets that hold the water pan to hold the lower grill rack - which puts the rack just above the top of the water pan, and 9" below the top rack. It seems to me that having the option of placing the lower rack within 4 or 5 inches of the top rack would be a better deal when doing multiple rack of ribs, as it would minimize the temperature differential between the two racks. I'll save this mini-project for a day where I have nothing better to do :-)
http://
Update: A few weeks later I went ahead and cobbled up the grill rack brackets (pdf here) carved from the left-over strapping.
The top grill rack bracket screw is 7/8" below the top of the smoker body, while the water pan/bottom rack bracket screw is 9 1/2" below. I split the difference and drilled the new bracket holes 5 1/4" from the top of the smoker, vertically aligned with the existing screws.
I used 10-32 x 1/2" screws with washers under the screw heads on the outside and lock nuts on the inside to attach the new mid-mount grill rack brackets.
Water pan in place, with bottom grill rack in normal location at left, and in new, mid-body location below upper grill rack at right.
I expect to give this new configuration a try soon!
http://
Another Update: A couple of weeks later we were having my sons and their spouses over for a Saturday afternoon of simply hanging out on our deck with drinks and snacks while I smoked up some ribs. Yes, it was going to be my "put my money where was mouth was" moment with the boys, and I wanted to knock them both out with some tasty Q!
I just had to figure out how to get three racks of SLCs - 15 pounds of ribs - into the smoker - there was no way they would fit on just two grill grates! With the new middle rack brackets, one option was to add a third grilling grate - the three racks and trimmed bits would have just fit with some random gaps. Unfortunately, I couldn't find a 15 1/2" diameter grill grate anywhere in my area to save my life, so I bought a Char-Broil vertical rib rack for $8 from the local Lowe's instead.
Friday afternoon, after trimming the three racks of ribs, I took them out to the smoker to figure out how I'd set it all up the next day. I quickly realized there wasn't enough clearance above the top grate position for the lid to fit with the ribs standing up in the rack, so I used the middle grill rack position instead. That was handy! I would then use the bottom grill rack to smoke up the trimmed rib bits for a pre-dinner treat.
Next problem was how to get through the foiling phase. If I had the third grill grate I could have foiled the racks in the smoker. Without it, my best alternative was to use my gas grill, set as low as it can go. Then, once the hour in the foil was done, I just had to get the ribs back in the smoker rack without them falling completely apart and firm them up for the last hour or so. Finally, I'd use the gas grill for saucing and crisping.
So I had a plan! I took the ribs back to the kitchen, got them all rubbed up and into the 'fridge for the next day, then got out the ingredients to whip up some barbecue sauce.
All that colorful stuff - and this is a relatively simple recipe!
The weather Saturday was absolutely perfect - in the midst of what has been one of the wettest June's in recent memory. The smoker was all set up and purring at 225°F by noon when I loaded it up with pork.
Ready for launch Cruising Speed
Three hours later, the ribs are out of the smoker, into foil boats with some apple sauce, and on to the grill.
While we munched on the smoked trimmings (yum!)
After one more hour in the smoker...
...and a quick saucing and crisping on the gas grill, it was time to eat!
Served with home made corn bread and coleslaw, the food was a huge hit - there was barely enough left for a midnite snack!
The boys will be playing defense for some time to come ;-)
So...The middle rack brackets definitely were an advantage. And I've ordered a third grill rack.
After six smokes, running the smoker is almost mechanical. I take the meat out of the 'fridge for 30 minutes, then put 2/3rds of a water pan of water in a pot to boil on my gas grill's side burner, fill the smoker's charcoal pan to a bit less then level (I've been using Royal Oak lump), dump a third of a chimney of fully lit coals in the middle and spread it out a bit, put the grill body on, set the water pan in and pour in the boiling water, put on the lid, and close the three intake dampers down to a little less than 1/4 open, leaving the exhaust damper wide open. I can usually get the smoker to sit at 225°F within 15 minutes, at which time I put the grill rack(s) in and load in the meat, toss in a couple/few chunks of apple wood, then settle down for the smoke. The wee beast is almost as easy to control as a kitchen oven - requiring only the occasional nudge of an intake damper to hit the desired temperature. And I've never used more than half a pan of charcoal for ribs, so it's pretty darned efficient as well.
At this point I've pretty much run out of things to change. Along the way, I did add a second charcoal grate, placed 90° across the first grate. It makes a huge difference in keeping the smaller lump chunks from falling through. Otherwise, I think this critter is all set for the long haul. It sure makes great barbecue!
http://
Yet Another Update: It'd been many months since the first cook on my modded-up Brinkmann, and I had yet to do a full-blown overnight cook on it. But that was about to change.
The wife is a fan of pulled pork, but with our big eatin' boys all gone off to make their lives it's hard to justify smoking up the typical 10-12 pound butt or picnic, and we rarely cook for the freezer anymore for the same reason. So when I'm at the markets I keep an eye out for cuts a bit more our size, and a couple of days ago I came across a package with the top part of a picnic, weighing just 5 pounds, and with just a small patch of skin. Perfect!
I got it home, removed the skin and excess fat, hit it with homemade rub, followed by a mustard slather and more rub, then wrapped it up in plastic wrap and stuffed it in the fridge. The plan was to get it on the smoker at midnight Thursday and have it ready for Friday dinner.
[I don't have any "before" pics of the meat yet - they're trapped in my beloved Spousal Unit's fancy digicam - with a now-dead battery, and her dedicated charger is on a cruise ship somewhere between Boston and Bermuda (she left it on board) But I took plenty of set-up and post-cook pics with my 10 year old backup camera.]
So Thursday afternoon I got my smoker all set up for the overnight cook. I filled the charcoal pan as full as I dared - including what would go in the starter chimney (1/3 load) so I wouldn't have lit stuff falling out all over the deck.
I then weighed the charcoal (5.25 pounds) before dumping it back in the pan (I was on a statistics kick).
About a half-hour to midnight I was ready to fire up the smoker. Sky was overcast, outside air temp was 40°F and would drop into the mid-30s.
I had the cooker stabilized at 230°F with a full pan of pre-boiled water, and the meat went on right at midnight - after another heavy dusting of rub - with a 2:1 Apple:Hickory mix in a foil pack. I checked the cooker a half-hour later and the temp was hanging right where I left it, so I went to bed. I had planned to get up around 4AM to give it a check, but slept right through to 7:30AM. When I woke I immediately checked the cooker and it was sitting at 250°F. That was just fine with me so I left it right there!
I intended to open the smoker as little as possible - no peeking, no spritzing/mopping/basting, and no foiling during the cook. I wasn't going for monster bark on this cook - I was looking more for a cooker performance baseline - and I had allowed plenty of time to not need to foil. So the only time the lid was removed during the cook was to stab the meat with my El Cheapo Taylor thermometer probe (yeah, it's still alive, but going down the tubes - it is now reading low by ~5°F).
Things proceeded apace, until around 3PM the internal temperature hit an indicated 200°F (ie: 195°F)...
...and it was time to take my first look at the semi-picnic.
Mmmm....Ready for bidness!
I wrapped the chunk tightly in plastic wrap, then two layers of heavy duty aluminum foil.
...then tucked that into a big baggie, then wrapped that in two bath towels, and stuffed the whole thing into a warmed cooler to rest for dinner.
While the meat was resting, and after the cooker had gone completely cold, I did a post-burn analysis of the fuel situation. The charcoal pan looked to be about 1/3 full.
I separated the unburned charcoal from the ash...
...weighed the charcoal (1.5 pounds remaining)...
...and measured the ash. A mere 2 cups for 15 hours cook time. Gotta love lump charcoal!
Finally it was time for dinner - and Mister Picnic made his post-cook appearance....
...whereupon he was promptly pulled apart...
...and then set upon by two hungry hungry humans! :-) (sorry - I was too freakin' famished to remember to take plated pics)
This pork chunk had virtually no fat blobs or pockets remaining and was marvelously moist and tender. My wife was particularly pleased with how little fat was left in the meat. The apple/hickory smoke flavor was wonderful and there was plenty of rub flavor and heat in the bark. We had this on fresh bulkies with a couple of different sauces, but my favorite today was raspberry-chipotle. Mmmmmm! We stuffed ourselves with meaty sammies along with some fresh broccoli and winter squash, with glasses of hearty Cab Sauv. Leftovers will accompany the Sunday ball games!
The Stats:
Meat Starting Weight: 5 pounds
Trimmed Weight: 4.6 pounds (skin & fat removed)
Cooked Weight: 2.4 pounds
Finished Weight: 2.1 pounds (big ol' bone removed)
Ambient temperature range: 36-45°F
Cooking temperature range: 230-250°F
Cooking Start: 12 midnight
Cooking Complete: 3PM
Cooking Time: 15 hours
End Internal Temperature: 195°F
Charcoal Used: Royal Oak lump
Charcoal Load Weight: 5.25 pounds
Charcoal Remaining: 1.5 pounds
Net Charcoal Used: 3.75 pounds
Ash Volume: 2 cups
This first really long cook on my li'l ol' Brinkmann went as well as I could have hoped - the smoker was very well behaved and required almost no attention at all! I especially like that I didn't need to add any fuel even though it was a chilly night. Indeed, I could have gone another few hours with what was left unburned - and there was enough water left in the pan to handle that as well.
So, the mods have turned a notoriously hard-to-control fuel-wasting beastie into a tame and thrifty smoker that will let me get my beauty sleep. It's A Good Thing!
http://
It's getting close to Spring, and I was hankering for some more pulled pork. I pulled a 7 pound butt out of the freezer Saturday morning, and planned on getting it on the smoker at midnight.
I decided to go crazy on this butt, and started by injecting the heck out of it with a mix of apple juice, apple cider vinegar, bourbon and some of "Magic Dust" rub. I pumped about two cups of marinade all through the butt, then parked it in the 'fridge for a few hours.
About an hour before starting the smoker, I pull the butt out of the 'fridge, drained it a bit and patted it more or less dry, then caked on the Magic Dust.
The wee smoker was all set to go, and the butt went on right at midnight.
It didn't take long to get the smoker settled down and cruising at 230°F. I kept an eye on the remote thermometer until 1am, then took it to bed.
Around 5AM I cracked open an eye and checked the remote thermometer, and the smoker temperature was still sitting at 230°F, so I went back to sleep. Got up at 7:30, got the coffee going, then checked the smoker, and all was still well. Amazing little cooker.
I put some more of the marinade in a spray bottle and started spritzing the butt every half hour to build up some serious bark. Checked the smoker around noon and the butt was sitting at 170°F.
It already looked and smelled amazing. The bark was just starting to get going.
Around 2:30 the internal temperature hit 200°F, so the butt was ready for resting. The bark was amazing - all that spritzing really worked!
When it was finally time for dinner I unwrapped the butt and pulled it apart using gloves (I think using forks or "claws" shreds the pork too fine). It was perfectly done - moist and tender - and after sneaking a small hunk I found the flavor started at the bark and went all through the meat.
Horrible picture - but the sandwich was fabulous!
I snarfed down two sandwiches with some salad and Old Vine Zinfandel. It was delicious! And there's enough to make another meal! Yum!
http://
It's been roughly 18 months since I did the original set of modifications to the wee Brinkmann, and over that time the little beastie has done dozens of cooks without any issues. I did make another change fairly early in that period: I added a second charcoal grate, flipped up-side-down and oriented 90° to the original one, forming a grid that has virtually eliminated charcoal "fall through".
Very effective indeed! Now, only ash makes it to the charcoal pan.
Otherwise, I had made no further changes - up until very recently: with a hurricane forecast to hit the general vicinity I had cleared our deck of anything that could be blown through the glass doors, including the smoker. After the storm had passed and I was bringing everything back out again, I managed to stumble while carrying the smoker up the stairs, lurched forward, and planted my upper body smack on top of the lid, driving it down just far enough to pop the fiberglass rope seal loose from the lid.
I didn't have any more of the furnace cement that came with the rope kit, but I did have a tube of high temperature "RTV" silicone sealant, and as I had received quite a few messages from folks that had read this write-up who had used RTV successfully, I decided to give it a try.
So, after grinding the old cement off the lid using the same drill press technique I had originally used to remove the paint, and chipping off the cement bits from the rope, I gooped the lid with RTV and slid the rope gasket back in place. Then I coated the rim of the smoker body with some veggie oil and set the lid in place, adjusted the fit of the gasket, and let it set for the next couple of days.
When I was certain the RTV had fully cured, I removed the lid and checked the gasket to see if it was securely attached. As best as I could tell, it wasn't going anywhere, so I was ready to fire up the smoker to do some ribs.
I could have/should have used some tape to mask the lid off to do a neater job with the RTV. Ce la vie!
With the newly glued gasket in place the cooker performed just like it always had: with aplomb. But the acid test would be at the end of that cook, where I remove the lid and water pan, crank up the fire to "raging inferno" levels to caramelize some sauce on the rack, then put the lid in place and close up all the dampers to shut down the fire. That would be the most intense heat the lid would ever see, and if the RTV was going to fail, it would be some time after that exposure.
As it turned out, the RTV held fast - and surprisingly the RTV on the underside of the gasket didn't appear to have been affected at all by the high heat (which was high enough to cause the thermometer to go all the way around and back up to the 150°F mark before I removed it - I didn't think it would survive much more of that!)
So, RTV is definitely an option - and indeed may be the better choice verses using the original furnace cement. Time will tell, of course, but so far, so good!
http://
It's January 2011, almost two years since I posted the first iteration of this humble write-up, and I'm still getting two or three emails about it each week - and from all over the planet! I think that's amazing - and very cool!
Some of the conversations I've had made me realize I needed to add a few updates. For one, I've noted above that I no longer bother filling the thermometer feed through with RTV. It isn't necessary, and in any case, it won't stay put for long.
Next, if you live in a part of the world that is underserved by Weber corporate parts (I'm looking your way, Adelaide, Australia!) an alternative to using the Weber charcoal grate is to find a metal working shop and have them cut a pair of 13.5"/343mm diameter disks from heavy gauge expanded steel. It shouldn't cost much, and likely the pieces can be cut from "drops" which would be wasted otherwise. Orient them 90° to each other, similar to how I use my pair of Weber grates, and you'll end up with a similar "grid" that will virtually eliminate charcoal dropping through.
Finally, if you have a wired thermometer like the Maverick Redi-Check ET73, you probably don't want to be passing the probe wires through the lid (as many of the photos with my old Taylor digital show) especially if you're using the cooker temperature probe along with the meat probe. Much better to add another "ingress" point than to risk damaging either probe wire when handling the cooker lid.
When I got my ET73, I immediately added a second brass feed through, of the same 1" length and same 5/16" ID as the front mounted feed through, over to the right side of the main body. If you follow the wires in the picture below you'll just make out the added feed through.
I located this feed through at the same height as the top cooking grate. I pass the cooker probe through the feed through, then under the grate, and clip it to the underside (you can see the clip and a bit of the cooker probe between the butt and the chuck roast). Then I pass the meat probe through the feed through and over the cooking grate, sticking it into whatever hunk o' beast I happen to be doing. I've been using this setup since early summer 2010, and both of my ET73 probes still work perfectly (which is pretty much the only benchmark that counts).
Finally, at some point in the life-cycle of your Gourmet, if you cut new intakes in the bottom body pan you'll find it will eventually start to rust, mostly on the inside. Between moisture in the cooker condensing and running to the bottom pan, and the heat from the charcoal pan radiating downwards, there's plenty of oxidation energy and chemistry available to work on the unpainted interior metal.
If you want to keep your little cooker around for more than a couple/few years, plan on sanding off any rust/failing paint down to bare metal, and repainting with high temperature paint. I found inexpensive spray cans of Krylon paint rated for 1200°F exposure, and have used it to repaint the bottom pan with success - I've gone a year between refinishing the pan. This is definitely worth the time to do.
That's about all I can think of right now. So here's some "barbecue pr0n" to whet your appetites!
Full rack o' spares
Pulled beef chuckie with home made baked beans and a home brewed Stout
More spares, with home made slaw and grilled garlic bread
Pulled beef chuck and pork butt with slaw and pickels
Spares, fresh salad from our gardens, and corn bread, with a hearty Cabernet
Cheers!
webbot bot="HTMLMarkup" startspan webbot bot="HTMLMarkup" endspan i-checksum="38380"
[size=+3]Brinkmann Gourmet Smoker Modifications[/size]
(Birth of the FrankenBrinkmann)
(I'm no web designer, so this is best viewed with screen at least this wide)

(FYI: This file loads 6 MB of images)
Quickie Foreword
Both of my sons have water smokers - and use them very often. They told me how great the smoked meats were, with mouth-watering descriptions of the flavor and tenderness. My younger son brought a few left-over ribs over last summer and they were indeed a wonderful treat, then my older son smoked up a full blown rib dinner for us during a recent visit to his home, and I knew right then and there I was hooked. I had to have a smoker of my own!I originally threw this page together as a Yet Another Project Documentary for my two sons and immediate family - a bit of periodic terror I foist upon them all. I put it up in the web space that is provided with my Comcast account as that has been the easiest way to post long winded image-heavy "Here's What's Up" stuff for my family to find without bombing their In Boxes. Then, once Google's spider found it, the page url quickly climbed the hit ladder until it reached the top rung on a "Brinkmann Smoker Mod" search. Yikes!
As as result, for the last couple of years I've been getting all kinds of emails from folks, usually just a simple thanks but occasionally a request for help, either sourcing materials in some far-flung region of the globe, or spit-balling over an alternate approach to a mod. I enjoy them all - it is pretty cool to know there's someone literally on the opposite side of the earth that found something useful on such a random page.
As a warning, I'm a hardware engineer with over 35 years designing computing platforms, from mainframes to pizza boxes, a background that may become apparent with some of the over-kill you may encounter. That's me all over. Sorry ;-) On the other hand, some specifics were driven by tools already in my shop, so cost-avoidance had a role here as well. I advise reading the whole thing at least once before doing anything, then apply your own sanity filters.
Right! We're off and running!
I did a fair bit of research on smokers, and saw a huge and loyal following of the Weber Smokey Mountain Smoker. Older son's wife had found one of these in a bargain-price close-out sale in 2008, and he'd been enjoying it ever since. Then I saw how much the latest model cost. YIKES! No way was I going to spend that kind of money for a smoker! So I pretty much let the matter slip.
But older son had done some homework as well, and found a number of web sites that showed various modifications for the inexpensive Brinkmann smokers that could greatly improve their utility. He knows I love tinkering with "stuff" - and that I have a well-equipped shop in my home - and he figured if he bought me a Gourmet Smoker for my birthday I would have a good time tweaking it. He was right!
Ok, so the Gourmet Smoker is a modestly priced unit, and I didn't expect Audi features and performance for a Chevy price tag. So this is not intended to be a hatchet job on the Brinkmann Gourmet Smoker. It's just an observation of the "issues", and an application of various ideas, some of which I came up with, and others found while looking around the "InterTubes".
So, yes, there are a number of apparent - or at least perceived - short-comings found in the Gourmet Smoker design. The most glaring is a complete lack of control for inlet and exhaust flow. There are no dampers on the unit at all. The design has a single 2" diameter inlet air hole, and relies on a large gap on top between the lid and the body for exhaust. So there is no way to actually control the temperature within the unit, and the size of the gap - between 1/4" to 3/8" wide around the 53 inch lid circumference, depending on how one places the lid, would seem to let a lot of heat out of the top, likely wasting a lot of charcoal. And it would be pretty much impossible to come up with repeatable "settings", because that gap is never consistent - every time the lid is put down the gap will change in size and location. And finally, it is likely susceptible to wind effects.
The charcoal pan has no grating, so the bed of charcoal rests right on top of hooded slots punched in the bottom of the pan, which seems to ensure that the slots will get blocked up by the charcoal bed, and the charcoal would smother in its own ashes. The probability of fussing with a choked-out fire in a hot pan didn't sound appealing.
The base of the smoker stands on stubby legs - only an inch and a quarter tall. I would be using the smoker on a deck built with composite decking which probably wouldn't be happy being exposed to significant heat. Plus, if I add damper-control to the air inlet, it would be way down near the floor. I noted other folks stood their Brinkmann smokers on top of strategically placed bricks, but that seems like asking for a tip-over. I was pretty sure I could come up with something better.
The temperature gauge provides little useful information. There are no markings for actual temperature, just three ranges "Warm" "Ideal" and "Hot". When I read about the importance of establishing proper temperature for smoking, this seemed less than ideal.
So, I planned on adding a charcoal grate to the pan, adding taller legs, adding a damper-controlled exhaust vent in the lid, adding damper-controlled air intakes at the bottom, plugging up that gap around the lid, and adding a real thermometer with an actual temperature scale just below the top cooking grill.
Some of these may be overkill, perhaps even unnecessary, but none of the changes are, in effect, irreversible. And, anyway, I had recently run out of projects to keep me out of trouble :-)
As I wanted to show my sons what I was up to with this project, I took plenty of pictures and wrote up everything I did. The result is a step-by-step tutorial. If it gets used by others who are interested in making a fairly cheap smoker perform as well as models selling for 5 or 6 times the price, even better.
Before I made any modifications to the Brinkmann unit, I spent considerable time tuning the fit of the door and the lid. The top of the body had a horizontal crease about a foot in length, just below the top rim, likely caused when the top edge was rolled at the factory, and this caused the top grate and the lid to fit poorly. I straightened that out using a piece of wood cut to fit the proper curve of the body and used that to hammer out the crease.
The door fit pretty poorly, too, with large gaps along the top and bottom. But after some tweaking it fit nice and tight to the smoker body.
Here's a shot of my Brinkmann Gourmet Smoker before modification. You can see how low to the floor it sits, and the rudimentary temperature gauge.

This picture shows the gap around the top lid. Assuming even a conservative 1/4" gap around the 53" circumference, there is at least 13 square inches of exhaust area - always open.

Here's the unmodified charcoal pan. I'll give Brinkmann credit for the hooded vent slots.

http://
Ok, we're off and running!
First task is to fit a raised charcoal grate to the charcoal pan. This seems to be a common modification, going by comments found in the multitude of smoker fan web sites.
I started by marking a line around the charcoal pan 1" from its bottom. Here's a neat way to do that accurately.

The circumference of the pan is 46", so I drilled three 1/4" diameter holes spaced 15 3/8" apart along the drawn line, and inserted 1/4-20 x 2" stainless steel bolts with SS washers and doubled ("jambed") nuts.

http://
I picked up a replacement Weber charcoal grate (Weber p/n 307440). This is 13.5" in diameter, uses heavy gauge steel wire, and it fit perfectly, allowing about an inch of space for ashes to accumulate without smothering the fire. Step one is done.

http://
Next up: fabricate taller legs.
Perhaps it's because I'm 6' 5" tall that I thought this would be a good idea. I actually didn't find a similar modification in the smoker group sites - maybe those folks are all short people :-) But it seemed simple enough to just go ahead and do it.
I found some aluminum bar at Lowes, 1/8" thick by 2" wide, that felt sturdy enough to work. I drew up a diagram (pdf here) showing the bends and drill holes, and then set about figuring out how to actually bend up the legs (I don't own a brake).
I used chunks of hardwood with my bench vise to put the first bend on all three legs. Then I used a 1/2" thick piece of wood as a spacer and put the second bend in by bending over the outside of the vise face, providing a roughly 1" wide "foot" on the legs.


A quick straightness check, then the final bend.


Checking the finished leg against the bending plan, and the set of three legs.


Next, I drilled two pairs of 1/4" diameter holes to attach the legs to the side and bottom of the base pan.


I should have used my drill press, as you can see the bit drifted on some of the holes. So, to avoid any fitting problems, I marked each leg 1 through 3, then used each leg to locate its mounting holes in the base pan, and marked the corresponding position for the mating leg on the pan. I positioned the new legs to more or less hide the original legs from view (I could have removed the original legs, but then I'd have to fill their mounting slots to block the air flow through them, and that just wasn't worth the effort). Then I drilled 1/4" diameter holes in the base pan.
Side mounting holes

Bottom mounting holes

I then used 1/4-20 x 1/2" stainless steel screws to mount the legs to the base pan. Side screws were inserted from outside, bottom screws were inserted from inside. I used washers in front of the nuts for all screws, and also put washers under the screw heads for the bottom screws to avoid any chance of tear-out through the thin sheet metal.


Everything lined up perfectly. And the result is absolutely solid, stable, and level!

http://
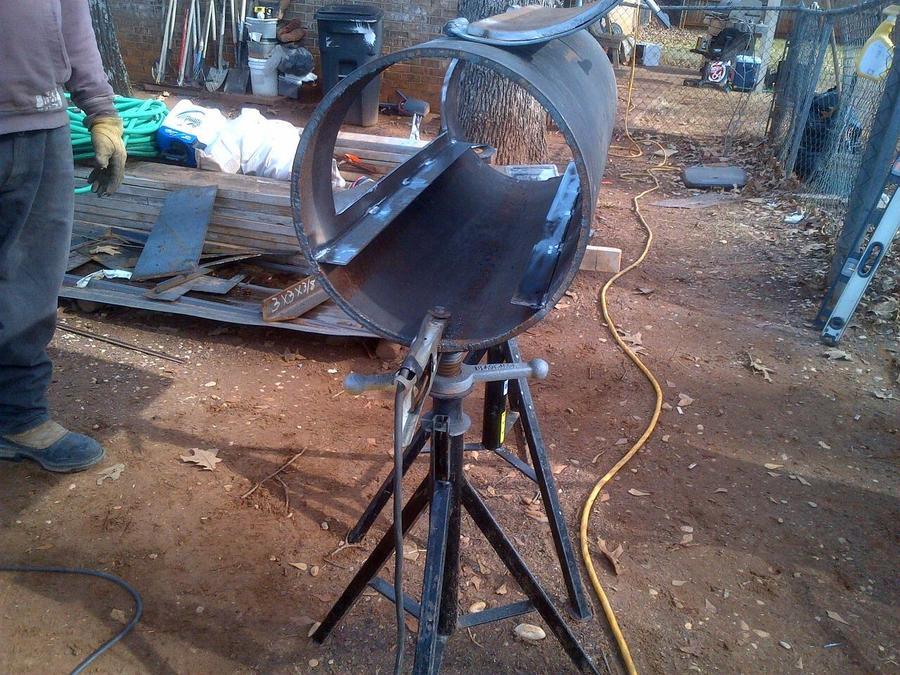
Next: fabricate an exhaust vent and damper control.
My older son's Weber has a single round exhaust damper located near the top of its lid. With three 3/4" diameter vent holes it provides a maximum of 1.3 square inches of exhaust area. I drew up a similar damper control (pdf here) based on 1" diameter holes (Why 1"? Because that's the size of my smallest metal hole cutting saw!) which will provide up to 2.3 square inches of exhaust area.
Then I used some light gauge aluminum sheet (I used 20 gauge - 0.0320 inch thick) and traced the outline of the damper four times (for the top exhaust damper and three bottom air intake dampers). I used a punch to mark the centers for the 1" diameter holes along with the 1/4" diameter hole in the middle that the attachment screw will pass through.
Then I cut out the damper holes using a 1" metal cutting hole saw.


I cut out a damper with tin snips, and drilled the 1/4" diameter center hole. Then I placed the damper upside-down on the family room carpet, and used a small rubber mallet to form the damper in a slight "dish" shape so it would sit "flat" on the domed smoker top. Then I bent up the three control "arms" as shown.


Next, I positioned the damper template on the smoker top, a couple of inches away from the handle location, and center punched the damper hole centers and the mounting hole center. Then I removed the template and cut the damper holes using the 1" hole saw, and drilled the 1/4" mounting hole.
Then I attached the damper, using a 1/4-20 x 1/2" screw, with a backing washer and a pair of SS nuts. Et voila!


http://
Next: install a real thermometer.
A common complaint with the Brinkmann unit is the lack of a degree-graduated thermometer, and adding a real thermometer may be the most common modification. So I picked up an inexpensive "candy" thermometer that has a 6" long probe and a 100F-400F range, with a highly visible scale. After thinking about how to mount it, I came up with the idea of using a threaded brass feed-through - basically, something you'd often find on a table lamp to hold the lampshade. I found a 1" long, 3/8" outside diameter threaded feed-through with brass nuts at the local hardware store that would do nicely.
The thermometer probe is 1/4" in diameter, while the inside diameter of the feed-through is 5/16", so I will fill the feed-through with high temperature RTV, then drill a 1/4" hole through the middle after it cures. This will provide a good seal, but still allow the thermometer to be easily removed and reinstalled if needed.
I drilled a 3/8" hole in the smoker body, locating the hole just below the top grill rack - 1 1/2" below the top of the body - and centered above the door.


Then I installed the feed-through so it is nearly flush with the outside of the smoker body, and securely tightened the two brass nuts front and back. Then I inserted the thermometer. The length of the feed-through holds the thermometer level quite nicely.


http://Update: After a few cooks the RTV packing pulled out with the thermometer stem. It was shortly thereafter that I realized that with the thermometer pushed all the way into the feed through, the back of the thermometer dial blocked the small gap between the stem and the inside of the feed well enough to obviate the need for using RTV inside the feed through. So I recommend skipping the RTV.
Next: adding bottom dampers
Older son took some measurements from his Weber Smokey Mountain smoker (he has the 18" model which is similar in size to the Brinkmann). We determined that the Weber provides a maximum of 4" of air inlet area, based on three dampers, each having three 3/4" diameter holes. The stock Brinkmann smoker has a single 2" diameter inlet hole, providing just over 3 square inches of air intake area - not too different from the Weber.
But there is no control provided for that hole, and my son felt the intake controls on his Weber were very useful - and more critical than the exhaust damper. With the new legs in place, a simple but easily reached pivoting damper control over that center hole wouldn't be feasible, so I decided to provide a similar setup to the Weber for my Brinkmann: three rotating dampers, each with three 1" diameter holes (1", again, because I didn't have a 3/4" diameter hole saw bit), which would provide up to 7 square inches of inlet area. It's probably WAY WAY overkill, but what the heck - I can always close the dampers WAY WAY down.
I modified the damper design used for the top exhaust control to remove two of the control "arms", and increased the third arm to 2 inches in length. This would extend the control arm out from under the base pan, making it easy to adjust. Also, as the base pan has a flat bottom, there was no need to "dish" these dampers - they just needed to be flat.
I removed the new legs from the base pan, then I placed the template in the first of three locations on the underside of the base pan, and positioned it so the control arm could be moved from fully open to fully closed while still remaining visible and easily reachable from above. Then I punched the centers for the three vent holes and the mounting hole. I repeated this for the other two damper locations.
Then I chucked the hole saw into my drill press and started cutting holes, and then drilled the mounting holes. After deburring all those holes with a Dremel tool and small grinding drum, I mounted the dampers, using 1/4-20 x 1/2" SS screws, with backing washers and doubled nuts.
And while I was at it, I cut a scrap piece of the aluminum sheet to cover up the original intake hole, and used a pair of pop-rivets to hold the cover in place.


When I put the charcoal pan inside the base pan, I realized the intake damper mounting screws were sticking up too high and the charcoal pan wasn't resting on its rim. So I reversed the damper mounting screws so the heads were inside and the nuts and washers were below the base pan - similar to the bottom leg attachment screws.


Here are close-ups of one of the intake damper controls. At the left, the damper is in the fully closed position. At the right, the damper is in the fully opened position. I'll paint small vertical white stripes corresponding to these settings, plus a few intermediate settings (1/4 open, 1/2 open, 3/4 open), once I've finished all the modifications to this smoker and give it a good cleaning.


http://
Next: Minding The Gap!
I found a smart way to close off the gap around the smoker lid-to-body interface in my wanderings around the web. The person who came up with the idea ("wasilvers" - in a posting on the web discussion group "The Smoke Ring") used fiberglass rope, which is typically used as seals for stove (eg: wood stove) doors. He cemented the rope to the outside lip of the smoker lid, just below the slight bead formed in the lid. The rope he used was wide enough such that when the lid was placed on the smoker body, the rope rested on the top of the body, closing off the entire gap.
I picked up a Rutland kit at our local Aubuchon that included 7 feet of 1/2" diameter graphite impregnated fiberglass rope and a tube of furnace cement, and after experimenting with the rope taped around the lid of my Brinkmann, this seemed to be a brilliant solution.
The paint used on the outside of the Brinkmann is quite shiny - and slippery enough that I doubted anything would securely stick to it. So the first thing to do was to roughen up the paint where the cement would need to go. Rather than make a mess out of the nice green factory paint job by skidding around the lid with a hand-held electric drill, I chucked a narrow wire brush wheel in my drill press, clamped a wide extension to the drill press table, placed the smoker lid on the extension, and adjusted the press so the brush would hit the bottom of the bead around the edge of the lid. Then I turned on the drill press, and rotated the lid around a few times so the wire brush could chew at the paint and roughen it up enough that the cement could stick to it.

There's no "tack" to furnace cement, so I decided the easiest way to keep the rope in place while the cement cured was to cut it to a length that would put it in slight tension when placed around the lid, and then splice the two ends together with a paperclip, which I stuck in the rope ends, pushed out through the sides, and bent the ends back towards the splice. Once the cement cured I'd remove the paperclip.
You can just see the bent ends of the clip in the picture below, one just below the tip of the tube, the other to the left of the tip about two-thirds down the side of the rope. When I cement the rope down I'll be sure to keep those paperclip ends exposed so removal will be easy.

In the next picture, you can see the roughened paint just above the raised bead on the lid, as well as the looped rope below the bead. I was ready to put some disposable gloves on and start applying the cement to the roughened paint strip.

No pictures of the cement: my gloves were quickly covered with the black, tarry stuff, and there was no time to mess about removing the gloves to take a picture - the cement starts curing rather quickly. So, just imagine a black ring of goo where the roughened paint strip is.
Here is the finished lid: I rolled the rope loop down over the raised bead and pressed it into the cement, made sure it was at a uniform height all the way around the lid, then quickly cleaned up the mess I had made before taking this picture.

Once the cement had hardened, I removed the paperclip by cutting off one of the hooked ends then drawing it out by the other.
And then the acid test: does the lid fit to the smoker body as expected?

Yup! There's a nicely consistent fit all the way around the lid! And there is more than enough penetration of the lid down into the body that there is no chance that it will slip off. I think this is going to work just fine!
http://
Finally: Gilding the Lily
I had some left-over aluminum from the legs mod, and it didn't take long to come up with a use for it: adding a pair of handles to the base pan! Seemed like a reasonable idea, and it was raining, so what the heck. I whipped up a template (pdf here) that generally matched the handle design that the three stock handles were based on, then started cutting.
I first cut a pair of 9" long pieces from the scrap strapping, then ripped them both to end up with 7/8" wide pieces. Then I marked the bend points, and made the 90° bends in my bench vise, followed by the 110° bends, which snug up to the base pan circumference.


I had a length of 1.25" diameter dowel left over from a previous project which would work for the handle grips. I cut two pieces 3 5/8" long, then ripped them down the middle, along the grain, using my band saw. Then I drilled the handles and grips: to attach the handles to the smoker base, I would use left over 10-24 x 3/8" screws and nuts that came with the smoker, so those holes are 13/64"; for the grips, I would use 8-32 x 1 1/8" screws and nuts, so those holes are 11/64". Then I counter sunk the holes on both sides of the grips using a 3/8" drill bit to match the diameter of the 8-32 screw heads and nuts.


With all of the handle holes drilled, I assembled the grips to the handles. I then used the assembled handles to locate and mark the two pairs of mounting holes in the smoker base pan, making sure not to interfere with the bottom dampers or the legs, while also staying comfortably below the lip of the charcoal pan. The 13/64" diameter holes ended up being 2 3/4" below the top edge of the base pan.


Once I cleaned up the burrs around the holes I attached the assembled handles using 10-24 x 3/8" screws and nuts left over from the original smoker assembly. Looks good, should work just fine.


As shown above, I painted small white stripes at each of the intake damper locations, indicating (from right to left) fully closed, 1/4 open, 1/2 open, 3/4 open and fully open damper position. This should make it fairly easy to replicate the ideal smoking configuration - once I figure out what those settings want to be.
With all the modifications completed, I then disassembled the unit and touched up all the holes I had cut using high temperature paint, to help prevent rusting. The next morning I reassembled the smoker, then took it outside and sprayed the entire interior with a can of PAM, and then let that more or less dry out for a few hours. Then it was all ready for a test run!
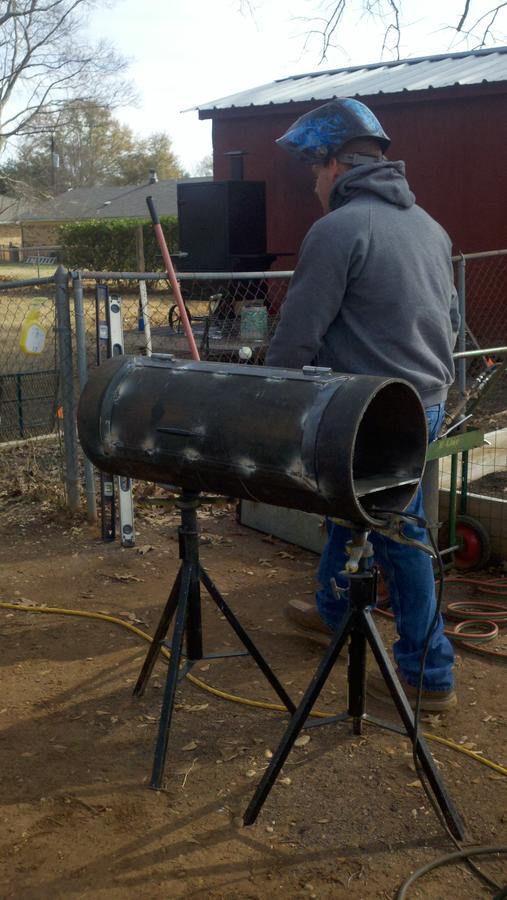
So, what does this FrankenBrinkmann look like now that I'm all done tweaking it?

Ready for lift off!
http://
So, how does it work?

This shot was taken about an hour into a 2 hour test burn. (btw, there's actually almost a foot of space between the smoker and the railings). I filled the charcoal pan about half full using Royal Oak charcoal, then dumped a half-full Weber lighter of fully lit coals on top, tucked two foil-wrapped packs of hickory chunks on the sides, put the smoker body in place, filled the water pan with boiling water, put the lid in place, and set all bottom dampers and the top damper to half open. In short order the temperature was up around 275°, so I closed down the bottom dampers to 1/4 open. 20 minutes later the temperature was down to 220°, as seen above. One more tweak of the intake dampers and it settled in at around 230°. A nice plume of smoke developed out of the top damper, but there was no smoke coming out around the fiberglass rope, so that was working very nicely.
I let the smoker run for about a half hour more at those settings. I could feel the wetness in the exhaust plume out of the top vent so the water pan was doing its thing. After a while I shut all the dampers to see if I could kill the fire completely, and indeed, in about 20 minutes the temperature had fallen below 125°, and continued to fall until the thermometer had bottomed out. A while later I lifted the body off and checked the coal bed, and there were no hot spots, and quite a bit of unburned charcoal remaining, so I emptied out the water pan, put the body back on and left it all closed up.
Bottom line, this beast can now be predictably controlled. It will take some runs with a full fuel load and a load of meat to really understand what the optimal settings are, but it is clear that it can be throttled up and down at will. So the entire effort appears to have been very successful - so far!
Right! So Let's Cook Some RIBS!
I picked up a package of four pounds of trimmed spare ribs and a bag of apple chips, then looked around the web for rub and sauce recipes. It was my good fortune to stumble onto the Amazing Ribs web site (www.amazingribs.com) and after giving it a thorough read decided to use the "Meathead's Magic Dust" rib rub recipe with the "Kansas City Classic BBQ Sauce" recipe, along with the recommended cooking process (found here). I prepared the rub and gave the ribs a thorough dusting on both sides, then put them in the 'fridge overnight.
The next day, a bit after Noon, I took the ribs out of the 'fridge to warm up, made up three foil-wrapped packs of apples chips, and set a gallon of water to boil on the stove while I set up the smoker. I loaded a full charcoal pan of Royal Oak, started a half-filled chimney of glowing coals, dumped those on top of the charcoal pan, set the smoker body in place, then filled the water pan, put the top grilling grate in place, then put the lid on, set the exhaust damper to half-open, the bottom dampers to quarter-open, and let the temperature settle in at 230°, before loading the ribs, meaty side down. Then I popped in a chip pack, and in a few minutes the smoke started rising through the exhaust damper.
The smoker required very little attending over the next three hours, just a few gentle bumps on the intake dampers to keep the temperature hovering around 230°, and replacing the chip pack when the smoke died down. So, while the ribs were merrily smoking along, I went back to the kitchen and prepared the barbecue sauce.
After the three hours, I removed the ribs, made the foil "boat" as directed, put a cup of apple *sauce* in the boat (didn't have any apple juice but what the heck - apples are apples, right?), laid the ribs on top, then sealed up the boat and laid it in the smoker. I dialed up the temperature to around 250° - a bit higher than before, just to get the liquid within the foil to simmer. I let that run for an hour, then removed the ribs, discarded the foil, then set the ribs back on the top grate, dialed down the temperature, and let it run for a half hour. Then I removed the ribs, removed the water pan, put the ribs back, brushed on the sauce on both sides, and dialed up the temperature to 350°. I turned the ribs over after five minutes of sizzling the first side, then removed them five minutes later once the other side was sizzled.
Here's what the ribs looked like just before I brought them in for eating!

The smoke ring is visible in these pictures. You can also see the moistness remaining in the meat. And OH MY GOD were they good! With just the two of us, we still plowed through all but a few ribs, accompanied with my wife's home-made coleslaw and cornbread.


It was so good it should be illegal!
Conclusion: An unqualified success! The modifications did everything I could have hoped for, providing an easily controllable smoker, that ran for almost 6 hours at optimal temperatures for each stage, and there was still plenty of unburned charcoal remaining.
The next weekend we had my mom over (for Mother's Day) and I smoked up another five pounds of spare ribs, using the same recipes and cooking procedure. It would be a good check to see if the first run was a fluke :-) My younger son also came by to say hello to his mom and grandma and to check out the smoker. Running the smoker was even easier than the first time as I knew the optimum settings for the controls, and as the smoker just purred along for hours at 225° my son was duly impressed. The ribs came out just as awesome as the first run and everyone thoroughly enjoyed them.
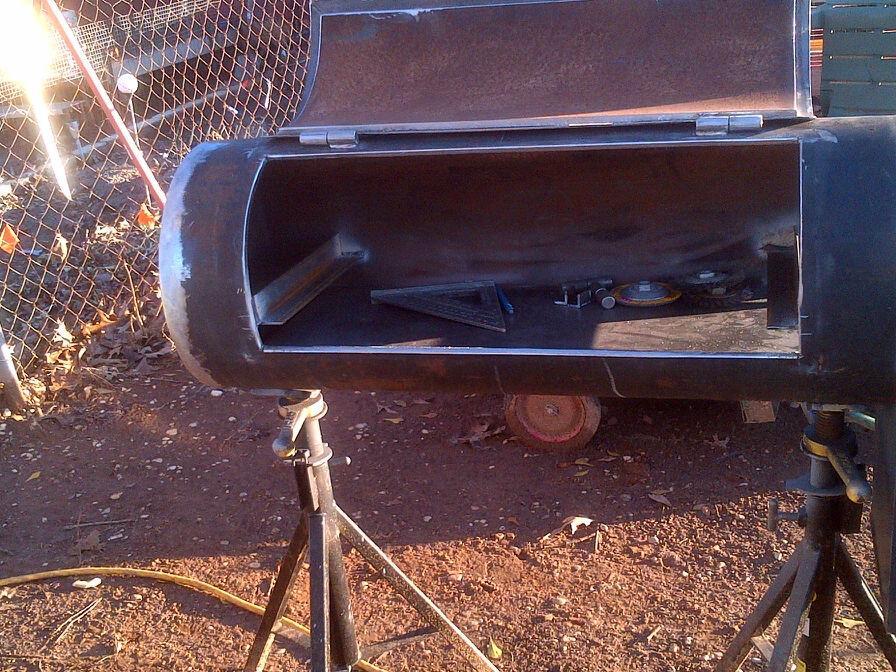
One last modification I may do, using the left-over bits of aluminum strapping, is to fabricate an extra set of grill rack brackets to give me the option of placing the bottom grill rack higher up in the smoker body. The original design uses the same brackets that hold the water pan to hold the lower grill rack - which puts the rack just above the top of the water pan, and 9" below the top rack. It seems to me that having the option of placing the lower rack within 4 or 5 inches of the top rack would be a better deal when doing multiple rack of ribs, as it would minimize the temperature differential between the two racks. I'll save this mini-project for a day where I have nothing better to do :-)
http://
Update: A few weeks later I went ahead and cobbled up the grill rack brackets (pdf here) carved from the left-over strapping.


The top grill rack bracket screw is 7/8" below the top of the smoker body, while the water pan/bottom rack bracket screw is 9 1/2" below. I split the difference and drilled the new bracket holes 5 1/4" from the top of the smoker, vertically aligned with the existing screws.

I used 10-32 x 1/2" screws with washers under the screw heads on the outside and lock nuts on the inside to attach the new mid-mount grill rack brackets.

Water pan in place, with bottom grill rack in normal location at left, and in new, mid-body location below upper grill rack at right.


I expect to give this new configuration a try soon!
http://
Another Update: A couple of weeks later we were having my sons and their spouses over for a Saturday afternoon of simply hanging out on our deck with drinks and snacks while I smoked up some ribs. Yes, it was going to be my "put my money where was mouth was" moment with the boys, and I wanted to knock them both out with some tasty Q!
I just had to figure out how to get three racks of SLCs - 15 pounds of ribs - into the smoker - there was no way they would fit on just two grill grates! With the new middle rack brackets, one option was to add a third grilling grate - the three racks and trimmed bits would have just fit with some random gaps. Unfortunately, I couldn't find a 15 1/2" diameter grill grate anywhere in my area to save my life, so I bought a Char-Broil vertical rib rack for $8 from the local Lowe's instead.
Friday afternoon, after trimming the three racks of ribs, I took them out to the smoker to figure out how I'd set it all up the next day. I quickly realized there wasn't enough clearance above the top grate position for the lid to fit with the ribs standing up in the rack, so I used the middle grill rack position instead. That was handy! I would then use the bottom grill rack to smoke up the trimmed rib bits for a pre-dinner treat.
Next problem was how to get through the foiling phase. If I had the third grill grate I could have foiled the racks in the smoker. Without it, my best alternative was to use my gas grill, set as low as it can go. Then, once the hour in the foil was done, I just had to get the ribs back in the smoker rack without them falling completely apart and firm them up for the last hour or so. Finally, I'd use the gas grill for saucing and crisping.
So I had a plan! I took the ribs back to the kitchen, got them all rubbed up and into the 'fridge for the next day, then got out the ingredients to whip up some barbecue sauce.

All that colorful stuff - and this is a relatively simple recipe!
The weather Saturday was absolutely perfect - in the midst of what has been one of the wettest June's in recent memory. The smoker was all set up and purring at 225°F by noon when I loaded it up with pork.


Ready for launch Cruising Speed
Three hours later, the ribs are out of the smoker, into foil boats with some apple sauce, and on to the grill.
While we munched on the smoked trimmings (yum!)

After one more hour in the smoker...

...and a quick saucing and crisping on the gas grill, it was time to eat!


Served with home made corn bread and coleslaw, the food was a huge hit - there was barely enough left for a midnite snack!
The boys will be playing defense for some time to come ;-)
So...The middle rack brackets definitely were an advantage. And I've ordered a third grill rack.
After six smokes, running the smoker is almost mechanical. I take the meat out of the 'fridge for 30 minutes, then put 2/3rds of a water pan of water in a pot to boil on my gas grill's side burner, fill the smoker's charcoal pan to a bit less then level (I've been using Royal Oak lump), dump a third of a chimney of fully lit coals in the middle and spread it out a bit, put the grill body on, set the water pan in and pour in the boiling water, put on the lid, and close the three intake dampers down to a little less than 1/4 open, leaving the exhaust damper wide open. I can usually get the smoker to sit at 225°F within 15 minutes, at which time I put the grill rack(s) in and load in the meat, toss in a couple/few chunks of apple wood, then settle down for the smoke. The wee beast is almost as easy to control as a kitchen oven - requiring only the occasional nudge of an intake damper to hit the desired temperature. And I've never used more than half a pan of charcoal for ribs, so it's pretty darned efficient as well.
At this point I've pretty much run out of things to change. Along the way, I did add a second charcoal grate, placed 90° across the first grate. It makes a huge difference in keeping the smaller lump chunks from falling through. Otherwise, I think this critter is all set for the long haul. It sure makes great barbecue!
http://
Yet Another Update: It'd been many months since the first cook on my modded-up Brinkmann, and I had yet to do a full-blown overnight cook on it. But that was about to change.
The wife is a fan of pulled pork, but with our big eatin' boys all gone off to make their lives it's hard to justify smoking up the typical 10-12 pound butt or picnic, and we rarely cook for the freezer anymore for the same reason. So when I'm at the markets I keep an eye out for cuts a bit more our size, and a couple of days ago I came across a package with the top part of a picnic, weighing just 5 pounds, and with just a small patch of skin. Perfect!
I got it home, removed the skin and excess fat, hit it with homemade rub, followed by a mustard slather and more rub, then wrapped it up in plastic wrap and stuffed it in the fridge. The plan was to get it on the smoker at midnight Thursday and have it ready for Friday dinner.
[I don't have any "before" pics of the meat yet - they're trapped in my beloved Spousal Unit's fancy digicam - with a now-dead battery, and her dedicated charger is on a cruise ship somewhere between Boston and Bermuda (she left it on board) But I took plenty of set-up and post-cook pics with my 10 year old backup camera.]
So Thursday afternoon I got my smoker all set up for the overnight cook. I filled the charcoal pan as full as I dared - including what would go in the starter chimney (1/3 load) so I wouldn't have lit stuff falling out all over the deck.

I then weighed the charcoal (5.25 pounds) before dumping it back in the pan (I was on a statistics kick).

About a half-hour to midnight I was ready to fire up the smoker. Sky was overcast, outside air temp was 40°F and would drop into the mid-30s.

I had the cooker stabilized at 230°F with a full pan of pre-boiled water, and the meat went on right at midnight - after another heavy dusting of rub - with a 2:1 Apple:Hickory mix in a foil pack. I checked the cooker a half-hour later and the temp was hanging right where I left it, so I went to bed. I had planned to get up around 4AM to give it a check, but slept right through to 7:30AM. When I woke I immediately checked the cooker and it was sitting at 250°F. That was just fine with me so I left it right there!
I intended to open the smoker as little as possible - no peeking, no spritzing/mopping/basting, and no foiling during the cook. I wasn't going for monster bark on this cook - I was looking more for a cooker performance baseline - and I had allowed plenty of time to not need to foil. So the only time the lid was removed during the cook was to stab the meat with my El Cheapo Taylor thermometer probe (yeah, it's still alive, but going down the tubes - it is now reading low by ~5°F).
Things proceeded apace, until around 3PM the internal temperature hit an indicated 200°F (ie: 195°F)...

...and it was time to take my first look at the semi-picnic.

Mmmm....Ready for bidness!
I wrapped the chunk tightly in plastic wrap, then two layers of heavy duty aluminum foil.

...then tucked that into a big baggie, then wrapped that in two bath towels, and stuffed the whole thing into a warmed cooler to rest for dinner.

While the meat was resting, and after the cooker had gone completely cold, I did a post-burn analysis of the fuel situation. The charcoal pan looked to be about 1/3 full.

I separated the unburned charcoal from the ash...

...weighed the charcoal (1.5 pounds remaining)...

...and measured the ash. A mere 2 cups for 15 hours cook time. Gotta love lump charcoal!

Finally it was time for dinner - and Mister Picnic made his post-cook appearance....

...whereupon he was promptly pulled apart...

...and then set upon by two hungry hungry humans! :-) (sorry - I was too freakin' famished to remember to take plated pics)
This pork chunk had virtually no fat blobs or pockets remaining and was marvelously moist and tender. My wife was particularly pleased with how little fat was left in the meat. The apple/hickory smoke flavor was wonderful and there was plenty of rub flavor and heat in the bark. We had this on fresh bulkies with a couple of different sauces, but my favorite today was raspberry-chipotle. Mmmmmm! We stuffed ourselves with meaty sammies along with some fresh broccoli and winter squash, with glasses of hearty Cab Sauv. Leftovers will accompany the Sunday ball games!
The Stats:
Meat Starting Weight: 5 pounds
Trimmed Weight: 4.6 pounds (skin & fat removed)
Cooked Weight: 2.4 pounds
Finished Weight: 2.1 pounds (big ol' bone removed)
Ambient temperature range: 36-45°F
Cooking temperature range: 230-250°F
Cooking Start: 12 midnight
Cooking Complete: 3PM
Cooking Time: 15 hours
End Internal Temperature: 195°F
Charcoal Used: Royal Oak lump
Charcoal Load Weight: 5.25 pounds
Charcoal Remaining: 1.5 pounds
Net Charcoal Used: 3.75 pounds
Ash Volume: 2 cups
This first really long cook on my li'l ol' Brinkmann went as well as I could have hoped - the smoker was very well behaved and required almost no attention at all! I especially like that I didn't need to add any fuel even though it was a chilly night. Indeed, I could have gone another few hours with what was left unburned - and there was enough water left in the pan to handle that as well.
So, the mods have turned a notoriously hard-to-control fuel-wasting beastie into a tame and thrifty smoker that will let me get my beauty sleep. It's A Good Thing!

http://
It's getting close to Spring, and I was hankering for some more pulled pork. I pulled a 7 pound butt out of the freezer Saturday morning, and planned on getting it on the smoker at midnight.
I decided to go crazy on this butt, and started by injecting the heck out of it with a mix of apple juice, apple cider vinegar, bourbon and some of "Magic Dust" rub. I pumped about two cups of marinade all through the butt, then parked it in the 'fridge for a few hours.

About an hour before starting the smoker, I pull the butt out of the 'fridge, drained it a bit and patted it more or less dry, then caked on the Magic Dust.

The wee smoker was all set to go, and the butt went on right at midnight.

It didn't take long to get the smoker settled down and cruising at 230°F. I kept an eye on the remote thermometer until 1am, then took it to bed.
Around 5AM I cracked open an eye and checked the remote thermometer, and the smoker temperature was still sitting at 230°F, so I went back to sleep. Got up at 7:30, got the coffee going, then checked the smoker, and all was still well. Amazing little cooker.
I put some more of the marinade in a spray bottle and started spritzing the butt every half hour to build up some serious bark. Checked the smoker around noon and the butt was sitting at 170°F.

It already looked and smelled amazing. The bark was just starting to get going.

Around 2:30 the internal temperature hit 200°F, so the butt was ready for resting. The bark was amazing - all that spritzing really worked!

When it was finally time for dinner I unwrapped the butt and pulled it apart using gloves (I think using forks or "claws" shreds the pork too fine). It was perfectly done - moist and tender - and after sneaking a small hunk I found the flavor started at the bark and went all through the meat.

Horrible picture - but the sandwich was fabulous!

I snarfed down two sandwiches with some salad and Old Vine Zinfandel. It was delicious! And there's enough to make another meal! Yum!
http://
It's been roughly 18 months since I did the original set of modifications to the wee Brinkmann, and over that time the little beastie has done dozens of cooks without any issues. I did make another change fairly early in that period: I added a second charcoal grate, flipped up-side-down and oriented 90° to the original one, forming a grid that has virtually eliminated charcoal "fall through".

Very effective indeed! Now, only ash makes it to the charcoal pan.
Otherwise, I had made no further changes - up until very recently: with a hurricane forecast to hit the general vicinity I had cleared our deck of anything that could be blown through the glass doors, including the smoker. After the storm had passed and I was bringing everything back out again, I managed to stumble while carrying the smoker up the stairs, lurched forward, and planted my upper body smack on top of the lid, driving it down just far enough to pop the fiberglass rope seal loose from the lid.
I didn't have any more of the furnace cement that came with the rope kit, but I did have a tube of high temperature "RTV" silicone sealant, and as I had received quite a few messages from folks that had read this write-up who had used RTV successfully, I decided to give it a try.
So, after grinding the old cement off the lid using the same drill press technique I had originally used to remove the paint, and chipping off the cement bits from the rope, I gooped the lid with RTV and slid the rope gasket back in place. Then I coated the rim of the smoker body with some veggie oil and set the lid in place, adjusted the fit of the gasket, and let it set for the next couple of days.
When I was certain the RTV had fully cured, I removed the lid and checked the gasket to see if it was securely attached. As best as I could tell, it wasn't going anywhere, so I was ready to fire up the smoker to do some ribs.

I could have/should have used some tape to mask the lid off to do a neater job with the RTV. Ce la vie!
With the newly glued gasket in place the cooker performed just like it always had: with aplomb. But the acid test would be at the end of that cook, where I remove the lid and water pan, crank up the fire to "raging inferno" levels to caramelize some sauce on the rack, then put the lid in place and close up all the dampers to shut down the fire. That would be the most intense heat the lid would ever see, and if the RTV was going to fail, it would be some time after that exposure.
As it turned out, the RTV held fast - and surprisingly the RTV on the underside of the gasket didn't appear to have been affected at all by the high heat (which was high enough to cause the thermometer to go all the way around and back up to the 150°F mark before I removed it - I didn't think it would survive much more of that!)
So, RTV is definitely an option - and indeed may be the better choice verses using the original furnace cement. Time will tell, of course, but so far, so good!
http://
It's January 2011, almost two years since I posted the first iteration of this humble write-up, and I'm still getting two or three emails about it each week - and from all over the planet! I think that's amazing - and very cool!
Some of the conversations I've had made me realize I needed to add a few updates. For one, I've noted above that I no longer bother filling the thermometer feed through with RTV. It isn't necessary, and in any case, it won't stay put for long.
Next, if you live in a part of the world that is underserved by Weber corporate parts (I'm looking your way, Adelaide, Australia!) an alternative to using the Weber charcoal grate is to find a metal working shop and have them cut a pair of 13.5"/343mm diameter disks from heavy gauge expanded steel. It shouldn't cost much, and likely the pieces can be cut from "drops" which would be wasted otherwise. Orient them 90° to each other, similar to how I use my pair of Weber grates, and you'll end up with a similar "grid" that will virtually eliminate charcoal dropping through.
Finally, if you have a wired thermometer like the Maverick Redi-Check ET73, you probably don't want to be passing the probe wires through the lid (as many of the photos with my old Taylor digital show) especially if you're using the cooker temperature probe along with the meat probe. Much better to add another "ingress" point than to risk damaging either probe wire when handling the cooker lid.
When I got my ET73, I immediately added a second brass feed through, of the same 1" length and same 5/16" ID as the front mounted feed through, over to the right side of the main body. If you follow the wires in the picture below you'll just make out the added feed through.

I located this feed through at the same height as the top cooking grate. I pass the cooker probe through the feed through, then under the grate, and clip it to the underside (you can see the clip and a bit of the cooker probe between the butt and the chuck roast). Then I pass the meat probe through the feed through and over the cooking grate, sticking it into whatever hunk o' beast I happen to be doing. I've been using this setup since early summer 2010, and both of my ET73 probes still work perfectly (which is pretty much the only benchmark that counts).
Finally, at some point in the life-cycle of your Gourmet, if you cut new intakes in the bottom body pan you'll find it will eventually start to rust, mostly on the inside. Between moisture in the cooker condensing and running to the bottom pan, and the heat from the charcoal pan radiating downwards, there's plenty of oxidation energy and chemistry available to work on the unpainted interior metal.
If you want to keep your little cooker around for more than a couple/few years, plan on sanding off any rust/failing paint down to bare metal, and repainting with high temperature paint. I found inexpensive spray cans of Krylon paint rated for 1200°F exposure, and have used it to repaint the bottom pan with success - I've gone a year between refinishing the pan. This is definitely worth the time to do.
That's about all I can think of right now. So here's some "barbecue pr0n" to whet your appetites!
Full rack o' spares

Pulled beef chuckie with home made baked beans and a home brewed Stout

More spares, with home made slaw and grilled garlic bread

Pulled beef chuck and pork butt with slaw and pickels

Spares, fresh salad from our gardens, and corn bread, with a hearty Cabernet

Cheers!