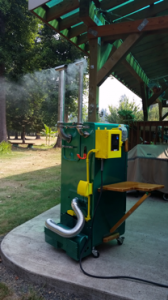
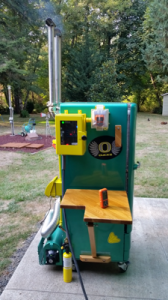
I finished my 1951 GE Fridge smoker! Took about 6 months or so. It has been quite a journey and learning experience. But most projects are always learning experiences. I want to thank many of you for your ideas that you have posted. There is so much information on the website, it is almost hard to sort through all of it. My designs were made to get me the most flexibility as possible, and in some cases... probably did a little overkill. The original intent was to do everything from cold smoke to Pizza oven.
And most of all, I want to thank my son. I have been very fortunate that my son works as a welder at fab shop. He found many great pieces of metal, and got a good price on a stainless steel sheet metal from a distributor. He also TIG welded some of the more difficult stuff with work equipment. Lastly he also bought me a nice Miller AC/DC and he made the base for the welder.


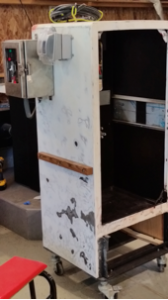
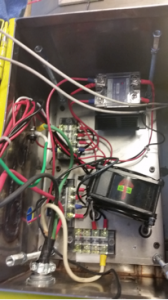
When everything was pulled apart, there was a small rust hole in the bottom pan of the outside fridge shell. The rust was all ground out and then coated with Rust neutralizer; Phosphoric Acid I believe. Anywhere on the fridge that rust was found, it was ground down and coated with neutralizer. The whole inside of the shell was primed and painted with high temp paint and stainless steel was added in the inside of the bottom where the hole was and the metal was thin. The shell wall was also strengthened with extra supports in places were items were mounted on the outside e.g.: electric controller, table, and push bar.
Scrap 3/8 aluminum plates were used to support across the bottom as a base. Then adjustable height casters were mount to the base. I found the casters at a recycle yard, and the scrap aluminum that was removed out of a old machine.
I was very happy to see the only rust on the inside tub was on a dog ear the manufacture used to hold the tub while doing the coatings.


The original insulation was replaced with rock wool.


Stainless Steel (SS) .060 sheet metal was used throughout. It took almost a whole 4‘x8’ sheet. My son got me a discount on the sheet metal, $160. A sheet metal shop did the major sheering for me, so the edges were straight and square to start with. The rest of the sheet metal was cut by hand with a angle grinder and Metabo cutoff wheel. I bent a few of the small pieces myself. The rest of the sheet metal was sent out to 2 different places depending on tolerances of the bends.
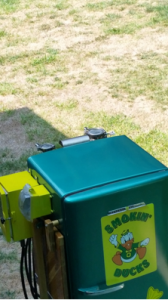
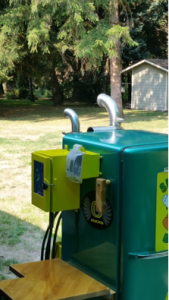
The large square hole in the bottom back is the intake to the smoker. An old 1950s-1960 heating register vent was used for the air intake and intake from the mailbox smoker generator. It has a single flap on the inside that can vary the air flow. I have been leaving it 3/4 open. It is probably a little overkill in size, but it is working for my my needs. More on this later on. There are also 2 round holes higher up on the back for exhaust .
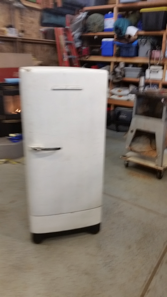
The fridge was repainted with white pain before I got it. The paint was a dull white and was soft feeling to the touch. I ended up sanding most of the top coat off. Found many little surface spots of rust while sanding away the top layer of paint. I spent at least a month sanding, and could have spent a lot more time glazing and blocking the outside body. It is not quite show car quality, but as my son and wife say, “It’s a smoker, get over it”.
All of the bare spots is were rust was found, They were coated with rust neutralizer again. The top coat of old paint broke down when tested with paint thinner., so the whole outside was sealed with an epoxy primer, then a high build poly primer.
As you can see in the second picture I was test fitting sheet metal corners covering the space between the Inside and outside walls.

I used SS rivnuts/nutserts to attach items to the both the inside and outside of the smoker. 10-24 and 1/4-20 rivnuts were used throughout. I first tried to make make own crimping tool with thrust needle bearings like I found on youtube, but the strength of the SS made the tool useless after one insert. I bought a Astro Pnuematic rivnut tool that you can use a handheld drill with a clutch to put in the rivnuts. Due to the strength of the SS, and the driving force of the drill I stripped a 1/4-20 arbor on the tool after 6 inserts. Things were not going so good... Astro replaced the arbor with next day shipping... Fantastic!! I used a little 1/4” ratchet and a 1/4”socket and inserted the rivnuts by hand. Took a little strength and to feel the give of the rivnut, but I got the process down and inserted 25 rivnets before the arbor started showing any wear. New arbors are about $7 each, so I order 2 more of each size that was needed for the smoker. The next arbor has done more than 25 rivnuts probably 35-40 rivnuts. SS bolts were used on everything possible, with food grade anti-seize grease in the threads.
Looking at the inside of the smoker, hot rolled 1.5” angle iron for shelving support. There is a total of 8 shelves spaced at 4 inches apart. In the back bottom you can see the flapper on the intake area. Below that is the 2600W - 240V stand stove top burner. Brand new mine is drawing 11Amps (2640watts). Fire bricks are across the bottom and 4.5” up the side. I probably got carried away the fire bricks, but the temp of the element can reach 1500 degrees F, and it gives me some thermal mass.


All of the shelving in the smoker are a 1/8 perforated SS. All of the metal shelves were free; They were scrapped because of a fabrication error. They all had a small arc to them because they were mount on a huge tube. The SS sheet metal in the lower picture is on the shelf above the raised above the wood chip box. It works as a diffuser above the cold smoker and chip box. On top of the diffuser there is a drip pan/water tray/sand box to help even the temperature. The next shelf up are 2 narrow angled sheet metal next to each wall. This to keep the drippings flowing back onto the diffuser plate and drip pan... All of the handles on the shelves are parts from the mounting brackets for the 3” SS food pipping.
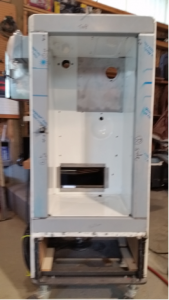
Food grade High temp red chalk is used seal all the holes in the inside tub from the old fridge hardware. The 4 pieces of sheet metal (corners) that cover the insulation between the inside and outside of the smoker, and the exhaust were also chalked. The whole project took about 1 full tube of chalk.


And most of all, I want to thank my son. I have been very fortunate that my son works as a welder at fab shop. He found many great pieces of metal, and got a good price on a stainless steel sheet metal from a distributor. He also TIG welded some of the more difficult stuff with work equipment. Lastly he also bought me a nice Miller AC/DC and he made the base for the welder.
When everything was pulled apart, there was a small rust hole in the bottom pan of the outside fridge shell. The rust was all ground out and then coated with Rust neutralizer; Phosphoric Acid I believe. Anywhere on the fridge that rust was found, it was ground down and coated with neutralizer. The whole inside of the shell was primed and painted with high temp paint and stainless steel was added in the inside of the bottom where the hole was and the metal was thin. The shell wall was also strengthened with extra supports in places were items were mounted on the outside e.g.: electric controller, table, and push bar.
Scrap 3/8 aluminum plates were used to support across the bottom as a base. Then adjustable height casters were mount to the base. I found the casters at a recycle yard, and the scrap aluminum that was removed out of a old machine.
I was very happy to see the only rust on the inside tub was on a dog ear the manufacture used to hold the tub while doing the coatings.
The original insulation was replaced with rock wool.
Stainless Steel (SS) .060 sheet metal was used throughout. It took almost a whole 4‘x8’ sheet. My son got me a discount on the sheet metal, $160. A sheet metal shop did the major sheering for me, so the edges were straight and square to start with. The rest of the sheet metal was cut by hand with a angle grinder and Metabo cutoff wheel. I bent a few of the small pieces myself. The rest of the sheet metal was sent out to 2 different places depending on tolerances of the bends.
The large square hole in the bottom back is the intake to the smoker. An old 1950s-1960 heating register vent was used for the air intake and intake from the mailbox smoker generator. It has a single flap on the inside that can vary the air flow. I have been leaving it 3/4 open. It is probably a little overkill in size, but it is working for my my needs. More on this later on. There are also 2 round holes higher up on the back for exhaust .
The fridge was repainted with white pain before I got it. The paint was a dull white and was soft feeling to the touch. I ended up sanding most of the top coat off. Found many little surface spots of rust while sanding away the top layer of paint. I spent at least a month sanding, and could have spent a lot more time glazing and blocking the outside body. It is not quite show car quality, but as my son and wife say, “It’s a smoker, get over it”.
All of the bare spots is were rust was found, They were coated with rust neutralizer again. The top coat of old paint broke down when tested with paint thinner., so the whole outside was sealed with an epoxy primer, then a high build poly primer.
As you can see in the second picture I was test fitting sheet metal corners covering the space between the Inside and outside walls.
I used SS rivnuts/nutserts to attach items to the both the inside and outside of the smoker. 10-24 and 1/4-20 rivnuts were used throughout. I first tried to make make own crimping tool with thrust needle bearings like I found on youtube, but the strength of the SS made the tool useless after one insert. I bought a Astro Pnuematic rivnut tool that you can use a handheld drill with a clutch to put in the rivnuts. Due to the strength of the SS, and the driving force of the drill I stripped a 1/4-20 arbor on the tool after 6 inserts. Things were not going so good... Astro replaced the arbor with next day shipping... Fantastic!! I used a little 1/4” ratchet and a 1/4”socket and inserted the rivnuts by hand. Took a little strength and to feel the give of the rivnut, but I got the process down and inserted 25 rivnets before the arbor started showing any wear. New arbors are about $7 each, so I order 2 more of each size that was needed for the smoker. The next arbor has done more than 25 rivnuts probably 35-40 rivnuts. SS bolts were used on everything possible, with food grade anti-seize grease in the threads.
Looking at the inside of the smoker, hot rolled 1.5” angle iron for shelving support. There is a total of 8 shelves spaced at 4 inches apart. In the back bottom you can see the flapper on the intake area. Below that is the 2600W - 240V stand stove top burner. Brand new mine is drawing 11Amps (2640watts). Fire bricks are across the bottom and 4.5” up the side. I probably got carried away the fire bricks, but the temp of the element can reach 1500 degrees F, and it gives me some thermal mass.
All of the shelving in the smoker are a 1/8 perforated SS. All of the metal shelves were free; They were scrapped because of a fabrication error. They all had a small arc to them because they were mount on a huge tube. The SS sheet metal in the lower picture is on the shelf above the raised above the wood chip box. It works as a diffuser above the cold smoker and chip box. On top of the diffuser there is a drip pan/water tray/sand box to help even the temperature. The next shelf up are 2 narrow angled sheet metal next to each wall. This to keep the drippings flowing back onto the diffuser plate and drip pan... All of the handles on the shelves are parts from the mounting brackets for the 3” SS food pipping.
Food grade High temp red chalk is used seal all the holes in the inside tub from the old fridge hardware. The 4 pieces of sheet metal (corners) that cover the insulation between the inside and outside of the smoker, and the exhaust were also chalked. The whole project took about 1 full tube of chalk.