New guy starting a small RF project

  • Some of the links on this forum allow SMF, at no cost to you, to earn a small commission when you click through and make a purchase. Let me know if you have any questions about this.
SMF is reader-supported. When you buy through links on our site, we may earn an affiliate commission.

turn4fun

Fire Starter
Original poster
Jul 1, 2010
58
11
Independence, MO
First off I guess a hello is in order.  My name is Shawn and I'm from Missouri.  Been lurking on the forums here off and on for 3 or 4 years now but somehow have never posted. 

I first started smoking food over 20 years ago and have had many great successes as well as a few epic failures.  I'm a guy who likes to tinker and build stuff so naturally I've dabbled with smoker builds a little bit.  I've built a handful of hot and cold smokers over the years ranging from cellotex boxes to old freezers and of course mods to commercial units.  I've been wanting to build a patio sized horizontal reverse flow unit for some time now and recently I found a tank that I liked so I guess it's time for a new build.

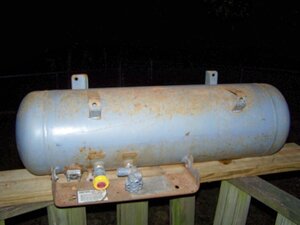
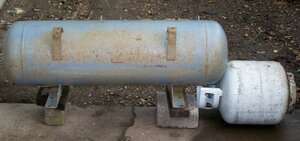
I've read as much as I can but I do have some questions about fire box size.  First off, the tank I'm using for the cooking chamber is 12" x 41" so it is pretty skinny in comparison to it's length.  Not a big deal for me since I rarely have a need to smoke more than a couple of butts or a couple racks of ribs at the same time.  I have a good idea of how I want it all to go together but my biggest concern is with having enough of a fire box without over firing it.   Following the 1/3 rule would suggest that a 20lbs grill tank (12" x 14") would be the appropriate size.  However, considering that this tank is so skinny, pork butts will literally come within an inch or less from the sides and top, so if this thing runs too hot it's gonna cook way too fast.  I have a 13.5 lbs Primus tank that I was thinking about using, it is 9" x 13". 

Would really like some input from you guys who have built small and mini RF's.  What are your thoughts on using a smaller fire box than the calculator recommends?   Here's a pic of the tank I'm going to use.  

126402ed_19.jpg

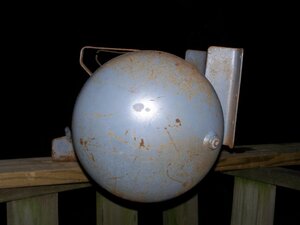
Here's a pic of the end of the tank.  It is shown with the top of the tank oriented up.  The mounting brackets on the back will become the base and the top of the tank will become the front.  I plan to weld a couple of short extensions on those bases which the front shelf will mount to.  

499193a7_Tank%20end.jpg

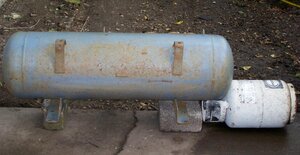
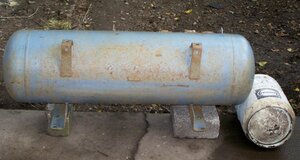
I really want this unit to look good too but can't decide which way to orient the fire box.  The following two pics show the smaller tank as the fire box and the third pic is with the 20 lbs tank for comparison.  Give me your thoughts and concerns please.

6e74e78d_100_3343.jpg

0cf135c2_100_3344.jpg

69d4c724_20%20lbs.jpg
 
  • Like
Reactions: cyril
My mini smoker is  14"x30" with a 20 lb propane cylinder for a firebox.   The firebox/smoke chamber ratio is about 1/4.   Check out my build thread for details.

Here is a closeup of my fire box.   

791652e2_Spring%202010%20314.jpg


The peice of expanded metal in the bottom is 9"x9".  If you used the plimus tank that bottom grate would be about 6"  which wouldn't give you enough room for coals.   This firebox is is quite small when it comes to maintaining a strong bed of coals.  

How does my smoker perform wit an "undersized"  fire box?   Pretty good I guess.   On my test run,  i had to get up every hour to adjust the tempature.    Part of this is because my airvents are prone to clogging form the charcoal ash.  And I was trying to burn sticks which run the temp up fast and the fall off quick.   Once I get the fire rope glued to the door, it should be alot more effiencet too.

As far as the tank goes, you don't want to go any narrrower.   You should go with a 4" exhaust.    Make sure you have plenty of room at the end of the RF plate.   You need at least the area of the I.D. of your exhaust pipe plus 10%  (13.82 sq. in for a 4" pipe).   If you need help calculating the area of the rounded end, I can figure it out in CAD if I have a few measurements from your tank.

I have been really impressed with my mini-smoker.   The pork shoulder I did last night was amazing.  

If you have any more questions,  feel free to ask.   There a several guys on this forum who have built these things. 
 
Last edited:
if you use the calculator spreadsheet, it will automatically compensate for larger or smaller fireboxes.  it will adjust your firebox to smoke tank opening, air inlets and exhaust to work with pretty much whatever size you have.

p.s.  as for the configuration, i prefer the look of the top picture.
 
Last edited:
Guys, thanks for the replies.  Well I've decided to go with the bigger fire box even though I'm slightly concerned about it being too much fire.  The wife likes the look of it with the fire box turned sideways so that's the way I'm gonna put it.  I've made a little progress since I first posted.

First I had to burn off the remaining propane.  Didn't think there was very much in it but it ended up taking almost a week of running a catalytic heater 6-8 hours/day to burn it all off. 

597102b7_100_3322.jpg


After it was empty I removed the valves and flushed it with soapy water and the let it sit a week.  Next I cut off all the unwanted hardware and ground down the welds.  Then I leveled the tank in both directions and used a fabric tape and a level to lay out the lines for my door opening.

b5aa9139_100_3346.jpg


Here is all the junk I removed or cut off.  Those angled brackets just might see new life as door stops on the back of the tank.  Undecided on that right now so we'll have to wait and see.

6d8fb6b8_100_3352.jpg


I decided I'd form the edge straps before I cut the door out in case it lost some of it's curve.  This paid off because the door did lose some curvature but when I clamped and welded the straps on it held it's original shape and fit perfectly.  I didn't have to tweak it or reshape it at all.

ce34464e_100_3349.jpg


Because the radius on this tank is pretty tight, forming the straps was not as easy as I thought it would be.  But I improvised and found a super easy way to do it.  I put evenly spaced lines on the strap and then used the winch on the front of a boat trailer as a brake.  Worked like a charm!

5450a1e1_100_3351.jpg


Before I started cutting I drilled a 1/2" hole in each corner.  I did this because I thought the opening would look much nicer with rounded corners, and it does.

b9287b66_100_3353.jpg


You're probably wondering what all those small holes are for.  Well I figured I could give the door a cleaner look if the straps were not stitch welded on the face.  So I drilled holes around the parameter every 2.5" or so.  After I cut the door out I clamped the straps on and welded them through from the back.  Came out pretty good I think.  I may go back and flux the joints and sweat in some silver solder before I paint just so I don't have a place for rust to set up shop down the road.

3d47dfdf_100_3354.jpg


Got the tubes inside cut out and burned a good fire in it today.  That's all for now, maybe I'll do more tomorrow.  
 
Last edited:
good job ,I like the idea of the plug welding the door frame.

Gives it a real clean look. 
 
I bet this is going to be one fine looking smoker when you get through. What other little tricks do you have in store for us? Like the boat winch was not enough I would of never of thought of that. I can't wait to see your progress.
PDT_Armataz_01_34.gif
 
Made a little bit of progress tonight.  Fabbed up my base unit from 1" x 2" tube, some 1" angles and 9 ga. expanded steel.  Got my wheels mounted and the tank temporarily clamped in place.  Pics tomorrow, it was just too dark by the time I thought about it.  Also decided to make a late game design change.  Gonna axe the 20 lbs propane tank as a fire box in favor of a square fire box made from 3/16" plate.  Was just too hard trying to figure out the compound curves needed to mate the tanks together. 
 
Pics as promised

Dry fitting the reverse flow plate.

6e2119dc_100_3441.jpg


Starting to take shape.  The tank is still just clamped to the base for now and no that Coleman oven is not the actual fire box.  When I decided to switch to a square box I had to recalculate everything.  Turns out the fire box needs to be 11.5" square.  I had this old Coleman oven sitting around and it's 12" square, so I used it for fitting purposes and to get a good idea of what the finished product will look like.  Gonna build the actual fire box out of 3/16" plate.  Found a really cool cast iron door on a frame that is just the right size but not sure I want to spend the extra $$ on it.  BTW, that's my RF plate sitting where my front shelf will end up.

157af831_100_3444.jpg
 
Well I've hit a brick wall.  Haven't really had much time to work on it for the last couple of weeks and when I did I seems to just be spinning my wheels.   I discovered that I miscalculated the opening on my fire box, it was way too small.  This also meant that my convection plate was too narrow so I have to make a new one.  Just glad I hadn't welded it in yet.

I had this idea that I wanted a cast iron door on my fire box.  I explored a few options and then settled on an el' cheapo simply because it fit my size requirement.  Anyway, it needed some modification to fit my needs.  The main thing was the latch.  It had the type of latch that is a simple tab and you lift the door and set the tab into a notch in the flange when you close the door.  I wanted to have a handle that turns so I set out to modify it.  I didn't take a before pic so this pic I scrounged online will have to do.

57a1e827_CIcleanoutdoor.jpg


What you can't tell from the pic is that there is a good size hole all the way through the flange where the catch is and this needed to be plugged to avoid an air leak.  So I got out the grinder and got rid of the whole catch.  I was left with a hole in the flange and a section about 1 1/2" that was missing the decorative bead that surrounds the door opening.   So I got out the welder and fixed that.  If you've ever tried to weld cast iron you know it's pretty tricky but it's something I've experimented with before so I felt confidant.  The weld actually took very well and a little grinder work made it acceptable looking. 

89c3ebd9_door.jpg


Here's a close up of the area I filled in.

14dda1ef_edge.jpg


Before I started modifying it, I had noticed that the door was a little warped and didn't fit flush.  More grinder work trued it up enough that I didn't think it would suck air too bad.  Well after fiddling with the thing for far too long I finally got to the point where I was ready to fit it into my fire box.  That's when I discovered that the flange was warped pretty bad (not from the welding BTW) and I was chasing a lost cause.  There was just no way I was gonna make this work without lots of sealant and fire rope and then there were no guarantees.  So I chucked the idea altogether and started building a new face for the fire box.  That's where I hit the brick wall.  I got my door opening cut out and two of the four vents.  The first two went fine and my drill press ran like a champ but as I started the third hole my drill press suddenly dropped from 480 RPM down to about 20.  Don't have a clue what's wrong.  Not gonna be happy if I have to replace the motor.  Guess I'm on hold for a while until I figure out what's wrong.

Here's the new front for the fire box.  I still may be able to use the cast door, just not the flange.  But I may just go ahead and scratch build a door from 1/4" plate instead.  

560ead8b_face.jpg


I did make some progress anyway, I got the stack welded in and the end of the fire box re-fit to the tank. 

9db914a9_stack.jpg


2be3d555_100_3468.jpg
 
Shawn, if you are in need of drilling a couple holes shoot me a pm, you are more then welcome to drop by and drill them out. What size hole saw is that? If its 1" I have a bit that you can run in a cordless and punch right thru there. Just let me know.

BTW....the smoker is lookin great. I like the square box vs the 20 pounder sideways. On the rf plate, can you use angle iron to widen and raise the plate to a better level to make the larger hole work out?
 
Thanks Matt &Tom. When my press shot craps I was so frustrated that I didn't even think about finishing with a cordless, heck I did the 3" hole for the stack with the cordless and these are only 1.25". After I thought about it for a bit I realized that my dad has a press and I'm gonna be over there this afternoon anyway, duhh!! So all is not lost. About expanding the plate, I thought about doing that but I think I've decided not to. It only needs to be 2 1/2" wider so it would be easy to do but I sort of cheaped out on the first one anyway. I used 11ga but the more I've thought about it the more I wish I'd gone with 3/16" instead. I figure that 3/16" should disipate heat more evenly from end to end and will difinitely help reduce recovery time when the door is opened. So rather than spending a bunch of time widening the 11ga plate I think I'll just drop the $16 that a new 3/16" plate is gonna cost. It's supposed to rain for the next couple of days so I may take advantage of the indoors and turn some barrel hinges for my door on the lathe. Got a few more ideas I want to incorporate into this build but I'll save them for a later thread. Shawn
 
Lil' Piggy is nearing completion.

I'm about 90% done now.  About all I have left to build are my handles and my front shelf, and then of course paint.  Decided to fire it up this evening to see how it draws and check for leaks.  First I used a single wood chip. Got it going with a torch and closed the door.  Within a few moments it was rising out the chimney pretty good so I added a small handful of lump and let that go.  I was grilling brats at the time so once they were done I dumped the remaining lump which was still burning good into my fire box and threw in a chunk of pecan.  It's been going pretty good for a few hours now.  I've had everything wide open but it hasn't gotten much over 250. 

Here's a shot of my fire box and the cool door I made.  I was initially working with a cast iron door but it didn't work out too well so I just made one.  I could have taken the cut out piece from my face plate and just strapped the perimeter but I really wanted it to have a bold, beefy look.  So I cut out the corners of it, smoothed over all of the edges and then welded it on top of a slightly larger piece of 1/4" plate.  I think it came out OK, the door is 7/16" thick.  I still need to cut a little slot between the door and the intake ports so I can run a short rod through to slide the damper plate back and forth.

392628aa_100_3481.jpg


1f56978c_100_3484.jpg


The bottom is hinged for easy ash clean out.

fffa2012_100_3486.jpg


2ec3689f_100_3483_00.jpg
 
The pig is totally freakin awesome.

The door itself looks pretty fantastic as well.

I'm still on the fence with the ash dump plan. Are you thinking that there will be enough room for ash from a long stick burn to not have to clear it out until the cook is over? My thought is that if you dump it during a cook that ash may try and make it to the meat when it opens and goes WOOOFFFF.(large ash cloud)
 
That is one nice lookin smoker. It's gonna be a real bueat when it's done. I really like that domed RF plate.
 
Sounds like this guy has been smoking for years. If he can smoke as well as he builds, I think I'd rather taste some of it than see it. 
 
SmokingMeatForums.com is reader supported and as an Amazon Associate, we may earn commissions from qualifying purchases.

Latest posts

Hot Threads

Clicky