MES Mod Madness Teaser Pics!!!

  • Some of the links on this forum allow SMF, at no cost to you, to earn a small commission when you click through and make a purchase. Let me know if you have any questions about this.
SMF is reader-supported. When you buy through links on our site, we may earn an affiliate commission.

tallbm

Legendary Pitmaster
Original poster
OTBS Member
★ Lifetime Premier ★
Dec 30, 2016
7,709
4,810
Texas
Well for about a month or more now I have been alluding to doing all kinds of mods like a MES40 Gen1 rewire for PID, the HeaterMeter PID controller, a convection fan, and a custom built controller box to house everything including a variable speed fan control.

Well he excitement has gotten to me.  It is not completely finished and not 100% tested but I would say barring any catastrophes I'm about 85% of the way there.  Everything works individually, everything is functions when assembled, but some kinks and finishing touches are being worked out but everything looks promising!

So here are some tease pics, enjoy!

HeaterMeter PID Controller Pic(s):

If you don't know about this guy it's a digital controller with wifi capability.  It is built of the Raspberry Pi 3 technology/pc board


MES40 Gen1 Rewire WITHOUT taking off the back! :  

(Testing unplugged wires for continuity with a $10 Multimeter to determine which was Hot and which was Neutral.  The MES wires to the heating element both have black insulation so no color identification possible with wires.  No need to tear off the back and follow wires using this method
icon_cool.gif
   )


[Edit: Updated text and image to correctly reflect wiring connection described for the image. ]

Hot Power plug to Hot MES wire that goes to heating element.  I got cute and used a male spade connector to leverage the existing female spade and I then leveraged the existing insulation covers that came with the MES.


Both Neutral and Hot power chord wire to Neutral and Hot MES Wire that goes to heating element.
Heating Element Rotation (Flip) to Center it Up:

I got the idea to copy this mod from user @cmayna  and his mod post doing so, Thanks!

I figured this would help with the fan mod and generate heat from the center rather than 1 side.  I use a Mailbox Mod and AMNPS for smoke so no need for the all the other stuff.  You can also see the fan shaft there above the element.

I also flipped over the metal bars thingy under the heating element, this was to turn downward the metal flap that it contains so that it does not touch or interfere with the heating element.  Worked like a charm!


Convection Fan Pic(s):

Large back hole drilled, stainless steel sharpie body inserted and cut with a dremel cutting wheel to be the fan shaft tube to prevent smoke from getting into smoker insulation and body. Silicon seal will be applied to seal the gaps around the tube once all kinks are worked out.


Fan mounted to smoker body and plastic housing mounted smoker body around fan.  Fan shaft is poking through to the inside!


All sealed up.


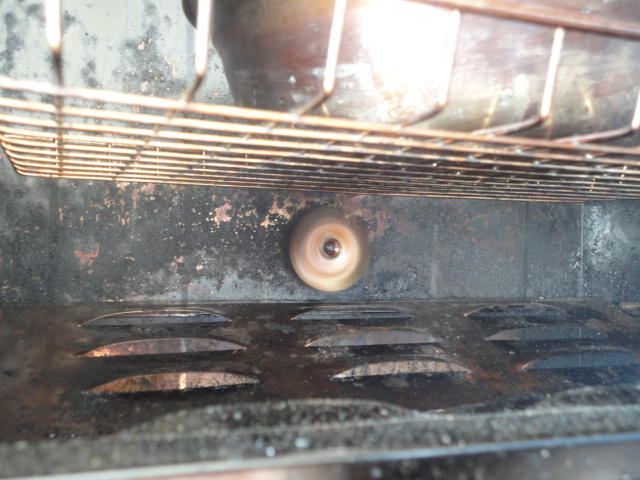
Shaft on inside with sharpie tunnel (need to seal the extra hole space with hi temp Food safe silicon). Fan blade on. Rack, Waterpan, and Heating element Clearance all good.


The money shot of the fan blade spinning!!!


Custom Controller Box:

Plug, outlets, and power switch all labeled


The guts.


Probes outlet and heatsink to Solid State Relay (SSR)


Variable speed fan controller.


It's alive!!!!


Closeup of HeaterMeter PID display.


Well guys if you have made it this far I hope you enjoyed pic heavy the tease.  

I do plan to do some detailed posts about some or all of these mods so others who are interested and capable can benefit from them.  

I think the "no back removal" MES rewire tips will be super helpful and I will include the measurements for adding a back panel for the Rollout Limit Safety switch, which I did not show in the pics above.  I swapped mine with a 350F manually resetable switch and used high temp steel connectors.  

[EDIT: I believe a couple of other members on different posts pretty much confirmed that the MES stock Roll out limit switch is an auto-resetable one rather than a one time tip]

I don't like the idea of the one time use 302F switch being there without me being able to access it.  Plus the higher 350F threshold will give me some margin for error as I manually tune my HeaterMeter PID to get things heating properly. 

I hope you enjoyed and thanks for stopping by!
 
Last edited:
 
Nice mod.....   I'm interested in a part. no. of the fan and motor....  and where you got them....
Dave the parts are:

  • Frigidaire 316136300 Range/Stove/Oven Fan Motor - purchased on Amazon for just under $25 prime shipping

  • 318398302 OEM Frigidaire Fan Blade #12239 - purchased on ebay for $7.33 including the shipping

  • Stainless Steel Left Hand Hex Nuts 1/4-28 nuts - purchased on ebay  from vendor "stainlesstown" for $5.95 and free shipping.  Notice what is needed is a Left hand nut not a normal right hand!!!  This is not the correct nut/part but it works with a little rigging by using another larger nut as shim to fill the extra space between the end of the fan shaft threads and the fan blade.  There is a gap that this nut cannot close to touch the fan blade when the shaft's threads end.    I could not find the exact Frigidaire "part" for the nut but with some serious digging I managed to find out the size, thread count, and left hand orientation.  Again, the nut I ordered works with a little extra rigging.
I looked up these parts and they go together but it was hell finding that info and I didn't save it so you will just have to believe me or feel free to do a little Googling and I'm sure you will find that the parts match.

Oh by the way I used a little gorilla glue to glue some other large 1/4 nuts to again act as a shim for the fan motor's feet where the screws go.  The hole for the fan haft happens to fall close to the heating element panel.  Without the extra shim space the fan motor cooling fan blade touches the screw heads of the heating element panel :(  

Again a little rig job with glued nuts over the holes made enough of a gap so that the cooling fan blade on the motor would easily clear the screw heads on the panel.

Lots of little tricks and tips I had to create in order to get things to work out well.  Nothing crazy but definitely something that I will point out if/when I post about each mod in detail :)

I hope this info helps!
 
Last edited:
Very interesting! Just a quick question, while I see the benefit of flipping the heater element so it's more centered why the need for a fan? Is the fan constant RPM or does it ramp up and down automatically according to conditions in the smoker? Thanks.
 
Very interesting! Just a quick question, while I see the benefit of flipping the heater element so it's more centered why the need for a fan? Is the fan constant RPM or does it ramp up and down automatically according to conditions in the smoker? Thanks.
The idea behind the convection fan is that it will constantly stir the air in the smoker to keep temps as even as possible throughout the entire smoker the same way a convection oven works.  I'm trying to eliminate hot and cold pockets of air.

The fan will run at a constant speed.  The fan will be connected to a variable speed controller, controlled with a dial.  The speed variations aren't that great, more like off, low, and high but I had nothing to go on so it was a total design decision guess for the variable speed and I had hoped for more speed variation.  But hey, I guess 2 speeds is better than 1.
 
Last edited:
That fan is going to be the wild card in this mod. I have no idea whether it will be really good thing, or a really bad thing. It will, for sure, be a thing: something will happen.

It would seem that some or all of the following things will be true:

1. More air circulation will dry out the food.

2. More air circulation will cook faster.

3. Air circulation may change how much smoke is deposited/absorbed by the food (I have no idea whether it will be more, or less).

4. Air circulation may change how much smoke is exhausted through the top, especially if you are using an external smoke generator (mailbox mod, etc.)

I will be really interested to hear what you think the fan pros and cons are after you've done a few smokes. I think it is a great idea to try, and I'm really glad you are doing it and are willing to share the results of your design.
Yep I will have to figure out what it does and doesn't do for me and HOPE it has more pros than cons.

I did a good amount of research online to be convinced it should be a good mod.  A majority of the information was from other people doing fan mods in electric smokers.  I did find it odd that this amazing forum did not have much info on fan mods, but maybe I can add a little info to help out the next guy :)

If things do not work out well then I always have the ability to flip a switch and turn off the fan.  I'm not backed into a corner with it so I should be ok no matter what.
 
Last edited:
UPDATE:
  • Hi Temp 600F FDA approved, food safe, Silicone Sealant added to any gaps and holes created in smoker during/for mods.  Just needed it to cure for the full 7 days before heat tests.
  • Fan mod kinks worked out and assembly test passed.  Assembly testing = things put together which includes the silicon seal.
  • HeaterMeter kinks worked out and assembly test passed.  
FYI, the HeaterMeter really NEEDS a 12v 3Amp power supply.  T

The documented and suggested 12V 1Amp power supply is the minimum for the electronics (Raspberry Pi 3) specs  
102.gif


As more devices are added/managed and drawing power from the HeaterMeter (wifi, SSR, etc.) the more power needed.  The HeaterMeter device produces power consumption spikes as it engages hooked up devices which then causes a starvation of power situation that then causes the HeaterMeter device to reboot.

More available power means no power starvation during consumption spikes

Next UP, Testing:
  • Do a full Test of the device by executing a 3 hour "seasoning" with all devices assembled and running and adding smoke for the last hour and a half or so
  • Do a chicken smoke (chicken is cheap) with everything running including smoke.  I plan to double/triple up on the smoke since the overall time would be short and even shorter than normal if the fan is doing it's job.
  • Fix any kinks and perform the testing cycle again as needed.  
Thanks for hanging around for the ride guys! :)
 
Last edited:
Really looking forward to your experience with the convection fan. That is something I could install. We really like the convection oven in the kitchen.  Did you consider mounting the fan above the chip tube so it would blow the heat toward to opposite side and away from the top vent?
 
Are you planning to still generate smoke within the smoker itself, using the original chip tray? If so, it just occurred to me that the fan man wreck havoc with that process. You know what happens when you blow on the embers of a campfire: they get really hot and flame up. Even if the fan isn't blowing directly across the chip tray, the extra circulation may have some of that same effect.

Of course maybe you said that you were using an external smoke source, and I missed that.
 
 
Really looking forward to your experience with the convection fan. That is something I could install. We really like the convection oven in the kitchen.  Did you consider mounting the fan above the chip tube so it would blow the heat toward to opposite side and away from the top vent?
I did think about mounting the fan in that location or other locations.  I decided to go with the position over the heating element because all convection oven designs and info I found had the fan always mounted over the heating element at the back of the stove.  Additionally all of the fan mods I found online for electric smokers had it in the same spot, over the heating element in the back.  I went with the general information, designs, and approaches used by other fan mod examples that seemed to have success.

If you do the mod the way you mention I would love to see how it turns out! :)
 
Are you planning to still generate smoke within the smoker itself, using the original chip tray? If so, it just occurred to me that the fan man wreck havoc with that process. You know what happens when you blow on the embers of a campfire: they get really hot and flame up. Even if the fan isn't blowing directly across the chip tray, the extra circulation may have some of that same effect.

Of course maybe you said that you were using an external smoke source, and I missed that.
I use a mailbox mod so no smoke generation using the original chip tray.  From what I can tell from other people's fan mods for electric smokers I should be ok.  

Most of the fan mod examples I found were with bradley smokers which has the smoke generation outside of the smoker unit with the puck burning contraption attached to the side.
 
UPDATE:

Ok so yesterday I was excited test out my MES with all of the mods (Heatermeter, fan, flipped element, etc.).

I loaded up the smoker with simulated heavy load so I could tune my PID settings to handle a big load and I wanted to see how the mods would perform to handle a heavy load.

Load was top rack 12x12 ceramic tile wrapped in foil, foil pan and old vent mod vent on rack 2, upside down foil pan on rack 3, and nothing on rack 4 but water pan set under it.

I put Smoker probe clipped under top rack with a probe 1 backing it up sitting at rack level on top.

I then put probes 2 and 3 on the next two racks on the left side.

I used my Thermopro TP20 to measure right side of racks 3 and 4 at bottom but on the right side.

The simulated load made for quite a bit of load on rack 2 compared to all others.


What I found was that between racks 2-4 I had temps within 15 degrees of each other.

On rack 1 the discrepency was very large like 50 degrees.  I don't think air could flow much around the heavy load on rack 2.  Even with the fan mod going full blast.

Heavy Load Test Findings:
  • Racks 2-4 behaved well with temps so I think the fan was doing it's job circulating between racks of sensible load
  • Racks 2-4 had no problem getting to the set temp or close within about 7 degrees
  • Racks 2-4 I had temps within one another with the largest spread being 15F degrees while trying to reach 325F.  I used 325F for tuning purposes
  • Rack 1 had a 50F degree lower difference from the highest measurement of the other probes on racks 2-4 :(
  • With this much load I don't think any level of fan circulation matters because flow is simply blocked all over the place
  • Hitting the set temp took FOREVER with the vent wide up. Again the load plaid a big part in this
  • When set temp was hit and the HeaterMeter (HM) would cut/reduce power to the heating element the temp drop would occur and shoot down 20 degrees low and take a long time to pick back up.  I had to PID tune a bit but didn't get to tune as much as I would have liked to, I'll get to that later.
  • Testing was cut short, explained next.
My testing and tuning was cut short at about the 4 hour mark due to the on/off power switch of my controller box failing.  One of the spade connectors to the on off switch to my controller box appears to have been a little loose because the resistance caused the area to heat up and the switch to start melting.  I stopped when I found this.

Luckily I had ordered 2 witches because it was the same price as ordering 1 switch from a different vendor.  I figured I would have it as a back up in case I broke it during instulation or something bad happened to the switch.  It was a great idea :)

I replaced the switch but could not continue testing until today.

So today I ran a more realistic test.  I put 4 pounds of boneless skinless chicken breast (BSCB) on the top rack and a whole 5.25 pound chicken on a chicken roasting rack set on/in a foil pan all on the bottom (4th) rack.  No water pan.  I put the smoker probe all the way at the ceiling/top of the smoker, it was not on a rack at all.

I backed up the smoker probe with probe 1 of the HM.  Probes 2 and 3 were stuck in chicken breast, one in the middle back of the top rack and one in the middle front of the top rack.

I used the TP20 to measure IT of the whole chicken (in deepest part of the brest), and the second probe to measure temp at rack level of the chicken.

Realistic Test, Findings:
  • Temp discrepency of smoker probe to TP20 rack level probe was about 35F degrees with the smoker probe being the low one
  • Temp discrepency of smoker probe to HM probe 1 was 10F degrees, with probe 1 being the low one
  • With the smoker empty and the vent closed I hit a set temp of 335F in about 30 minutes!  I set higher to try and compensate for the drop when I open the door to put chicken in.
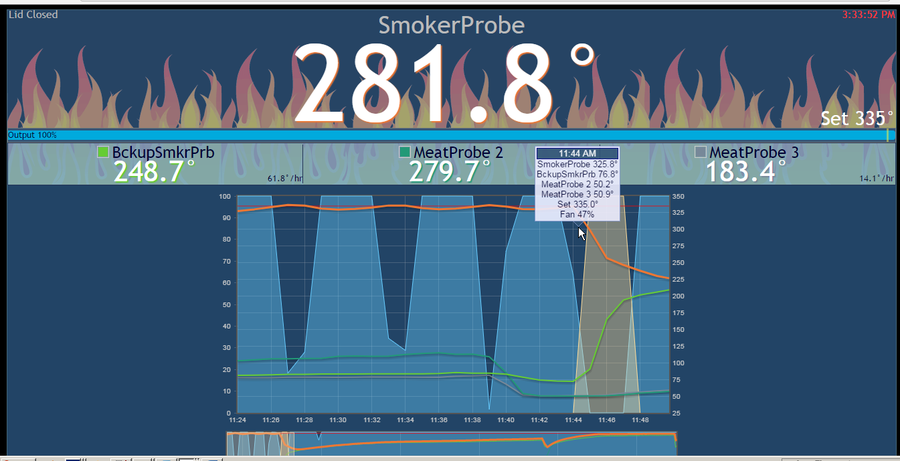
  • When the smoker is empty and vent closed the HM can handle keeping temp very well and recover quickly as well.  See HM dashboard image below.  The red line is set temp.  The orange line is smoker probe and notice it is oscillating within 2 degrees of set temp when things are empty.
  • I have some inconclusive findings when loaded because I opened the smoker and had a 4-5 minute period of the element cut off :(
    • There is a HM setting that cuts the power to the heating element off when it detects "lid open" of the smoker.  In a charcoal smoker this is desired because u don't want to turn the fan full blast when the lid is open, only after it is closed.  In an electric smoker this is no good because the heating source is dropping temp not just the air inside the smoker.
    • I fixed the setting but the damage was done with the temp dropping all the way to 223F :(
  • Again with load the smoker takes a LONG time building temp back up, keeping the vent closed is a must!
  • Rack 1 never hit set temp again but the rack was mostly full of chicken breast and it seems the airflow all the way to rack 1 is not so great, even with the fan mod.
  • The smoker probe on the ceiling was always 10-12F degrees lower which proves air flow at the exact level of a chicken breast is hindered but above the exact rack level it is better
  • Rack 4 eventually hit set temp but also took a long time to recover over 100F degrees from the drastic drop to 223F :(
  • The smoke probe on the ceiling and probe at rack 1 level seemed to recover temp at 30-35F an hour while the probe at rack 4 level seemed to recover at about 65F an hour.  This again leads me to believe that the fan is really working well in the area of rack 2-4
  • I think the MES size and lack of natural airflow related to heating element output is probably a bigger hurdle to overcome than people realize.  It is Definitely something I'm learning about first hand. When rack 1 has a considerable load it seems the space between racks 2-4 behave much much better with airflow and temp.
  • IMPORTANT, for the first time ever I produced CRISPY skin on chicken in my MES!!!!!  I think the key factors are:
    • I can get over 300F with the HM controller
    • The fan does a great job at rack 4 level for moving heat and air around
  • I had the best smoke flavor I've ever had on chicken, I think the 90% closed vent helped since I had to try and recover temp that way
So in all I think I have a whole new smoker to figure out as is evident by me discovering the impact of the "open lid" setting causing a 100F plus drop in smoker temp hahahaha.

I think the Fan mod is making a difference on lower racks, especially 3 and 4.

I think I am going to abandon using rack 1 unless it is something that cooks quickly like veggies or chicken breast.

I think that no matter the controller that with an MES you cannot get away from needing/wanting to set your temp 20F higher than what you want to cook at so the smoker can better recover from the temp drop od adding the meat to the smoker.  I was doing this before any of the new mods.

I think that during a 5+ hour smoke the recovery to the set temp becomes less of an issue because low and slow is still low and slow whether its climb from 225F to 275F hahahaha.

I think I have eliminated temp swings of 35F with my new setup!!!!

I think I am now poised to smoke sausage and bacon without worry of temp swings to cause fat out or rendering.  This was a major driving factor for me to use a different controller!

I'm getting to where I want to be, I just need more time and smokes.  As is the case with anything worth learning :)

And now if I havent bored you to death, the QVIEW on the best smoked chicken I have ever produced or eaten!!!

BSCB mmmmm!


Crispy skin whole chicken deboned and broken down... and a few pieces missing from what I HAD to eat while deboning :D


Screenshot of the HeaterMeter (HM) dasbhoard after the smoke was done.  I just zoomed in on an early portion of the overall timeline where I opened the smoker, added the chicken and all probes.  Hence the orange line (smoker probe) taking a dip and the green line (probe 1 backing up smoker probe) climbing fast.  

The BIG numbers in the image are the last real time values recorded at the time when I shut off the HM.  I had pulled the probes out the meat or moved them them on the rack hence all the different high numbers being measured and reported.
The little box on the graph reports the probe measurements at that time during the smoke/cook.

 
Last edited:
  • Like
Reactions: denny
Seriously impressed with your engineering skill set Tall. I have been away from this forum for a long time due to some health issues, but glad i came back to follow this thread. Keep doing what you do cuz i find it fascinating.
 
TallBM, I'm curious to know what wattage is your heating element. My 40" MES has a 1200 watt element. On a cold day 35-40 degrees my recovery time after loading food is around 20-25 min. Did you calibrate your probes using boiling water or an ice bath just to make sure all probes read the same? Another thing I noticed, it looks like your using a meat probe to measure ambient temperature. A meat probe only measures temp at the tip while a ambient probe uses the length of the probe to measure. Is it possible the tip of probe on rack 1 was blocked somewhere? Very interesting mod and will continue to follow. Good luck!
 
Seriously impressed with your engineering skill set Tall. I have been away from this forum for a long time due to some health issues, but glad i came back to follow this thread. Keep doing what you do cuz i find it fascinating.
Thanks, I'll do what I can :)
TallBM, I'm curious to know what wattage is your heating element. My 40" MES has a 1200 watt element. On a cold day 35-40 degrees my recovery time after loading food is around 20-25 min. Did you calibrate your probes using boiling water or an ice bath just to make sure all probes read the same? Another thing I noticed, it looks like your using a meat probe to measure ambient temperature. A meat probe only measures temp at the tip while a ambient probe uses the length of the probe to measure. Is it possible the tip of probe on rack 1 was blocked somewhere? Very interesting mod and will continue to follow. Good luck!
I have the 1200watt element and nothing else running on the outlet.  Now there may be other stuff running on the breaker so that might be something but I can't change outlets so I'm stuck there.

I measured all the HM probes and the TP20 probes in boiling water twice.  The HM Probes were the following:
  • HM Smoker Probe - was 216F (4 degrees high)
  • HM Probe 1 -3 were 207F (5 degrees low)
  • TP20 probes were 211F (1 degree low)
The HM allows me to set offsetts so I corrected all the smoker probe with a -4 offset and the others were +5 offset.  I can't fix the TP20 probes but I can live with a -1 degree discrepency.

The HM probes are hybrid Maverick ET732 hybrid probes so they are suppose to work for both.  The TP20 probes are also hybrid probes.

I believe the tip of the probe on rack 1 was blocked somewhat as it was behind a breast fillet and the wall and just a hair above rack level. I put it through a cork and it barely keeps it above the rack bars without touching.  I need to get some clips for sure to raise it an inch or 2.

I look forward to learning more and sharing.  It is definitely cool stuff.  I am still debating on opening up a port on my router to allow the app to work from anywhere rather than when I'm just on my router's wifi.  I will debate that as I worry about the main funtionality getting ironed out :)
 
Tall,

I just rebuilt a Smoke hollow electric using a HeaterMeter 4.2. You can do better by, tweaking PID and fan (SSR) controls. The first temp overshoot was 20-30 degees. I've got that down to 15 degrees...then it settles right in at set temp. Driving a SSR from that PWM fan out is a bit trickey. SSR turns on at 3 volts...no reason to drive it with 12volts, fan min 100%, fan max 100%. I have mine set 40% / 40%. You can read PID tuning at that other website. I have some more work on mine. I built the control box and it's a little too small. Have to move it to a biggerbox.

Here's a shot of a pork butt cook....on at 8pm, turned temp down at midnight and went to bed. I did port forward on the home router...works great. Now I can control it from the beer store!.

Good luck!

RG

 
SmokingMeatForums.com is reader supported and as an Amazon Associate, we may earn commissions from qualifying purchases.

Latest posts

Clicky