This is the second time I've done a hind leg of pork into a cured and smoked ham for Easter! (The first:
http://www.smokingmeatforums.com/t/89979/from-hog-leg-to-easter-ham)
After picking up a bottom round beef roast for corned beef and pastrami, I also ordered, well in advance, a fresh ham to be picked up Tuesday, March 14th (while the pastrami was smoking in the smokehouse).
But, to my terrible disappointment, the fresh pork leg did not arrive to WinCo in Fort Worth. To partially compensate, the meat cutter on duty gave me a pork arm shoulder, which is no replacement for a hind leg. As soon as i got back and added 2-3 more chunks to the smokehouse, I wrote a letter to WinCo Corporate Office in Des Moines. Later that evening i got a totally apologetic response, telling me that the head meat buyer was shipping a case of pork hind legs to the store to arrive the next day, Wednesday, and on Wednesday afternoon the Fort Worth Store Manager and Assistant Store Manager hand-delivered a fresh hind leg to my door, apologizing profusely! Apparently they had a new warehouse in Denton, Tx. (north of Fort Worth) and the delivery arrived late. I have had to work with suppliers thousands of times over the years and fully understand the difficulty. But, the BOTTOM LINE is that WinCo solved the problem immediately and graciously to totally exceed my expectations!!!
Couldn't do anything Thursday (Chiropractor plus our stroke monthly meeting), but this morning I jumped on doing the processing on the hind leg and front shoulder.
The products:
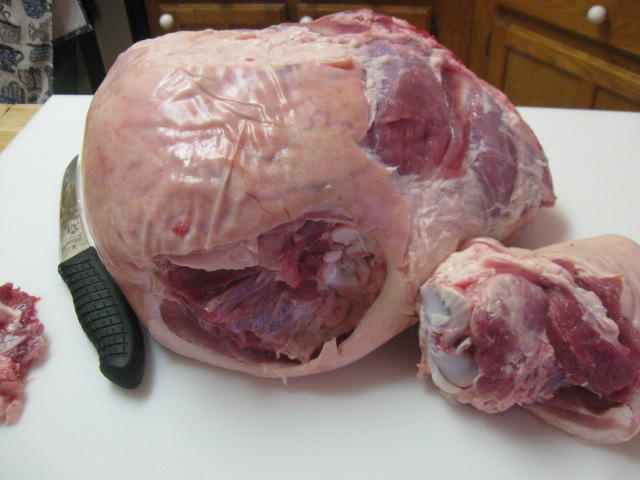
The hind leg:
The arm shoulder:
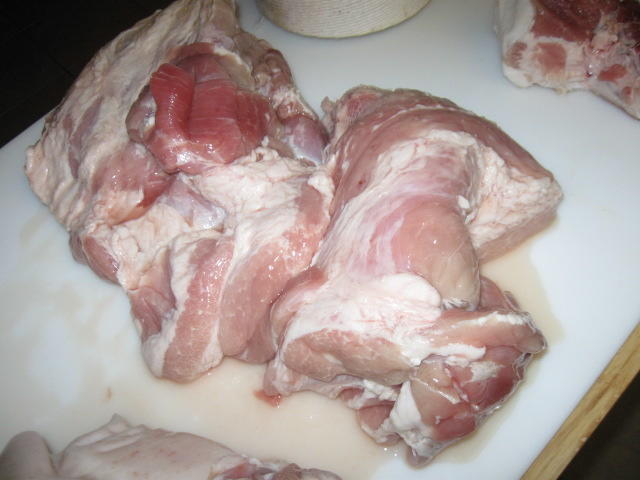
Processing the fresh ham:
Trimming the back fat:
removing the hock (will cure and smoke in a separate ham bag along with the others, use for pea soup):
Boning out the arm shoulder:
(After curing, I will tie up the front shoulder as a boneless pork arm shoulder smoked picnic)
Injecting the fresh ham:
I repeatedly injected the fresh ham in all parts of the ham; first through the aitch bone hole into the top, bottom and eye of the fresh ham, then repeatedly into the sirloin tip on the side of the ham in both directions so it will cure from the inside-out as well as the outside-in:
Then, into the bucket the fresh ham, the hock, and the boneless arm shoulder, with a plate on top to hold it down, and into the back fridge:
Not a real interesting photo. but shows where it will rest an cure until Friday, April 14th, when I will pull them out, sack and/or tie them up, and into the smokehouse!
We will see you then, and a HUGE THANK YOU to WinCo for 'making it happen'!
April 12th (moved up Smoking Day to Wednesday vs. Friday; should anything go wrong... enough time to recover and just purchase a whole ham!
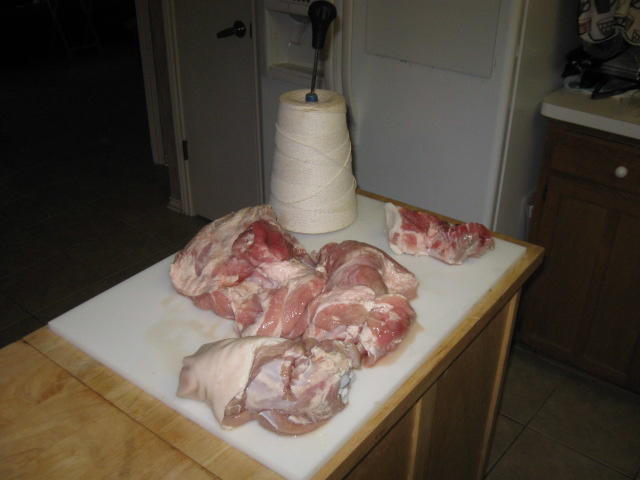
Got the bucket out of the fridge, kicking it to the sink where I had to get my wife to help me pick it up far enough to rest on the counter, then dumped the contents into the freshly-cleaned sink. Had the ham in the sink and removed the Aitch bone (pelvic). So, what I have is:
Parts'n'Pieces:
The Aitch bone:
the boned-out pork shoulder:
the ham hock:
Plus the semi-boneless ham in the sink (just left in the femur).
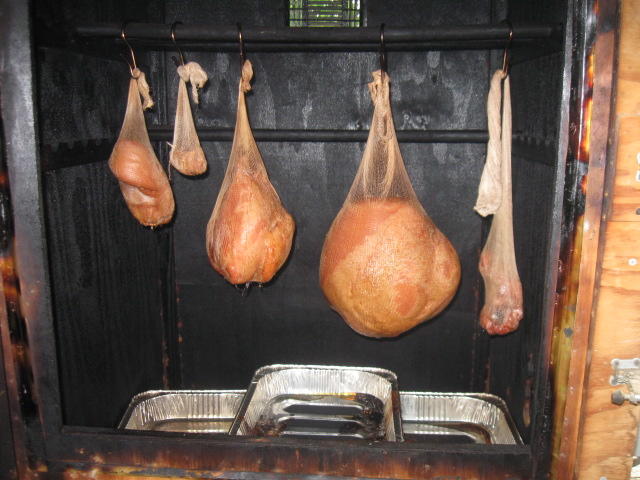
In the smokehouse, left to right:
1) Ham Hock 2) small amt of pork trim off the shoulder, put in a stockinette to cure:,
3) boneless pork shoulder, 4) semi-boneless ham, 5) aitch bone
...............annndddd... we're smoking!
2 pm - color is doing good! Will check internal temps on all products by 4 pm. Smokehouse is purring at a steady 235°! Smelling wonderful!
There are 3 major bones in the hind leg:
At the top is the hock (once the hoof is removed)
In the center is the femur (plus the small bone at the top, the kneecap, which is attached to the femur)
The bottom bone is the Aitch bone (pelvic)
I removed the top bone, the hock, prior to curing so it would cure by itself. I left the femur and aitch bone inn the leg while curing, then removed the aitch bone after curing, just so it wouldn't occupy more space in the bucket (it was full to the brim!). Then removed it after taking it out of the cure to smoke separately for a dog I know!
Now, with just the femur in the leg, it becomes a semi-boneless ham (like the description you see in the grocery store).
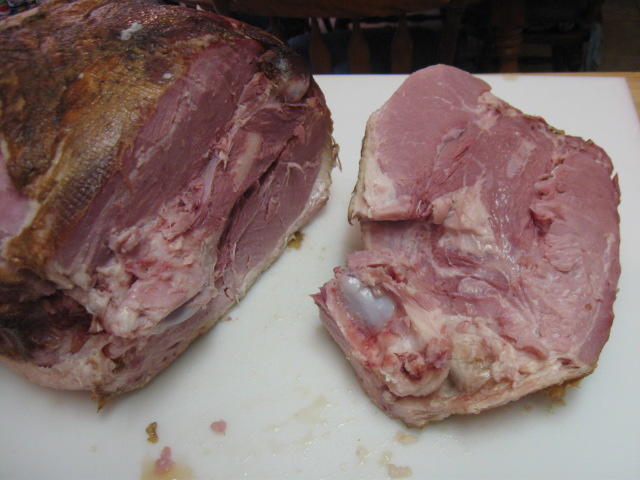
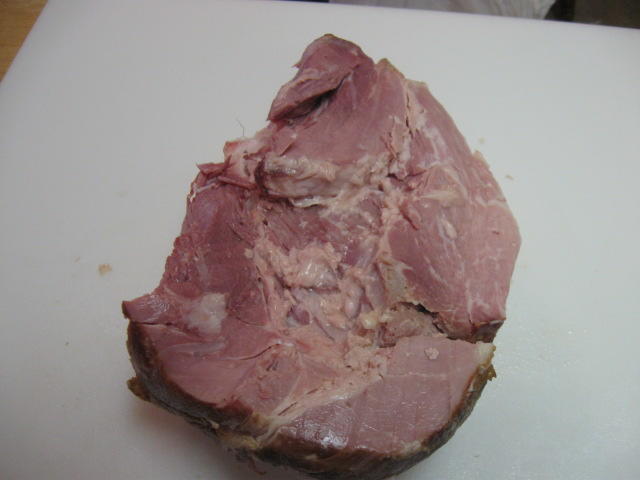
You can remove the femur by 'tunnel-boning' - going from both ends to remove it whole without cutting through the leg muscles. However, once the ham reaches min. 146° and is done and cold, I will process it by cutting off the right side (sirloin tip) exposing the bone, removing the femur and kneecap, then splitting the top and bottom of the ham into top round and bottom/eye round:
Then I will bake in the oven at 350° at 10 min. a pound to reheat it for Easter dinner. Photos will follow.
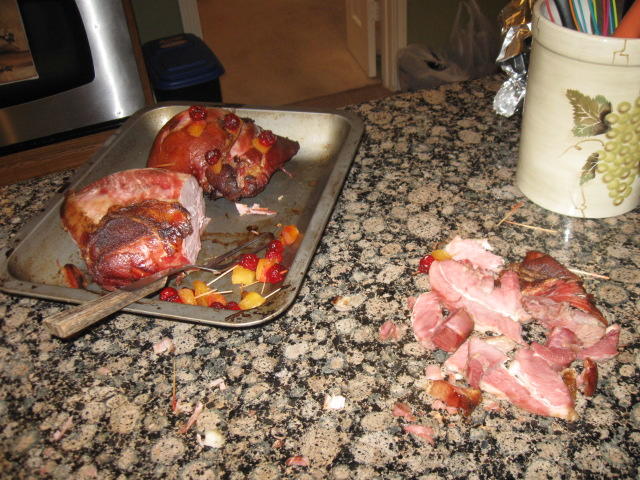
As you can see, I pulled the hock, the small bundle of trim, and the aitch bone - they were all done, 155°+.
The boneless shoulder was 141° and the ham (which now I can call it, not a hind leg) was 135° - perfect for 'partially-cooked' temp. However, I prefer to let it come up at least to 150° so it will be fully cooked, esp. as I am serving it to a houseful of relatives on Easter!
A slice from the arm shoulder....
O. M. G. ! And as delicious as it looks!
reliving the memories!
http://www.smokingmeatforums.com/t/89979/from-hog-leg-to-easter-ham)
After picking up a bottom round beef roast for corned beef and pastrami, I also ordered, well in advance, a fresh ham to be picked up Tuesday, March 14th (while the pastrami was smoking in the smokehouse).
But, to my terrible disappointment, the fresh pork leg did not arrive to WinCo in Fort Worth. To partially compensate, the meat cutter on duty gave me a pork arm shoulder, which is no replacement for a hind leg. As soon as i got back and added 2-3 more chunks to the smokehouse, I wrote a letter to WinCo Corporate Office in Des Moines. Later that evening i got a totally apologetic response, telling me that the head meat buyer was shipping a case of pork hind legs to the store to arrive the next day, Wednesday, and on Wednesday afternoon the Fort Worth Store Manager and Assistant Store Manager hand-delivered a fresh hind leg to my door, apologizing profusely! Apparently they had a new warehouse in Denton, Tx. (north of Fort Worth) and the delivery arrived late. I have had to work with suppliers thousands of times over the years and fully understand the difficulty. But, the BOTTOM LINE is that WinCo solved the problem immediately and graciously to totally exceed my expectations!!!
Couldn't do anything Thursday (Chiropractor plus our stroke monthly meeting), but this morning I jumped on doing the processing on the hind leg and front shoulder.
The products:
The hind leg:

The arm shoulder:

Processing the fresh ham:
Trimming the back fat:

removing the hock (will cure and smoke in a separate ham bag along with the others, use for pea soup):
Boning out the arm shoulder:


(After curing, I will tie up the front shoulder as a boneless pork arm shoulder smoked picnic)
Injecting the fresh ham:
I repeatedly injected the fresh ham in all parts of the ham; first through the aitch bone hole into the top, bottom and eye of the fresh ham, then repeatedly into the sirloin tip on the side of the ham in both directions so it will cure from the inside-out as well as the outside-in:


Then, into the bucket the fresh ham, the hock, and the boneless arm shoulder, with a plate on top to hold it down, and into the back fridge:

Not a real interesting photo. but shows where it will rest an cure until Friday, April 14th, when I will pull them out, sack and/or tie them up, and into the smokehouse!
We will see you then, and a HUGE THANK YOU to WinCo for 'making it happen'!
April 12th (moved up Smoking Day to Wednesday vs. Friday; should anything go wrong... enough time to recover and just purchase a whole ham!
Got the bucket out of the fridge, kicking it to the sink where I had to get my wife to help me pick it up far enough to rest on the counter, then dumped the contents into the freshly-cleaned sink. Had the ham in the sink and removed the Aitch bone (pelvic). So, what I have is:
Parts'n'Pieces:
The Aitch bone:

the boned-out pork shoulder:
the ham hock:

Plus the semi-boneless ham in the sink (just left in the femur).
In the smokehouse, left to right:
1) Ham Hock 2) small amt of pork trim off the shoulder, put in a stockinette to cure:,
3) boneless pork shoulder, 4) semi-boneless ham, 5) aitch bone

...............annndddd... we're smoking!
2 pm - color is doing good! Will check internal temps on all products by 4 pm. Smokehouse is purring at a steady 235°! Smelling wonderful!
There are 3 major bones in the hind leg:

At the top is the hock (once the hoof is removed)
In the center is the femur (plus the small bone at the top, the kneecap, which is attached to the femur)
The bottom bone is the Aitch bone (pelvic)
I removed the top bone, the hock, prior to curing so it would cure by itself. I left the femur and aitch bone inn the leg while curing, then removed the aitch bone after curing, just so it wouldn't occupy more space in the bucket (it was full to the brim!). Then removed it after taking it out of the cure to smoke separately for a dog I know!
Now, with just the femur in the leg, it becomes a semi-boneless ham (like the description you see in the grocery store).
You can remove the femur by 'tunnel-boning' - going from both ends to remove it whole without cutting through the leg muscles. However, once the ham reaches min. 146° and is done and cold, I will process it by cutting off the right side (sirloin tip) exposing the bone, removing the femur and kneecap, then splitting the top and bottom of the ham into top round and bottom/eye round:

Then I will bake in the oven at 350° at 10 min. a pound to reheat it for Easter dinner. Photos will follow.

As you can see, I pulled the hock, the small bundle of trim, and the aitch bone - they were all done, 155°+.
The boneless shoulder was 141° and the ham (which now I can call it, not a hind leg) was 135° - perfect for 'partially-cooked' temp. However, I prefer to let it come up at least to 150° so it will be fully cooked, esp. as I am serving it to a houseful of relatives on Easter!
A slice from the arm shoulder....

O. M. G. ! And as delicious as it looks!


reliving the memories!
Last edited: