New Grill Mods

  • Some of the links on this forum allow SMF, at no cost to you, to earn a small commission when you click through and make a purchase. Let me know if you have any questions about this.
SMF is reader-supported. When you buy through links on our site, we may earn an affiliate commission.

kens grill

Newbie
Original poster
Dec 10, 2016
6
10
Well my old grill is finally about dead.  Its over 10 years old, doors have fallen off and the "Stainless Steel" is starting to rust.


The old one also has multiple doors and even a cubby on the side that you can not see in this picture.   I have been wanting to try to smoke and grill with charcoal and gas and I did not want to break the bank as well.  Walking around a store I found this "Smoke Hollow" that has a Propane, Charcoal grills as well as an offset smoker but it only had open shelves which would have been a deal breaker except for the fact that I needed a project.


After getting it home, spending 4-5 hours to assemble,  I smoked a brisket and it seemed to work pretty well.  Didn't smoke it long enough and found out that you need quite a bit of charcoal to keep a smoker going 10+ hours, plus a lot of other things :).  Even bought a nice wireless thermometer and supplies from my local store here.  

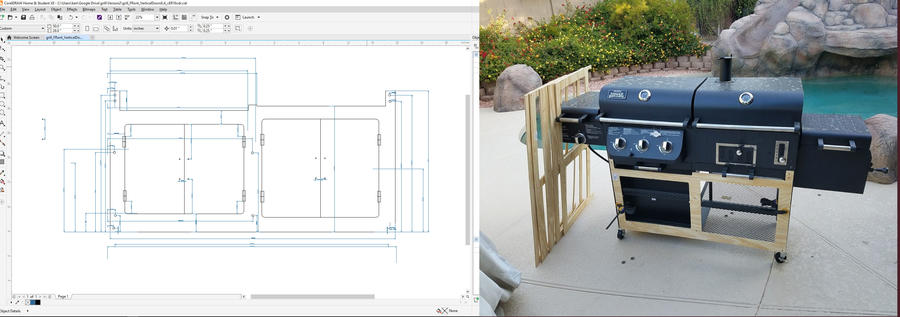
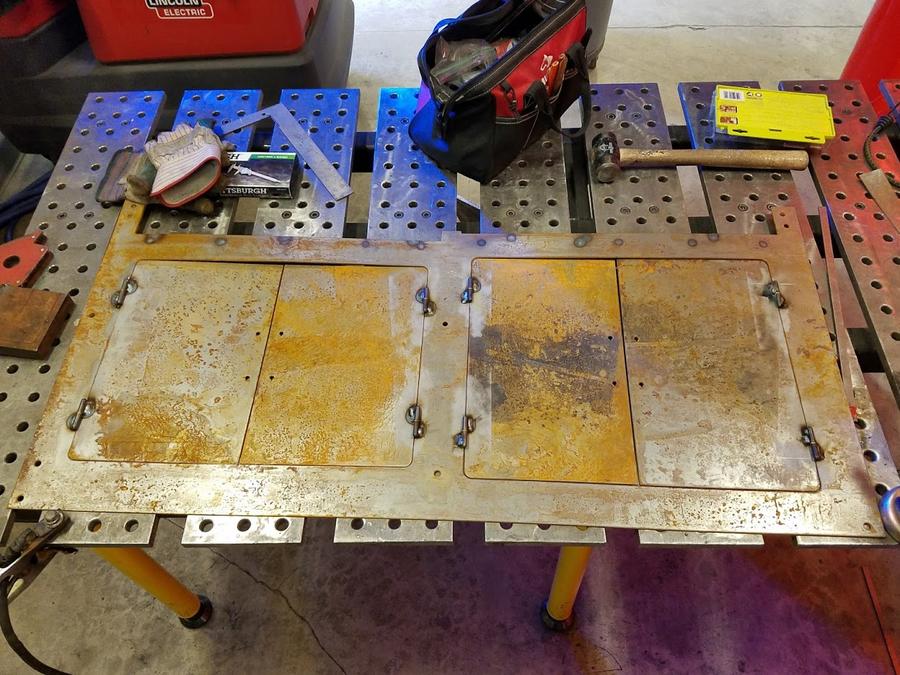
However, the missing doors and a place to keep stuff "kind of clean" is a real pain.  I have a pile of pans and other stuff that I kept in the old grill.  So I have decided to enclose the open shelves with two sets of doors, and backs, as well as learn how to create drawings I can use on the ShopBot wood CNC machine(Verify my design with cheap wood), port those drawings to work with the Water jet I can use to cut it out 14 Gauge sheet steel as well as learn how to use a MIG welder better that what I can do now, as well as powder coating it. 

I am currently working on my initial design and will try to cut it out tonight.
 
Finally, after learning how to measure things correctly, how to enter them into the computer, how to actually setup the ShopBot and program that with the information I was able to get the design below cut out on the wood test piece(s).  During this exercise of patience I also changed the design a few times and fixed more than one "mistake" :)  Maybe tonight, I can get the plan ported to the waterjet SW.


.  
 
I finally got the front cut on the waterjet. I had never used it before and did a nice clean job.  Had some issues with the pathing sw so some of the holes have got a key mark in them but I think the door handle will cover them.
 
Since I use a Mig welder once every 18 months, my skills are, shall we say, are  pathetic. :)  So I practiced for for an hour to two and then welded the hinges on.  One bad thing about the water jet and then leaving the door outside during a rain is that the metal kind of rusted... :)  I see a hour or so in the snad blasting booth in my future... I also welded some stiffeners on the back side that will help keep the metal straight.

 
Hello Ken, welcome to the SMF! 
welcome1.gif
 Great job on posting up some pics for all of us on your new grill mod project.
Looks-Great.gif
No question about it, you're definitely going the extra mile to Pimp your new grill, that's awesome! 
yahoo.gif


I wouldn't let a little light surface rust bother, those doors will out last the rest of your grill even if you didn't paint them at all. Rustoleum makes awesome products to adhere to rust after you have lightly buffed it off, and the primer and paint will stick just nicely to it. It's the light film of oil from your hands and stuff you don't see that will cause you all the problems when you try to paint over that, cleaner the better.

As for your hinges, I like to use a dry type lubricant ( moly graphite spray ) over a petroleum based. Helps keep the dust and dirt from sticking to it causing you a bigger mess!

Also pop rivets work really well sometimes for mounting hinges over welding to light gauge material. Unless you have lots of experience with light metal and how heat affects it,it can drive you crazy for when things start to warp and pull out of square on you.

Your project looks really great, no question you are going the extra to make it look really nice for yourself.

Here is my .02 cents worth on your project. I knowing that the original material used by the manufactures to build your grill isn't very thick. I would pop rivet everything to your grill frame work to close it in, your sides hinges, everything. The you could use a magnet latch on your doors to keep them closed.

Now for the advantage in using pop rivets over welding in your project. You have the option of really Pimping out your new grill by using light ga. smooth stainless steel and or smooth mild steel or aluminum diamond plate.  NOW you really have a conversation piece for when you have friends and family over for a cookout and you're all standing around your New Grill tipping back a few cold ones while waiting on your meal.

Looks-Great.gif
, keep us posted with more pics for when you're all finished and up and smoking !  
grilling_smilie.gif
 
 
  • Like
Reactions: ahumadora
Well I finally got the powder coat.  I spent a couple hours figuring out how to attach the side pieces to the grill, built some L brackets to hold the pieces together in the back.  I didn't need to drill any holes in the actual grill since 16 gauge steel doesn't bend that easily ;).  Then spent a couple hours sandblasting and calibrating how long I need to leave the sides in the oven so they hit 400 degrees for 15 minutes and the actual powder coating was a breeze and  i was able to get all six side pieces powder coated over two nights.   

I then got them home and installed with almost no issues until I looked at them in the sun light.  My color match was not so good, so I now have fancy, sporty, customized 2 tone grill :)  I had a friend of mine try to pick the correct color afterwards and he made the same mistake as I did.  I am now ordering some powder coating hopefully a little more grey.  When it comes in I will give it a try on the front pieces. 


Last edited:
Hello Ken, your progress 
Looks-Great.gif
 thanks for keeping us posted on your WIP ! 

IMO, the two tone color just adds character to your custom build, detail that bad boy out with a little red and orange fire flames onto the over all flat black and no one would know the difference unless you told it wasn't meant to be that way.

My money's on, your friends and family are more interested in what magic you have going on, on the inside of your Smoker over it's outside two tone custom uniqueness !  
xrocker.gif
 
Better late than never.  I spent a couple hours this weekend finishing this thing.  It came out pretty nice.  I can now store the grill tools and stuff and not have to worry to much about the weather except heat but thats a different issue.  Gets kind of hot is Phoenix.


SmokingMeatForums.com is reader supported and as an Amazon Associate, we may earn commissions from qualifying purchases.

Latest posts

Hot Threads

Clicky