My Stump Gravity Feed Clone Build

  • Some of the links on this forum allow SMF, at no cost to you, to earn a small commission when you click through and make a purchase. Let me know if you have any questions about this.
SMF is reader-supported. When you buy through links on our site, we may earn an affiliate commission.

all5n

Newbie
Original poster
Sep 25, 2015
27
15
Hey everyone!

Fairly new to the forum, but have been lurking for a while.  As promised in my roll call post, i wanted to share my build experience on this smoker.

I started out 10 or so years ago with a Bar-B-Chef from bbqsgalore.  That recently gave up the ghost.  My neighbor and I decided to build our own stump clones.  His was first, and we over-shot a little.  It will easily smoke about 28 briskets.

For mine, we scaled it down to something sane.  This one will only hold about 8 briskets.

I learned to weld during this process (and got too good with the angle grinder), and took over the garage for a month or so (the wife was not pleased).  But the end result she is more than happy with.

I have a visio diagram with the design/schematic and all the cuts, if anyone is interested.  Drop me a PM.

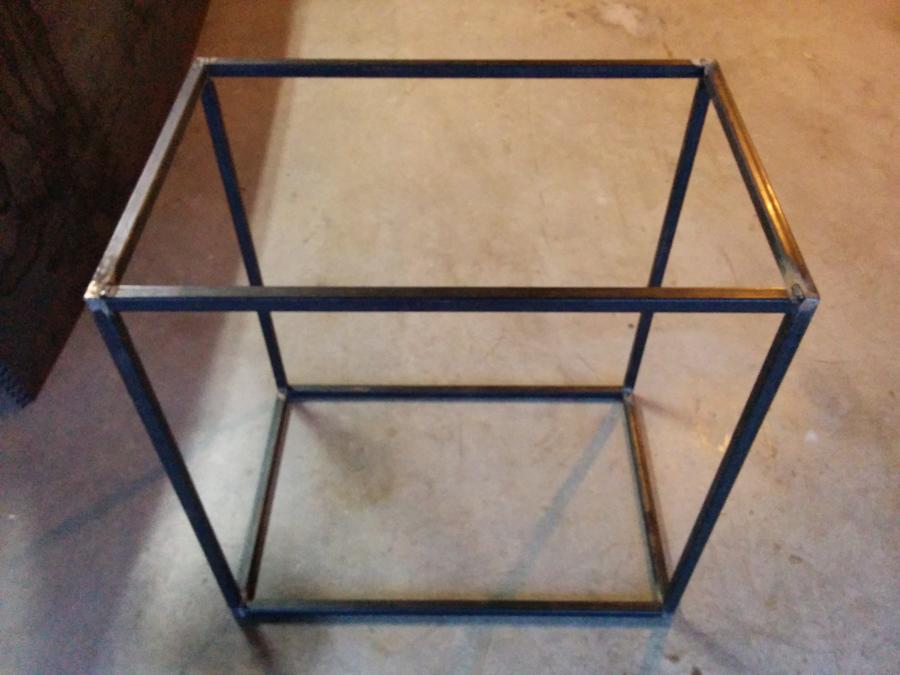
The basic frame.  36h x 36w x 24d (inches).  4x 90 degree clamps make lining up the welds square easier.  This is 1" square tubing.


Cross beams welded in.  The project seemed to go fast until this point.


Door frames.  Smoke Chamber, charcoal chute, and firebox doors.


Mineral wool for insulation.  This is the smoke chamber door before i welded the sheet metal to close it up.  Used 14 gauge sheet metal and a handy plasma cutter to cut the pieces.


Fire box and chute is made from 1/4" steel plate.  The welder got a workout putting it together.  The firebox is 8x12 at the bottom.  The chute is 8x8.

Smoker is upside down in this picture.


Smoke vent from firebox to smoke chamber.  You can also see the angle iron used as a slide for the grate at the bottom of the fire box.  Makes for easier cleaning/replacement.  Used one of the grates from my old bar-b-chef to make the firebox grate.

Smoker is upside down in this picture.


Starting to seal off the chute area.

Smoker is right side up in this picture.


Angled drip catch at the bottom of the smoke chamber.  Used a makeshift metal break to give it a slight angle.

Smoker is upside down in this picture.


Inside skin done with rack slides welded in.

Smoker is upside down in this picture.


Outside Skins complete with doors welded on.  No latches yet in this picture.  You can also see the dual heat shields on top of the firebox chamber port.  Used the chimney from my old bar-b-chef.


Possibly the hardest part to this process was loading the beast up and taking it to have it sandblasted/painted.  Took 3 people to muscle this thing around.

Here is the finished product.


I finally got around to making a side table, and the paint i used didnt quite match :/


Thanks for looking guys.  Let me know if you have any questions.

-allan
 
Last edited:
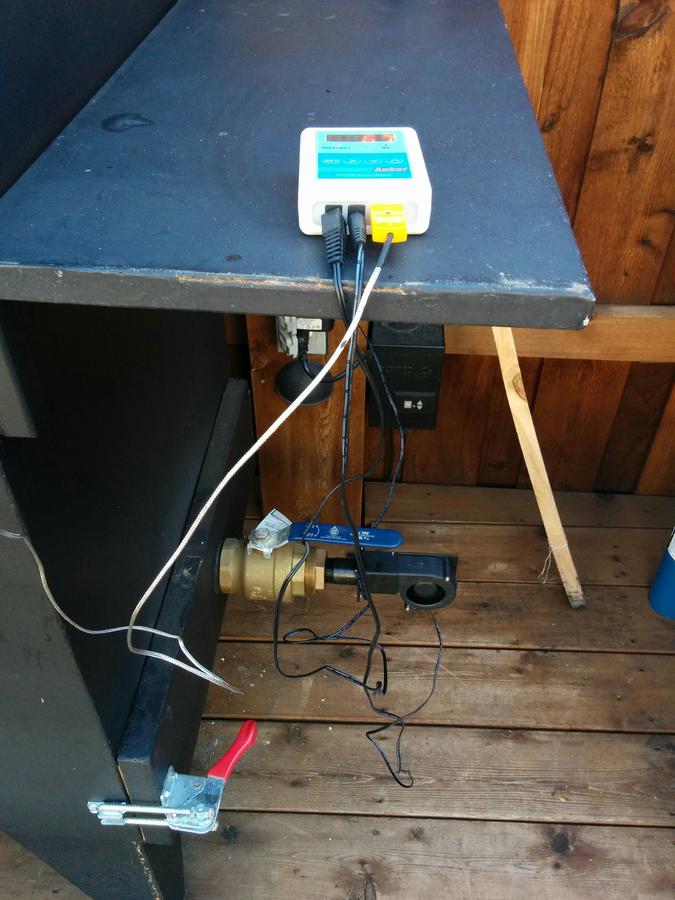
It works like a champ, I actually finished it this past march.  I bought a temperature control unit with a mini-squirrel cage blower for the air intake.  Uses more charcoal but gets the smoker ready for the meat faster.

The problem with my old smoker is i had to check it every hour or so.  This one will hold enough charcoal to last 12-16 hours, and the temp controller keeps it a constant temperature.  Set it and go to bed.

Next up is pastrami and a roast beef...  Now if that new hobart meat slicer would show up...
 
I have a pretty long list of garage projects, but is I ever get through them, I may contact you for the plans!
Points for sharing! :points:
 
Nice job All5n!  But I don't' quite understand the combustion process on your gravity feed system. I assume it's sealed tight on the top (until you open it to feed in the charcoal)?  And you say the ~3x4" rectangular pipe is the smoke feed INTO the meat area?  Great idea using a temperature feedback controller on the air inlet.  But where is the fresh air fed into the combustion area?  

How does the ash fall out? You show a slide in area for a grate...is there an ash/ember area under there?  Do you empty it out the back?   I assume that's all integrally sealed so the smoke doesn't go out the bottom?  Or is the "draft" so strong that the smoke all goes into the meat chamber and up the chimney?  So then how does the blower work?  I see a brass ball valve in the finished pictures...is that the (only?) air inlet?  It appears about opposite the rectangular smoke outlet--no coincidence?  

Do the coals ever jam up in the feeder?  The 8x8 dimension of the feed chute is uniform along the length?  The perspective of the pictures make it look angled inward as the fuel feeds, but that would seem to invite jams.    

I use a pellet gravity feed system built around 2" iron pipe so I'm particularly curious how yours works scaled up to charcoal size.   
 
Edit:  2" ball valve, not 3".

The firebox door is on the right side of the smoker at the bottom.

In the last picture, you can see a 2" ball valve on the lower right hand side.  That is the air intake to the firebox.

I welded a custom metal tray that fits inside there to catch the ashes as they fall through the grate for easy removal.

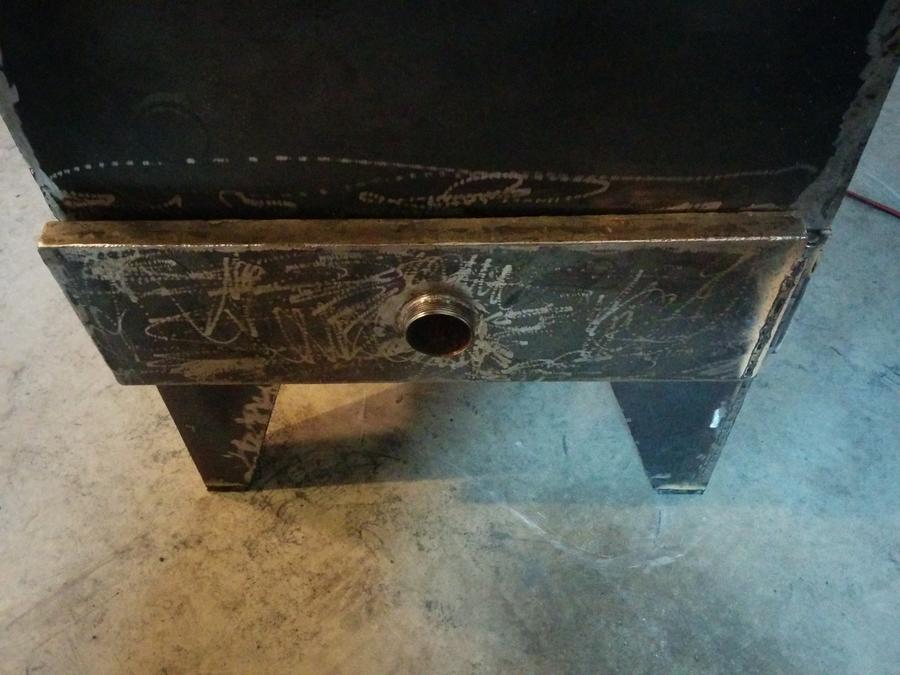
Here is a better picture of the firebox door (prior to painting/adding the latch).  The ball valve is threaded onto that (with a pipe wrench).  Then i have an adapter that fits the blower from the temperature controller onto that.


Here is a picture of the firebox with the grate "slide-in":

 
Last edited:
The chute is not angled inwards.  It flares outwards towards the firebox at the bottom.

I think I see the problem.  In many of the pictures, the smoker is actually upside down.  I will re-label them as such.
 
Thanks for the details--that new first picture is just what I needed to see!  Now I notice the pressure clamps in the earlier pictures keeping the feeder hopper and ash tray leak-tight, which was another concern of mine. Is there any additional gasketing there or just flush metal-to-metal fits?   You're an excellent welder to do all that without warping!   

So that ball valve is 3" as in 3" pipe?  Bigger than I thought.  And the thermostatically-controlled blower attaches to that with it fully open?  Can you estimate what your typical air flow is when "on"? Details on the blower?   Is it just fully on or off or is the controller more involved than that?  Perhaps you have pictures of the smoke coming out the top chimney in operation?  

One last question: it appears your air inlet is at the very bottom within the ash catcher. When I've tried that with smaller charcoal chutes, the positive pressurization down low kept the ash from freely falling (the air is pushing up against gravity) and my grate system would clog.  (My grates were much smaller than yours.)  Are the openings in your grate spacing around 1" or 3/4" or ???  So embers smaller than that fall through with no clogging issues?  And no clogs at the rectangular port routing smoke to the smoking chamber?  What do you use for charcoal?  Favorite Brand? 

Do have any estimates of how heat is distributed vertically in the feed chute?  About what is the height of burning coals at any given time?  Are the coals hot all the way to the top and it's only a lack of oxygen keeping them from burning?  

I commend you on your design.  You reached success (set & forget) in a single iteration!  Most of my efforts are full of plugs and patches where I needed to re-route things once reality intruded on my design!   
 
Trust me, i am an amateur welder at best.  The finished product looks good due to the nice paint job, but trust me there is warping.

The bigger panels bow outward or inwards at places.

I would still be working on it if i was going for perfect.  But the Q it makes is far more perfect than the smoker that makes it.

The seals are not metal on metal.  I used nomex felt tape to seal the doors.

It is a 2" ball valve.  got it at Lowes.  There is a screw-in adapter that goes on the outside of the ball valve making it a 1" aperture, into which the blower fan fits/screws in (not pictured).  I remove the blower and controller when not in use to keep it from getting wet.

I haven't measured, but i would guess the grates are 1/2 " between the bars.  I have used both lump charcoal, kingsford briquettes, and the cheap grocery store brand briquettes and never had an issue with clogging.  There is surprising little ash in the ash catcher after a run - the efficient burn seems to make it a very fine powder.

I never see charcoal burn high up the feed chute, mainly just in between the air inlet and the outlet to the smoke chamber.  All the burn seems to be right at the grate.

This was definitely not the first iteration.  We worked on my neighbor's beast first, which is the same design but at about 2x the scale.  His used 1.5" square tubing (this one used 1" square tubing") and a 6" square chute (it is also much taller).  You could run a BBQ joint or catering business using that thing.  We applied a lot of what we learned on that one to this "smaller" model.
 
Last edited:
To All5n, Thanks for all your help.  Your humility is evident and commendable but so is your design and execution on this--no brag, just fact.  And no shame in using gasketing at the seals; the pre-weld flatness and planarity of the stock material probably makes it required!  Learning welding from scratch is a huge tribute to you Sir!  

My experience is that .25" square grates lead to clogging (esp with Kingsford!) when pressurized from below so your 1/2" proof of principle is a real contribution to the art/science of this.  The fact that it's 1/2" in one dimension only (slots, not squares) may help, and the fact that your grate's rails have a triangular "channeling" effect may help too.  As you've noted, being able to feed air from the bottom (up through the grates) without clogging means you help combust the small coal fragments further to ash even after they've fallen through.  

My experience with simple on/off thermostats on blowers is that when shut off, the heat and smoke back-fills the blower which is probably a fatal flaw.  Hence any info you can share on your blower and its controller is appreciated.  I rather suspect an analog speed control, where a min flow/pressure is given as a setpoint, is the way to go with this.  Am I right?  

And did you mention what guage steel plate you used?  The structural strength is in the frame, and the double-walled construction is where the thermal insulation comes from, so the sheet stock needn't be heavy.  Although lighter stock will warp more--no matter how experienced the welder!  
 
Thanks for your kind words.

The welding stuff was a pain, no doubt.  I probably spent more time with the angle grinder grinding down blobs of flux core than any other single task on this project.

We used a cheap 170 Harbor Freight mig welder.  It actually failed and we had to get a new one under warranty with about 4 hours left to complete.

The blower that i bought actually has a little door that closes with the back-pressure so that no smoke comes back out the fan port.  I can get the link for that if you want it.

We used 14 gauge steel sheets for the skins, cut to dimensions using a (cheap) Ramsond plasma cutter. 
 
Great info!  Yes, I'd love a link or mfgr p/n's for the blower and controller you use.  The "check valve flap door" sounds like just the thing to make this work yet  is something one could spend hours trying to re-produce on their own.  
 
Hello all5n,

I am thinking about building a smoker just like this one. I just can't justify spending over three grand for a smoker. Plus building one sounds like fun and I can say I built it.

Anyway, I have a couple questions for you... How big are your cooking grates? When you had it sandblasted, did you have the inside blasted? Or did you just season it?

Thanks for all the info. Hopefully I can start on mine soon.  
 
The guys i paid to paint/sandblast also sandblasted the inside for me.

I sprayed down the inside with canola oil and then seasoned it.  Worked great.

Total cost of materials (without blower) was around $800.  Doesn't count gas to/from the steel supplier.  Sandblast/Paint was $150.  Blower/Controller was $150ish.

The grates are 23"x23".

Here is the front view from the blueprints i created:


Last edited:
Thanks for the information. I am getting prices today on the steel. Now that you have used it a few times, would you change anything? Or do anything different when you built it?
Thanks again.
 
SmokingMeatForums.com is reader supported and as an Amazon Associate, we may earn commissions from qualifying purchases.

Latest posts

Hot Threads

Clicky