20" Pipe RF Smoker

  • Some of the links on this forum allow SMF, at no cost to you, to earn a small commission when you click through and make a purchase. Let me know if you have any questions about this.
SMF is reader-supported. When you buy through links on our site, we may earn an affiliate commission.

geothermal

Smoke Blower
Original poster
Jul 16, 2014
91
14
Mukwonago, WI
Hello from Wisconsin!

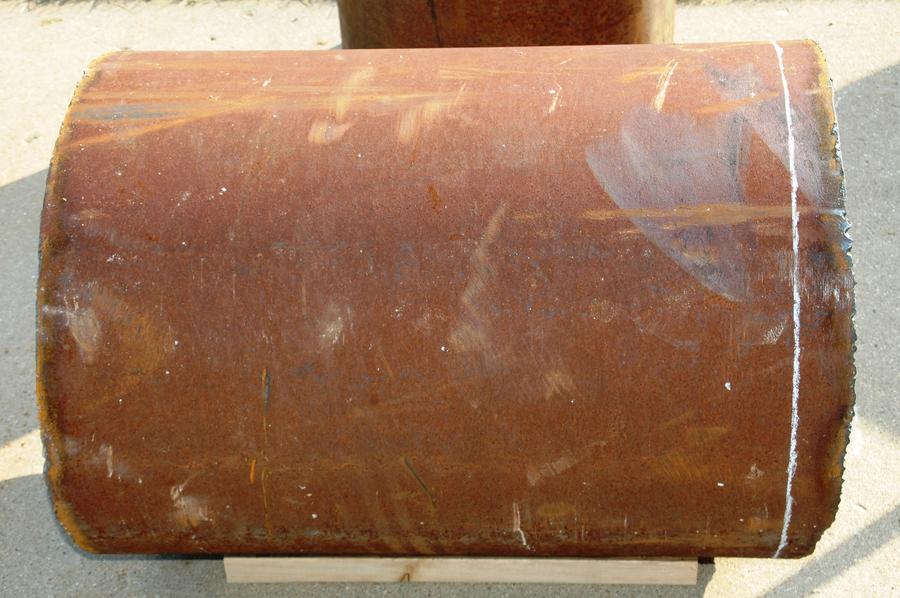
I'm new to the forum and planning my first RF smoker build. I have a couple questions to get me headed in the right direction. I couldn't find an old propane tank, so I acquired some old rusty 20" X 1/4" pipe from a local steel supplier. I had them cut a 4' and 2' piece which turned out to be more like 55"  and 26" pieces. I'm building a backyard smoker, so I don't intend of competing and since it's just my wife and I in the house, I would rarely have the need to cook a lot of meat at once except for an occasional party. I don't plan on putting it on a trailer, but do plan on attaching 4 old steel tractor wheels (2 large at the FB & 2 small under the end of the CC) to make it kinda look like an old tractor. That way, I can at least roll it around if I need to and if it doesn't work, I can let it rust in the yard like yard art :-). The pipe is pretty heavy so:

1. Should I take advantage of the whole 55" for the CC, or would a pipe that size work better on a 48" or even a 36" smoker?

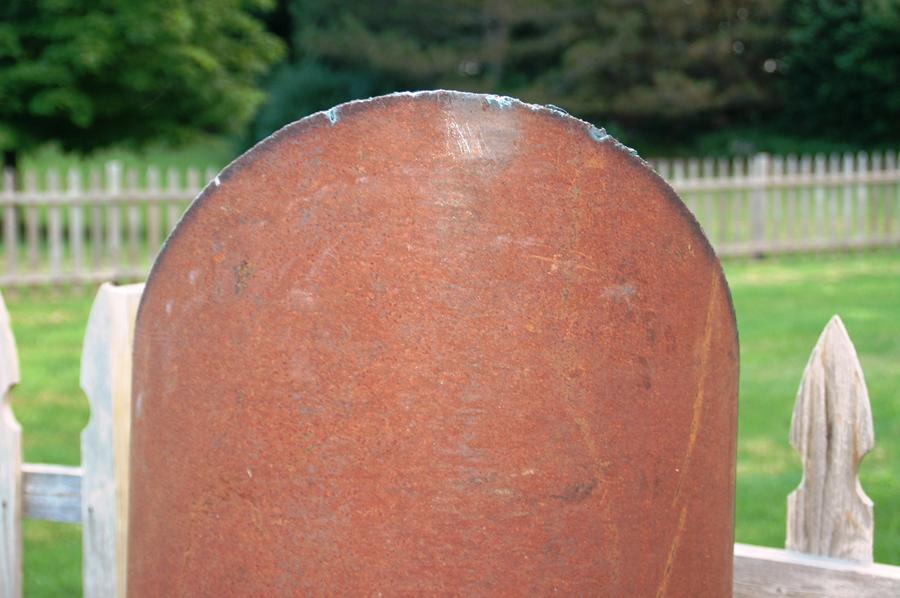
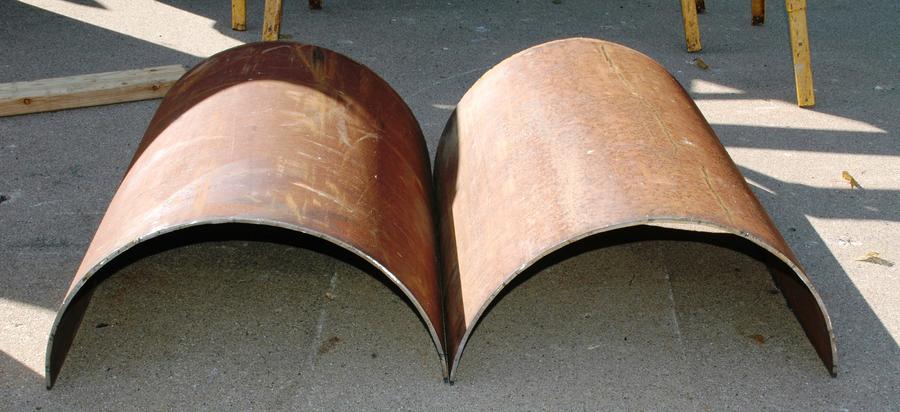
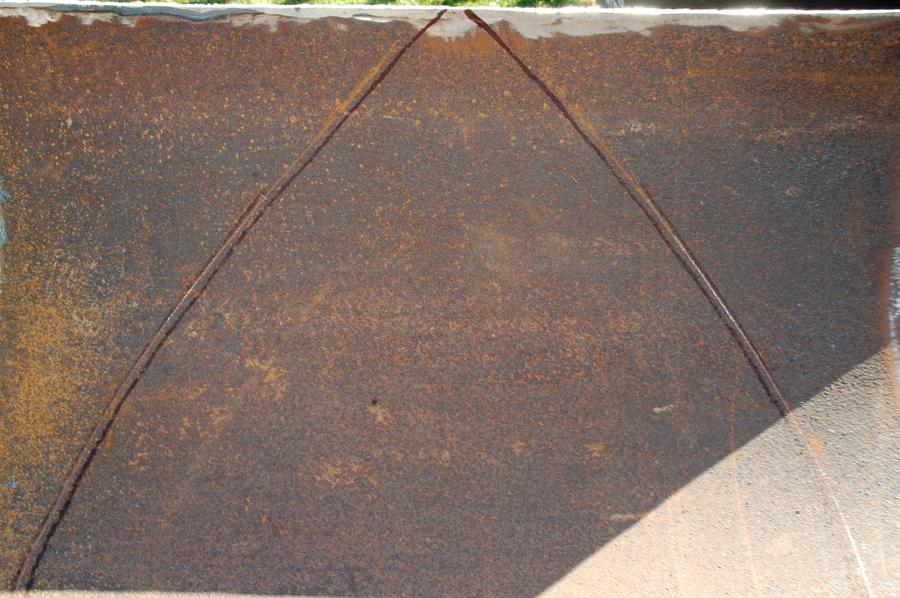
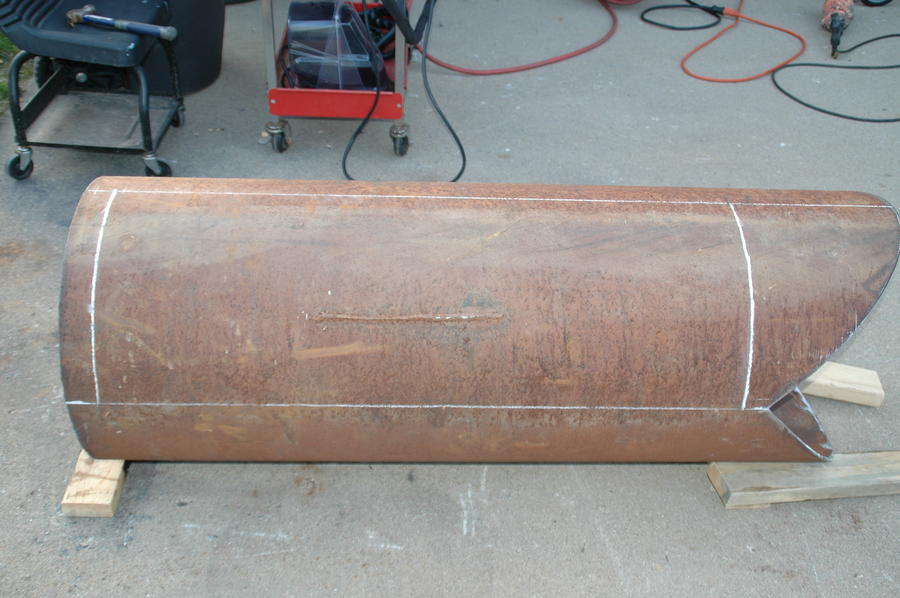
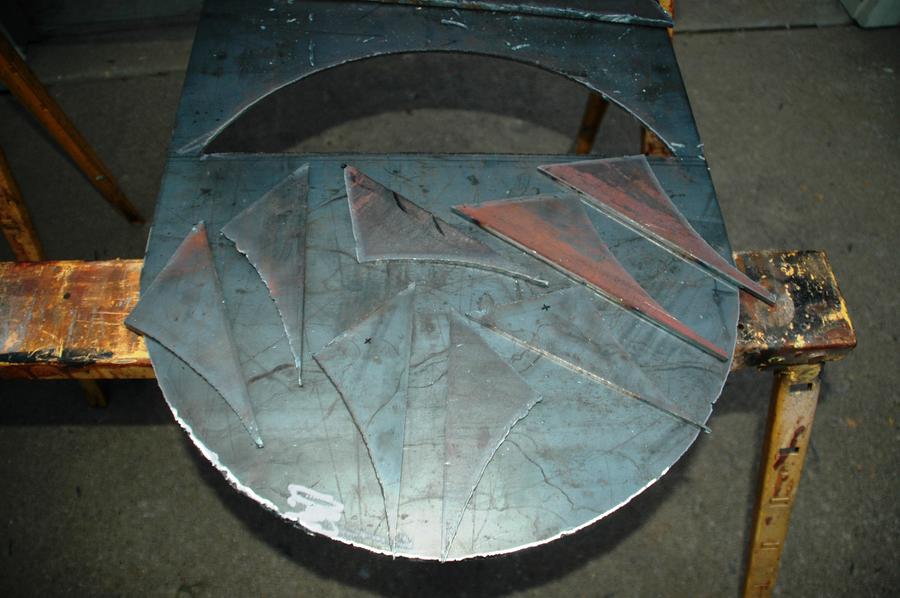
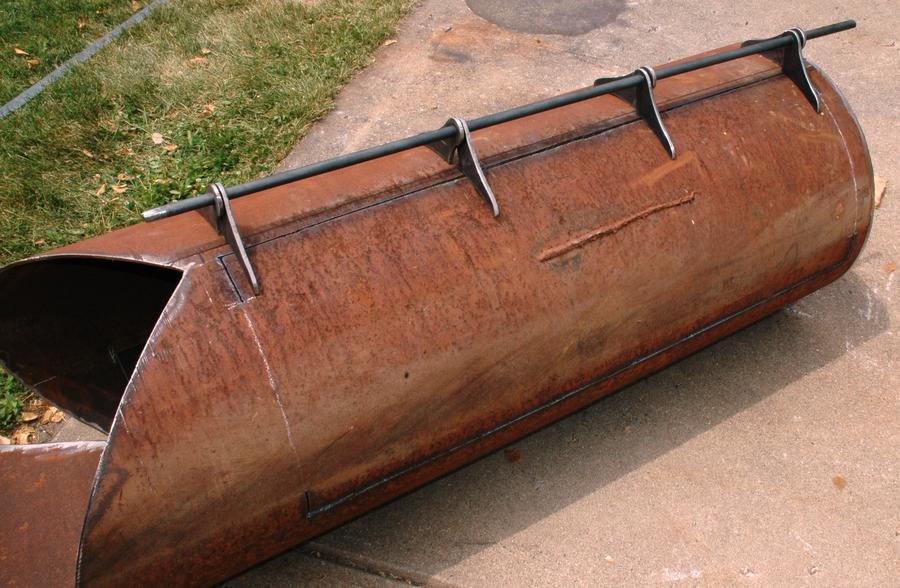
2. I've read somewhere that round ends are better opposite the FB to promote a more fluid path for smoke and heat as opposed to a flat or square end. So my plan was to cut the smaller pipe in half longways then cut it and the end of the CC to create somewhat of a round end. Sorta like a reverse Saddle Cut. I realize I'll probably end up doing a lot of grinding to get them to fit properly, so I'm wondering if it's really worth the effort or should I just weld on a flat end?

More questions and pictures to come.

Thanks for any advice.

George
 
Last edited:
Hello.  Well, size does matter!  As to the length, this is one of those "your gonna have to decide that" question.  If your description is accurate then a 36" cooking chamber will be more than plenty.  6sq ft of cooking space should be more than enough for you and the wife; but what IF!

Yes a welding head/cap would be better for the flow of heat and smoke but you don't want to buy one.  Really expensive; "know what I mean Vern"?  Unless you are a really experienced pipe fitter/welder, the process you are talking about trying will be such a pain in the ***, you will wish you never started!  I was a welder pipe fitter for almost 20 yrs. and I would not even consider messin with that.  I would just go with the flat end in this case.  Just my opinion.  Good Luck.  Keep Smokin!

Danny
 
You might want to also consider what Rib did on one of his... It would be easier to pull off and help with the flow.

900x900px-LL-c032319e_LL.png
 
That's not a bad idea at all!!!  Much easier to do and while not "perfect", should greatly improve performance of the smoker.  Leave it to Ribwizzard to come up with a good idea!  That boy knows how to build smokers!  Keep Smokin!

Danny
 
Thanks Danny and Len. Yes, I've seen Ribwizzard's idea before and have also read that post about Feldon's calculator many times, so I think I have my sizes (below) right. Just need to decide to go with a 54" or 36" chamber or something in-between. I'm just stubborn enough to try the pipe fitting like I mentioned just to say I did it and cause I've never seen anything like that before (Probably a good reason for that like Danny mentioned). I figure if I screw it up too much the first time, it will decide for me how long the CC will be. I plan on doing some plasma cutting today after work.

20" Dia X 54" CC: FB to CC Opening 45.24 ci X 1.5 = 67.86 sq. in. or approx. segment height of 5 3/8"

20" Dia X 48" CC: FB to CC Opening 40.21 ci X 1.5 = 60.32 sq. in. or approx. segment height of 4 7/8"

20" Dia X 36" CC: FB to CC Opening 30.16 ci X 1.5 = 45.24 sq. in. or approx. segment height of 4 1/16"

Thanks again.

George
 
Last edited:
I've thought about rounding the end of the pipe and think it would work well. Capping it is easy, just tack weld it at the top and heat as you go as you bend and tack it evenly on both sides. I'd go with a larger radius than the pipe so as you don't have so much taper to blend in at the top and bottom.

Honestly, it's a lot of work, but I will no longer build reverse flows with flat end caps, too much heat is lost at that end when it's flat like that. At the very least, install inserts on the inside to help the air flow.
 
 These are the 20" pipes I have to work with.


Short 20" Pipe for part of FB.


Getting ready to square one end of smaller pipe.


Wrapped pipe with brown wrapping paper to get square end and marked with soap stone.

Pipe marked and ready to cut.


Before I removed paper, I cut it off square to use for future template.


Pipe marked square.


Plasma cut complete.


Grinded and looks good and square.


After my first failure last night to lay out the wrong side (Main) of the "Reverse Saddle" I think and hope I got

the right "Branch" template layed out on the brown wrapping paper. This by the way is from this site:

http://www.harderwoods.com/pipetemp...rmd=20&rbd=20&rbt=0.25&offset=0&Submit=Submit


After wrapping template around CC and punching holes. Side view.


Top View.


Other Side View.


Removed Template and connected dots with soap stone. Side View.


Bottom View. Vertical marks are original pipe welds.


After plasma cut.


Side view of rounded end of CC opposite of FB.


Top/Bottom View of CC end.

 
Last edited:
GEO, morning...... very nice link to templates.... I wish I had that 20 years ago.... :popcorn ..... I'm in......
I'm learning stuff.... good stuff..... Dave
 
Got the short piece cut in half.


Set the half pipe on top of CC to scribe for the cut. I could have used that template but wasn't sure if the CC  pipe was perfectly round.

It had a dent on top rounded end that I pounded out with a sledge hammer.


Fit was very good, thanks to that template.


Scribed for the cut to cap off the CC.


Plasma cutter also cuts wood! I thought I saw smoke coming from somewhere.


Round end cap cut out.


Side view with end cap on. After cutting the small pipe in half and then again to fit the end of CC, it expanded about 1/2",

so I'll try to bend it in with clamps once I'm ready to weld.


Not too bad a fit. I expected to have to do some grinding to get it just right for welding.


Tomorrow night I hope to get the other end of the CC squared off and the left over half pipe squared off. It will become the bottom of the FB.

If the sun is stil out, I might even get a start laying out and cutting the door on the CC.

Then it's back to the steel yard this weekend to try and find some flat 1/4" pieces for the RF plate and sides of the FB.
 
Last edited:
Question on the CC door(s). I see a lot of builds that weld 1/8" X 1" flat steel around the door edges. I can see the welds on the outside, usually a couple inches long spaced around the door.But then is it a good practice to also weld the inside all the way around? Seems to me it wouldn't seal off if you didn't do that.
 
CC door marked. This view is backwards. For some strange reason I fell like the FB needs to be on the right side of the CC door.

Must be a right handed thing. :-)


CC end at FB squared off at maximum 55" from rounded end cap and door partially cut. Need to get hinges and 1X1/8" flange installed before cutting the rest out. Grinded CC end and  end cap to make a tighter fit before welding and cut other end of FB half pipe square at 25" long. So FB will have a nice round bottom (who doesn't like that?) and be 25" long and squared off at the top approximately 24" from the bottom round pipe. I plan on putting in an ash tray at the bottom. Trying to decide if I should put the FB door on the side or back? Any suggestions? Either way, I will put the intake vents in line with the CC, both lower and upper vents, Next stop, the steel yard to get some 1/4" flat steel.

 
Last edited:
Question on the CC door(s). I see a lot of builds that weld 1/8" X 1" flat steel around the door edges. I can see the welds on the outside, usually a couple inches long spaced around the door. But then is it a good practice to also weld the inside all the way around? Seems to me it wouldn't seal off if you didn't do that.


GEO, evening..... Another idea for the door seal..... use 14-16 gauge mild steel...... either drill holes in the door and blind weld the seal from the inside of the smoker...... OR as Ribwizzard does it.... using a grinder, notch the outside edge of the door and weld the seal from the inside...... you do not need 100% weld.... first weld in the center of the seal.... next welds on the ends.... then the center between the welds.... doing a weld pattern like that, the seal "should" shrink a little and be tight..... I would weld about every 2-4".... tack weld that is... take you time with the seal....

The amount of air leaking around the seal.... not much.... if you get it tight, you have maybe 10-20 thousandths gap... you can always heat shrink the seal or use high temp silicone...


I sure do like that "fitment" and cut out you did..... That will be one nice design.....
 
Last edited:
My RF plate is 48" X 17 3/4" X 1/4" thick. I am considering putting the drain in the middle of it by grinding and tapering the bottom edge along where it wil be welded to the CC.

Then before I weld, apply pressure along the center of the plate across it which should slope it 1/4" toward the center from each end. Does anyone see anything wrong with that?

I have see similar builds where someone has actually cut and welded pieces to create even more of a drainoff into the center.
 
You can take the RF plate and make cuts like below..... that should remove enough metal to form a shallow dish shape that will drain....

Set the RF plate on blocks and hit the center with a big BIG hammer, or press to form the dish then weld her up... or something like that...

 
SmokingMeatForums.com is reader supported and as an Amazon Associate, we may earn commissions from qualifying purchases.

Latest posts

Clicky