Electric SS Hospital Cart Smoker Built (W/ PID)...Updated

  • Some of the links on this forum allow SMF, at no cost to you, to earn a small commission when you click through and make a purchase. Let me know if you have any questions about this.
SMF is reader-supported. When you buy through links on our site, we may earn an affiliate commission.
The results are in...

The Getinge Castle blanket warmer went for $320 + buyer's premium (10%) so that's way more than I wanted to go on a curing cabinet project!

Alas, I was the winner on the little small SS hospital cabinet. I went up to $80.00 as I already have an old grill/griddle that I plan on dismantling and utilizing part/pieces. We originally bought it for our camper because we loved the simplicity of the RVQ! The RVQ2 was/is a POS so we bought a little Champion gas grill to replace it...it works very well!

So, I'm planning on turning this into a little propane smoker. I'll would love some advice/input to get me going in the right direction? As soon as I gather all the pieces I will post pics and ideas (which I'm not sold on any one thing/idea, looking for inexpensive/effective products!). Todd sent me another 12" Pellet Tube smoker so I might just make a cold smoker out it?

Thanks for playin'

~Brett

P.S. Correct me if I'm wrong...but doesn't this cabinet strike an eerily similarity to the Smok-It Smoker? Doppelganger!

 
Last edited:
Is there anybody out there? Just nod if you can hear me...they'll be no more ahhhhh-ahhhhh....Is there anybody home?

Okay, so as I posted previously, I was the auction winner of the small hospital cart. Got it home, cleaned it up and here are the particulars.

Construction: All stainless steel (apporx. 10-12ga), non-insulated single wall, except the door, it's double wall about 1/2" thick (no insulation). Most of the panels are spot welded together. There was some clear silicone around the inside perimeter bottom (where panels meet). I've scraped it all out and plan on sealing with high-temp RTV (black).

Inside Dimensions: 24"D x 26"W x 31"H (total volume is 19,244sq.in.).

The lower door hinge has pulled off (where spot welded); however, it's an easy fix with a tap and some SS screws.

I disassembled my RVQ2 and laid the pieces inside in the approximate places they may go? Remember, I'm open to any suggestions?

I also got these 2 SS things with it...I'm not sure what they are but they are full of circuit boards, digital displays (using) and a plethora of ss screws/bolts/fasteners, that and I can use the SS for heat shield and other various pieces?

Meat View:
 
So I got one of the fandangled long controlly things disassembled and use the SS to make a heat shield for the burner (i know there are holes, I may cover them or see if they're non-consequential?

Again...looking for input...I should mention, I'm move along pretty quickly when I work!


Tootles,

~Brett
 
Brett, evening.....   I see what may be a couple of problems....  first, the heat shield will direct heat to the side of the smoker... I could overheat and warp.....   Second, the venturi and orifice are inside the smoker....  the flame could consume all the oxygen inside the smoker, then the flame would go out, and you would have a very large propane bomb.... the venturi end of the burner needs to be outside the smoker..... also, the burner seems a little large for that small area....  

When using propane, you need good air flow inside the smoker....

The SS box is a cool unit for a smoker.... Nice find.....   Dave  
 
Brett, evening.....   I see what may be a couple of problems....  first, the heat shield will direct heat to the side of the smoker... I could overheat and warp.....  I'm not sure of the BTU of the grill? That is a concern, of course? Second, the venturi and orifice are inside the smoker....  the flame could consume all the oxygen inside the smoker, then the flame would go out, and you would have a very large propane bomb.... the venturi end of the burner needs to be outside the smoker.....This is almost exactly how the set up was on the grill I had. I do plan on having a few 1" holes in the bottom for fresh air? If for some reason it gives me a fit or won't stay lit, then I'll make a spacer and shift the venturi out of the cabinet?! Don't want no propane bomb also, the burner seems a little large for that small area.... I agree; however, it's what I had laying around in me garage
When using propane, you need good air flow inside the smoker....
The SS box is a cool unit for a smoker.... Nice find.....   Dave  

So I thought about getting a cheap gas valve (like one from a camper oven) that has a thermostat, thermocoupler and pilot light...I might still do that...just to be safe?

I will say the grill it was in earlier was not very big (of course it wasn't sealed and it had a few holes in the bottom?) I don't think we'll have an issue with heat/warpage...this is heavier gauge than the grill and it's further away from the edges?

More pics...

Gas valve installed:

Burner installed:

Gas Functioning:

Heat Shield Installed and Flame burning:

Dave (thanks as always)...I'm gonna let it ride for now, get my racks installed, get my fresh air/exhaust installed, run it and see what needs adjustment. From an engineering standpoint, I suspect you're correct! I respect your opinion...it's the reason I asked you to take a look...

Warmest Regards,

~Brett
 
Brett,

I'm with Dave on this one (Great Dave's think alike!).  I don't really like that burner and the heat shield "as is".  I've never been a great fan of propane smokers as usually the flame is turned way down to get the low temps, and there is that "propane bomb" situation if it goes out.

In addition to "wicking" heat to the side I think one side of your racks will be hotter than the rest.  I would like to see some sort of a central burner in the middle with a angled heat shield (think roof top) but open on all sides around the burner.  I would also put a second sheet as a real heat shield as any meat fat dripping on the one you have now or the angled one I'm talking about would immedieately ignite into flames (the metal is directly over the flame and would be very hot.  If you have a 2nd sheet of metal spaced say 1" above that with an air gap between them, it will prevent this.

Also since it's a single walled body it is going to be hard to hold temps "as is".  And as is, if you are smoking at 225* the body of the smoker will also be 225* which could be "fun" (once anyway).  I would think about adding at least 1" of roxul or similar insulation (high heat resistant insulation especially with the flame like it is and the small box size).  You could skin it in either aluminum or stainless on the inside of the box and probably use the spot welded in shelf brackets to mount the skin on. Do you know anyone who does sheet metal fabrication?  Probably worth the cost to have them make you a 5 sided box that would fit.  That's such a nice shell, might as well keep it pro looking.

Actually the more I look at this photo, I think you could use a 3 sided bend of sheet metal to form the top, bottom and back.  On the back edges you could leave some tabs that would bend over and rivet to the shelf rack that's already in there.  Then make each side a flat piece with tabs on the back that bend and rivet to the back insert. Use the solid blind rivets (no air hole all the way through when the stem seperates).  If you set the sides back from the surface of the rack supports you could probably still us the rack support slots as is.  The tabs would be in between the slots.  You would need to seal the joints between the panels though.  That would be the advantage of the 5 sided insert and new shelf racks as you could have it made as a sealed interior box when it's fabricated.  Does this make sense?

Also you could leave the bottom uninsulated and put two sheets of the 1/4" thick hardi-board in the bottom both as thermal mass and a fire shield.  If you insulate it the bottom sheet metal will need some x-bracing across the bottom to support the new bottom.

Just a few thoughts, I'm sure it can be refined before cutting anything.

 
Last edited:
Dave,

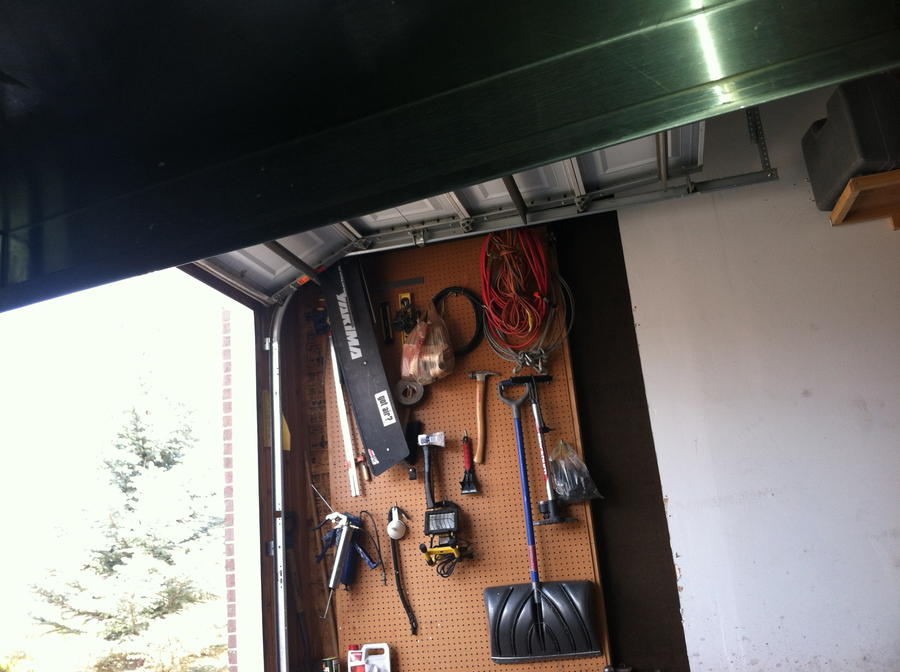
Okay, if I understanding you, you think a centrally located burner would be better? I agree 100%, there was no practical way for me to achieve this with what I had on hand. I was gonna mount the burner from the back, but that create an awkward location for the control!? I may still do this? As far as a 2nd 'heat shield' I already had that planned as I was gonna use a 1/2 sheet x 2"D steam table pan for chips...

Like this one--->
I'm aware that one side will be hotter than the rest; however, I plan on using that to my advantage? by rotating meat?

I also would like to have a double wall with some form of insulation between. I like your idea of riveting it too the shelving brackets (Side Note: There was only the one bracket that it came with, I bought some 1" x 1" aluminum angle for new shelving supports, if I make a new interior 'skin' then I could bolt them directly too?) This project is a minimum invest type deal, so we'll see on that. I know most of the cheaper smokers are single wall thin gauge CRS...this one is a little thicker (hell, even thicker than Frank's skin, but he has 2 layers and insulation between). It most likely won't hold heat ideally, but it might get the job done?

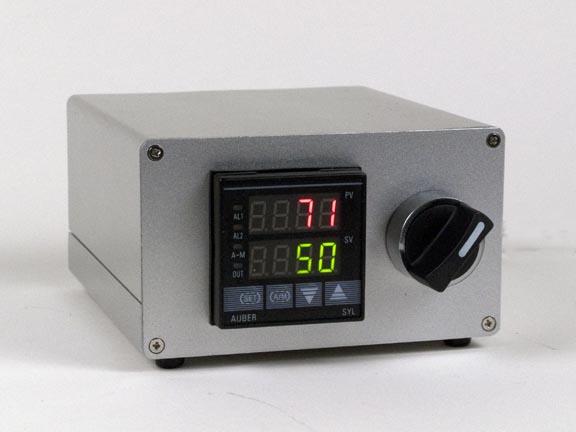
Another note I found out cruising the internet is the RVQ2 burner is only 12,000BTU...even the cheaper "Smoke Hollow" has a 15,200BTU burner. Not sure of cubic inches though? It'll be hot for sure on the exterior, but no hotter than my NBBD nor my gas grill I used on my deck?!

As I said, I'll run her up the flag pole and see what flys? I get the idea it'll be a constant tinker type project making subtle improvements trying to get her dialed in?! If you remember Frank's mods, I'm a try it an see what happens kinda guy.


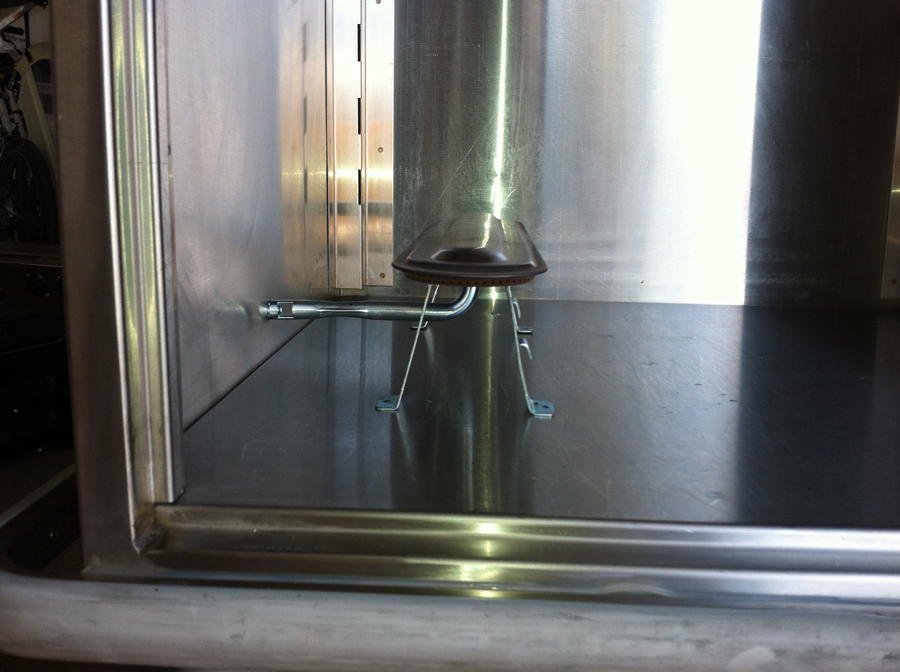
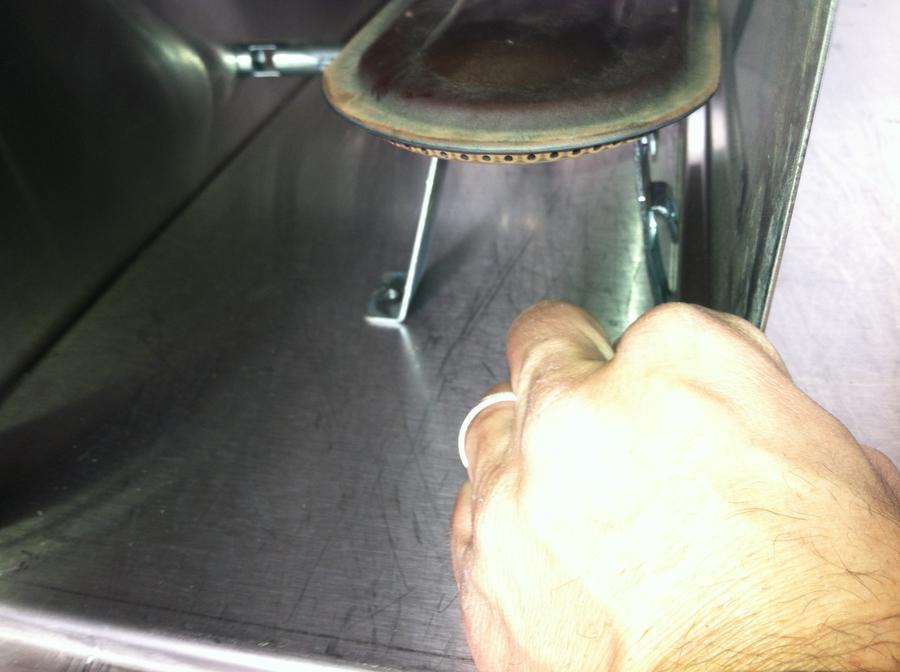
Oh yeah, my new exhaust stack...I'll make a dampner or get a 90* ell...it's 1 1/2 chromed brass sink tail piece...The coupler is galvanized (I know, I know?) But many years ago I used to be an iron worker (short summer, I was actually a machinist) I got zinc posioning from puddle welding galvanized decking on a bridge we were building...never been so sick! You'd have to get the galvanized metal hot enough to melt the zinc coating and that is 787.15*F...if I'm hitting those temps we got a problem!!!

Exhaust:
I'll keep this thread updated as I make more changes!
 
Yep, if you are hitting those temps at the exhaust port there is a REAL problem!

If you go with a interior skin over the insulation you could use aluminum instead of stainless to reduce costs.  That would let you use thicker material too so you could attach your food rack supports to the left and right side by riveting or through bolting (or welding the aluminum if you still have the right equipment available).

If you are going to upgrade the burner and stay with LP, Northern Tool has a $39.95 model that has three valves that control different parts of the burner for real tight flame control.  There are several builds on the forum that use this burner but they are in full size units more like Frank.  Maximum output is 35,000 btu. Pops used one in his cabinet if my memory is correct.  And I'm pretty sure he can dial it low enough to do cured sausage smokes in steps up to 150*.

http://www.northerntool.com/shop/tools/product_15490_15490


I would still try to mount it in the center with an air intake directly below it (perhaps with a rotating vent damper with a stem out the side or front for adjustment of the air flow.   Heck, with that size burner you could just cut a 10" hole in the bottom and probably still hold temps.  My main concern would be avoiding oxygen starvation and having that flame go out.

I also would not even mess with a chip pan and just use that pellet tube.  You already have it on hand and it's a proven performer in this type smoker, plus the smoke will be more even and last longer than chips in a pan. And I would still like to see a double layer of metal above this to prevent drippings catching fire.

I think if I was going with a LP burner, I would just mount a 12" square steel plate a few inches above the burner as a heat plate and thermal mass.  Then use the lowest rack a inch or two over that to be a dedicated drip/water pan rack for hot smokes.  That setup would work like a Holland Grill does and prevent any drips from flaring into a fire.  Just use a disposable aluminum drip pan and toss it after a smoke.  That way you could still use that lower rack for cold smoking when you don't have the burner lit.  I forgot to label the plate in the drawing but it's there.  I would go 1/4" or 3/8" thick and hit with with 2,000* flat black header paint. It's going to rust otherwise from the moisture that is generated by burning LP.  Just make some simple 90* brackets to hold the 4 corners up above the burner.  The one in my Holland grill would glow red hot in use, but I never had a drip flare up while I owned that grill.

Also you could use aluminum channel instead of angle and that would give some tip protection to keep your racks from tipping when pulled forward. Or just mount another small piece of angle above the racks at the front to act as tip prevention.

Something like this perhaps?


Just mount the pellet tube to the side of the burner since it will be well below the flames.  Just make sure the drip pan or something covers the tube to prevent it from being dripped on and extinguished or flaring up.
 
Last edited:
Dave and Dave,

Well, I've switched gears and decided to go electric! I found a 1,500w 110v element from a griddle. I will mount it from the back, run wires to the control on the top. Your ideas have paid-off, I've decided to add an interior skin to preserve heat. I tried finding some 16g aluminum, nothing really available locally unless I buy the whole sheet? I found a sheet metal shop that had SS, but for the sizes I needed it would've been $170 before cut and it was 20g. So, I went with some 16g sheet metal (non-galvanized). I lined the top first using 1/4" spacers to shift it down. Mounted the back piece directly to the old shelving rack supports (used pop-rivets) to attach...it actually looks pretty good. The sides and back will have 1 1/4" space. Ironically the sheet metal shop had some really nice duct insulation scraps, she said I could have as much as I wanted (score), except it's max temp rating is 250* (bummer). I wasn't gonna buy anything additional (the 16g was $106, cut to size).

Earlier, I got the element removed from the griddle, got the knob and associated wiring removed. Tomorrow my goals are:

1) Get the interior sides installed and all caulked.
2) Get the element layout, installed and a doghouse installed.
3) connect to a power source and see how hot I can get 'er up to,
4) I also bought some silicon fire/smoke door seal.

Of course I'll post some pics...just don't have time at the moment!

~Brett
 
Looks like "Son of the Electric Franken Smoker AKA/ Frank Jr." is about to be ALIVE!!!!!!!

Since you are going electric, no reason not use just plain old fiberglass insulation from the home improvement store (bare insulation, unfaced).   It should work fine since electric will not be quite as "flame on" as the LP version would have potentially been. 

Are you going to buy a Auberins ready to run 1,800 watt controller or roll your own from parts?  (Not sure what those two panels were, but I bet there is a temp control unit in there somewhere).
 
Dave--
I am looking at the auberin controllers (PID), the heatin element is a 1,500w 120vac! I clipped off the dial/heat control (it was a simple mechanical one)! So I need a controller that can operate the element? The cheaper the better! Which one would work? I can rewire the element 'hot' no manual control...let the PID control on/off for temp control? I don't need a fancy schmancy one!

Thanks,

~Brett
 
Ain't cheap, but this one is pre-made and ready to go for $215.  One probe for the pit and another for the meat all in one neat box and handles up to 1,800 watts of load.

http://www.auberins.com/index.php?main_page=product_info&cPath=8&products_id=203


Since we all know you are like a mad scientist type (keeping in role with the Frankensmoker motif), I would buy the PID module, and pick up some temp probes and a 20-25amp SSR relay with heat sink on Ebay.  Probably get the parts for around $100.

And Plan "C" is figure out what all those circuit cards in those two other panels the U.S. Guberment gave you are for.  I bet one of those has temp control in it. Then try and scavenge and re-task it.

If you have some mechanical relays up to the task of switching 20 amps, you could use them, but SSR (Solid State Relays) are better with no moving parts.  The constant "click, click, click" of a mechanical relay in a process control module will eventually cause a mechanical relay to fail (could fail open or could fail closed and start a fire).  That would be the drawback to a recycled mechanical relay for $5 on ebay.
 
Last edited:
Dave,
I'm gonna built my own from scratch using a PID, SSR and K Thermocouple (hello ebay)...should function well enough for me...here's the post I found a lot of good info on. Smoking a 13lb brisket in Frank and it's snowing pretty good here...so project will be hold until Monday!

http://www.susanminor.org/forums/showthread.php?315-PID-Controller


Ciao,

~Brett
 
Last edited:
Take a look at this web page on the Auberins site.  The page is for the box, but scroll down and look at the photos of what they show can be put in the box (which already has the cutouts).  That would work but it uses a mechanical contactor (relay) instead of a SSR.  Relay is cheap though and rated for 30 amps which would be more than a 120v circuit would ever output.  Take the rubber feet off and just screw it to the top of Frankie Jr and there 'ya go....

Items on the back plate are a BNC connector for temp probe, 120v PC type power socket for power in, and a single female 120v outlet for power to the element.  You could just drill round holes for cords and use grommets to protect the cords since it will be hard mounted to the smoker. Or if you want a clean look, drill hole for the power to the element and the K probe in the bottom of the box and run it on the outside edge of the insulation in the smoker (use high temp wire).  Then mount the BNC on the inside of the smoker.  You would have a 12 gage SJ wire coming out the back through a grommet with a 120v plug on the end to plug the whole thing in.   I would probably add an appropriately sized push to reset circuit breaker to the box also.  Actually might add two. One for the main power and a 1 or 2 amp one for the power takeoff to the PID to protect it.

http://www.auberins.com/index.php?main_page=product_info&cPath=7_34&products_id=262


Last edited:
Brett,

Check out this search list on Ebay.  Lots of PID controller kits in the mid $30 range (most with relay and temp probe, some with relay & ssr but no temp probe).  Most are buy it now and a lot have free shipping.

http://www.ebay.com/sch/i.html?_trk...pid+temperature+controller&_sacat=0&_from=R40

Yup...Here's the one I ordered (LINK)...as far as the box goes...that Auberin one is nice (and pricey), but I'll make a 'box' out of something 'cool' and mount it on the smoker...Don't let the label mislead you, I found many others that have used the same, cheap, PID with success on other forums. the AC220V is a max reading!

We're currently at a balmy 23* and snow flurries...got up at 4:45am and fired up Frank for a nice 12# brisket smoke. Holy heck was it chilly this morning! As of 2:00pm (local time, yo) the brisket was at 185* and lookin' sexy! I used some hickory (first 6 hours in the 18" AMNTS) then loaded the 12" AMNTS woth oak for the remainder...Folks are in town visiting from Minnesota...gonna show these 2 southerners (Mom from NC and Father from TN) what real smoked Q is!!!

~Brett
 
Okay...

So I switched gears and went electric.

Cabinet (with taxes and fees) $92.55
Incidentals (screws, aluminum channels, drill bits, etc..): ~$86.00
Used 1,500w/15amp burner: $4.16
Ebay PID controller with SSR and Temp Probe: $21.89
16g Steel: $106.00
TOTAL: $310.60 (way more than I wanted to spend, for sure and more than TEFS by $230.00)

Dimensions: 22 1/2"D x 24"W x 30"H

It has 16 gauge interior walls (1/4" on top, 1 1/4" on sides and back), no insulation :th_crybaby2: I wanted to be able to go above 250* and not stress over fiberglass and couldn't find rock wool in a timely manner!!!

I still have to make some custom racks as the one that came with it is now too long based on the double wall construction (I could modify it, but it'd look funny). I have to add a pig tail and the wiring for the PID (plus a controller box). I'm also thinking a granite top?

I plan on adding 2 more sets of racks, a fresh air hole in the base (plus a large "dent" that makes the floor pitch downward).

The 'doghouse' was made using the heavy gauge SS from the two "towers" and is 2 overlapping pieces pop-riveted together and 4 legs cut from the same heavy gauge SS (looks nicer than it sounds and has no holes). I also sealed the whole interior with Hi-Temp RTV.

THE HEATING ELEMENT:

INSIDE:

DOUBLE WALL (riveted in):

ALUMINUM CHANNEL (2 more sets to install):

ELEMENT:

~Brett
 
Last edited:
You do know you will end up drilling those rivets out and installing insulation at some point.  Look on e-bay for Roxul batts. You can get a box of 6 pieces of 2'x4'x2" shipped for around $60-70.  It it's too thick, just split them into thinner pieces to fit.

On a side note I fiddled around with my warmer cabinet today.  Found out why the element is not heating.  The school I bought it from had it disconnected but then reassembled the cabinet for some reason.  I did not have my meter with me so I don't know if the element is open or just has high resistance (slowly dying).  Good news is it looks like a standard finned element so once I pull it I should be able to find a replacement at a decent price.  I need to lay the cabinet on it's side to work on that though and I was by myself.  Cabinet is rated at 16.8 amps and lists a 20amp breaker recommendation so it's probably a 1,500 watt element (with the rest going to the 3 fans & interior light).  I'll see what the marking are when I pull it.
 
SmokingMeatForums.com is reader supported and as an Amazon Associate, we may earn commissions from qualifying purchases.

Hot Threads

Clicky