Home-Made Weber Kettle Charcoal Basket(s)

  • Some of the links on this forum allow SMF, at no cost to you, to earn a small commission when you click through and make a purchase. Let me know if you have any questions about this.
SMF is reader-supported. When you buy through links on our site, we may earn an affiliate commission.

ski-freak

Meat Mopper
Original poster
I use my Weber 22.5 Kettle quite a bit, and I use hot burning natural charcoal briquets, plus I add lump charcoal and mesquite/hickory wood chunks. I have always heeded Weber's warnings and kept my coals off of the enameled sides of the kettle, to avoid premature burn-through, which limits how much charcoal can be used. At times I have wanted to get a longer burn than I could just using the stock charcoal grate (while keeping the coals off the enameled Kettle). Eventually, I decided to build a charcoal basket out of Expanded Metal to allow using a larger amount of charcoal while keeping the coals off of the sides.

I considered the options of a plain basket, a basket with a zig-zag labyrinth, and in the end decided to incorporate a central water bowl to get a circular track around the perimeter, with a steel stop/start barrier.

It turned out that Lowe's sells the Weber Replacement Charcoal Grates for my 22.5 Weber for $11 (Weber # 7441), so that became my starting point. Lowe's also sells a 12" X 24" sheet of 18 Gauge Expanded Steel for $10.

Using hand snips I cut the Expanded Steel into 3 strips each 4" wide and welded them onto the Weber Charcoal Grate for this Plain Weber Kettle Charcoal Basket (the circumference is about 5-6" longer than 48" so 2 strips won't make it around):


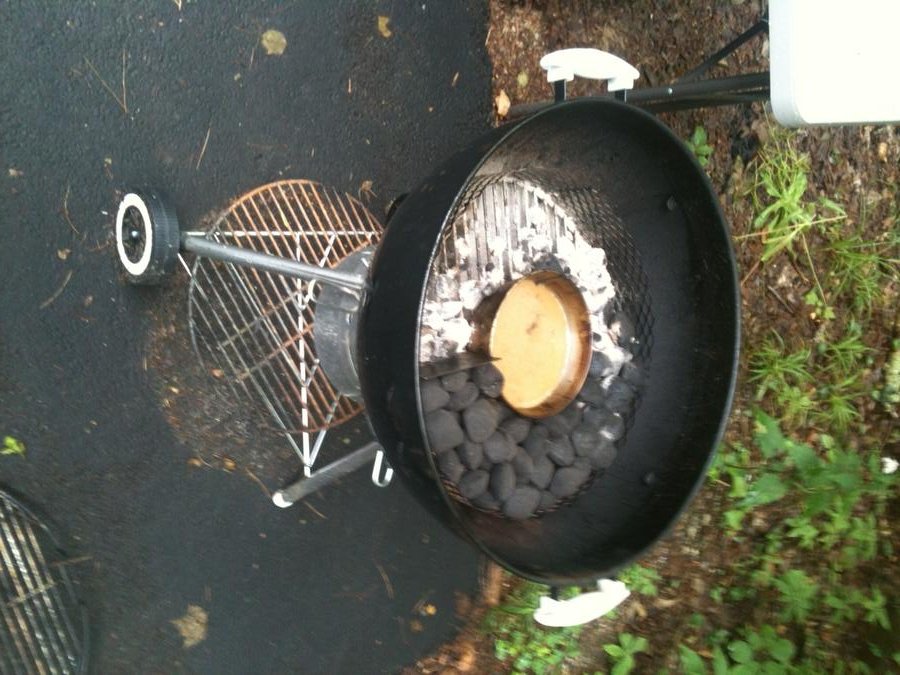
Taking it to the next level from a 4" deep Plain Charcoal Basket, I added to a Stainless Steel kitchen bowl in the center and a Sheet Steel Start/Stop Baffle to create a long burning circular track around the water bowl. The perimeter track will be filled with unlit briquets and then a handful of lit briquets will be placed at one end of the circular coal track - up against the start/stop baffle. The coals will burn their way around the track until all of the coals are burned. Water evaporating from the central bowl add moisture.


I used my little 120 VAC MIG welder with the power knob turned way down, and made quick welds so as not to liquify too much of the thin stock too quickly. The Weber Charcoal Grate is very easy to weld to, the trick is NOT liquifying too much of the other thin materials.
 
Here is the charcoal basket just getting fired up with 15 live charcoals from the chimney, and some mesquite chunks mixed in with the unlit charcoals in the basket, in preparation for a long smoke of a beef brisket:


Put on this beef brisket for a long cook:

 
After almost 11 hours the water bowl was still 3/4 full of very "caramel" looking water, from the fat drippings falling in the bowl and mixing with the water (cooked the briisket fat side down). Also the charcoal had only burned a little over half way around the perimeter track - with the lower vent closed for most of the burn and the lid vent 3/4 open for all of the burn. The brisket was done by around 11 hours so after I removed it I closed the lid valve to snuff the remaining charcoal. This indicates that there was around 15 to 20 hours of total burn capacity with the new perimeter track charcoal basket - which holds quite a bit of charcoal. The full setup is below:

 
We had two couples over and one of the couples brought their fussy kid. Everyone thought it was excellent and very tender meat - even the fussy kid. There were raves about the sweet smoky flavor. The 7 pound flat cut brisket was the perfect size. The smoke ring was a half an inch deep into the meat, and the top bark was really tasty. The bottom bark was the half inch fat layer so I trimmed that off when I was slicing/preparing. I served it with warmed BBQ sauce on the side, a macaroni and shrimp salad, fresh corn on the cob, and a salad.
 
When I was cleaning up this morning here's what the charcoal basket looked like:


The caramel color in the water bowl was a half inch of floating fat, and BTW I had added about 1 inch of fresh water to the four inch deep water bowl after the first 5 hours of cooking, even though it wasn't really necessary. All I did to stop the burn and snuff the remaining charcoals when I removed the meat was to close the kettle lid vent all the way (the bottom vent was already closed for slow cooking). Those un-burnt coals are ready to be used for our next BBQ!
 
Thanks for posting this thread separately. I'm definitely gonna give that charcoal ring and water bowl a try.

Did you measure temps while you were smoking the brisket? If so, what smoker temps to you get? What temps did it hold? Was it yo-yo'ing or were you able to hold it pretty well?

I've not done any smoking on my OTG yet. I'm really interested in your fire control process. What is the diameter of the bowl? How much water does it hold?

Really neat idea and it looks like it worked really well for you.
 
The Weber is up at my mountain home, in the White Mountains of New Hampshire. I had meant to bring my Maverick dual electronic thermometer up with me from our regular home in Rhode Island, but forgot it so sorry I didn't take any inside-kettle temperature readings. I do keep a dial meat thermometer there, so that's all I used.

I started it with 15 lit coals from my chimney using newspaper, and left the bottom vent open and the lid beside the grill while I went up to the kitchen to spread mustard and salt/pepper on the brisket. It was early in the AM so I had some coffee, then in around 10 minutes I brought the brisket down to the grill and I put it on in the center of the grill over the bowl and put the lid on, then when I saw good smoke coming through the lid vent which was open 3/4 (less than a minute) I completely shut the bottom vent and watched the smoke trail reduce by around half. Remember too that this really is a direct/indirect hybrid since the brisket is above a water/drippings bowl at the center of the grill, and only maybe 2 inches of the brisket overhangs the bowl on all sides - BUT only a small band of coals is lit at a time and the lit band works its way around slowly so at any time there is mostly indirect heat on the brisket. Once it was confirmed to be smoking reasonably I went back inside and finished my coffee waiting for my wife to wake up so I could cook breakfast.

The neat thing about this setup is how little intervention was necessary. After breakfast we went for a long drive in our convertible, and I didn't check on it until we got back. That was 5 hours later and I took a quick peak, added an inch of water to the bowl, and checked the internal meat temp. Then we went to the clubhouse and hung out at the pool where there was also a band to listen to while we relaxed and had a drink. Around 4 hours later we returned home to get ready for our company that was coming over. The Weber just ran on its own!
 
Last edited:
Well...I stand corrected...I really thought your water would steam away much faster...looks like you got it figured out...great idea and great lookin' meat...well done!
 
Happy to share, and always amazed at how versatile a Weber 22.5 can be! Too bad we can only use the Weber Kettle on the driveway in the summer, since this house gets a real lot of snow in the winter and the plow guy needs a clear driveway to do his thing. I'm just not brave enough to cook with charcoal in the winter up on our wood deck in the middle of a national forest...
 
I tried something a little different with the charcoal basket with the central bowl. I had a batch of steak tips to grill AND 2 small sections of spare ribs (5 ribs each). I lit a full chimney of charcoals and poured the whole lit chimney around the perimeter basket, added some mesquite chunks, and then poured a pitcher of water into the bowl. I cooked the spare ribs in the center over the bowl (dry rubbed then mopped) for 45 minutes, then arranged the marinated steak tips around the perimeter over the hot coals. Everything was nicely done at the 1 hour mark!
 
Excellent build.  I have been looking for an idea on how to build one for my Weber.  Thank you for posting.
 
I think your idea is great. Have picked up the metal at Lowes, except it was $ 16.95 plus tax here in Canada. Have cut it as you suggested, and hope to use my arc welder in am. to spot weld it together, on a low setting of 80, using # 6013 rod. Hope the arc works ok.
 
I just welded a complete vertical skirt of expanded metal a few inches tall around the perimeter of the Weber charcoal grate, welded a stainless steel water bowl in the center, and then cut start/stop divider/baffle out of scrap steel sheet metal for between the bowl and the perimeter mesh and welded that in place.
 
SmokingMeatForums.com is reader supported and as an Amazon Associate, we may earn commissions from qualifying purchases.

Hot Threads

Clicky