There are numerous benefits with using this smoking method including: eating lean meats for a healthier diet; improved moisture retention in lean meats finished at high internal temperatures; improved bark quality and quantity on smoked meats; improved smoke reaction due to removal of fat-cap. These all go hand-in-hand with this method, and can be customized to suit your preference. If you prefer lean-trimmed smoked meats and struggle with dried-out meats, I recommend that you consider this method. I use it for nearly everything I smoke now, with consistently improved results when compared to conventional wet smoking.
When people see the mention of a dry smoke chamber, their normal thought response may be that a dry cooking environment will dry the food, similar to a dehydrator. In actuality, this is not the case at all, and has the opposite effect on hot-smoked meats.
I began developing this method in June 2012, with the sole purposes of improving moisture retention and creating a well-developed bark with little enhancement from dry rub using lean-trimmed meats. With a dry-only (low humidity) smoke chamber on a pork butt, I discovered that smoke reaction was severely hampered due to lack of humidity in the smoke chamber (smoke needs humidity or a moist surface to stick to the meat), so I opted for a wet (high humidity) smoke chamber for approx. 1/3-1/2 of the anticipated cooking time along with a denser/heavier smoke application during the wet stage. Smoke density is dependent on the intensity of smoke flavor you want. I found that this offered a good balance of smoke reaction, while still providing the added benefits from the dry cooking environment, as long as the smoke chamber humidity transitioned to dry before the meat's internal temperature got too high. If I waited too long to switch to dry, I didn't allow enough time for the meat's surface to tighten-up and begin forming the bark, so the internal moisture evaporation would continue for too long and resulted in a drier finished product. Smoke reaction time, in this case, would be extended at the cost of moisture loss.
I have had very good success with moisture retention in all meats finished at higher I/T using this method for the past year. Wet (high humidity) up front to allow for the best smoke reaction with the meat, then, after you're happy with the amount of smoke time and the meat is progressing with cooking (approx 140-150* I/T or go by time of 4-6 hours for say a lean trimmed brisket flat), you want to reduce the humidity as much as possible, and as this happens, smoke reaction will be reduced. Two things will help you on this: partially opening the smoke chamber lower intake vents (if available) and removal of water source(s) in the smoke chamber, or allowing them to evaporate dry by using smaller amounts of water than you normally would during a wet smoke.
Principles of the Wet-to-Dry Smoke Chamber Method
The drier environment will do just the opposite of what you would think it does, and so does a wet cooking environment. Dry seals the surface fibers to retain moisture...the drawback to using a dry smoke chamber for the entire smoke is that you will loose smoke reaction time, as you need humidity for good smoke reaction...tighten the meat fibers too early and you get very little smoke flavor. Lean-trimmed meats give the best overall results for maximum surface area to collect smoke.
The opposite effect of a dry chamber is that when using a wet/humid smoke chamber for the entire cooking process with high finished internal temps, you allow the meat's surface to remain loose, and this allows moisture evaporation to run unchecked. Something else to consider is that with the fat-cap attached, you have a moist surface on the meat throughout the entire cooking process, so this could cause a drier overall interior as well. I know this goes against what many old-schoolers would believe, but things do change a lot when you go from a horizontal pit to a vertical smoke chamber with a water pan...on a pit you can easily mop to simultaneously increase surface moisture and smoke chamber humidity for better smoke reaction, but here again, if done for too long into the cooking, it can keep the meat's surface moist for too long and increase moisture evaporation from the meat by preventing the surface from tightening-up. Overall humidity levels during the wet and dry stages of this method do have an impact on the results. The more humid during the wet stage, the more smoke reaction can achieved. The drier the dry stage, the more the meat's surface will tighten and seal-up, as well as the harder the meat's bark will be.
So, in a nut-shell, run wet smoke chamber humidity until you have the desired amount of smoke, then transition to dry, and you can continue smoking at this point if you wish, but the smoke reaction will become more diminished over time as the dry chamber tightens the meat fibers on the surface. Less porous surface fibers on the meat do not attract as much smoke, but also resist interior moisture evaporation. Not much to it.
Setting-up your smoker for wet-to-dry smoke chamber capability...this is much easier than it looks, but I wanted to cover the basics so you can hopefully roll right into it without any issues...
This is a basic starting-point to get your vertical smokers set-up for the wet-to-dry smoke chamber method with little tending after you get a smoke underway. Horizontal pit smokers may need a little thought on placement of a water pan in the smoker chamber to apply this method, but it can be used with them as well, understanding the same principles.
1: You'll need a thermal mass in the water pan other than the water to avoid warping the pan while continuing to use it as a baffle for indirect cooking. Add a foil liner to the pan with enough capacity to add about 2/3qt or so of water (I have gone up to 1.5qts if I use higher sides in my SV-24 with it 2/3 full of pea-gravel). What seems to work best for my propane Smoke Vault and my Brinkmann Gourmet charcoal is washed pea-gravel. Pea-gravel is less dense than sand by volume, and has small gaps between some of the media to allow some hot air to pass through and heat up the water in the foil drippings catch. This gives me a bit less humidity on start-up than sand will, but it allows the water to evaporate a little more slowly, and I leave my SV-24 intake side vents closed for hot smokes to hold onto a bit more of this initial humidity by not letting fresh air into the smoke chamber. With less than 1 qt of water I still have enough water to last for several hours with most smokes and not refill water. For shorter smokes such as no-foil pork ribs, as an example, 1/3 qt is adequate for the wet chamber stage and smoke reaction time. A little experimenting will show you how much to use for a particular cut of meat, based on your smoker and preferences. It's easier to start with too little water and just add more if it evaporates before you reach you desired smoke time. Measure your water used/added, or just eye-ball it...whatever works for you.
An option to having the thermal mass and water separated is to add the water into the pan along with your sand or pea-gravel and omit the foil liner. This was used by another member here who tried this with his first time using this method on a brisket. I thought it was a nice way to customize the set-up to his specific situation. You still will want to have a drippings catch of some sort above the water pan in this case, just to keep drippings out of your thermal mass media, as he did.
2: Drippings catch: should cover the lip of your water pan and have slightly elevated edges to allow a bit more capacity for water, if desired, and if head-space is adequate under the lowest grate position. If you wish to harvest the drippings for an Au Jus, this will add these flavorful drippings back to your sliced or pulled brisket, pork butts, etc. Remember that in many vertical smokers, you will experience less smoke reaction on the meat if it is too close to a water source (the smoke may be baffled and travel up and past the meat), so keeping the meat far enough above the water will be to your advantage if you desire a stronger smoke flavor.
Thermal mass tips (sand/gravel):
Fill your water pan to no more than 2/3 the level capacity...this gives slightly less thermal mass than when full, but allows more capacity for water without extending the edges of the foil too high. Change-out the foil after every smoke and be sure to use double foil layers if you suspect you might puncture the foil when installing into the pan.Any drippings in the media will cause a scorched odor and flavor to accumulate on your meats, so you want to avoid that, as the bottom of the water pan will get quite hot without water to boil and cool it down. Just look your media over a bit for signs of drippings before you use for the next smoke.
If drippings get into your sand or gravel, it's easiest just to toss it in the trash and start with fresh, although I have re-seasoned the pea-gravel in a dry water pan with the smoke wood pan removed, and slowly bumped chamber temps up to almost 400* over about a 20-minute period...it probably pushed the temps of the pea-gravel to over 600* in doing so. I could smell the scorched drippings in the pan venting out the top, and when that odor diminished, I tossed in smoke wood chips to season the smoke chamber again, and the pea-gravel had just light grease stains when I was finished. So, it can be cleaned-up easily, if you have some time to do it.
Thermal mass provides slower temperature swings, but will not control high temperature spikes like boiling water can, so smoke chamber temperature control may be a little more challenging with charcoal or propane fired smokers, but using thermal mass instead of water in vertical smokers is nothing new....lots of folks run their smokers this way.
Dry Rubs:
I used to do a lot of different blends for brisket, pork shoulder cuts, and pork ribs. Lately, I've gone back to the basics...just meat and smoke, with a little enhancement from the rub, being SPOG. I've being leaning towards 1-part of minced garlic, 1 part of course ground onion (from chopped/dried) and 1/2 part each of fresh ground black pepper and kosher salt. Works great for lean trimmed cuts of brisket and chuck, offering variations in texture, a little bite, and does not really cover anything up...it let's you taste more of the meat and smoke. Use whatever you prefer or are accustomed to...it won't have much effect on the results of the moisture retention, although I have not used mustard, oils, or any other wet ingredients when preparing the meat, so use your own judgement on that. Any rubs you have used in the past which aid in forming a heavy bark will be further enhanced by the dry smoke chamber. I will caution about using added sugars for longer smokes such as brisket or pork shoulder cuts, as the longer exposure to heat may cause rapid caramelizing of the rub, and could lead to scorching before the meat reaches finished temperature or desired tenderness. This effect may be accelerated by the dry smoke chamber stage of this method.
Previously frozen meats:
Someone asked me about using previously frozen briskets and wondering if that may cause a drier brisket. I have smoked only a handful of fresh brisket and mostly frozen/thawed...I don't seem to notice much difference between them. You will see some purge when any flesh-food thaws, but I think overall that there won't be much difference, as part of the natural cooking process involves a lot of moisture evaporation...less water tied-up in the meat may translate to faster cooking, btw. Part of the purpose of the wet-to-dry smoke chamber method is to reduce the natural moisture evaporation. Think of it as cheating mother nature...and getting away with it. With the early bark formation you can generate using the wet/dry chamber humidity, this may help to reduce the overall moisture loss when using frozen/thawed meats...it sure can't hurt it, that much I do know.
Meat preparation:
For the meat prep, I find lean trimmed gives the best results using a wet/dry smoke chamber. Any fats on the surface tend to impede smoke, but also keep the surface of the meat moist when you want to transition to a dry smoke chamber to seal it all up for moisture retention. Small bits of remaining fat after trimming won't matter, but larger parts of the fat-cap will provide a noticeable difference in smoke reaction and moisture loss in underlying meat.
Preserving the hard texture of bark on meats during resting:
If you wish to preserve this hard bark for pulled pork, as an example, you can rest the meat on an elevated grate in a baking/roasting pan and cover with towels. this will allow the meat to breathe while it cools instead of trapping water vapor inside of foil and steaming the bark. With a well-developed bark, internal moisture evaporation during resting will be minimal, although if you want to experience the full effects of the bark you have created, this is the best way to keep that bark hard and crisp.
How to soften the bark on your meats:
With a heavy and hard bark on the meat, you may wish to soften the bark somewhat. There are a few ways this can be accomplished: foiled resting will allow a small amount of moisture evaporation to lightly soften the bark, and the longer the rest, the more effect it will have. If you wish to soften the bark more than this, you could foil at 5-10* below your desired finished temp. This will loosen the meats surface fibers somewhat as the meat is still exposed to a heat source, so you don't want to do it for too long before reaching finished temperature or it will begin to reverse what you accomplished with the dry smoke chamber. With a little experimenting, you can create the desired amount of firmness in your bark.
Baffling effect from items added to the smoke chamber:
When adding larger items to a vertical smoke chamber such as drip pans, they need to have adequate clearance on all sides of the smoke chamber to prevent them from becoming a heat baffle. If baffling occurs it can reduce thermal convection near the center of the cooking grate(s) resulting in much slower cooking. Check grate temps with a probe when in doubt, and any time you change internal configurations to your smoker by adding modifications, or when smoking unusually large amounts of food.
Here are some of my results with the wet-to-dry smoke chamber with various cuts of beef and pork (I have to look, but I may have used it for chicken, also, and will add that when/if I find it, or do it)...if you wish, right click on the photo, select open to a new tab, and click on the image where you want to zoom-in for close-ups...look for retained moisture in the meat, bark, smoke ring...you know the drill. Click on the link provided below the photos to go to the thread explaining how I smoked it, if you like.
2nd attempt with pork butt:


http://www.smokingmeatforums.com/t/...mmed-butt-wet-dry-smoke-chamber-q-view-method
Pork Spare Ribs, no foil:

http://www.smokingmeatforums.com/t/...-wet-dry-smoke-chamber-humidity-q-view-method
**this thread explains the breathable resting method to preserve your bark in detail (post #12)***
Pork Picnic Shoulder:

http://www.smokingmeatforums.com/t/...dry-smoke-chamber-q-view-prep-method-finished
Beef Brisket with separated point/flat, sliced point, sliced flat, pulled point/flat mix:
Sliced point:

Sliced flat:

Pulled point/flat mix:

http://www.smokingmeatforums.com/t/141647/brisket-with-wet-to-dry-smoke-chamber-q-view-method
Beef Chuck, no-rub, pulled, finished with Cherry/Balsamic Finishing Sauce...dry-only smoke chamber:


http://www.smokingmeatforums.com/t/...hamber-cherry-balsamic-finishing-sauce-q-view
Top Round finished above normal internal temps:

http://www.smokingmeatforums.com/t/...chamber-cherry-rbp-rub-recipe-q-view-finished
7-Bone Whole Beef Rib (Prime Rib), rib eye and ribs separated:


This thread includes a short instructional on rib and rib eye separation:
http://www.smokingmeatforums.com/t/...mber-christmas-dinner-a-lil-drool-view-for-ya
For an additional instructional on rib eye/rib separation for a heavy rib slab, click below:
http://www.smokingmeatforums.com/t/...boned-rib-lunch-ribeye-dinner-q-view-w-method
***Added 10-27-13***
[h1] [/h1][h1]Trimmed Packer 100% Pulled- wet/dry smoke chamber[/h1]

To read about this:
http://www.smokingmeatforums.com/t/151378/trimmed-packer-100-pulled-wet-dry-smoke-chamber-q-view
EDIT: forgot to include this and felt it is important if you really want to understand the wet stage vs dry stage of this method, as it explains in detail how smoke really works for us:
understanding-smoke-management-updated-5-18-13
Those photos and links above should give you a good idea what you can do with this method...trust me, it doesn't end there, and I'm still working on more as time allows. I'll update this as more cuts of meats are smoked with this method...there are probably more that I still have to look for when I get some more time.
If you have any questions on getting started, don't hesitate to drop me a PM...always glad to help.
Eric
EDIT (06-05-13): I encourage anyone who uses this method to post a thread in the appropriate forum explaining how you set-up your smoker, what you smoked and how it worked for you. Also, add your thoughts on how it helped your finished product, and what, if anything, you might do differently next time around. And don't forget the Q-View!!! LOL!!! I'd love to see the results of your efforts, as I'm sure others here would as well.
Also, note that anything you post can be used by others looking for ways to use this method, so you'll be helping them, as this method is currently in it's infancy regarding it's use in a multitude of smoker manufacturers/models, not to mention the vast amount of potential candidates for meats to be smoked.
Thanks to all for helping your smoking brothers and sisters!!!
(Added 06-03-13)
Q & A on Wet-to-Dry Method from PMs with my responses and some additional information: (to be continuously updated)
1. (regarding) Target Chamber Temps and (my added comments on) causes for normal chamber temp rise (non-defective equipment related):
Q: What temps you are running the smoker at? Are you running it lower at the beginning with the moisture then going higher with the dry chamber or are you going the same temp the whole time?
A: For brisket, I'm still low & slow, for the most part, @ 225-235*, and generally on the lower end at start-up until transitioning to the dry smoke chamber. For pork shoulder cuts, they seem to respond well up to 240* during the dry chamber stage, and even up to 250-270* for a few hours off and on didn't seem to have any adverse effect on texture of the pulled pork. Ribs seem to come through with very good moisture retention in the 225* range for wet, then up to 240* for dry as well, and the bark is not overly hard like it is with pulled pork due to the cooking time being so much less than butts or picnic shoulder cuts.
I run chamber temps a bit cooler with high humidity than when I transition to dry. Bear in mind that higher heat reduces smoke reaction time and high humidity helps smoke reaction. So, if using cooler temps during the main smoking stage (wet) you are improving the smoke reaction 2 ways. 225* seems to be the minimum recommended temp for assuring the surface of the meat gets pasteurized to kill any bugs that may be present. I bump temps to meet time-lines if I think it's necessary, but only after transitioning to the dry chamber. With all except thermostat controlled smokers, chamber temps will climb on their own as the water vapor dissipates and reduces the effects of evaporative cooling, so increased chamber temperature is often an automatic response of the smoker.
This effect is greatly increased if using only water in a pan and the pan boils dry...chamber temps will spike very drastically if this occurs, as without water in the pan for a given chamber temp with a propane smoker, for example, the lack of water boiling off energy, combined with the lack of evaporative cooling due to loss of water vapor being generated translates to a more efficient heating of the smoke chamber, and excess heating is the result if the burner flame is not reduced. Vertical charcoal smokers can be especially challenging to control if the unit is all manually operated, and getting high-temp spikes back down due to lack of water in the pan is best accomplished by adding cold water, then wait for temps to drop on their own before making any adjustments to intake draft controls.
One other factor which causes increased chamber temps (non-thermostat controlled) that is not related to smoke chamber humidity or lack of water in the pan is the temperature differential between the smoke chamber and the internal meat temperature. As meat temperature rises, the differential becomes closer, and thermal energy transfer/convection from the smoke chamber gases to the meat will decease. This causes more energy being released from the heat source which is not being absorbed into the meat, and the end result is a higher smoke chamber temperature. Unless chamber temps appear to running away, adjustments during this stage of cooking may not be necessary. A gradual climb in chamber temps will push the meat internal temps up a bit faster towards the end of cooking, and this is not always a bad thing. A few things which will off-set this effect somewhat are falling ambient temps and precipitation, especially with non-insulated smokers, so, when getting a smoke lined out for the evening with plans on catching some sleep (like I try to do), keep in mind that as ambient temps fall and smoke chamber temps trying to rise due to loss of evaporative cooling when the dry stage of smoking begins, combined with chamber/meat temp differentials, chamber temps will, fro the most part, take care of themselves, but there is never any guarantee. You may want to keep an eye on it every few hours, or have a wireless probe with a high-temp alarm set @ 25-40* above your target temp to alert you to temp spikes, with a closer range for charcoal-fired smokers, which allows you more time to make adjustments to regain control of your fire before temps are out of control. In any case, you do need to be aware that excessive chamber temps for prolonged periods are likely to result in scorched bark on the meat (especially with certain dry rub ingredients), and this is just one reason for cooking low & slow with larger cuts of meats, provided they are intact whole muscle, which has less restrictive cooking guidelines (danger-zone temps/time).
2. (regarding) Foiling for the stall:
Q: What are you thoughts on foiling to get through the stall? I am thinking that this process wouldn't work that well for that since your bark would never have time to set?
A: Correct. Foiling will soften the bark or prevent it from forming if foiled too early, and can also cause the reduced porosity or tightening of the surface meat fibers to be reversed and create a higher rate of moisture evaporation from the meat.
I have noticed mixed results on stall times compared to wet-only no-foil smokes vs wet-to-dry no-foil smoke chamber humidity. I sometimes think that the wet-to-dry is decreasing stall times, and if so, it would be caused by a reduction in evaporative cooling of the meat due to less moisture loss from the meat, but I have not found conclusive evidence to support this at this time. I will be watching for this phenomena, but it would be difficult to provide hard evidence due to each piece of meat developing a "personality" of it's own...no two similar cuts seem to smoke/cook the same as the last, and there are a variety of factors which can play a role in this that we cannot control.
(regarding) 18.5" WSM & BBQ Guru DX2, Water Evaporation Rates at Altitude/Elevation:
Q 3: Still not sure about my water bowl set-up. Thinking about using a 12" Terra Cotta saucer in the bottom of the water bowl then foiling over it and the bowl and adding water to the remaining empty bowl. Also, thinking about possibly filling in space under Terra Cotta saucer inside water bowl with pea gravel. It's hard to know how long it will take for the water to completely evaporate using smoker temp of 225.
A: If there's a gap between the Terra Cotta and the water pan, and the pan is on bottom, that could be a warpage issue. I would probably add a thin layer of gravel as a base for the saucer, then rest the saucer onto it and slowly work it around (spin slowly) to displace any voids underneath the saucer.
As for water evaporation rates, that will be unknown for your smoker, mods, etc. So, start with less than you think you will need...you can always add more later if it goes dry too early. Measure what you start with, and what you add, if you think it will help. Also, record your ambient conditions (temp, wind, precipitation or lack thereof). This will help you to better guestimate what it will take next time around. Oh, elevation changes may effect not only the rate at which the food cooks (it does take longer at higher elevation for a given chamber temp), but it could also translate to faster evaporation, as water boils at lower temps when elevation increases.
Old article, but very useful in cooking and determining your boiling point of water for cal-checks on thermometers:
Boiling Point / Atmospheric Pressure / Altitude
Response to above:
The elevation at my home is just a couple hundred feet above sea level so boiling point at home is ~212degF. Upcoming maiden WSM smoke will be at an elevation of ~6500ft. so the chart shows a water boiling point of ~200degF. If I'm thinking correctly looks like the water will evaporate faster at 6500 ft than at sea level. Will keep an eye on water level to get an idea of how much wet smoke I get.
Yep, you're dead-on...good plan to get it started, too.
(added 08-27-13)
Q 4: Just read your whole tutorial on wet-to dry chamber method. Wanted to ask some "propane smoker" related questions. I have two propane smokers and I was always a fan of using a water pan, but recently I have switched to pea gravel dry chamber methofd to give it a try (mostly out of sheer laziness. tired of changing out water). So far I have been happy with the results and haven't used a water pan since (except for making jerky). Anyways, as you may already know, propane gives off quite a bit of moisture when burned. I was wondering if you found your technique to be different when using your propane smoker vs charcoal. In other words, do you feel you don't need as much water in your propane smoker since the burning propane adds moisture to the chamber already? For the most part I am content with the smoke flavor levels I'm getting with my all-dry-chamber cooks I have been doing recently, but wanted to know your thoughts since you have put so much time into it.
A: You know, that's a very interesting question, and I have found that there actually is a noticeable difference, specifically in the bark. It seems to be harder and more developed in a charcoal smoker than in propane, and I never really made the correlation until you brought this up. I do notice far less smoke reaction with a dry-only smoke chamber in my charcoal rig, and this came about during initial experiments, and resulted in my further development into the wet-to-dry chamber for enhanced smoke reaction. I do get slightly better smoke reaction with propane when running a dry-only chamber, although the smoke ring does not indicate this...the smoke flavor is a bit more pronounced, and this would indicate a slightly higher humidity.
I do use less water with propane than charcoal smokers, and this could partly be due to the proximity of my water pans to the heat source in the different smokers...with my charcoal gourmet, I made an additional mod to raise the water pan even higher above the fire than I originally moved it a few years ago, so water evaporation is that much less now than in the previous configuration. But with my Smoke Vault 24 propane, it's still 100% stock internally with the water pan separated from the burner flame by the cast iron smoke wood tray, but I do have a 24" vent stack mod to increase the draft, and the side intakes can be fully closed to keep the internal heat more stable form top to bottom & side to side...the stock intakes only closed to about 20% and now I can run them anywhere I want.
When using wet-to-dry, you can add water directly into the pan with gravel or sand and just let it evaporate dry while using a drippings catch above the pan...finding the right amount of water to use for your particular smoker, and for your desired amount of smoke reaction takes a little experimenting, but you can find that sweet spot for various cuts and weights of meats. You may want to look into getting a bit more ventilation if you're interested in more/harder bark, but otherwise, unless you want to get more retained moisture in the meats, you're probably on track for your desired amount of smoke. If more retained moisture in the meat and more smoke is desired, that's where high humidity up front (for smoke) and low humidity to finish it up (create the heavy bark and seal-up the meat) will do the most for you.
Oh, regarding propane smokers and ventilation rates, you can experience higher humidity if your exhaust vent is closed down part-way, so a good amount of ventilation is needed to reduce the humidity. Electric smokers have this very issue, and some members have done mods for improved ventilation, which seems to be the solution when they want a dry smoke chamber. The meat itself will evaporate some water (less when maintaining a dry chamber), and this is enough to increase the humidity a lot if there is not sufficient ventilation, either in propane or electric cabinet smokers. With charcoal smokers, I tend to allow quite a bit of exhaust ventilation and control the fire with intake draft only, so that would compensate for potential water vapor accumulation.
Sounds like you've found a happy medium with a relatively constant but slightly reduced humidity at this point, and there's nothing wrong with that at all. If what the wet-to-dry chamber can do for you is more appealing, then by simply adding a small amount of water with your pea-gravel, along with a bit more ventilation later in the smoke, it may be just the ticket to bring it to another level for your hot-smoked meats.
***
(to be continued)
When people see the mention of a dry smoke chamber, their normal thought response may be that a dry cooking environment will dry the food, similar to a dehydrator. In actuality, this is not the case at all, and has the opposite effect on hot-smoked meats.
I began developing this method in June 2012, with the sole purposes of improving moisture retention and creating a well-developed bark with little enhancement from dry rub using lean-trimmed meats. With a dry-only (low humidity) smoke chamber on a pork butt, I discovered that smoke reaction was severely hampered due to lack of humidity in the smoke chamber (smoke needs humidity or a moist surface to stick to the meat), so I opted for a wet (high humidity) smoke chamber for approx. 1/3-1/2 of the anticipated cooking time along with a denser/heavier smoke application during the wet stage. Smoke density is dependent on the intensity of smoke flavor you want. I found that this offered a good balance of smoke reaction, while still providing the added benefits from the dry cooking environment, as long as the smoke chamber humidity transitioned to dry before the meat's internal temperature got too high. If I waited too long to switch to dry, I didn't allow enough time for the meat's surface to tighten-up and begin forming the bark, so the internal moisture evaporation would continue for too long and resulted in a drier finished product. Smoke reaction time, in this case, would be extended at the cost of moisture loss.
I have had very good success with moisture retention in all meats finished at higher I/T using this method for the past year. Wet (high humidity) up front to allow for the best smoke reaction with the meat, then, after you're happy with the amount of smoke time and the meat is progressing with cooking (approx 140-150* I/T or go by time of 4-6 hours for say a lean trimmed brisket flat), you want to reduce the humidity as much as possible, and as this happens, smoke reaction will be reduced. Two things will help you on this: partially opening the smoke chamber lower intake vents (if available) and removal of water source(s) in the smoke chamber, or allowing them to evaporate dry by using smaller amounts of water than you normally would during a wet smoke.
Principles of the Wet-to-Dry Smoke Chamber Method
The drier environment will do just the opposite of what you would think it does, and so does a wet cooking environment. Dry seals the surface fibers to retain moisture...the drawback to using a dry smoke chamber for the entire smoke is that you will loose smoke reaction time, as you need humidity for good smoke reaction...tighten the meat fibers too early and you get very little smoke flavor. Lean-trimmed meats give the best overall results for maximum surface area to collect smoke.
The opposite effect of a dry chamber is that when using a wet/humid smoke chamber for the entire cooking process with high finished internal temps, you allow the meat's surface to remain loose, and this allows moisture evaporation to run unchecked. Something else to consider is that with the fat-cap attached, you have a moist surface on the meat throughout the entire cooking process, so this could cause a drier overall interior as well. I know this goes against what many old-schoolers would believe, but things do change a lot when you go from a horizontal pit to a vertical smoke chamber with a water pan...on a pit you can easily mop to simultaneously increase surface moisture and smoke chamber humidity for better smoke reaction, but here again, if done for too long into the cooking, it can keep the meat's surface moist for too long and increase moisture evaporation from the meat by preventing the surface from tightening-up. Overall humidity levels during the wet and dry stages of this method do have an impact on the results. The more humid during the wet stage, the more smoke reaction can achieved. The drier the dry stage, the more the meat's surface will tighten and seal-up, as well as the harder the meat's bark will be.
So, in a nut-shell, run wet smoke chamber humidity until you have the desired amount of smoke, then transition to dry, and you can continue smoking at this point if you wish, but the smoke reaction will become more diminished over time as the dry chamber tightens the meat fibers on the surface. Less porous surface fibers on the meat do not attract as much smoke, but also resist interior moisture evaporation. Not much to it.
Setting-up your smoker for wet-to-dry smoke chamber capability...this is much easier than it looks, but I wanted to cover the basics so you can hopefully roll right into it without any issues...
This is a basic starting-point to get your vertical smokers set-up for the wet-to-dry smoke chamber method with little tending after you get a smoke underway. Horizontal pit smokers may need a little thought on placement of a water pan in the smoker chamber to apply this method, but it can be used with them as well, understanding the same principles.
1: You'll need a thermal mass in the water pan other than the water to avoid warping the pan while continuing to use it as a baffle for indirect cooking. Add a foil liner to the pan with enough capacity to add about 2/3qt or so of water (I have gone up to 1.5qts if I use higher sides in my SV-24 with it 2/3 full of pea-gravel). What seems to work best for my propane Smoke Vault and my Brinkmann Gourmet charcoal is washed pea-gravel. Pea-gravel is less dense than sand by volume, and has small gaps between some of the media to allow some hot air to pass through and heat up the water in the foil drippings catch. This gives me a bit less humidity on start-up than sand will, but it allows the water to evaporate a little more slowly, and I leave my SV-24 intake side vents closed for hot smokes to hold onto a bit more of this initial humidity by not letting fresh air into the smoke chamber. With less than 1 qt of water I still have enough water to last for several hours with most smokes and not refill water. For shorter smokes such as no-foil pork ribs, as an example, 1/3 qt is adequate for the wet chamber stage and smoke reaction time. A little experimenting will show you how much to use for a particular cut of meat, based on your smoker and preferences. It's easier to start with too little water and just add more if it evaporates before you reach you desired smoke time. Measure your water used/added, or just eye-ball it...whatever works for you.
An option to having the thermal mass and water separated is to add the water into the pan along with your sand or pea-gravel and omit the foil liner. This was used by another member here who tried this with his first time using this method on a brisket. I thought it was a nice way to customize the set-up to his specific situation. You still will want to have a drippings catch of some sort above the water pan in this case, just to keep drippings out of your thermal mass media, as he did.
2: Drippings catch: should cover the lip of your water pan and have slightly elevated edges to allow a bit more capacity for water, if desired, and if head-space is adequate under the lowest grate position. If you wish to harvest the drippings for an Au Jus, this will add these flavorful drippings back to your sliced or pulled brisket, pork butts, etc. Remember that in many vertical smokers, you will experience less smoke reaction on the meat if it is too close to a water source (the smoke may be baffled and travel up and past the meat), so keeping the meat far enough above the water will be to your advantage if you desire a stronger smoke flavor.
Thermal mass tips (sand/gravel):
Fill your water pan to no more than 2/3 the level capacity...this gives slightly less thermal mass than when full, but allows more capacity for water without extending the edges of the foil too high. Change-out the foil after every smoke and be sure to use double foil layers if you suspect you might puncture the foil when installing into the pan.Any drippings in the media will cause a scorched odor and flavor to accumulate on your meats, so you want to avoid that, as the bottom of the water pan will get quite hot without water to boil and cool it down. Just look your media over a bit for signs of drippings before you use for the next smoke.
If drippings get into your sand or gravel, it's easiest just to toss it in the trash and start with fresh, although I have re-seasoned the pea-gravel in a dry water pan with the smoke wood pan removed, and slowly bumped chamber temps up to almost 400* over about a 20-minute period...it probably pushed the temps of the pea-gravel to over 600* in doing so. I could smell the scorched drippings in the pan venting out the top, and when that odor diminished, I tossed in smoke wood chips to season the smoke chamber again, and the pea-gravel had just light grease stains when I was finished. So, it can be cleaned-up easily, if you have some time to do it.
Thermal mass provides slower temperature swings, but will not control high temperature spikes like boiling water can, so smoke chamber temperature control may be a little more challenging with charcoal or propane fired smokers, but using thermal mass instead of water in vertical smokers is nothing new....lots of folks run their smokers this way.
Dry Rubs:
I used to do a lot of different blends for brisket, pork shoulder cuts, and pork ribs. Lately, I've gone back to the basics...just meat and smoke, with a little enhancement from the rub, being SPOG. I've being leaning towards 1-part of minced garlic, 1 part of course ground onion (from chopped/dried) and 1/2 part each of fresh ground black pepper and kosher salt. Works great for lean trimmed cuts of brisket and chuck, offering variations in texture, a little bite, and does not really cover anything up...it let's you taste more of the meat and smoke. Use whatever you prefer or are accustomed to...it won't have much effect on the results of the moisture retention, although I have not used mustard, oils, or any other wet ingredients when preparing the meat, so use your own judgement on that. Any rubs you have used in the past which aid in forming a heavy bark will be further enhanced by the dry smoke chamber. I will caution about using added sugars for longer smokes such as brisket or pork shoulder cuts, as the longer exposure to heat may cause rapid caramelizing of the rub, and could lead to scorching before the meat reaches finished temperature or desired tenderness. This effect may be accelerated by the dry smoke chamber stage of this method.
Previously frozen meats:
Someone asked me about using previously frozen briskets and wondering if that may cause a drier brisket. I have smoked only a handful of fresh brisket and mostly frozen/thawed...I don't seem to notice much difference between them. You will see some purge when any flesh-food thaws, but I think overall that there won't be much difference, as part of the natural cooking process involves a lot of moisture evaporation...less water tied-up in the meat may translate to faster cooking, btw. Part of the purpose of the wet-to-dry smoke chamber method is to reduce the natural moisture evaporation. Think of it as cheating mother nature...and getting away with it. With the early bark formation you can generate using the wet/dry chamber humidity, this may help to reduce the overall moisture loss when using frozen/thawed meats...it sure can't hurt it, that much I do know.
Meat preparation:
For the meat prep, I find lean trimmed gives the best results using a wet/dry smoke chamber. Any fats on the surface tend to impede smoke, but also keep the surface of the meat moist when you want to transition to a dry smoke chamber to seal it all up for moisture retention. Small bits of remaining fat after trimming won't matter, but larger parts of the fat-cap will provide a noticeable difference in smoke reaction and moisture loss in underlying meat.
Preserving the hard texture of bark on meats during resting:
If you wish to preserve this hard bark for pulled pork, as an example, you can rest the meat on an elevated grate in a baking/roasting pan and cover with towels. this will allow the meat to breathe while it cools instead of trapping water vapor inside of foil and steaming the bark. With a well-developed bark, internal moisture evaporation during resting will be minimal, although if you want to experience the full effects of the bark you have created, this is the best way to keep that bark hard and crisp.
How to soften the bark on your meats:
With a heavy and hard bark on the meat, you may wish to soften the bark somewhat. There are a few ways this can be accomplished: foiled resting will allow a small amount of moisture evaporation to lightly soften the bark, and the longer the rest, the more effect it will have. If you wish to soften the bark more than this, you could foil at 5-10* below your desired finished temp. This will loosen the meats surface fibers somewhat as the meat is still exposed to a heat source, so you don't want to do it for too long before reaching finished temperature or it will begin to reverse what you accomplished with the dry smoke chamber. With a little experimenting, you can create the desired amount of firmness in your bark.
Baffling effect from items added to the smoke chamber:
When adding larger items to a vertical smoke chamber such as drip pans, they need to have adequate clearance on all sides of the smoke chamber to prevent them from becoming a heat baffle. If baffling occurs it can reduce thermal convection near the center of the cooking grate(s) resulting in much slower cooking. Check grate temps with a probe when in doubt, and any time you change internal configurations to your smoker by adding modifications, or when smoking unusually large amounts of food.
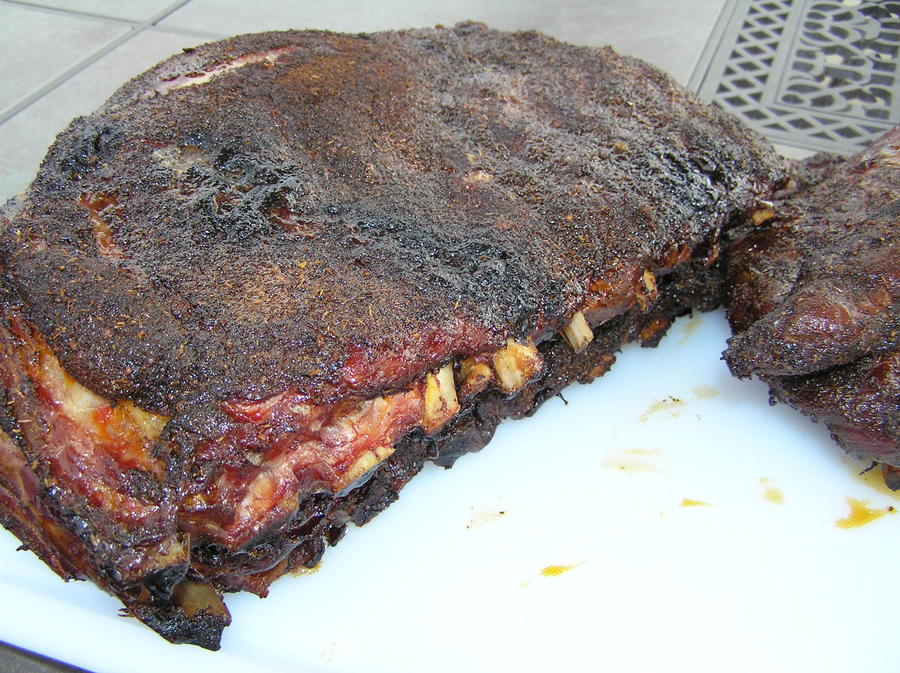
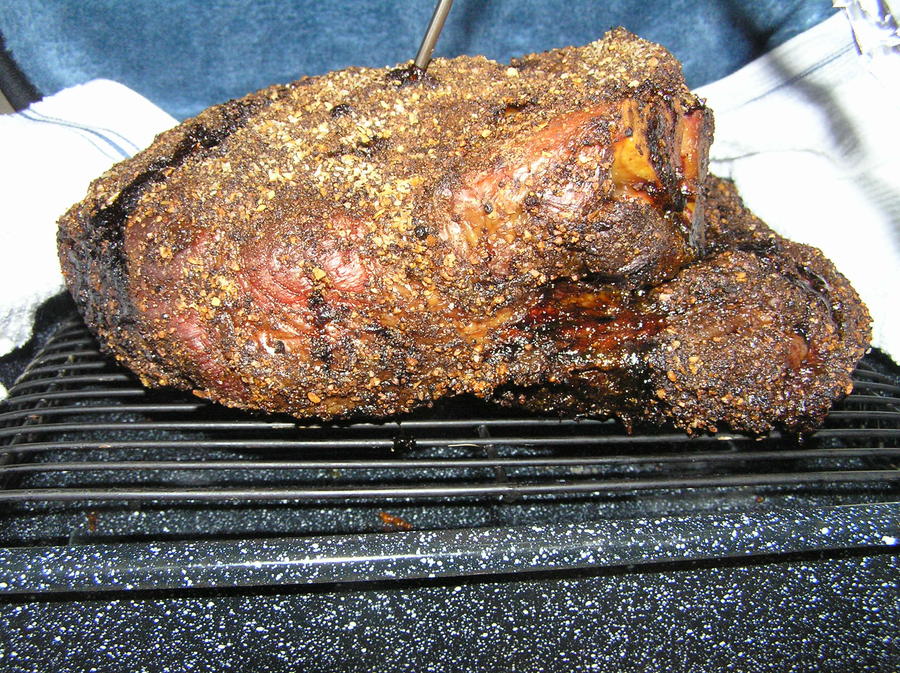
Here are some of my results with the wet-to-dry smoke chamber with various cuts of beef and pork (I have to look, but I may have used it for chicken, also, and will add that when/if I find it, or do it)...if you wish, right click on the photo, select open to a new tab, and click on the image where you want to zoom-in for close-ups...look for retained moisture in the meat, bark, smoke ring...you know the drill. Click on the link provided below the photos to go to the thread explaining how I smoked it, if you like.
2nd attempt with pork butt:
http://www.smokingmeatforums.com/t/...mmed-butt-wet-dry-smoke-chamber-q-view-method
Pork Spare Ribs, no foil:
http://www.smokingmeatforums.com/t/...-wet-dry-smoke-chamber-humidity-q-view-method
**this thread explains the breathable resting method to preserve your bark in detail (post #12)***
Pork Picnic Shoulder:
http://www.smokingmeatforums.com/t/...dry-smoke-chamber-q-view-prep-method-finished
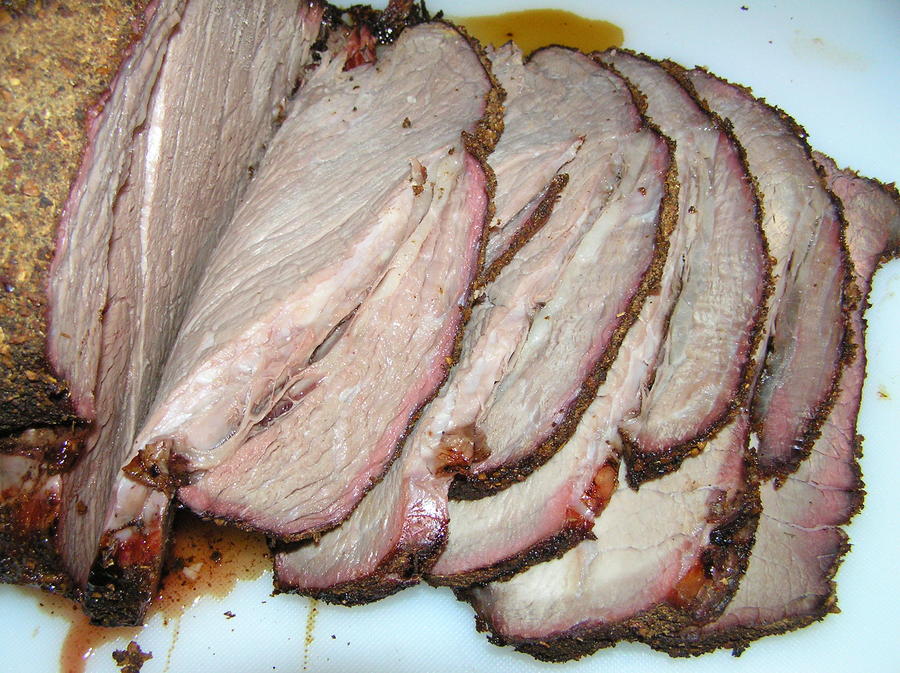
Beef Brisket with separated point/flat, sliced point, sliced flat, pulled point/flat mix:
Sliced point:
Sliced flat:
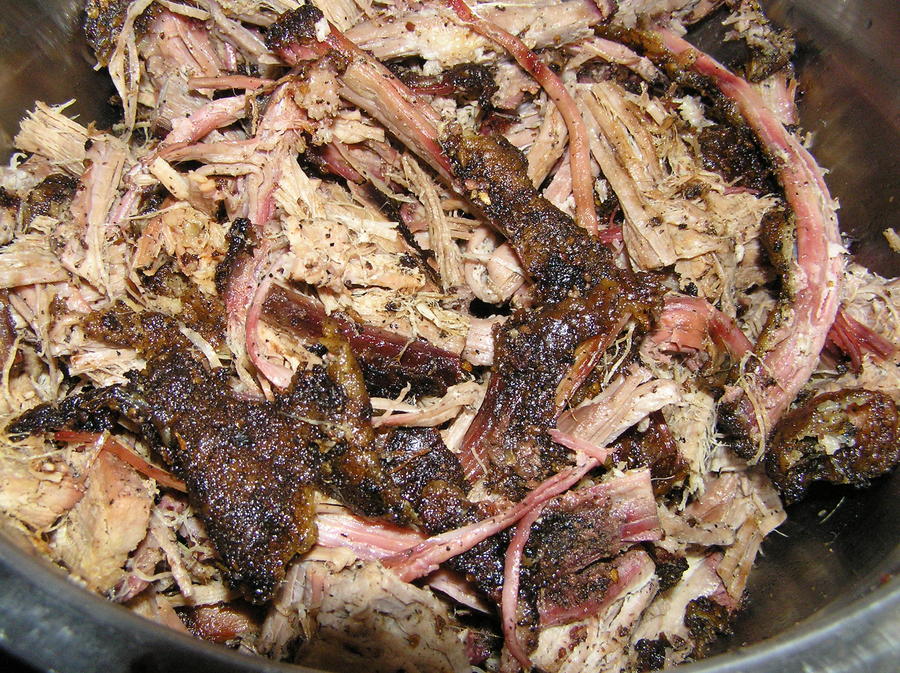
Pulled point/flat mix:
http://www.smokingmeatforums.com/t/141647/brisket-with-wet-to-dry-smoke-chamber-q-view-method
Beef Chuck, no-rub, pulled, finished with Cherry/Balsamic Finishing Sauce...dry-only smoke chamber:
http://www.smokingmeatforums.com/t/...hamber-cherry-balsamic-finishing-sauce-q-view
Top Round finished above normal internal temps:
http://www.smokingmeatforums.com/t/...chamber-cherry-rbp-rub-recipe-q-view-finished
7-Bone Whole Beef Rib (Prime Rib), rib eye and ribs separated:
This thread includes a short instructional on rib and rib eye separation:
http://www.smokingmeatforums.com/t/...mber-christmas-dinner-a-lil-drool-view-for-ya
For an additional instructional on rib eye/rib separation for a heavy rib slab, click below:
http://www.smokingmeatforums.com/t/...boned-rib-lunch-ribeye-dinner-q-view-w-method
***Added 10-27-13***
[h1] [/h1][h1]Trimmed Packer 100% Pulled- wet/dry smoke chamber[/h1]
To read about this:
http://www.smokingmeatforums.com/t/151378/trimmed-packer-100-pulled-wet-dry-smoke-chamber-q-view
EDIT: forgot to include this and felt it is important if you really want to understand the wet stage vs dry stage of this method, as it explains in detail how smoke really works for us:
understanding-smoke-management-updated-5-18-13
Those photos and links above should give you a good idea what you can do with this method...trust me, it doesn't end there, and I'm still working on more as time allows. I'll update this as more cuts of meats are smoked with this method...there are probably more that I still have to look for when I get some more time.
If you have any questions on getting started, don't hesitate to drop me a PM...always glad to help.
Eric
EDIT (06-05-13): I encourage anyone who uses this method to post a thread in the appropriate forum explaining how you set-up your smoker, what you smoked and how it worked for you. Also, add your thoughts on how it helped your finished product, and what, if anything, you might do differently next time around. And don't forget the Q-View!!! LOL!!! I'd love to see the results of your efforts, as I'm sure others here would as well.
Also, note that anything you post can be used by others looking for ways to use this method, so you'll be helping them, as this method is currently in it's infancy regarding it's use in a multitude of smoker manufacturers/models, not to mention the vast amount of potential candidates for meats to be smoked.
Thanks to all for helping your smoking brothers and sisters!!!
(Added 06-03-13)
Q & A on Wet-to-Dry Method from PMs with my responses and some additional information: (to be continuously updated)
1. (regarding) Target Chamber Temps and (my added comments on) causes for normal chamber temp rise (non-defective equipment related):
Q: What temps you are running the smoker at? Are you running it lower at the beginning with the moisture then going higher with the dry chamber or are you going the same temp the whole time?
A: For brisket, I'm still low & slow, for the most part, @ 225-235*, and generally on the lower end at start-up until transitioning to the dry smoke chamber. For pork shoulder cuts, they seem to respond well up to 240* during the dry chamber stage, and even up to 250-270* for a few hours off and on didn't seem to have any adverse effect on texture of the pulled pork. Ribs seem to come through with very good moisture retention in the 225* range for wet, then up to 240* for dry as well, and the bark is not overly hard like it is with pulled pork due to the cooking time being so much less than butts or picnic shoulder cuts.
I run chamber temps a bit cooler with high humidity than when I transition to dry. Bear in mind that higher heat reduces smoke reaction time and high humidity helps smoke reaction. So, if using cooler temps during the main smoking stage (wet) you are improving the smoke reaction 2 ways. 225* seems to be the minimum recommended temp for assuring the surface of the meat gets pasteurized to kill any bugs that may be present. I bump temps to meet time-lines if I think it's necessary, but only after transitioning to the dry chamber. With all except thermostat controlled smokers, chamber temps will climb on their own as the water vapor dissipates and reduces the effects of evaporative cooling, so increased chamber temperature is often an automatic response of the smoker.
This effect is greatly increased if using only water in a pan and the pan boils dry...chamber temps will spike very drastically if this occurs, as without water in the pan for a given chamber temp with a propane smoker, for example, the lack of water boiling off energy, combined with the lack of evaporative cooling due to loss of water vapor being generated translates to a more efficient heating of the smoke chamber, and excess heating is the result if the burner flame is not reduced. Vertical charcoal smokers can be especially challenging to control if the unit is all manually operated, and getting high-temp spikes back down due to lack of water in the pan is best accomplished by adding cold water, then wait for temps to drop on their own before making any adjustments to intake draft controls.
One other factor which causes increased chamber temps (non-thermostat controlled) that is not related to smoke chamber humidity or lack of water in the pan is the temperature differential between the smoke chamber and the internal meat temperature. As meat temperature rises, the differential becomes closer, and thermal energy transfer/convection from the smoke chamber gases to the meat will decease. This causes more energy being released from the heat source which is not being absorbed into the meat, and the end result is a higher smoke chamber temperature. Unless chamber temps appear to running away, adjustments during this stage of cooking may not be necessary. A gradual climb in chamber temps will push the meat internal temps up a bit faster towards the end of cooking, and this is not always a bad thing. A few things which will off-set this effect somewhat are falling ambient temps and precipitation, especially with non-insulated smokers, so, when getting a smoke lined out for the evening with plans on catching some sleep (like I try to do), keep in mind that as ambient temps fall and smoke chamber temps trying to rise due to loss of evaporative cooling when the dry stage of smoking begins, combined with chamber/meat temp differentials, chamber temps will, fro the most part, take care of themselves, but there is never any guarantee. You may want to keep an eye on it every few hours, or have a wireless probe with a high-temp alarm set @ 25-40* above your target temp to alert you to temp spikes, with a closer range for charcoal-fired smokers, which allows you more time to make adjustments to regain control of your fire before temps are out of control. In any case, you do need to be aware that excessive chamber temps for prolonged periods are likely to result in scorched bark on the meat (especially with certain dry rub ingredients), and this is just one reason for cooking low & slow with larger cuts of meats, provided they are intact whole muscle, which has less restrictive cooking guidelines (danger-zone temps/time).
2. (regarding) Foiling for the stall:
Q: What are you thoughts on foiling to get through the stall? I am thinking that this process wouldn't work that well for that since your bark would never have time to set?
A: Correct. Foiling will soften the bark or prevent it from forming if foiled too early, and can also cause the reduced porosity or tightening of the surface meat fibers to be reversed and create a higher rate of moisture evaporation from the meat.
I have noticed mixed results on stall times compared to wet-only no-foil smokes vs wet-to-dry no-foil smoke chamber humidity. I sometimes think that the wet-to-dry is decreasing stall times, and if so, it would be caused by a reduction in evaporative cooling of the meat due to less moisture loss from the meat, but I have not found conclusive evidence to support this at this time. I will be watching for this phenomena, but it would be difficult to provide hard evidence due to each piece of meat developing a "personality" of it's own...no two similar cuts seem to smoke/cook the same as the last, and there are a variety of factors which can play a role in this that we cannot control.
(regarding) 18.5" WSM & BBQ Guru DX2, Water Evaporation Rates at Altitude/Elevation:
Q 3: Still not sure about my water bowl set-up. Thinking about using a 12" Terra Cotta saucer in the bottom of the water bowl then foiling over it and the bowl and adding water to the remaining empty bowl. Also, thinking about possibly filling in space under Terra Cotta saucer inside water bowl with pea gravel. It's hard to know how long it will take for the water to completely evaporate using smoker temp of 225.
A: If there's a gap between the Terra Cotta and the water pan, and the pan is on bottom, that could be a warpage issue. I would probably add a thin layer of gravel as a base for the saucer, then rest the saucer onto it and slowly work it around (spin slowly) to displace any voids underneath the saucer.
As for water evaporation rates, that will be unknown for your smoker, mods, etc. So, start with less than you think you will need...you can always add more later if it goes dry too early. Measure what you start with, and what you add, if you think it will help. Also, record your ambient conditions (temp, wind, precipitation or lack thereof). This will help you to better guestimate what it will take next time around. Oh, elevation changes may effect not only the rate at which the food cooks (it does take longer at higher elevation for a given chamber temp), but it could also translate to faster evaporation, as water boils at lower temps when elevation increases.
Old article, but very useful in cooking and determining your boiling point of water for cal-checks on thermometers:
Boiling Point / Atmospheric Pressure / Altitude
Response to above:
The elevation at my home is just a couple hundred feet above sea level so boiling point at home is ~212degF. Upcoming maiden WSM smoke will be at an elevation of ~6500ft. so the chart shows a water boiling point of ~200degF. If I'm thinking correctly looks like the water will evaporate faster at 6500 ft than at sea level. Will keep an eye on water level to get an idea of how much wet smoke I get.
Yep, you're dead-on...good plan to get it started, too.
(added 08-27-13)
Q 4: Just read your whole tutorial on wet-to dry chamber method. Wanted to ask some "propane smoker" related questions. I have two propane smokers and I was always a fan of using a water pan, but recently I have switched to pea gravel dry chamber methofd to give it a try (mostly out of sheer laziness. tired of changing out water). So far I have been happy with the results and haven't used a water pan since (except for making jerky). Anyways, as you may already know, propane gives off quite a bit of moisture when burned. I was wondering if you found your technique to be different when using your propane smoker vs charcoal. In other words, do you feel you don't need as much water in your propane smoker since the burning propane adds moisture to the chamber already? For the most part I am content with the smoke flavor levels I'm getting with my all-dry-chamber cooks I have been doing recently, but wanted to know your thoughts since you have put so much time into it.
A: You know, that's a very interesting question, and I have found that there actually is a noticeable difference, specifically in the bark. It seems to be harder and more developed in a charcoal smoker than in propane, and I never really made the correlation until you brought this up. I do notice far less smoke reaction with a dry-only smoke chamber in my charcoal rig, and this came about during initial experiments, and resulted in my further development into the wet-to-dry chamber for enhanced smoke reaction. I do get slightly better smoke reaction with propane when running a dry-only chamber, although the smoke ring does not indicate this...the smoke flavor is a bit more pronounced, and this would indicate a slightly higher humidity.
I do use less water with propane than charcoal smokers, and this could partly be due to the proximity of my water pans to the heat source in the different smokers...with my charcoal gourmet, I made an additional mod to raise the water pan even higher above the fire than I originally moved it a few years ago, so water evaporation is that much less now than in the previous configuration. But with my Smoke Vault 24 propane, it's still 100% stock internally with the water pan separated from the burner flame by the cast iron smoke wood tray, but I do have a 24" vent stack mod to increase the draft, and the side intakes can be fully closed to keep the internal heat more stable form top to bottom & side to side...the stock intakes only closed to about 20% and now I can run them anywhere I want.
When using wet-to-dry, you can add water directly into the pan with gravel or sand and just let it evaporate dry while using a drippings catch above the pan...finding the right amount of water to use for your particular smoker, and for your desired amount of smoke reaction takes a little experimenting, but you can find that sweet spot for various cuts and weights of meats. You may want to look into getting a bit more ventilation if you're interested in more/harder bark, but otherwise, unless you want to get more retained moisture in the meats, you're probably on track for your desired amount of smoke. If more retained moisture in the meat and more smoke is desired, that's where high humidity up front (for smoke) and low humidity to finish it up (create the heavy bark and seal-up the meat) will do the most for you.
Oh, regarding propane smokers and ventilation rates, you can experience higher humidity if your exhaust vent is closed down part-way, so a good amount of ventilation is needed to reduce the humidity. Electric smokers have this very issue, and some members have done mods for improved ventilation, which seems to be the solution when they want a dry smoke chamber. The meat itself will evaporate some water (less when maintaining a dry chamber), and this is enough to increase the humidity a lot if there is not sufficient ventilation, either in propane or electric cabinet smokers. With charcoal smokers, I tend to allow quite a bit of exhaust ventilation and control the fire with intake draft only, so that would compensate for potential water vapor accumulation.
Sounds like you've found a happy medium with a relatively constant but slightly reduced humidity at this point, and there's nothing wrong with that at all. If what the wet-to-dry chamber can do for you is more appealing, then by simply adding a small amount of water with your pea-gravel, along with a bit more ventilation later in the smoke, it may be just the ticket to bring it to another level for your hot-smoked meats.
***
(to be continued)


