Dry curing chamber build

  • Some of the links on this forum allow SMF, at no cost to you, to earn a small commission when you click through and make a purchase. Let me know if you have any questions about this.
SMF is reader-supported. When you buy through links on our site, we may earn an affiliate commission.

indaswamp

Epic Pitmaster
Original poster
Staff member
Moderator
OTBS Member
Apr 27, 2017
15,096
13,495
South Louisiana-Yes, it is HOT
So, I obtained an old refrigerator last summer with the intent on using it as a dry curing chamber for meats. It did not survive the move on the trailer to the house and I had to junk it.
Well, today I scored a better one. It's a commercial grade laboratory frig. that was used to house water samples. No pathogens or chemicals. It is about 3 ft. wide. 2ft. deep and 6 ft. high. Has double glass doors.
1581212469241.jpeg


It needs a good cleaning and sanitizing with vinegar, but otherwise it is in great shape!

So, being new to dry curing meats I have a few questions:
Are the glass doors detrimental to the quality of the final product? Does the curing chamber need to be dark? Answered

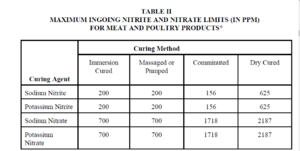
What is the recommended ppm of cure #2 for dry cured meats? How much per pound or Kg? Answered

How much salt is recommended for dry cured meats? What percentage? Answered

What controllers does the brain trust here @SMF recommend for the temp. and humidity?

What humidifiers, fans, heater, other equipment do you recommend?

And finally, what do you recommend I make first as a beginner?
 
Last edited:
  • Like
Reactions: 73saint
For most dry cured meats and sausages i use 0.25% cure, 2.5% salt. Easy to remember.

With a curing chamber everything becomes easy...so you can start with anything. If don't want to wait long for a large muscle try some duck breast or pork tenderloin. Or dry cured sausages. Will you be using fermenting cultures? Mold culture?
 
  • Like
Reactions: indaswamp
For most dry cured meats and sausages i use 0.25% cure, 2.5% salt. Easy to remember.

With a curing chamber everything becomes easy...so you can start with anything. If don't want to wait long for a large muscle try some duck breast or pork tenderloin. Or dry cured sausages. Will you be using fermenting cultures? Mold culture?
Thanks for the reply.
Yes, I will be using fermenting cultures. I have some 2" beef middles on hand so I may start out with some pepperoni. I really want to start making my own panchetta and cappocola.
 
Here's another question...
Would it be advantageous to set up 2 separate chambers within the same frig.? This one is so big and it has 2 doors so I could potentially have two different environments for making a bunch of different products at one time. I live in the hot humid deep south...

Also, can you age homemade cheese along side of the meats in the curing chamber? or would I need a separate chamber?
 
Dry aging meats is usually done at one temp... ~55F with 80% humidity... Cheese can be done at that same temp... Using cheese wax is a good idea when aging cheese.... AND, it can be reused....
Coating the meat with Bactoferm 600 is a good idea...
Marianski will answer all of your questions....
 

Attachments

  • 1581259468947.jpeg
    1581259468947.jpeg
    7.9 KB · Views: 110
  • Like
Reactions: indaswamp
Well...
After moving the TRUE refrigerator into the house and letting the oil settle for a couple of days (I had to lean it over at a severe angle to get it through the door). I put a temp. probe inside and plugged the unit into power yesterday afternoon. It came on, and the compressor runs. The fan runs, but it is not cooling. Could be any number of things... I called a friend at the firehouse, His dad owns a refrigeration business. He will come by and look at it some time Thursday. I hope it is a quick and easy fix, but I'm not holding my breathe. I may need to rebuild it. Good thing is I do not need the cooling power of a commercial compressor and coil since I'm only cooling the unit to 55* basically converting it to a wine cooler before adding the other equipment to it. This will SIGNIFICANTLY reduce the price of replacement parts if I need to go that route.

I really want to get this unit running because it is such a perfect size and height. It will be easy to refurbish because all the cooling components are easily accessible and not made into the walls. Will know more later this week and make a decision on which direction to go with the project.

Fingers crossed......
 
  • Like
Reactions: fivetricks
I diagnosed the system this morning. Compressor runs, thermostat checks out, but low on refrigerant. Only 70psi on the high side; should be 290psi. Written on the top of the condenser unit, in 2017 a service tech. put a dye pack into the system and recharged with refrigerant. Probably looking for a small leak. My buddy said 90% of the time, it will be a leak in the evaporator coil. I ran the unit for a little bit and soap tested the rest of the system and did not find anything.

Good news is that I can get a evap. coil for about $150 plus refrigerant... so....not prohibitively expensive to get it up and running. Will post when I know more.
 
Last edited:
You might be able to silver solder the coil... The make all sorts of solder for aluminum even...
Check the tubing by the motor... The motor running could cause metal fatigue... cracks happen...
 
  • Like
Reactions: indaswamp
You might be able to silver solder the coil... The make all sorts of solder for aluminum even...
Check the tubing by the motor... The motor running could cause metal fatigue... cracks happen...
<thumbs up>
Used working units like this run $1500-1700 so even if I have to spend a little, I'll come out ahead.
If I can find the leak, I may be able to repair it...unless it is in the middle of the 3 stacked coils on the evaporator.
 
  • Like
Reactions: daveomak
Well...the compressor is shot, and it needs a new Evap coil....
The unit is using 409A refrigerant, a replacement for R22, and of course, it's one of the most expensive ones made, and can not be used with any other refrigerant. So I'd either have to refurbish this system,, $800~$1000, or totally rebuild it with a smaller 1/5~1/4hp. system using 134a refrigerant; and still spent $6-700....

I'm gonna pass on it.

Sooooo.. I found a small 13cu. ft. frigidair freezer, 3 yeas old, for $125. Bought it and did not haggle the price. Very clean unit.
1583160257489.jpeg


Got inside and started cleaning... took the back cover off and the evap, coil looks like new.

1583190698172.jpeg


Wiped down with non-anti bacterail soap and water, then rinsed with water followed by a wipe of vinegar. I used a spray bottle to spray the evap. coil, then followed with denatured alcohol to remove the acid off the aluminum fins on the coil.

Put the cover back on, now I wait for all my parts and equipment to arrive and I'm up and running!
 
I currently have an old non-frost free freezer about the same size as the one I just bought. It still works, but it is old. I'm gonna keep looking for something bigger to use as a drying chamber(I really want a 2 door GDM; 30cu.ft.) and if I find one, I'll swap the 13cu.ft. back to a freezer and replace my old one....
 
So...after doing a lot of research, I ran across some ideas to try in order to locate where the condenser coil tube is located in the side walls of the freezer so I can drill a hole and not hit them. This will be to run power cords through for my controller cords, fan, etc...

One novel idea I got from a home brew forum of all places said to mix corn starch and alcohol (the guy used vodka, but all I had was rum. figured it'd do)....
1583379055395.jpeg


and with the freezer unplugged and warm inside, use this paste to coat the outside walls of the freezer where you want to drill your prospective hole. As the Coil tubing heats up from the hot refrigerant, the heat transfers to the outside wall of the freezer, and this causes the alcohol to evaporate faster, leaving a dry line where the coil is located...a ghost effect. I had my doubts, but the idea had it's merits...

So I painted the wall, then cranked the cold setting as low as it would go (to generate a lot of heat) and sure enough, it worked!

I traced where the dry 'ghost' line appeared with a permanent sharpie, and made an X where I thought the hole should go.
1583378998631.jpeg


verified the wall thickness and marked that...
1583379015963.jpeg

And it was time for the moment of truth! I found the smallest drill bit I had, 1/16", and drilled lightly just enough to break through the outside skin of the freezer. I did not want to press hard and have it punch through hard and possibly nicking a line or a wire.

Next, I ran some stiff wire into the hole to probe around for coil tubing, pushing it all the way until I touched the inside wall of the freezer.
1583379044939.jpeg


Satisfied that there was no tubing in the area, I drilled a 1/4" hole in the skin of the freezer, and probed some more. Going slow and methodical fanning out the wire in every direction.

Ok....coast is clear...
Next, I cautiously used my dremel to cut the skin but not into the insulation; about 1/2"to the left and down.
1583379070991.jpeg


Then I rolled the skin back with a pair of needle nose pliers...
1583379078964.jpeg


Now, I can start removing some of the insulation carefully looking for wires. I used a flat screw driver to break pieces of insulation, and pulled them out with the pliers. Satisfied that I could not see any wires, I cut more with the dremel and peeled back more metal. And kept diggin out insulation and looking for wires until I made it all the way though to the inside wall skin.
1583379090424.jpeg


And I'm good!! Hot damn that worked!!! Thank you internet!
 
  • Like
Reactions: daveomak
Big box of stuff arrived today! Temp controller, Humidity controller, Humidifier, Dehumidifier, Heater, Ceramic bulb and base (for fermentation trash can), All in one RH and Temp. station to monitor chamber, 2 Marianski books, and a new Japanese chef's knife I ordered. I spent all afternoon doing the install and running to Lowe's for stuff.

I held off sizing the hole until all the stuff arrived so I could see how big I needed it to be. Started opening boxes and looking at stuff, and an idea hit me so I ran with it.... I decided to run (4) 3 ft. cords. into the freezer; male plug on the outside, female plug on the inside and foam those in place. Here's the pics...

Sizing the outside hole with the dremel cut off wheel and a sanding stone.
1583559164319.jpeg

Installed the 1 3/16" grommets (from Lowe's)

1583559165521.jpeg

Then I used two zipties and tied the cords together where they will sit in the wall. I cut the ties, but left them a little long to center the wires in the hole for the foam.

1583559398930.jpeg


1583559399600.jpeg


Outside...
1583559400148.jpeg

Then I foamed the wires in place, and tied them up on the outside with some wire.
1583559209038.jpeg


1583559220707.jpeg


After that, I took a break and went ate supper and went to walmart to buy some distilled water to fill the humidifier. When I got home, I spent the next 2 hours installing the male plugs on the cords on the outside, reading up on the controllers to set the parameters, and plugging all the equipment up.
1583559227621.jpeg


That pic. was taken minutes after I turned the system on. I had to swap the humidifer and dehumidifier; I had them plugged into the wrong plugs. It's been up and running for about an hour and she looks to have settled down.
1583559233311.jpeg


I moved the temp. probe to the side from hanging in the middle not long after this pic. was taken; the probe was in the humidifier spray mist and had water condensing on it. I will let it run over the weekend and see how it runs. Then I'm ordering cure #2, cultures and I'm making some stuff next week!


Oh--So where is the best location for the probes? against the wall????

Off to read some books....
 
Last edited:
SmokingMeatForums.com is reader supported and as an Amazon Associate, we may earn commissions from qualifying purchases.

Hot Threads

Clicky