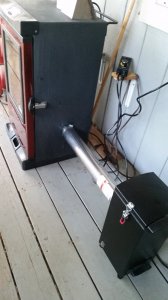
OK, so today's goal turned to making my MES 30 be optional to be cord controlled, or standard controlled.
Retired from 42 + years in the Electrical field, I've seen a couple of things, and done a couple of things. And no matter what it is, there is probably a couple of million ways to do it.
Here's mine....
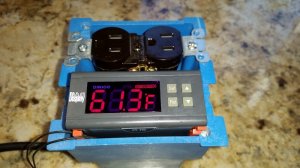
1. Step one was to find the controls in the guts, the element, then figure a way around so it can be cord controlled, with an Auber Control, or my simplistic way an Inkbird Itc-308 digital temperature controller.
And to do so in a manner that would not modify, nor nay-gate the warranty. In plain Engrish, easily removable and restore-able to OEM.
And to do so maintaining safety features like the over temperature Snap-disc element cut-out switch, which is a vital safety device.
2. Nice! My MES 30 has Phillips head screws for the element cover on the back, and for a plastic cover on the bottom where the control printed circuit board is housed. My first peek in was the back, found the elements connections. They are pretty tightly wrapped, having heat shrink tubing fully covering the connections.
(Click on any picture to enlarge it.)
Box 1 Element Connections

No reasons to disturb these, I moved on to the Main circuit board/control cover on the bottom of my version. Laying the MES 30 on it's chip feeder side gave me ready access to the bottom.
Incidentally, the Yellow/green wire is an equipment ground. it is just routed behind the element connections, and terminates on a case anchor point for the element. Do Not Disturb.
Box 2 The Main Control PC Board (printed circuit board)

Okey Dokey, now we are getting somewhere. See the little black box to the right? That is a control relay. The Black wire is the hot leg of the cord. It feeds 120 VAC power into the MES. The red lead goes directly to the heating element. When heating is called for, that relay closes and applies power to the element.
The White wire is the Neutral of the power cord. It connects the neutral side of the control transformer (center), and feeds directly to the Blue wire. The blue wire goes to the Over Temperature Switch (Snap-disc), then to the heating element via the black wire seen in Box 1. Typical in control circuits like this where the safety side is Normally closed, except if needed to shut down a bad situation. Like over temperature.
Let's take a moment here. Recall the tiny wires that plug connected to the control on top? (MES 30, top rear control) Well those, and the Temperature probe are plug connected on the left side of the PC board.
Picture 3

These connectors are also secured with a dab of silicone glue.
Do Not Disturb. I'm only showing you these for informational purposes.
If at some time you need to replace the PC board then you would remove these. But only then.
Proofing the element circuit, I connected my Ohm Meter to the disconnected Red and Blue wires. This reads through the Element, back through the Snap-disc Over temp safety switch, and to the Neutral side of the Elements circuit.


18.6 Ohms, continuity.
Circuit good, Element good, Snap-disc closed.
Now for my method of being able to By-Pass the OEM control, and allow my external Temperature Control to function. (Auber, or Inkbird)
A simple switch, rated for 10 amps is what I have. My MES 30 has an 800 watt element. It needs 6.66 Amps at 120 VAC. So I chose to use a switch rated for more amps than it requires, as well as the nominal voltage of 120 VAC.
Simply stated, Amps (I) = Watts (800) / Volts (120) 6.66 = 800/120


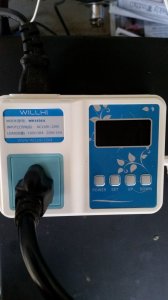
I merely put my switch in Parallel with the contacts of the OEM control relay. When my switch is in the "ON" position, it bypasses the control relay, and applies power to the element when plugged in. Which is where the external (Auber, or Inkbird) controller comes into play. Put their sensor into the smoker oven, and they control the heater element, by powering the plug and cord on or off.
Switch the Bypass switch to "OFF" position, and Wa-La, the OEM MES control comes into play, and the Smoker Oven functions with it's normalcy.
OK, say you have a lapse and plug it in direct, and the bypass switch is closed, what happens?
Well, this is why there is a safety device called a Snap-disc in the oven. When it gets too hot, the safety switch opens and interrupts the heating element until the Snap-disc cools enough to reset itself.
So if you were to plug it in, and try to use the OEM control, but the temperature keeps rising, you're in bypass mode. Check the Bypass switch.
So this is the way I chose to be able to run my smoker oven with either control method.
Let's call it, The Bypass Method
My goal was to be able to control the element with an external temperature control, specifically below 100 degrees, for things like Cheese smoking with a small amount (above Ambient, below 100°) of heat.
My Inkbird has a high range of 210°. But if I want something out of range for the Inkbird, I simply switch to regular MES control mode.
But within Ambient to 210°, the Inkbird has a 1 degree +/- resolution.
Close enough for the fish I smoke... ;)
Retired from 42 + years in the Electrical field, I've seen a couple of things, and done a couple of things. And no matter what it is, there is probably a couple of million ways to do it.
Here's mine....
1. Step one was to find the controls in the guts, the element, then figure a way around so it can be cord controlled, with an Auber Control, or my simplistic way an Inkbird Itc-308 digital temperature controller.
And to do so in a manner that would not modify, nor nay-gate the warranty. In plain Engrish, easily removable and restore-able to OEM.
And to do so maintaining safety features like the over temperature Snap-disc element cut-out switch, which is a vital safety device.
2. Nice! My MES 30 has Phillips head screws for the element cover on the back, and for a plastic cover on the bottom where the control printed circuit board is housed. My first peek in was the back, found the elements connections. They are pretty tightly wrapped, having heat shrink tubing fully covering the connections.
(Click on any picture to enlarge it.)
Box 1 Element Connections
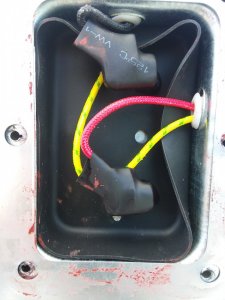
No reasons to disturb these, I moved on to the Main circuit board/control cover on the bottom of my version. Laying the MES 30 on it's chip feeder side gave me ready access to the bottom.
Incidentally, the Yellow/green wire is an equipment ground. it is just routed behind the element connections, and terminates on a case anchor point for the element. Do Not Disturb.
Box 2 The Main Control PC Board (printed circuit board)
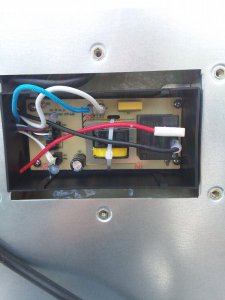
Okey Dokey, now we are getting somewhere. See the little black box to the right? That is a control relay. The Black wire is the hot leg of the cord. It feeds 120 VAC power into the MES. The red lead goes directly to the heating element. When heating is called for, that relay closes and applies power to the element.
The White wire is the Neutral of the power cord. It connects the neutral side of the control transformer (center), and feeds directly to the Blue wire. The blue wire goes to the Over Temperature Switch (Snap-disc), then to the heating element via the black wire seen in Box 1. Typical in control circuits like this where the safety side is Normally closed, except if needed to shut down a bad situation. Like over temperature.
Let's take a moment here. Recall the tiny wires that plug connected to the control on top? (MES 30, top rear control) Well those, and the Temperature probe are plug connected on the left side of the PC board.
Picture 3
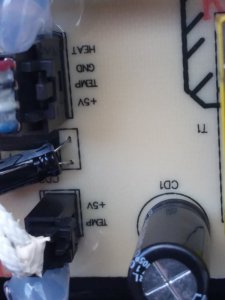
These connectors are also secured with a dab of silicone glue.
Do Not Disturb. I'm only showing you these for informational purposes.
If at some time you need to replace the PC board then you would remove these. But only then.
Proofing the element circuit, I connected my Ohm Meter to the disconnected Red and Blue wires. This reads through the Element, back through the Snap-disc Over temp safety switch, and to the Neutral side of the Elements circuit.
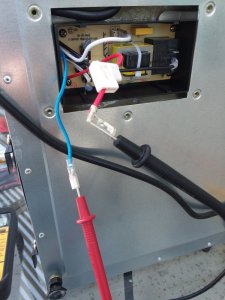
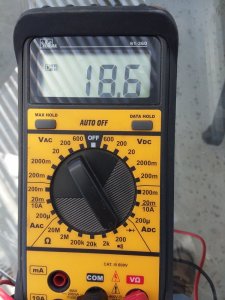
18.6 Ohms, continuity.
Circuit good, Element good, Snap-disc closed.
Now for my method of being able to By-Pass the OEM control, and allow my external Temperature Control to function. (Auber, or Inkbird)
A simple switch, rated for 10 amps is what I have. My MES 30 has an 800 watt element. It needs 6.66 Amps at 120 VAC. So I chose to use a switch rated for more amps than it requires, as well as the nominal voltage of 120 VAC.
Simply stated, Amps (I) = Watts (800) / Volts (120) 6.66 = 800/120
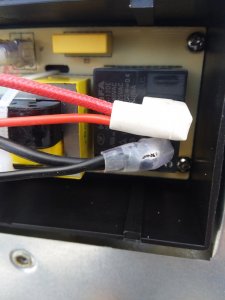
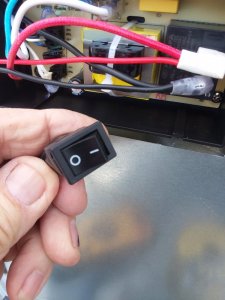
I merely put my switch in Parallel with the contacts of the OEM control relay. When my switch is in the "ON" position, it bypasses the control relay, and applies power to the element when plugged in. Which is where the external (Auber, or Inkbird) controller comes into play. Put their sensor into the smoker oven, and they control the heater element, by powering the plug and cord on or off.
Switch the Bypass switch to "OFF" position, and Wa-La, the OEM MES control comes into play, and the Smoker Oven functions with it's normalcy.
OK, say you have a lapse and plug it in direct, and the bypass switch is closed, what happens?
Well, this is why there is a safety device called a Snap-disc in the oven. When it gets too hot, the safety switch opens and interrupts the heating element until the Snap-disc cools enough to reset itself.
So if you were to plug it in, and try to use the OEM control, but the temperature keeps rising, you're in bypass mode. Check the Bypass switch.
So this is the way I chose to be able to run my smoker oven with either control method.
Let's call it, The Bypass Method
My goal was to be able to control the element with an external temperature control, specifically below 100 degrees, for things like Cheese smoking with a small amount (above Ambient, below 100°) of heat.
My Inkbird has a high range of 210°. But if I want something out of range for the Inkbird, I simply switch to regular MES control mode.
But within Ambient to 210°, the Inkbird has a 1 degree +/- resolution.
Close enough for the fish I smoke... ;)
Last edited:


