I haven't contributed much in a long time, so here's a recent post I wrote for my web site:
Brisket is one of those cuts of meat that tends to scare smokers away from trying it. For one thing, it's expensive. For another, we've all had someone else's bad brisket. It's like eating shoe leather. Brisket is actually two muscled connected by a thick layer of fat. The larger of the muscles is called the flat, which is the leaner of the two. The other muscle is called the point and contains a larger amount of marbling. Both muscles have long and fibrous strands. Surrounding these strands are tough pieces of connective tissue. I mean think about it. The brisket is the large muscle the cow uses to hold himself up. The more a muscle is used, the tougher it becomes. With that said, if cooked right (low and slow) those tough pieces of connective tissue will melt and actually serve to flavor the meat and add a tremendous amount of moisture. If you follow a few simple steps, and have the time, brisket is pretty easy to cook.
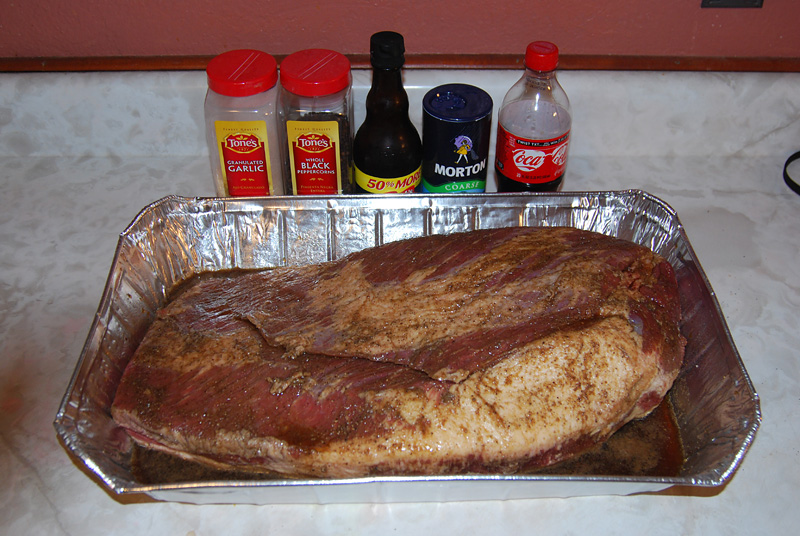
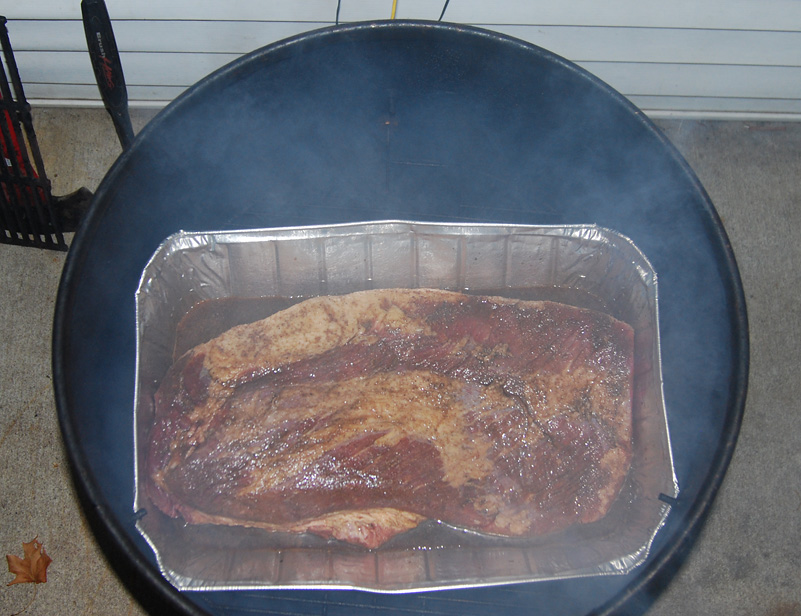
The first thing to realize is brisket has one of those flavors that stands out on it's own. For this reason, I go very light on the seasoning. As you can see in the image below, I only use small list of ingredients. You will also see that I cook brisket in a pan. Brisket has a lot of internal juice and we want to collect those drippings to keep the meat moist and then use those drippings in the final dish. The pan will do that for us.
Ingredients:
Course Sea Salt
Cracked Black Pepper
Garlic Powder
Worcestershire Sauce
Coca Cola
Beef Stock
Prep work, Day 1:
The night before I'm going to cook a brisket, I do some pre-prep work. This includes trimming some of the fat away from the meat. You may choose not to do this step, but I find that the more fat you remove, the more smoke will penetrate the meat. There's plenty of internal fat and connective tissue that will break down during the cook, so taking a little off the outside will be fine. Once the trimming is done, I wrap it tightly with several layers of plastic wrap. Then, I inject an entire carton of beef stock into the brisket. Inject in several places, but go in at an angle so the stock doesn't shoot right back out. Once injection is done, wrap tightly with more plastic until it is water tight. Store away in the fridge until the next day.
Prep work, Day 2 (cook day):
Remove the plastic wrap and place the brisket in the pan. Pour on some worcestershire sauce and rub it in evenly. Then sprinkle on the seasoning. I don't measure, I just lightly coat the surface with each and rub them into the meat. Do this on all sides. When you are finished, the fat cap of the meat should be on the bottom of the pan. Some will argue that the cap should be on top so, and I quote, "the fat will melt away down the surface of the meat and keep it moist". I say, total garbage. Meat isn't a sponge. You will never add moisture to the meat while you are cooking it. You can only try to retain moisture. Fat melting on the top will do nothing but keep the outside coated. There are better ways to achieve that. We want the cap to be on the bottom because that's where the drippings will collect. The fat cap will flavor those drippings and also act as an insulator between the heat the brisket. That insulation will do more to keep the meat moist than anything.
The last thing you will want to do is pour enough of the soda pop in the pan to fill the bottom no more than a quarter of an inch. To little and the soda may char in the pan; not good. Too much is just overkill. All we are doing here is starting our base of flavors for the drippings. It also keeps things on the bottom moist until the drippings start to collect. That keeps the initial drippings from charring when the would hit the otherwise dry hot pan.
Cooking:
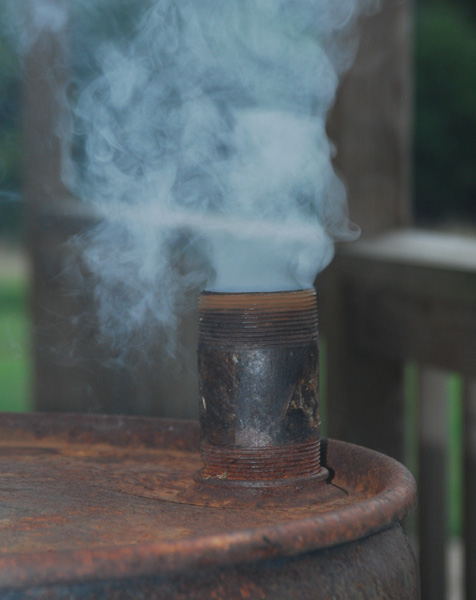
Fire up your smoker and getting going to about 225 degrees. Using lump charcoal and large chunks of hardwood, you want the smoker to run at temp for long enough for the smoke to calm down. White billowing smoke is a bad thing. White smoke means the heat around the wood isn't hot enough to vaporize the contaminants in the wood. That means those contaminants are going to flavor whatever you are cooking. If you've ever had smoked meat that tastes like an ash tray, white smoke is usually the culprit.
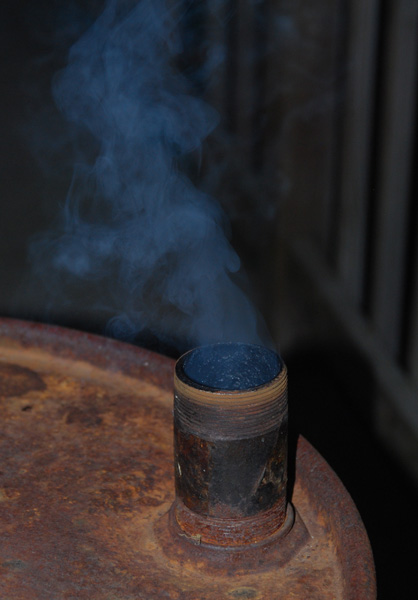
Once your temperatures start to even out the smoke will as well. The density of the smoke will reduce and it will start to turn a light blue-ish gray. That's what we are looking for. You may find that you don't even see smoke, but that's ok. If you can smell smoke, you're cooking with it.
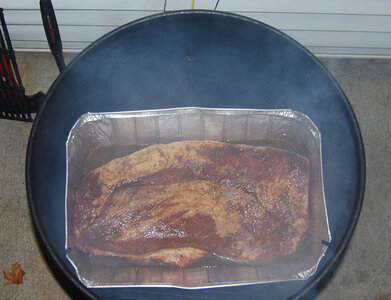
Load the pan with the brisket in the cooker and leave it alone for 2 hours. Don't be tempted to lift the lid to check it because you are only wasting heat, and you've got a long way to go. The typical cook time for a brisket is 1-1.5 hours per pound. The brisket I used for this instruction was an 18 pounder and it took over 19 hours to cook (hey, I said it was easy, not fast).
After 2 hours, using a spray bottle, aggressively "sprits" the brisket with more soda pop. Repeat this every hour. The sugars in the soda pop will caramelize and create a nice black finish. Keeping it moist throughout the cook will also contribute to the smoke ring, which I discuss below.
Once the meat comes to about 160-170 (depending on how smoky you like your meat), remove the brisket from the pan and wrap tightly in several laysers of foil. Before sealing the foil pour all of the collected juices in with the meat. I strain mine as I pour because I don't like over seasoned brisket. But that's up to you.
Now here's where BBQ purists will start throwing daggers. I finish my brisket in the oven at the same temp as the smoker. I know, that's not BBQ. Feel free to finish yours in the smoker if you want. But realize this: once the meat is in the foil, cooking it in the oven will have no different effect than cooked in the smoker. I like the oven because this is usually when I get some sleep. I jab an oven probe into the point of the brisket and set an alarm; 185 if you like firm slices, 200 if you like it shredded. Then, just let the thing cook; there's really nothing else you can do. Once it hit's your desired temp, remove from the oven and wrap in several layers of towels. Then place the whole thing in a cooler for at least 2 hours, but it will stay hot for several hours if you are planning around company. The temperature will continue to rise about 5-10 degrees, and that's what we want.
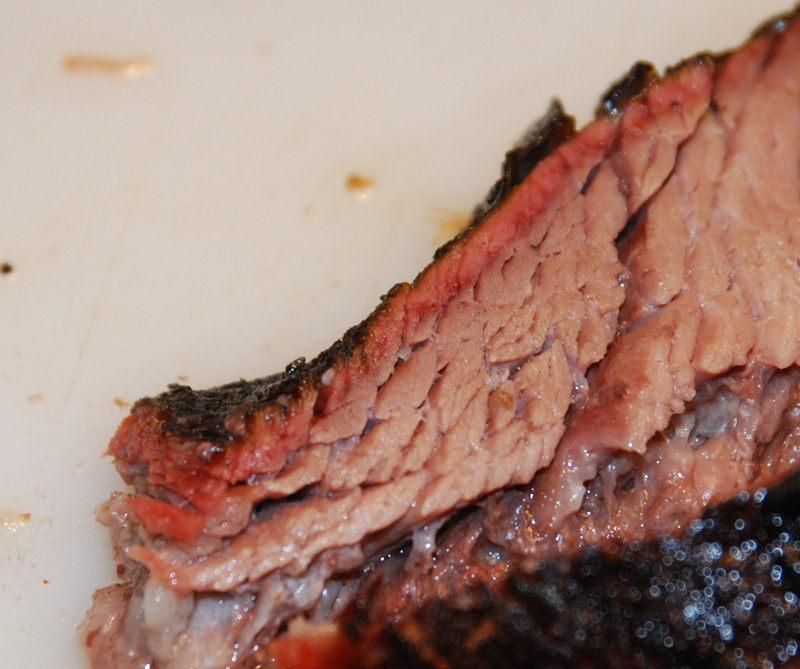
Once it's time to crack the seal on the foil, do so carefully. There will be quite a bit of steam (hopefully) that will want to escape. Remove from the foil and place on a cutting board. Remove the point from the flat and trim away most of the fat between the 2 muscles. Flip the flat over and scrap away most of the fat cap. The fat has already done it's job seasoning the meat so there's no need to serve it to your guests at this point. Be mindful of the direction in the grain and cut against it. If you cut along the grain, you will end up with long tough fibers that you can't chew. Notice that the fibers on the point go a different direction. So, again, be aware of the direction as you are carving. Many times I will just chop the point because of the high fat content and crazy grain direction. With that said, I find the point more flavorful than the flat. Once the meat is sliced or shredded, I pour most of the drippings back in. Again, I strain the drippings to avoid over seasoning. You can even use a fat separator if you choose.

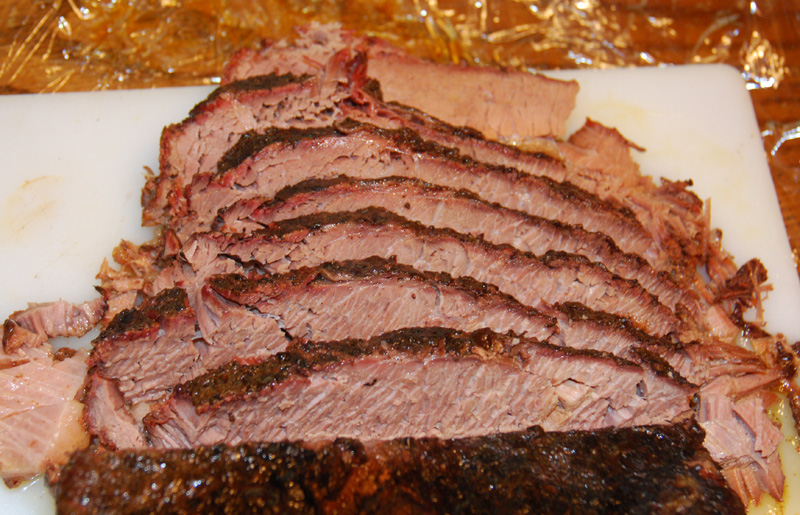
If you did your job keeping the meat moist, you will have a nice pink or red smoke ring. This is a chemical reaction that is formed from the humidity in the smoker (in this case, soda pop) and the nitrogen in the air and smoke. For all intensive purposes, the smoke ring doesn't make the meat better, it just lets you know you're on track.
Happy cooking, all!
Brisket is one of those cuts of meat that tends to scare smokers away from trying it. For one thing, it's expensive. For another, we've all had someone else's bad brisket. It's like eating shoe leather. Brisket is actually two muscled connected by a thick layer of fat. The larger of the muscles is called the flat, which is the leaner of the two. The other muscle is called the point and contains a larger amount of marbling. Both muscles have long and fibrous strands. Surrounding these strands are tough pieces of connective tissue. I mean think about it. The brisket is the large muscle the cow uses to hold himself up. The more a muscle is used, the tougher it becomes. With that said, if cooked right (low and slow) those tough pieces of connective tissue will melt and actually serve to flavor the meat and add a tremendous amount of moisture. If you follow a few simple steps, and have the time, brisket is pretty easy to cook.
The first thing to realize is brisket has one of those flavors that stands out on it's own. For this reason, I go very light on the seasoning. As you can see in the image below, I only use small list of ingredients. You will also see that I cook brisket in a pan. Brisket has a lot of internal juice and we want to collect those drippings to keep the meat moist and then use those drippings in the final dish. The pan will do that for us.
Ingredients:
Course Sea Salt
Cracked Black Pepper
Garlic Powder
Worcestershire Sauce
Coca Cola
Beef Stock
Prep work, Day 1:
The night before I'm going to cook a brisket, I do some pre-prep work. This includes trimming some of the fat away from the meat. You may choose not to do this step, but I find that the more fat you remove, the more smoke will penetrate the meat. There's plenty of internal fat and connective tissue that will break down during the cook, so taking a little off the outside will be fine. Once the trimming is done, I wrap it tightly with several layers of plastic wrap. Then, I inject an entire carton of beef stock into the brisket. Inject in several places, but go in at an angle so the stock doesn't shoot right back out. Once injection is done, wrap tightly with more plastic until it is water tight. Store away in the fridge until the next day.
Prep work, Day 2 (cook day):
Remove the plastic wrap and place the brisket in the pan. Pour on some worcestershire sauce and rub it in evenly. Then sprinkle on the seasoning. I don't measure, I just lightly coat the surface with each and rub them into the meat. Do this on all sides. When you are finished, the fat cap of the meat should be on the bottom of the pan. Some will argue that the cap should be on top so, and I quote, "the fat will melt away down the surface of the meat and keep it moist". I say, total garbage. Meat isn't a sponge. You will never add moisture to the meat while you are cooking it. You can only try to retain moisture. Fat melting on the top will do nothing but keep the outside coated. There are better ways to achieve that. We want the cap to be on the bottom because that's where the drippings will collect. The fat cap will flavor those drippings and also act as an insulator between the heat the brisket. That insulation will do more to keep the meat moist than anything.
The last thing you will want to do is pour enough of the soda pop in the pan to fill the bottom no more than a quarter of an inch. To little and the soda may char in the pan; not good. Too much is just overkill. All we are doing here is starting our base of flavors for the drippings. It also keeps things on the bottom moist until the drippings start to collect. That keeps the initial drippings from charring when the would hit the otherwise dry hot pan.
Cooking:
Fire up your smoker and getting going to about 225 degrees. Using lump charcoal and large chunks of hardwood, you want the smoker to run at temp for long enough for the smoke to calm down. White billowing smoke is a bad thing. White smoke means the heat around the wood isn't hot enough to vaporize the contaminants in the wood. That means those contaminants are going to flavor whatever you are cooking. If you've ever had smoked meat that tastes like an ash tray, white smoke is usually the culprit.
Once your temperatures start to even out the smoke will as well. The density of the smoke will reduce and it will start to turn a light blue-ish gray. That's what we are looking for. You may find that you don't even see smoke, but that's ok. If you can smell smoke, you're cooking with it.
Load the pan with the brisket in the cooker and leave it alone for 2 hours. Don't be tempted to lift the lid to check it because you are only wasting heat, and you've got a long way to go. The typical cook time for a brisket is 1-1.5 hours per pound. The brisket I used for this instruction was an 18 pounder and it took over 19 hours to cook (hey, I said it was easy, not fast).
After 2 hours, using a spray bottle, aggressively "sprits" the brisket with more soda pop. Repeat this every hour. The sugars in the soda pop will caramelize and create a nice black finish. Keeping it moist throughout the cook will also contribute to the smoke ring, which I discuss below.
Once the meat comes to about 160-170 (depending on how smoky you like your meat), remove the brisket from the pan and wrap tightly in several laysers of foil. Before sealing the foil pour all of the collected juices in with the meat. I strain mine as I pour because I don't like over seasoned brisket. But that's up to you.
Now here's where BBQ purists will start throwing daggers. I finish my brisket in the oven at the same temp as the smoker. I know, that's not BBQ. Feel free to finish yours in the smoker if you want. But realize this: once the meat is in the foil, cooking it in the oven will have no different effect than cooked in the smoker. I like the oven because this is usually when I get some sleep. I jab an oven probe into the point of the brisket and set an alarm; 185 if you like firm slices, 200 if you like it shredded. Then, just let the thing cook; there's really nothing else you can do. Once it hit's your desired temp, remove from the oven and wrap in several layers of towels. Then place the whole thing in a cooler for at least 2 hours, but it will stay hot for several hours if you are planning around company. The temperature will continue to rise about 5-10 degrees, and that's what we want.
Once it's time to crack the seal on the foil, do so carefully. There will be quite a bit of steam (hopefully) that will want to escape. Remove from the foil and place on a cutting board. Remove the point from the flat and trim away most of the fat between the 2 muscles. Flip the flat over and scrap away most of the fat cap. The fat has already done it's job seasoning the meat so there's no need to serve it to your guests at this point. Be mindful of the direction in the grain and cut against it. If you cut along the grain, you will end up with long tough fibers that you can't chew. Notice that the fibers on the point go a different direction. So, again, be aware of the direction as you are carving. Many times I will just chop the point because of the high fat content and crazy grain direction. With that said, I find the point more flavorful than the flat. Once the meat is sliced or shredded, I pour most of the drippings back in. Again, I strain the drippings to avoid over seasoning. You can even use a fat separator if you choose.
If you did your job keeping the meat moist, you will have a nice pink or red smoke ring. This is a chemical reaction that is formed from the humidity in the smoker (in this case, soda pop) and the nitrogen in the air and smoke. For all intensive purposes, the smoke ring doesn't make the meat better, it just lets you know you're on track.
Happy cooking, all!