Pellets and humidity?

  • Some of the links on this forum allow SMF, at no cost to you, to earn a small commission when you click through and make a purchase. Let me know if you have any questions about this.
SMF is reader-supported. When you buy through links on our site, we may earn an affiliate commission.
Sigmo, afternoon.....  below is a text on botulism in cold smoked fish...   I don't sift through all the BS...   It's for commercial processors...


Sooooooo, I just add cure #1 to all fish I smoke..   Up to 200 Ppm, if memory serves me correctly, is allowed....


http://www.fda.gov/food/foodscienceresearch/ucm092182.htm


Thanks, Dave. I appreciate that.

I've never smoked any fish, but I may have to try it. And having the right safety info is essential, I think.

I do love smoked salmon, but man, is it expensive. Like jerky, it really might be cheaper and more satisfying to make your own.

But not if it makes everyone sick.

Tabbed in.
 
The use of Nitrite will depend on the brining stage of the process and is not required unless you are trying to produce a low salt version. It is not usual practice to add Nitrite when making cold smoked salmon unless you are trying to produce an end salt content of less than 3.5% - Remember that as the fish loses water during the smoking/drying stages the salt taken up during the salting step actually becomes more concentrated within the fish. If you did want to add Nitrite, as Dave does, then you would need to use an immersion brine as it would be very difficult to know how much Nitrite is being taken up when using a dry cure.

The dry brining stage should be carried out at 40 F (4 C)  in the fridge and then the cold smoking is done at higher temperatures to help remove the required amount of moisture. In the USA the FDA recommendations say this can be at up to 90 F (32 C) for up to 20 hours. I smoke mine at ~75 F (24 C) for 20-24 hours.

Once smoked the salmon needs to then be cooled to below 40 F (4 C) where it has a shelf life of up to 10 days. Frozen it will last longer. The limit of the 10 day chilled shelf life is there to ensure that if there are any botulinum spores present (they are actually all around us every day) they will not have time to develop sufficient toxin to become a hazard to health

The UK and USA guidelines are very similar and as I produce and sell my smoked salmon commercially on a small scale I am governed by UK food standards and am subject to regular inspection. For traditional smoked salmon I do not know of any producers (UK or US) that use nitrite in their production, however that does not mean that there are not any.

By following the guidelines, smoked salmon is simple to produce and tastes delicious.

edited to correct spelling mistake
 
Last edited:
 
The use of Nitrite will depend on the brining stage of the process and is not required unless you are trying to produce a low salt version. It is not usual practice to add Nitrite when making cold smoked salmon unless you are trying to produce an end salt content of less than 3.5% - Remember that as the fish loses water during the smoking/drying stages the salt taken up during the salting step actually becomes more concentrated within the fish. If you did want to add Nitrite, as Dave does, then you would need to use an immersion brine as it would be very difficult to know how much Nitrite is being taken up when using a dry cure.

The dry brining stage should be carried out at 40 F (4 C)  in the fridge and then the cold smoking is done at higher temperatures to help remove the required amount of moisture. In the USA the FDA recommendations say this can be at up to 90 F (32 C) for up to 20 hours. I smoke mine at ~75 F (24 C) for 20-24 hours.

Once smoked the salmon needs to then be cooled to below 40 F (4 C) where it has a shelf life of up to 10 days. Frozen it will last longer. The limit of the 10 day chilled shelf life is there to ensure that if there are any botulinum spores present (they are actually all around us every day) they will not have time to develop sufficient toxin to become a hazard to health

The UK and USA guidelines are very similar and as I produce and sell my smoked salmon commercially on a small scale I am governed by UK food standards and am subject to regular inspection. For traditional smoked salmon I do not know of any producers (UK or US) that use nitrite in their production, however that does not mean that there are not any.

By following the guidelines, smoked salmon is simple to produce and tastes delicious.

edited to correct spelling mistake
Excellent information!  I appreciate the time it takes for everyone to make these posts.

What you said matches with what was in the document posted earlier.  And it all makes sense.

On the one hand, I like the idea of inhibiting bacterial growth with the nitrite.  On the other hand, we know it's not good for us.  And in that document, they talked about how it's not even legal to use it commercially, at least for some kinds of smoked fish, in various countries.

Even if the nitrates are not all that bad for us directly, one wonders about its effects on the thriving bacterial biosystems within our guts.  More and more research is pointing out how vital the bacteria and virus populations within our bodies actually are.  And different things we might eat or take can alter the balances of populations inside of us in harmful ways.

My son is studying to get into medical school and said that in one biology class, they talked about new research that found that the difference between fat mice and thin mice was the bacteria in their guts.  Transplanting "skinny mouse" bacteria into the intestinal tracts of fat mice made them get thin very quickly, and vice-versa, for example.

And the document about the smoked fish safety touched on a similar subject, saying that some treatments to reduce bacteria could be bad because harmless bacteria might be reduced, and therefore not be present to compete with the harmful bacteria!  It all gets surprisingly complex in a hurry.  Sort of a "friendly fire" situation in a way.

They're now harvesting and storing cultures of the intestinal bacteria from people who are planning on having surgery so that they can re-introduce it into their gut after the surgery and the requisite antibiotic "carpet bombing" that is always used.  Indiscriminately killing off all of the bacteria in a person can leave them with many bad ailments as a result.  One needs to be very careful.  You don't want to kill the "resistance" fighters that might actually be on your side.  And some of the complex processes that our bodies rely upon are performed by "friendly" bacteria in our systems.  :)

Around here, we catch trout from streams, rivers, and lakes.  I've always wanted to try smoking some of that, too.  And it sounds like that's just as complex as doing salmon.  But it might be very rewarding, too.  But the idea of parasites, etc., kind of gives me the creeps!   It was interesting to read that freezing can be an effective way of killing (at least some) parasites.  Who knew that freezing might be a good thing to have had happen to our seafood!
 
Living in Houston, with its often high humidity, I am experiencing the effects of high humidity. Many thanks to Sigmo for the effort it took to share your insights.  I have read all the advice here about how to keep the AMNZPS and AMNZTS burning. I am sure it is all good advice but I firmly believe that when the humidity is high (i.e. 80% plus) the pre-dried pellets and dust quickly again become damp and burn slowly with little smoke or go out.

I like the idea of channeling fresh air to the tray via a short section of flex duct to the left side of my MES40 gen 2.5. Although the fresh air is around 80% humidity--at least in the hot gulf coast summer--it is likely not as high as inside the MES. I use a shield over the chip loader port to make the fresh air flow to the center then go up. As I wrote that the thought came that maybe a first step in the experiment is to slide the AMNZ tray against that shield so the fresh air goes up through the tray.

This has been a very helpful and insightful thread. I am sure the high altitude guys have a unique situation but we definitely share a common challenge; i.e. humidity. The difference is that for us on the Gulf Coast it is 11 months out of the year. But, I would live no where else.
I've been to Houston a few times, and man, you DO have some serious humidity there! 

It's usually very dry here.  Most people install humidifiers as part of their furnace system to keep things from being so dry in the winter.  The static electricity is bad, and it dries out your skin and nasal passages, etc.  You folks have DE humidifiers, we have humidifiers. 
biggrin.gif


I tried something like what you mentioned above last night smoking some chickens.

I'd taken the whole chip holder assembly out of my MES 40 1st gen, and that leaves just a hole where the chip loader fits in, and nothing but the bare heating element down below that.

So I made some relatively crude air deflectors/drip shields out of aluminum from disposable steam table tray lids, and also put in a section of aluminum flex duct leading from the inlet/chip-loader hole above and past the heating element, dumping out so that it "blows" right at the area where my AMNPS usually sits.

It was fairly humid last night (maybe not as bad as it has been, but still 50% or more) and the pellets burned just fine.  I think, as you mentioned, even though it's humid air being drawn in, it makes a difference that this slight "breeze" is directed right at the AMNPS so the pellets are getting a constant supply of fresh (not stale low-oxygen) air.

The AMNPS isn't as well separated from the cooking chamber as it is when using a mailbox mod or the like, but it is somewhat separated from the cooking chamber because the air it sees is coming directly from outside.

I'd call that a success (unless it was just not as humid, and that made the difference).

Another thing I did, based on the advice that the tube smokers burn better, was to pile the chips into the rows in the AMNPS very high.  I think part of what makes the tube smokers burn better is just having more pellets all together that way.  On my failed attempts recently, I was not filling the rows very high.  It probably goes out a lot easier when there's a more tenuous, thin, weak stack of "fuel".

In addition, I also stuck a section of the aluminum duct in the outlet on the top of my MES to help create a more positive draft.

With all of that, the pellets burned well.
 
Sigmo - Thanks for the report. Yesterday I got a good burn with Traeger pellets in the AMAZN tray once they finally began burning. The weather was intermittent rains in the high 80s--very humid. First time using Traeger brand as found them at Kroger for about a $1/lb. Struggled to get it to burn but finally did.  I thought more than once about this thread. Glad to hear channeling the fresh air to the tray worked. I think I am ready to pull out the chip tray holder. With the air supply coming into the lower corner opposite the air exhaust port should also provide good smoke distribution. What do you think about putting a tee at the end of that line, plug the ends of the tee and have holes in the top of the tee thereby spreading out the air entry to the box? Yup, that may be a little "over the top".

I also have the 12" tube and agree that it burns more consistently due to the larger amount of pellets. Although I have only had the tray a few months I have better luck with it when the slots are full and I jiggle it while pressing down to consolidate them and reduce the air gaps.

I have been putting off the mailbox mod but with colder days coming I am looking forward to trying cold smoking. Saw an idea you may like and that is to take the Amanzn tube and slide it into the flex duct outside the MES in lieu of the mailbox. I would still use the duct inside so the smoke entered opposite the exhaust port.

Before I forget -- How did you keep the heating element from melting the flex alum tubing? You said it went above and past. How much clearance do you have between the element and the bottom of the duct?

Thanks again for sharing your experiences. 
Even though Traeger pellets are two thirds Oak or Alder and one third the wood on the bag I think they are good. I have Apple and Pecan. I still have a lot from Todd when I got the AMNTS and AMNPS.
-Kurt
 
 
Sigmo - Thanks for the report. Yesterday I got a good burn with Traeger pellets in the AMAZN tray once they finally began burning. The weather was intermittent rains in the high 80s--very humid. First time using Traeger brand as found them at Kroger for about a $1/lb. Struggled to get it to burn but finally did.  I thought more than once about this thread. Glad to hear channeling the fresh air to the tray worked. I think I am ready to pull out the chip tray holder. With the air supply coming into the lower corner opposite the air exhaust port should also provide good smoke distribution. What do you think about putting a tee at the end of that line, plug the ends of the tee and have holes in the top of the tee thereby spreading out the air entry to the box? Yup, that may be a little "over the top".

I also have the 12" tube and agree that it burns more consistently due to the larger amount of pellets. Although I have only had the tray a few months I have better luck with it when the slots are full and I jiggle it while pressing down to consolidate them and reduce the air gaps.

I have been putting off the mailbox mod but with colder days coming I am looking forward to trying cold smoking. Saw an idea you may like and that is to take the Amanzn tube and slide it into the flex duct outside the MES in lieu of the mailbox. I would still use the duct inside so the smoke entered opposite the exhaust port.

Before I forget -- How did you keep the heating element from melting the flex alum tubing? You said it went above and past. How much clearance do you have between the element and the bottom of the duct?

Thanks again for sharing your experiences. 
Thanks for your reports, too!

Here are a couple of pictures of how I have it set up right now.  This may not be permanent, but it's what I tried the other night.


This was how things looked after I removed the original "innards".

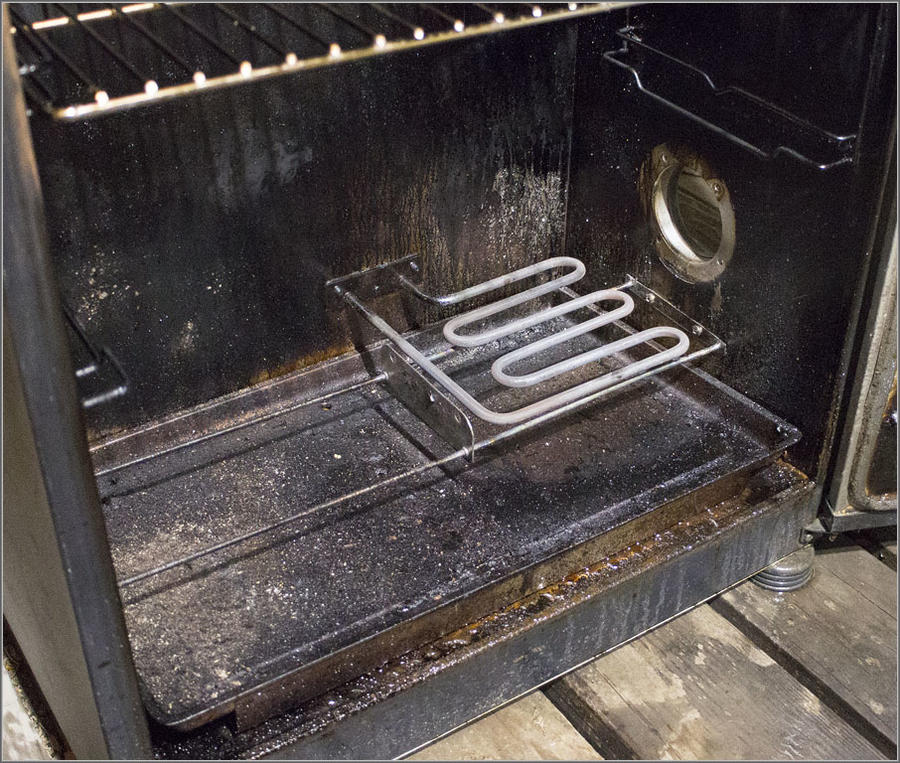
The original metalwork shielded the bottom of the heating element, which keeps its direct radiation from "shining" on the drip pan in the bottom of the smoker.  I think that was somewhat important because when the element is on fully, it glows, and the IR radiation shines down onto the collected grease, getting it hot enough to smolder, and we don't want that to happen because it creates a very nasty-smelling smoke, as well as potentially creating conditions for getting an explosion of that grease-smoke or igniting the grease itself.

So I wanted something below the heating element.  The original piece that slides in there below the heating element is steel.  And that might be a good material because it melts at a higher temperature than aluminum would.  But sheet aluminum might be acceptable, too.  I haven't worked out exactly what I'll end up doing.

Above the heating element, the chip tray itself would be closest, but the whole air box, chip-loader was up there above most of the element.  And that all acted as a drip-shield to keep grease or whatnot from dripping directly down onto the heating element.  Again, I think that's all very important because if grease drips onto the heating element, it will burn and the smoke from that will taste bad, too.

The original design also protected the door of the smoker from receiving direct infra-red radiation from the heating element.

When I tested the unit with no food and nothing around the heating element, I noticed that it made the crud on the inside of my smoker's door, down low, smolder.  That, too, would be bad tasting stuff!

So I wanted my shielding to protect the inside of the front door of the smoker from that direct IR from the heating element by casting a shadow on it, as well.

So I feel that the heating element should be surrounded by metal to prevent it from shining directly on nearby surfaces that will collect grease or residue, and also be protected from drips from above.  Yet at the same time, we need things to be open enough to let the heating element transfer its heat to the air inside the smoker.  So the design needs to be open enough to allow free air circulation around the heating element.

Also, in my model of smoker, the temperature sensor for the temperature controller is above the heating element.  I believe that this is done to provide what the manufacturer feels will be safe and work with the controller to keep the average temperature in the smoker close to the setpoint.  This is a fairly complex subject.  The position of the sensor for the controller is very important, but it can be influenced by how we place the food in the smoker, and certainly by any modifications we make to the airflow patterns in the smoker.

So I wanted to provide some air-flow path up the back wall of the smoker to let the sensor "see" the hot air coming up from the heating element.  The original design provides for that because none of it fit tight against the back wall.  If I recall correctly, there was about an inch gap or maybe more between all of their metalwork and the back wall.  That let hot air, heated by the element rise up along the back wall to not only heat the smoker up, but also be sensed by their little sensor.

In the design of various laboratory incubators and ovens, I've sometimes seen the manufacturer place their temperature sensor fairly directly in the path of the heated air coming off of the heating element.  On the one hand, this gives the controller a somewhat distorted "view" of the temperature in the oven, because it sees that hot air directly from the heater, and may read too high with respect to the rest of the oven.  But on the other hand, it makes the control loop easier to tune, and prevents overheating some areas of the oven due to the cooling effect of whatever goodies you have in the oven.  So it's safer and makes tuning the control loop easier.

But you will measure lower temperatures in other places in the oven or incubator.  This is somewhat helped by using active stirring in these ovens/incubators.  But even so, if there is a lot of "load" in them, and particularly if it's a drying oven, and you've got a lot of wet samples in it, the temperatures in many areas of the oven will be lower than what the controller sees, especially until most of the moisture is driven off.  When things are dry, and have been given a chance to come up to temperature, THEN the temperatures in these ovens evens out because there's nothing really absorbing or removing much heat from the oven.  And that's what they really count on.  They do not want parts of the oven to be way above the setpoint while the wet "load" in the oven is absorbing and removing a lot of heat from the system.

If the temperature probe was mounted far form the heat source, giving what we might feel is a more representative temperature for the inside of the oven (or smoker in this case), then at the first of the cooking process, the cold, wet "load" in the oven would keep the temperatures seen by the probe lower than the temperatures we'd have right near the heat source.  So that would fool the controller into turning the heating element on too hard.  And we'd end up with some places in the oven (near the heater) that were actually way over the temperature setpoint.  And that could be very bad for some laboratory operations (drying samples, for example) because many methods prescribe a maximum drying temperature to avoid driving off certain volatile compounds or elements.

And in our smokers, or any food oven, we'd end up burning or overcooking any food that was near the heating element even though the sensor for the controller thought things were actually too cool.

So there's a lot to be considered when tinkering with the airflow, "shading", etc., in and around the heating elements in these smokers.  And the position of the controller's sensor needs to be taken into account with all of it, too.

People complain about readings they get with their separate temperature sensors being incorrect, and showing that the smoker's controller or sensor is bad.  And I know that they may well be inaccurate.  Some worse than others.

But the thing people fail to take into account is the enormous variation in temperature you'll measure inside of any oven, incubator, or our smokers. depending on where you place your probe and what sort of "load" is in the unit at the time.

So I tried to keep all of that in mind when putting various baffles, reflectors, etc., in the smoker.  Mine is a work in progress.  I am just experimenting with easy to cut/bend/form thin aluminum from disposable steam-table trays and lids that I got at the local Sam's Club.  It's a nice thickness of aluminum because you can cut it easily, bend it easily, etc.  And if it isn't what I want, I can just wad it up and put it in the recycling bin!  :)

Here's what my smoker looked like originally:


You can see that the original metalwork hides the heating element.  That chip drawer part slides out, and a lot of us leave it partway open to get better airflow since we're not burning chips.  But what I didn't realize until I took things apart the other night was that the "drawer" that slides out has the chip drawer/tray, and it has a steel bottom to it that slides in underneath the heating element.  So with the chip drawer pushed in all of the way, the heating element's bottom is completely blocked/covered (from below) by that steel piece.

That contains some of the heat to make the chip tray get hotter, but it also serves to keep the infra red radiation from shining down onto the grease collector.  And I think that's important.  So removing the drawer or even sliding it partway open will expose the bottom of the heating element, allowing it to shine on the floor of the smoker (the grease pan).  And if there's grease there, it may well smolder from the intense heat, and that won't taste good.

Note how pristine the drip pan in mine looks in that photo!  The unit was brand new when I took that picture a few years ago.  By now, my grease tray is covered with grease, and kind of black.  I should clean it off and make it shiny again, I guess.  But since it is greasy, I don't want the heating element shining on it from close range as it will if I have that chip pan pulled out.


This photo shows my currently greasy drip tray and what things look like now that I removed all of the factory metalwork in that corner.  The heating element is just exposed.  And that wouldn't be a bad thing if it didn't "shine" on the grease tray and the inside of the bottom of the door, causing any buildup in those places to get hot enough to smolder.


This is a picture I took after just sliding the pellet tray back into the place where it used to fit.  You can see how part of it covers the underside of the heating element.  I think that's desirable.  It's just laying there for the picture.  It's not a secure fit, but then again, it wouldn't go anywhere unless you bumped it.  Note that neither the back edge of that bottom piece, nor the chip tray go back against the back wall of the smoker.  There's a nice gap.  That allows some hot air to move upwards.  The heat from the heating element has to get into the smoker.

Here's what I did:


I cut a piece of aluminum duct long enough that it reaches past the heating element and can lay on a flat metal piece that is attached to the two "rails" that run across the bottom of the smoker.  That flat piece has two threaded holes that used to hold two of the four screws that held the original metalwork in place.  Unfortunately, you can't see exactly how the aluminum duct is laying on that piece because all of it is blocked from view in this shot.

I used an adapter to connect the aluminum duct to the hole through the smoker.  The duct was slightly too large to fit through the hole.  The adapter is what you might call a male X male duct connector.  You could use it to join two sections of that 3" aluminum duct if you wanted to.  It fits right into the hole in the smoker, and makes a fairly snug fit!  Then you just stick the duct onto it on the inside.

I bent the duct down a bit at it's "snoot", and even squashed it down to an oval shape to blow right over onto where I usually put the AMNPS.  Because it's supported at the back end by the adapter through the hole, and on the nose end by laying on that flat metal piece that you can't really see, it's arched up over the heating element and cannot com into direct contact with it.  There's a gap of about 1 inch, I'd say, above the heating element in the closest place.  So the aluminum doesn't melt (or at least has not yet!).

The piece above the duct is more of that relatively flimsy disposable steam tray material.  The steam tray covers are a goldmine of thin, easy-to-work aluminum sheet.  Rigid enough to do the job, but flimsy enough to cut with a pair of regular scissors or a knife.  Just be really careful.  The cut edges are razor sharp!  Gloves are a good idea, for sure!

So anyhow, that piece above the duct is bent up at the side nearest the smoker door to give it rigidity and make it just the right length to let air from the heating element pass up on that side and not be blocked (as it would be if that piece reached over closer to the door).  I didn't want to choke off the various places where heat could circulate up from the heating element.  The back side also doesn't reach the back wall of the smoker.  I've left a gap there, too, for circulation.

It's hard to see, but I just bent the far right side upwards and cut and bent it so that it hangs from one of the places that are meant to hold the water tray.  The front end just lays on the duct.

The purpose of that piece is to act as a drip shield to keep dripping fat from falling directly onto the heating element (again, making nasty tasting smoke).

Now, the larger piece at the bottom, and sticking up in the front is there to shield my filthy drip tray from the direct radiation off of the heater and also shield the lower part of the door, also filthy, from that same infra-red "shine".  When I first tested the unit with nothing in there but the bare heating element, smoke was coming off of the drip tray under the heater, and the inside of the door down low.  Not good!

So that bent piece in the bottom is a heat shield.

None of this is permanent.  I think it will be best to build something more rigid and firmly attached ultimately.  But the general ideas are there.

As for using a tee, blocked off, with holes to distribute the incoming air:  That has some merit, I think.  I just wanted to get a nozzle effect, so the incoming air was aimed right at the pellet burner to encourage good burning even when the humidity is high.

I have had it very hot for a long time testing, and nothing melted or drooped.  I ran it for a few hours at 275 (the hottest setting available on this unit).  And I've run it under "real" conditions, too.  But what I haven't proven is how well and properly the pellets will burn under various conditions with this.

I did do a cold smoke of some butter, but because it was cold smoke, and I had the smoker turned off, I cheated and used a fan to force air into the duct from the outside.  The pellets burned well, and used up about 3/4 of a row during about 3 hours of operation before I finished and put them out.  But I think I actually pushed too much air over the pellets because to me, it seemed like they were giving off too much smoke, and not blue enough.

The conditions of combustion of the pellets is something I think bears a lot of scrutiny.  I've read that if the wood burns too hot, then it causes some of the good tasting/smelling smoke compounds to be formed, but then be broken down again by the high heat, leaving worse tasting compounds.  Perhaps the difference between thin blue smoke and thick white smoke.

So I need to work on all of that!

I like the idea of jiggling the tray and pressing the pellets down to consolidate them more.  I think that might help them burn more reliably for me, too!

I will very likely build a full mailbox setup too when I get some time to play with it more.  I do think that sort of thing offers a lot of advantages.  Better control over everything, it would seem.

My feeling is that you need to have good and independent control of a lot of factors.

Combustion of the pellets needs to be controlled so that they smolder, but at a low temperature, yet don't go out!

The temperature in the smoker needs to be well controlled, and the air inside mixed well so that temperatures are as even as possible throughout the chamber.  And the smoke needs to be evenly distributed in the chamber as well.

The amount of air passing through the smoker needs to be proper to either remove a lot of moisture from the product, or, in other cases, not pull too much moisture out of the product.

The amount of smoke going into the chamber needs to be controlled so that if you have high air flow through the chamber, you have more smoke generation. And if you have very little air passing through the chamber, you need a lot less smoke.

But you need to be able to control all of those things independently.  And that may take some novel approaches that we really don't see on most smokers right off the showroom floor.  :)
I removed all the chip housing etc. like you did to primarily reduce the temp swings from all the steel surrounding the heating element, being a heat sink.  Now it swings +/- ten degrees maxed at 275*F and is shorter when the Mes is set at a lower temp.  The bottom rack has a stainless steel perforated deflector on it to keep a little heat going through it but to let the heat rise to the center of the smoker.  I raised the water pan up one level because it fits on any level, allowing heat to work it's way around obstacles to the food to make a natural even convection to all four corners.  Otherwise the heat will rise from the heating element in the right rear corner past the controller sensor on the right rear wall straight out the right rear top exhaust vent.  I use all top three racks for cooking but the second from the top is my go to rack.  Then the top rack and then the second from the bottom rack.  The open lower smoker plan with an obstacle at the first rack level (deflector)then the water pan at the second rack level with the rack on top of it gets me +/- 5*F from left to right above the water pan.  Here's a few pics:


Stainless steel half circle for a 22.5" kettle grill for fish/vegetables.  It's hinged in the middle and folded in half shown as a deflector below .


Deflector on bottom rack right rear corner, allowing a little heat through and moving heat out of the right rear corner to the center of the smoker.   Raised the empty water pan to the second from the bottom rack to move heat around more evenly and to keep drippings from vaporizing as quickly. 


I usually hang probes without grate clips from the top rack when doing a one rack smoke to keep wires clean and out of the way.  I just fill aluminum tea light candle bases with 700*F rated Permatex ultra copper RTV silicone and let sit for a few weeks.  It turns into a little puck you push the probe through.   


Mailbox mod with straight three inch diameter rigid pipe that slides through chip loader opening four inches.  Made a rubber apron from a broken treadmill track for the leg extension kit so the legs and deck stay clean when sliding out racks with food on them.   


Supercollider attachment!  I cold smoke in my grill so after my cheese and CB were done cold smoking I bent the flex pipe to the left into the Mes to hot smoke the CB.


Redneck pellet scoop/funnel to fill the AMNPS/AMNTS.  Comes in handy with Todd's 20lb. bags.

I'm the one on the right.

-Kurt
Excellent ideas!

I've got to get my mailbox drilled and ready to try out.  I like the supercollider.  I may set something like that up, too, for cold smoking.  A nice long section of tube to really suck out the heat so it's just cold smoke making it into the smoker.

I think it pays to mind how the heat and smoke get distributed in the smoker.  Before I took the innards out of mine, I always used a deflector over the AMNPS (which sat right to the left of the heating/chip goodies, on those two rails so it was up for good air circulation.  That made the smoke itself come right up the center, or even push a bit to the right.

Then, when I wasn't using the very top rack (which was most of the time), I had an aluminum piece covering most of it, but with three or four inches left open on the far left side.  That way, the smoke (and rising hot air) had to zig-zag through the chamber to find its way out instead of short-circuiting directly up from the OEM pellet tray and heating element and out the vent at the top right.

It might be good to install a gentle draft inducer in the unit to force good circulation of both the heat and smoke to make things more uniform throughout the whole cabinet.  For me, that would free up more rack space that I sort of waste with the baffles.

Here's the general idea I've been using up until now:


This was a cold smoke of some cheese a while back, but the photo was already marked up.

I want a shield over the AMNPS, always, so that foil over the left side of the bottom rack always served as that shield.  But I lose use of pretty much all of that bottom rack, of course.  Then again, the temperatures and smoke wouldn't ever be that well distributed on that rack, anyhow, so no real loss in most cases.

And with my deflector on the top rack, it, too was off limits for actual use.

The paper clips were to hang skewers off of when doing jerky.

With a mailbox for the smoke generator, you don't need to worry about drips onto the pellets.  And it gets all of that out of the smoker.

With a draft inducer or something to create good stirring in the unit, I could get rid of the deflector on the top rack.  Ideally, the heat and smoke would be even throughout the whole chamber.

So what I'd like to do is get the mailbox set up, and then find an inexpensive draft inducer to actively stir the air in the smoker.  But I'd like to be able to adjust its speed so I could get good stirring, but not too much of a windstorm in the smoker.  :)
 
@Sigmo
I plugged the bottom holes in the mailbox except the four towards the door. I'm getting plenty of air through these holes plus the air from under the door at the hinge without drilling holes in the door.
-Kurt
 
Sig,

Now I know what the inside looks like, I would still take that flex intake to the bottom center of the box and have it off the bottom evenly all the way around about 1 inch, this way fresh air will hit the bottom and create a draft to all 4 walls, it will then feed the fresh along the bottom very even including coming up under your AMNPS, from what I did today to mine, and the results I saw, it worked great getting the AMNPS below the heating element, but I made a plate to go over the intake in the bottom of mine that is doing the same thing that yours would do if you could find a way to get that flex to the bottom, I think it would be even better if you could keep it from being super heated over the element in the air tube though, but my intake is dead center of the bottom on the analog, so the design made that part easy on this model.
 
@Sigmo
I plugged the bottom holes in the mailbox except the four towards the door. I'm getting plenty of air through these holes plus the air from under the door at the hinge without drilling holes in the door.
-Kurt
I have a mailbox, but I haven't taken it out of the box yet.  I'll have to look at it and see what holes are already in it.  Then I'll have to decide where to drill any additional holes.

It might be nice to be able to open and close different holes in different places when experimenting, to figure out what works best with the mailbox I've got.  If I drill the hoes to be standard conduit fitting sizes, then I could just use those snap-in steel electrical box plugs to plug any holes that I decide were a mistake.  ;)
 
Sig,

Now I know what the inside looks like, I would still take that flex intake to the bottom center of the box and have it off the bottom evenly all the way around about 1 inch, this way fresh air will hit the bottom and create a draft to all 4 walls, it will then feed the fresh along the bottom very even including coming up under your AMNPS, from what I did today to mine, and the results I saw, it worked great getting the AMNPS below the heating element, but I made a plate to go over the intake in the bottom of mine that is doing the same thing that yours would do if you could find a way to get that flex to the bottom, I think it would be even better if you could keep it from being super heated over the element in the air tube though, but my intake is dead center of the bottom on the analog, so the design made that part easy on this model.
I like the idea of letting the incoming air blow down against the bottom of the smoker so it'll curl back up evenly all the way around.  Some of it would go to the heating element and some to the pellet burner.  So that would be nice and even and keep too much of a draft off of the pellets.

I actually think that having the incoming air pass through the duct that's over the heating element might not be a bad thing in my case, though.  Pre-heating that incoming air helps to lower its humidity and just helps even out temperatures since the way I have things now, that warmed air blows across the bottom left of my smoker, toward the pellet burner, and that might help even things out since the lion's share of the hot air coming off of the heating elements will be over on the right side above the heater.

Here are some better pictures to show how my test-kludge is set up.  I've removed the shield piece that I use to shield below the heating element and toward the front door so we can see the setup inside more clearly:


The flex duct is above the heating element, but cannot touch it.  There is a little steel plate that it rests on.  That plate has the threaded holes in it that were used to secure the bottom of the original metalwork for the chip tray assembly.  So it's all pretty solid.

There is enough of a gap between the heating element and the flex duct to keep the aluminum well below its melting point.  Above the flex duct is a piece of that thin aluminum meant to be a disposable steam tray cover.  It's bent so it hangs, on the right side, from the place where the right side of the water pan was supposed to go. That piece is meant to be a drip shield to keep any drips from hitting the heating element directly and causing nasty smelling smoke.  The left side of that piece just rests on top of the flex duct.

It's all crude and simple to make it easy to bend and adjust and then just wad up and throw away if I don't like it.

You can see that the air flowing in through the flex duct is directed downwards toward the floor of the smoker, below and towards the AMNPS.  I can bend the "snoot" of that flex duct easily to get what I want.

I could use a bit longer piece of flex duct and bend it so it aims more fully downwards with, as you suggested, an inch gap or so between its end and the floor of the smoker.

Here's a wider view of it all:


There would be plenty of room to do what you suggested.  It wouldn't end exactly in the middle, but that would be fine.  I've got plenty of the flex duct, and it's cheap to get more if I need it.

It's hard to see, but I bent the "snoot" end of the flex duct to be somewhat oval shaped so it spreads the air out more front to back.  But there are a lot of possibilities as to how to direct that airflow to get what I want.

I set it up this way, though, because the main thing I was after was to get good burning even when it's very humid up here at 5300' of elevation.  So I really wanted to get the air flow aimed fairly well at the AMNPS.

And last night, I did a small rack of baby back ribs, and this setup worked just fantastic.

It had just rained (my luck, again).  A nice thunderstorm with rain and some hail and wind, etc.  But then it calmed down, and the radar showed that I had a three or four hour window of opportunity, so I uncovered the smoker and fired things up!

Another couple of angles:


As something of a photo nut, I must point out again, that all of these photos were taken at night (starting about 11pm), using just the light from a 60-Watt equivalent porch light over the deck, and, in this shot, supplemented by a little LED flashlight bounced off of the very heat deflector that I'd taken out of the smoker so we can see inside better.  You can see the back end of the flashlight in the bottom of this picture.  Classy!  ;)

Heat shield back in place:


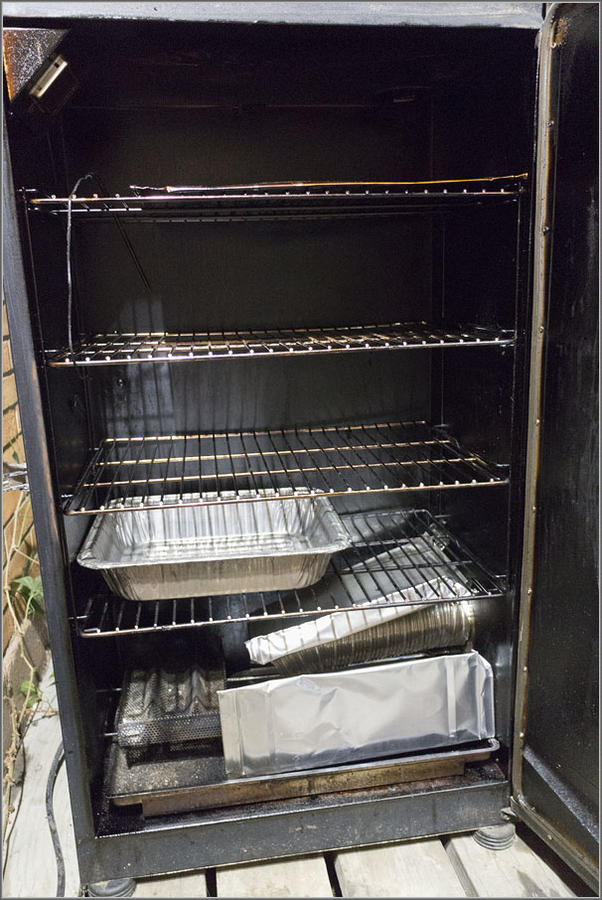
Full image to show all of the stuff:


On the top rack, I have my smoke/airflow deflector piece laying there to force the air/smoke to go to the left before it can wind its way around to the vent that's in the top, back, right corner of this smoker.

On the bottom rack is a small pan to catch any drips before they can get to the AMNPS.  It's narrow enough to allow airflow up behind and in front of it.

This all makes for a rather convoluted airflow pattern, which I wanted to stir the smoke and heat somewhat to keep things even.

Close-up with the pellets in place and the heater on:


I am doing some of the things suggested here to make the pellets burn better.  I filled the tray very deep with pellets.  And I tapped on and jiggled the tray, and pressed the pellets in place to get them more densely packed.  I paid special attention to the "corner" to make sure that the pellets were deep there.  I really do think that this is an important thing that I'd been neglecting before and was part of my problem.

The tube smokers probably work better, in large part, because they force you to use more pellets per inch, so to speak.  A bigger bunch of pellets all together helps them to burn and pre-heat the next pellets in line, driving moisture out of them before the burning reaches them.  So this may be part of my recent success.

Lightin' 'em up!:


I'm using a Mapp gas torch.  It produces a LOT of heat and gets things burning really fast.

Also, these are pre-dried pellets that I dried in my convection oven a week ago, and stored in a mason jar until just before this smoking run.  So they light easily.

After just ten or fifteen seconds of Mapp Gas goodness, they''re flaming well:


I let them burn for a minute or so, and then blew on them to stoke the cherry, and finally blew them out.  When they're burning this well, and very dry like that, it's hard to blow the flame out.  It took some huffing and puffing, big bad wolf style.

Smoking along nicely:


The whole setup with the little rack of ribs in place:


I had the meat probe just laying in the middle there to get its second opinion of the overall temperature in the smoker.  More often than not, I place it somewhere in the smoker to get a more representative reading of the overall cabinet temperature.  From testing I did a while back, the meat probe in my MES is quite accurate.  Within a degree or two of reality over a wide range.  So it's a good thing to have, and I can read it on the remote.

I do use it for the IT of meat, too, but when I don't, I use it like this.

Smokestack jammed into the top vent of this late gen 1 MES 40:


I didn't use any fan assist for this run.  But I did jam one of those adjustable aluminum duct elbows, straightened out, into the top vent to aid the draft up through the smoker.  I was running at 225°F the whole time, and the vent damper was all the way open, too.  This gave it a very good draw.

The temperature outside was about 64° the whole time, with humidity near 100% due to the rain just beforehand.  The deck, lawn, trees, etc., in the area were well drenched.  So I wanted to get a lot of air to the AMNPS, and thus, through the smoker.  But I didn't feel I'd need a fan-forced draft.  And I wanted to see if it would all work fine without it.  I do think you can have too much air, and get too hot of a burn on the pellets, and get a more creosote-ish smoke.

Taking the temperature of the rack at the end of the run:


This is off-topic, but these ribs were prepared in a way with which I'm experimenting.

I had pre-rubbed them and frozen them, in vacuum packaging, a week or so ago when I first bought them.

I then took out one rack, and cooked it for about 11 hours in a Sous Vide setup at 165°.  I'd intended to only do the Sous Vide part of the cooking for 6 hours, but the rainstorm delayed things.  But that's one advantage of the Sous Vide method.  You have some leeway in how long you cook things because you're controlling the temperature to be what you were shooting for as the endpoint.  So things don't overcook the same way they would with methods where your oven/smoker/whatever is a lot hotter than the endpoint IT you're after.

So anyhow, once the rain had subsided, and the radar showed no more big storms heading our way for a few hours, I took the ribs out of the sous vide, opened the bag and patted the rack dry.  Then I applied a bit more of the same dry rub, and put the ribs in the smoker to finish and get that smoke flavor.

But I'd just read another thread on this forum where @SmokinAl described his method to get perfect ribs.  So I decided to employ his internal temperature target along with what I was doing.  It's not the same, but a good way for me to decide when the ribs were done!

His thread is here:  http://www.smokingmeatforums.com/t/240916/perfect-ribs-every-time-this-really-works

The overall scene:


The pellets burned very nicely.  The total time was three hours, and one row burned, and it made it around the corner just fine.  The pellets were still burning very well when I finished:


I saved the unburned pellets and then dumped the coals out in the wet yard.  Even falling in some wet weeds/grass, they refused to go out!  I thought they'd snuff immediately because there were a lot of water droplets on all of the leaves/blades.  But alas.  They glowed well, which I could see, then, because it was nice and dark where I dumped them.  And bizarrely, the small that came up from that grass/weeds/pitmasters-choice was extremely familiar.  It's a smell one might have noticed when attending a Frank Zappa or Grateful Dead concert back in the '70s.  Incredible!  ;)

Reluctantly, I got a bowl of water and snuffed it all out Smokey the Bear style, like a good Boy Scout!  Not that my soaked yard would be likely to actually burn, but I thought the neighbors might get the wrong idea if they got a good whiff of that!  It really was an accurate smell.  But I digress.

The pellets burned at a rate that I consider to be good.  Not too fast, not too slow.  A row per 3 hours is probably decent.  And it made the corner, so I think it would have all worked well had I been going for a longer smoke.

The finished ribs:


Again, this is off topic, but it is the final result, after all, so a somewhat useful data point in a discussion of high-humidity smoke generator operation.

The texture was good.  Maybe a bit too "fall off the bone", but most folks like them this way.  I think the 11 hours in the sous vide made them more tender than what I was shooting for.  But this is how we learn!

Good crust, and a reddish color, which was probably due to the rub having some salt in it, and having been on them during the sous vide phase.  It kind of "cured" the meat, I think.

Next time, I'll leave the salt out of the rub that's on them when they get vacuum bagged.  They really were more salty than I'd prefer, too, so leaving all salt out for that first part of the cooking would give better control over that.

But the reddish color is actually kind of pleasant.  So maybe I'll just cut down on the salt a lot, but leave a little bit in.  Hmmm.

I didn't sauce them at all.  They were moist and very tender.

But the main things for this thread are that this whole routine:

Pre-drying the pellets.

Setting up the airflow the way it was.

Piling the pellets deeper and making sure they were packed densely in the AMNPS.

And with the cooking temperature being at 225°

...made the pellets burn perfectly for me, at 64°, with extremely high humidity, at 5300' elevation.

So if nothing else, this particular arrangement and procedure got me past my humidity-related pellet burner failures - at least this time! 
biggrin.gif
 
@Sigmo  If I drill the hoes to be standard conduit fitting sizes, then I could just use those snap-in steel electrical box plugs to plug any holes that I decide were a mistake.  ;)

I just made a rack to slide in the mailbox to elevate the AMNPS like the pic below.  Some people make legs for the AMNPS.  Just get it in the air stream for surround air flow and you won't need to drill holes.


Refrigerator magnets on a steel/galvanized mailbox works well to plug holes if you do decide to drill.

-Kurt
I love your rack.  Is that TIG welded steel, or what?

The refrigerator magnets are a good idea, too.  I purposely bought a mailbox that is steel so I could use magnets with it.  I just haven't gotten around to even taking it out of its box yet, so I don't even know what holes it's got in it!  I'll get around to it - someday!  ;)
The Frame is made from thick wooden paint stirrers cut to the length of the mailbox and a stretcher piece nailed between them.  I had the chrome plated metal rods from something else laying around that were the perfect length.  I used a Dremel tool to cut half circles into the top of the stirrers so the rods would lay in them a little above the wood so the AMNPS would slide in/out easily. The picture shows the rods dry fitted.  I put a dab of 700*F RTV silicone in each half circle to permanently hold he rods in place.

-Kurt
 
SmokingMeatForums.com is reader supported and as an Amazon Associate, we may earn commissions from qualifying purchases.

Latest posts

Hot Threads

Clicky