Cold Smoking With Soldering Iron, Complete With Photos

  • Some of the links on this forum allow SMF, at no cost to you, to earn a small commission when you click through and make a purchase. Let me know if you have any questions about this.
SMF is reader-supported. When you buy through links on our site, we may earn an affiliate commission.

whitegardens

Smoke Blower
Original poster
Dec 7, 2015
79
48
My main goal in joining this forum was to submit a good synopsis of using a soldering iron for cold smoking.

Through my searches on the subject, it seemed like articles were incomplete, not too informative, or didn't have enough pictures.

So I thought I would show, and explain how I did it, and on the initial test run, the results exceeded my expectation and can't wait to do my first cold smoke run.

Please bear with me, and fore-warning, there will be lots of Pictures. Please, if you can, wait until the instructional part of the thread is completed before responding.

The final post will be a video showing the output, I'll need to get that loaded on you-tube first.

After that, I will graciously answer any questions, and look forward to any comments on how to possibly do this mod better.

Thanks guys and enjoy!
 
So let's get started.

So as a bit of a background, I basically caught the smokers bug about a year ago. Since then I've modified my smoker to fit my needs, but also I wanted to keep the core of the Masterbuilt Smoker intact so that it could be used in the same manner as it was built, and not to damage the cabinet in any way and to keep it stock.

Another thing I was trying to achieve is to be able to run the stock heating element to modify the heat inside of the cabinet if there was a situation that would arise where I needed a bit higher temperature, such as some methods of curing bacon.

Also, I wanted to make my modifications so that they could be used with other smokers, or even with a custom built smoker.

I've been doing more cold smoking, and even with the PID modification, I still wasn't getting the results I wanted. The lower temp I was achieving wasn't enough to keep sufficient smoke going for the string cheese I've been playing with.

So ultimately I wanted a cheap and easy fix. I decided on the Soldering Iron method and this is how I designed it.

First off, I found the sufficient can. Luckily we hadn't had spaghetti in a while, so we had spaghetti dinner last night.

I then used a modern can opener in order to create a lid for the can to make it safe and reusable.


Here is the can with the new lid.


Then of course, I used a drill bit to create a hole in the can and lid. I then made sure the hole was suitable for the soldering iron.


Next, for my test run, I decided to use oak chunks that I made from an oak log I have in my yard. I didn't want to use my better peach chunks as they aren't as readily available. ( I love using peach by the way )

The chips were of varying size and were slightly damp being on the outside of the log.


Next, I inserted the soldering iron. The soldering iron was a $6.00, low end model I purchased at an auto parts store. It is rated to 750* Fahrenheit. When inserting the soldering iron, I made sure to only insert it far enough to allow the vent holes in the iron to stay outside of the can. I figured this would keep ash and embers out of the iron, and not destroy the wires inside of it.


Next, I removed the drip pan from the MasterBuilt smoker. I made sure to clean the worst of the grease from the inside bottom pan of the smoker in order to make sure any residue wouldn't drip into my can and contaminate my wood chips. Whether or not this is necessary, I'm not exactly sure, but wanted to be on the safe side.

I then wedged the can against the bottom of the smoker, aligning the hole in the lid of the can, with the drip hole in the smoker. For this test run, I just used a piece of broken concrete that was of suitable size.


Here you can just make out the hole in the top of the can aligned with the drip hole in the cabinet.


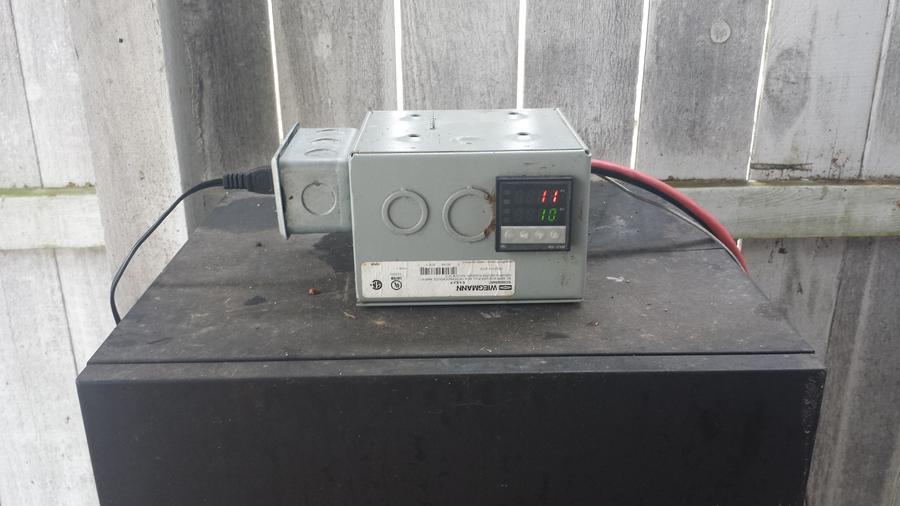
I then plugged the soldering iron into my homemade PID controller. My goal was to watch the temperature at cooking level to see if there was any change in temperature in the cooking area.


I then monitored the situation at hand.....

1.) In 15 minutes I had a small ribbon of smoke being emitted from the can.

2.) In 30 Minutes I had a full roll of smoke coming from the opening.

3.) Within and hour, the cabinet was emitting smoke very well.


To ensure that the chips were being processed by the soldering iron and making good contact, I occasionally poked through the drip hole, into the can, with a piece of wire to "stir" the wood chips. In all reality though, I don't think this was necessary.

During the test run, I monitored the outside air temperature in conjunction with the temperature inside the cabinet. I wanted to see if the soldering iron, can, and the smoke had any affect. 


During my 5 hour test run, the PID probe had reach a maximum reading of 15*C, or 59*F. So the chips and the soldering iron did affect the temperature of the inside of the cabinet, but was still well in range of cold smoking.

After my initial 5 hour run, I removed the wood chips from the can to determine how much of the chips were processed. What I found is that a small percentage was processed, and I can only assume that I could possibly get 12 hours of run time from the chips.


As soon as my instructional video is converted, uploaded and complete, I will show each step in the video, along with a visual of the smoke output from this modification.

Overall, the test run was a great success.

Here is the test run video.


Instructional Video, I was trying to merge the above video and the instructional, but was having too many issues.

 
Last edited:
Thanks,

It also looks like I'll be able to edit the initial post for the instructions, so as soon as the video is down, I'll try to embed it in the post, or at least insert a link.

All done!

If anyone has any suggestions, please let me know.

Thanks!
 
Last edited:
i've tried the can with soldering iron approach with sawdust and have found that the smoking stops without regular stiring / compression, you didnt have any of these problems?  Perhaps I'll give wood chips / a mixture a go - any suggestions?  
 
Can and soldering iron works, but the AMPNS is so much easier and works so much better.
 
Many moons ago I messed with the soldering iron and can method. I actually had a pretty good can working. What I found worked best was to install a small piece of perforated metal near the bottom of the can to act as an ash guard or basket. Air intakes below the guard. Worked best with pellets. One thing that I didn't like is that the contraption required the use of electricity.  So I bought my first AMNTS tube smoker (best for propane smokers) from Todd at Amaze N Smokers and haven't looked back. I wasted many years fooling around with sub par smoke generators. I can run the AMNTS right in the smoker with the pit temp up to 285°, or pipe the smoke in via my mailbox mod. I currently own all of the tube smokers, just acquired the newest one that expands. All work flawlessly and provide great smoke for hot or cold smoking.
 
 
Many moons ago I messed with the soldering iron and can method.  I wasted many years fooling around with sub par smoke generators. 
I resemble that remark.  
ROTF.gif


T

                                                                                               3


i've tried the can with soldering iron approach with sawdust and have found that the smoking stops without regular stiring / compression, you didnt have any of these problems?  Perhaps I'll give wood chips / a mixture a go - any suggestions?  
Try the chips, I got at least a solid 5 hours out of the smoke as shown above and still plenty of wood left to burn. I did stir occasionally, but not sure if it was necessary.
Can and soldering iron works, but the AMPNS is so much easier and works so much better.
Unless there is an AMPNS for wood chips, I'm not a fan of the AMPNS rigs. Not saying that they don't do the job (which they do very well), but I felt like that I would be limited on the type of wood I could use for smoking as you would have to buy the pellets or the dust.

I like to play with different types of wood or species of wood to see if I get a difference in flavor. Right now, my favorite for pork and chicken is Peach, and the peach log I am making chips from is a certain variety of peach.

Even though the soldering iron and can method isn't the greatest, my intention was just to put out a solid instructional video on how to do it as there wasn't much in the way of a full synopsis on the method so that anybody looking for a cheap design idea would have a good place to start.

I have made a major mod to the system involving a steel pipe and (dare I say it) drilling a hole in the smoking cabinet. Similar to other rigs out there, but still using the soldering iron. My goal is to possibly make a canister that can run without any sort of outside heat source after being lit.

All in all, I've got a mechanical side of me that likes to build and tinker, so trying to design something myself seems to be a fun project and keeps me busy in my spare time.

I'll post the photos of the new getup this weekend when I'm home during daylight hours..
PDT_Armataz_01_33.gif


........
 
Last edited:
I have a very similar setup and I can't seem to get the chips to smolder properly. I am getting very thick white smoke from mine. I'm using chips and not chunks. The smoke is very bitter and tastes like creosote. What type is smoke are you getting from yours?

-j
 
I too was getting a thicker white smoke from this setup.

When I did cheese, I used oak and a bit of hickory. The flavor I thought came out good with that combination.

I did do another run with a similar combination. I let the cheese smoke longer than the first run, and got a bit too heavy of a smoke flavor, but not bitter.

So, it might be a combination of type of wood and smoke time. Also, heat might be important. I ran my internal temp at 80* to get the cheese to sweat, thinking it helps to absorb the smoke and produce a better pelicule on the cheese.

That's my thoughts....

One other note I just thought of....

I have been putting my cheese on the top rack, and the lower racks have been covered in foil. This might help to minimize the creosote from rising past the foil and getting to the cheese.
 
Last edited:
I'm no professional by any means. I too used a soldering iron and a can until recently. I've even done the lit briquettes with chips on top. As I said, I'm not professional but I was told to do everything in your power to eliminate any sweating or moisture on the cheese. I guess the smoke adheres to the moisture on the cheese and this is what actually creates the creosote . I've never experienced it myself but I have noticed that when my cheese would get a shine to it from the oils coming out, that the cheese always was very overpowered with smoke flavor. Even on extra sharp cheddar which is very strong tasting. I don't recall any bitter taste tho but like I said, mine never got actual droplets on it. None the less, my cheese I smoke at colder temps ( 50 F was the cabinet temp), always seemed to come out with a more balanced flavor after resting a month. That's my two cents ! Happy smoking regardless !


John :grilling_smilie:
 
SmokingMeatForums.com is reader supported and as an Amazon Associate, we may earn commissions from qualifying purchases.
Clicky