I wanted to upgrade my outdoor area to make it a little more livable and fun. So, I decided to build an outdoor kitchen. Threw out some ideas and finally decided on building a kitchen area with a grill, side burner, and a fireplace. It has been a lot more work than I first envisioned, but when I am finally finished it will all be worth it in the end.
First problem was where to put it and what to include. I knew that I wanted a built in grill and fireplace at a minimum. Also considered a sink, fridge, ice cooler, and pizza oven. The small available location wasn't going to be able to accommodate my smoker and didn't think the neighbors would like the low smokestack since it would be pretty close to their house. Since my kitchen is only 40' away and up some stairs to the deck, I decided not to go with the extras and having to winterize any water supply. There is room for a future pizza oven if I want to add one. I ended up tearing out a small block retaining wall and moving the wall back about 3' and then building a cast-in-place concrete wall right next to a sidewalk.
Second question was how to fire it up, wood/charcoal, propane or natural gas. In the end it would have been easiest and cheapest to just go with propane. The only way to get gas to the location was to bury a gas line. It is a 165' run and required an 20" deep trench. I wanted to use CSST until I ran the numbers and needed a 1.5" [sup]φ [/sup]pipe and figured out what it cost just for the pipe and then to find someone to install it. I originally was thinking I could just run a 3/4" pipe but the friction losses for a low pressure run going that far are too great. I ended up using poly pipe with 1.25" [sup]φ for [/sup] huge cost savings. I also thought I could get this done in a weekend. It ended up taking me around 3 weeks to get it done. The trenching was a nightmare. Most of the run was in a tight area, had to move rocks, ground was extremely hard and uneven, and even when I had a nice level straight run the wheels kept on slipping. I started by getting a sod cutter thinking I could just put it back and save some money. Since it took 3 weeks, the sod all died and I had to buy new. The trench width wasn't wide enough to get anything into it to be able to clean it out. I ended up grinding down a hoe so it would fit and then dragging the dirt to an area I dug out wider so I could then dig it out. I would probably do it again though for not having to mess with the propane tanks. Yes I got a permit. First one I have ever gotten...the county was good to work with and very willing to answer questions and get everything pushed through. My biggest problem was listening to the plumber I hired to hook up the gas line. I was running the pipe through a pvc sleeve underneath the wall footing into a handhold blockout. He told me a 2" pipe was sufficient....it wasn't. So had to come up with a different solution and tearing out the wall wasn't one of them. So I had to hand dig a tiny trench directly behind the wall stem and the sidewalk...fun stuff...not. But I did get it done and then cored through the stem and ran the pipe through then filled the hole with grout around the pipe. There were other issues with the connections of the poly to the riser too...but I wont get into those. Lesson learned is never trust a plumber...
So I tore out the little retaining wall and built a CIP concrete wall. This part went well. I rented a concrete mixer and used bagged concrete to pour the footing one day and the stem another. Built the forms and bent the rebar. It was just me or I would have just had them deliver the concrete in a truck and probably saved some money that way too. For the stem I dumped it into a plastic kiddy pool and then shoveled it into the forms.
I am forming the kitchen base using metal studs with cement board facing. The stud work sits on some composite decking to prevent rusting. Since the footing slopes to match the patio for drainage, every stud is a different length so I can make it level. I am cutting the studs using a grinder. I bought a blade for my miter saw but it leaves sharp edges at the cut and I had to grind it smooth anyway so abandoned that. Very time consuming but probably the best way to go since wood is combustible and metal isn't. You can use wood if you utilize insulating blankets.
I am in the process of installing the cement board right now. I just have one piece to go but haven't taken pics yet. I will start on the fireplace and wood storage this weekend.
Here are some pics.
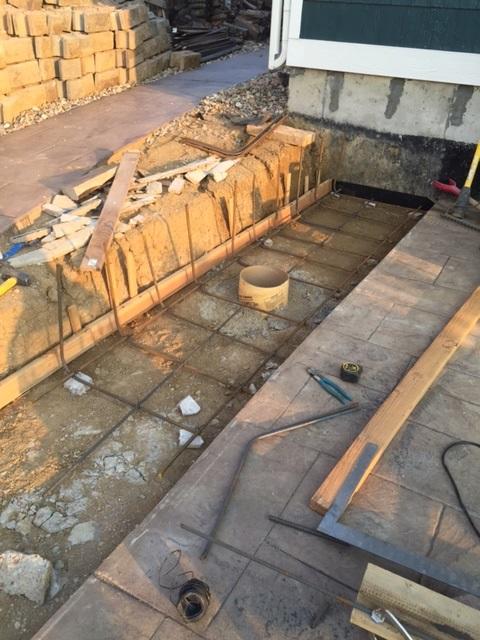
Formwork and reinforcing for wall and fireplace footing. Can see the old wall blocks against the fence in the 2nd pic
Can see the handhold here that was later abandoned and filled.
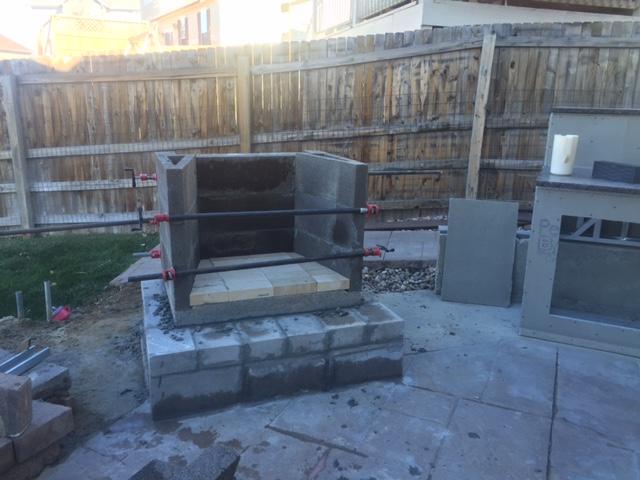
This is where the fireplace goes. Had to tear out one of the wife's planter boxes. cut the corner off the patio to make it fit.
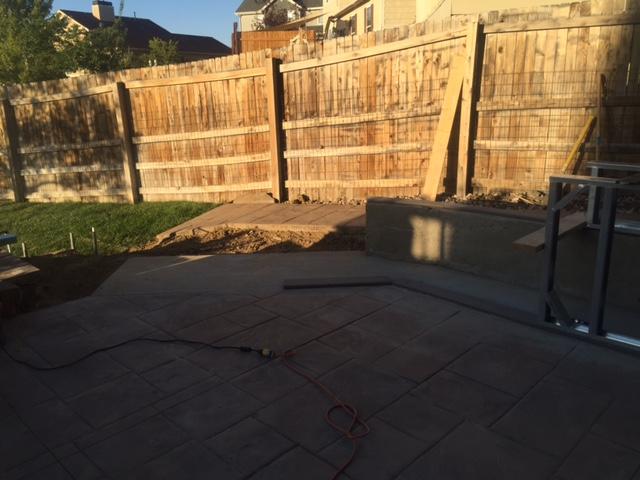
Wall complete and gas line through stem. Starting framing.
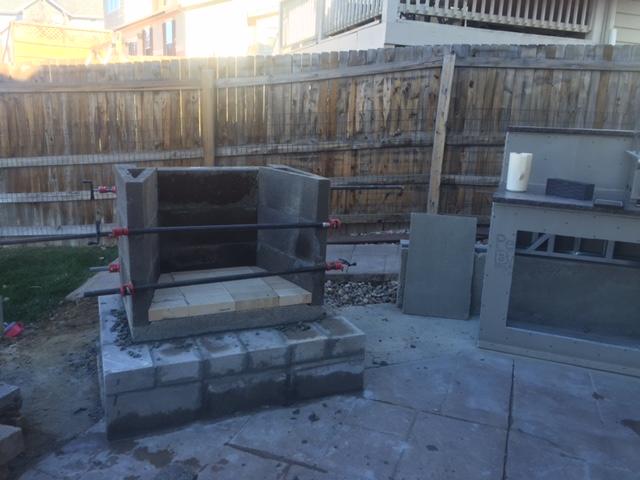
Front view. Can see blockout for grill and sideburner.
First problem was where to put it and what to include. I knew that I wanted a built in grill and fireplace at a minimum. Also considered a sink, fridge, ice cooler, and pizza oven. The small available location wasn't going to be able to accommodate my smoker and didn't think the neighbors would like the low smokestack since it would be pretty close to their house. Since my kitchen is only 40' away and up some stairs to the deck, I decided not to go with the extras and having to winterize any water supply. There is room for a future pizza oven if I want to add one. I ended up tearing out a small block retaining wall and moving the wall back about 3' and then building a cast-in-place concrete wall right next to a sidewalk.
Second question was how to fire it up, wood/charcoal, propane or natural gas. In the end it would have been easiest and cheapest to just go with propane. The only way to get gas to the location was to bury a gas line. It is a 165' run and required an 20" deep trench. I wanted to use CSST until I ran the numbers and needed a 1.5" [sup]φ [/sup]pipe and figured out what it cost just for the pipe and then to find someone to install it. I originally was thinking I could just run a 3/4" pipe but the friction losses for a low pressure run going that far are too great. I ended up using poly pipe with 1.25" [sup]φ for [/sup] huge cost savings. I also thought I could get this done in a weekend. It ended up taking me around 3 weeks to get it done. The trenching was a nightmare. Most of the run was in a tight area, had to move rocks, ground was extremely hard and uneven, and even when I had a nice level straight run the wheels kept on slipping. I started by getting a sod cutter thinking I could just put it back and save some money. Since it took 3 weeks, the sod all died and I had to buy new. The trench width wasn't wide enough to get anything into it to be able to clean it out. I ended up grinding down a hoe so it would fit and then dragging the dirt to an area I dug out wider so I could then dig it out. I would probably do it again though for not having to mess with the propane tanks. Yes I got a permit. First one I have ever gotten...the county was good to work with and very willing to answer questions and get everything pushed through. My biggest problem was listening to the plumber I hired to hook up the gas line. I was running the pipe through a pvc sleeve underneath the wall footing into a handhold blockout. He told me a 2" pipe was sufficient....it wasn't. So had to come up with a different solution and tearing out the wall wasn't one of them. So I had to hand dig a tiny trench directly behind the wall stem and the sidewalk...fun stuff...not. But I did get it done and then cored through the stem and ran the pipe through then filled the hole with grout around the pipe. There were other issues with the connections of the poly to the riser too...but I wont get into those. Lesson learned is never trust a plumber...
So I tore out the little retaining wall and built a CIP concrete wall. This part went well. I rented a concrete mixer and used bagged concrete to pour the footing one day and the stem another. Built the forms and bent the rebar. It was just me or I would have just had them deliver the concrete in a truck and probably saved some money that way too. For the stem I dumped it into a plastic kiddy pool and then shoveled it into the forms.
I am forming the kitchen base using metal studs with cement board facing. The stud work sits on some composite decking to prevent rusting. Since the footing slopes to match the patio for drainage, every stud is a different length so I can make it level. I am cutting the studs using a grinder. I bought a blade for my miter saw but it leaves sharp edges at the cut and I had to grind it smooth anyway so abandoned that. Very time consuming but probably the best way to go since wood is combustible and metal isn't. You can use wood if you utilize insulating blankets.
I am in the process of installing the cement board right now. I just have one piece to go but haven't taken pics yet. I will start on the fireplace and wood storage this weekend.
Here are some pics.
Formwork and reinforcing for wall and fireplace footing. Can see the old wall blocks against the fence in the 2nd pic

Can see the handhold here that was later abandoned and filled.
This is where the fireplace goes. Had to tear out one of the wife's planter boxes. cut the corner off the patio to make it fit.

Wall complete and gas line through stem. Starting framing.


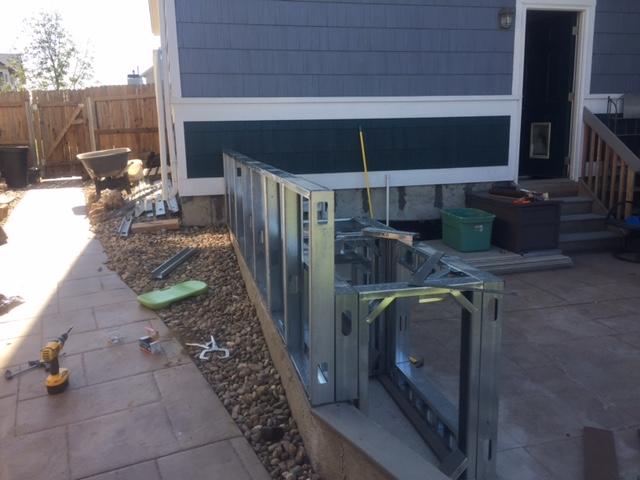
Front view. Can see blockout for grill and sideburner.

Last edited: