Smoked Pizza on 22.5" WSM

  • Some of the links on this forum allow SMF, at no cost to you, to earn a small commission when you click through and make a purchase. Let me know if you have any questions about this.
SMF is reader-supported. When you buy through links on our site, we may earn an affiliate commission.

noboundaries

Epic Pitmaster
Original poster
OTBS Member
SMF Premier Member
Sep 7, 2013
10,247
5,352
Roseville, CA, a suburb of Sacramento
One of my daughters is in town this week for a short visit.  She said she's been craving my pizza ever since I first started experimenting earlier this year with my grandmother's Italian bread recipe to make pizza dough.  She asked me if I'd make her pizza.  Who could refuse such a request?  One of my favorite ingredients on pizza is homemade, sliced Italian sausage meatballs.  They are fantastic on the smoker and have so many uses for leftovers.  I thought "Heck, since I'm going to have the smoker fired up, might as well try smoking a pizza!"  It was going to be a first for me. 

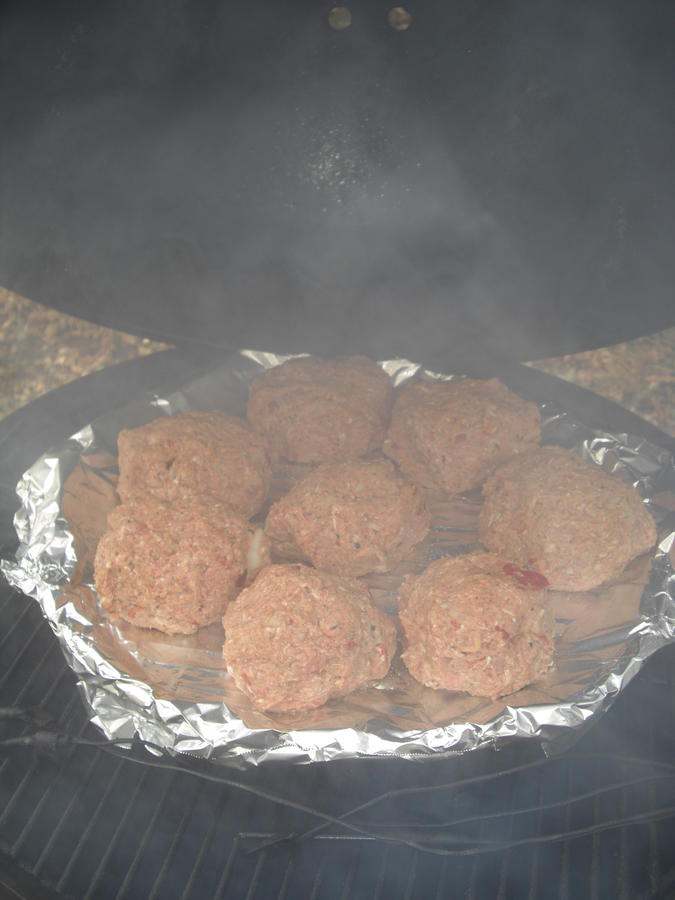
I make HUGE meatballs when I make them.  Here they are going on the WSM with some apple wood for the TBS.  They are best smoked on a grill topper but I was going to use both my 15" paella pans ($25 Amazon) in the pizza making process, one of which I often use for a drip pan.   


I mixed up the dough, let it rise, then separated it into roughly 1 lb portions to use to make bread and pizza dough.  Today's recipe gave me 5 lbs of dough.  Usually I'd get 2 loaves of bread and 6 thin crust pizzas out of that amount.  Today, since I was experimenting, I decided to make 3 loaves (one to send home with my daughter) and two thicker crust pizzas, one on the smoker and one in the oven on a stone. 


The meatballs are finished to 165F IT at about two hours at 350-400F chamber temp, and two of the loaves baked.  Time to set them aside and start working on the smoker pizza crust.


Time to get creative on making the smoker pizza crust.  I put a nice layer of EVOO in one of my well seasoned paella pans, spread the pizza dough as close to the edges as I could get, covered the top with EVOO then let it rest for an hour before putting it in the smoker with a chamber temp just over 400F to bake it half way.  It was in the smoker for 16 minutes, probably about 4 minutes too long but the bottom came out looking nice once I pulled it off the smoker to load it with ingredients!


All loaded with sauce, onions, garlic, pepperoni, and smoked meatball.  Then on the smoker for about 20 minutes.  It needed to bake just a little longer but I thought I was seeing burnt edges on the crust so I pulled it.  Turned out it was fine.  The bottom of the crust was crunchy and the pieces could be held by the edge of the crust and it didn't bend at all.  It was DELICIOUS!!!!  My daughter kept saying OMG with every bite. The WSM pizza won hands down over the pizza I did in the oven on a stone with the same ingredients.  All in all a fun experiment and first time effort.  Plus I found a new use for my paella pans!   


Last edited:
  • Like
Reactions: bmaddox and shoebe
Looks-Great.gif


Pizza...

Best food eva...

Luckily for me, the dough making belongs in Priscilla's department... 
241.png
 
Looks great I'm sure we could all use a great pizza crust recipe!
Okay, here's a little backstory.  My all time favorite pizza crust was sourdough.  It takes about 5 days to make a batch of sourdough starter.  I wanted to try something different and learned of biga.  Biga is a form of fermented starter and is ready to use in as little as 12 hours.  I've used it at 12 hours, 18 hours, 24 hours, 48 and 72 hours.  Anytime between 48 to 72 hours gives me my favorite result for taste in both bread and pizza dough.  I understand people more experienced than me let it age much longer, saving dough from one batch to use as a starter on the next batch.  I don't bake bread and pizza often enough to do that.    

Usually I make thin crust pizzas out of the dough, using 8-10 oz for about a 12-14" pizza .  This time though, since I was experimenting, I made thick crust pizzas, using 16 oz of dough for a 14" pizza.  Either was fantastic and just depends on your preference.  I actually prefer the thinner crust but my daughter and wife both went nuts for the thicker crust. 

The following recipe makes about 2 to 2.5 lbs of dough that can be used for bread, pizza, or both.  I usually double the recipe for all ingredients so I can bake bread and pizza.  I use a KitchenAid mixer with a dough hook. 

The recipe below is my version of my Italian grandmother's bread recipe.  I have her original recipe but it has so many things missing that I had to do quite a bit of research and experimenting to get a result I loved. 

Grandma Katie aka Nonni's Italian Pizza Dough with Biga

You can also use garlic infused EVOO to add another flavor element. 

Biga Ingredients
1 cup bread flour
1/2 cup warm water (115-120°F) if using rapid rise yeast, 110F is using regular yeast. 
1/8 tsp instant yeast

Dough Ingredients
1 1/2 cups warm water (see directions)
1 1/2 Tbs white sugar
1 package dry yeast
3 1/2 cups bread flour
1 Tbs kosher salt
2 Tbs extra virgin olive oil

Directions

1. Mix biga ingredients and let rest in an oiled and covered bowl at room temperature for 12-72 hours.  Save the unused yeast to add to the dough when ready to mix it all together.

2. Put water in microwave with probe and heat to desired temperature.  If using "active yeast" heat water and sugar in microwave to 100°F-110°F.  If using "instant" or "rapid rise" yeast, heat water to 120°F-130°F.

3. Add sugar to KitchenAid bowl, then the water, then the yeast.  Stir to mix then let sit for 5-10 minutes to allow the yeast to get foamy.

4. Add the biga, stir to mix, then put the dough hook on the mixer and start it on speed 2.  Slowly add the flour 1 cup at a time.   Slowly add the salt.  Let the dough turn on slow for 5-10 minutes.  Add the olive oil and let knead until thoroughly mixed.  Add additional flour if needed so dough starts to firm up and pull away from the sides of the mixing bowl.

5. Put the dough on a floured board.  Knead lightly and add a little flour until the dough is no longer sticky.  Place the dough ball in an oiled bowl, cover the top lightly with oil.  Run a kitchen towel under HOT water, twist out the water then cover the bowl and immediately put it in the oven with the light on only.  Let double in bulk, about 90 minutes.

6. Once you remove the dough from the warm environment, pre-heat the oven and pizza stone to 550°F for at least an hour putting the stone on a rack about 6-8" below the top of the oven so radiant heat from the oven top can cook the ingredients.

7. Gently push down, smoosh flat, fold in thirds, gently press down again, smoosh flat, then fold in thirds twice more.

8. Form into equal balls.  Use a scale if necessary.  Let rest at least 30 minutes then you can start making pizza!

9. If making bread, form the loaves then let double in bulk.  I like to form the loaves on parchment paper.  It makes it easy to slide on and off a stone with a pizza peel.  I like to make an egg wash with one large egg mixed with 1 Tbs of water.  Whip it up and brush on the loaf.  Then here's a trick that people LOVE!  Sprinkle the brushed loaves with kosher salt.  Bake on the stone for 8-12 minutes until the crust is nicely browned. 

10. If making pizza dough, put the parchment paper on the peel and the dough in the center of the peel.  Using your hands and a roller form push outwards until the pizza crust is formed into a round.  Lightly coat with olive oil.  If you want a thick crust, let it rise 30-60 minutes. If you like a thinner crust start immediately building your pizza, then slide on the stone and bake for 8-12 minutes. 

11.  If making in the smoker, the chamber temp will be lower than the oven and the pizza will take longer to cook.  It is a good idea to half bake the pizza dough on the smoker, then build your pizza and cook until the top is done.    
 
Last edited:
Great looking Za! Thanks for sharing the dough recipe!

Just to clarify your Biga instructions. Does the 1/8 teaspoon of yeast used for the Biga, come from the packet of yeast used for the dough, or is it in addition to the packet of yeast?

POINTS!
 
Great looking Za! Thanks for sharing the dough recipe!

Just to clarify your Biga instructions. Does the 1/8 teaspoon of yeast used for the Biga, come from the packet of yeast used for the dough, or is it in addition to the packet of yeast?

POINTS!
Good question!  I don't waste anything so yes, the 1/8th teaspoon of yeast comes from the packet.  I'll cut a package open, take out how much I need for the biga, then fold the package tightly closed.  After the biga has fermented and you need to add "1 package of dry yeast," just use the remainder of the packet you opened.  There is no need to open another package.  
 
Good question!  I don't waste anything so yes, the 1/8th teaspoon of yeast comes from the packet.  I'll cut a package open, take out how much I need for the biga, then fold the package tightly closed.  After the biga has fermented and you need to add "1 package of dry yeast," just use the remainder of the packet you opened.  There is no need to open another package.  

Thank you for the clarification. I plan on giving this a try for some bread this weekend. We use so much yeast we buy it by the jar. So I just wanted to double check. FYI one packet equals 2 1/4 teaspoons.
 
I used your recipe to make some ciabatta rolls last night. Made the biga on Friday evening and let it ferment on the counter until yesterday afternoon. Man it was some potent stuff. Mixed it up per plan, let it rise until it doubled. punched it down, divided it into ciabatta sized rolls, let those rise and double. Egg washed and salted the the tops and then into the oven. Man these turned out awesome! no more store bought ciabatta rolls for us!
 
I used your recipe to make some ciabatta rolls last night. Made the biga on Friday evening and let it ferment on the counter until yesterday afternoon. Man it was some potent stuff. Mixed it up per plan, let it rise until it doubled. punched it down, divided it into ciabatta sized rolls, let those rise and double. Egg washed and salted the the tops and then into the oven. Man these turned out awesome! no more store bought ciabatta rolls for us!

You just made my day DS! Probably made my Nonni's day too in the Heavenly Blue Yonder.
 
Richie, you're probably not going to like my answer. The above bread was baked at 500F for about 10- 12 minutes on a stone. I'm really not a temperature guy. I've cooked the bread at temps between 350F and 550F, as hot as my kitchen oven will go. I usually set the timer for 8 minutes then look through the window at the color, adding more time as needed until I get a nice color. Drives my wife nuts the way I cook.
 
Richie, you're probably not going to like my answer. The above bread was baked at 500F for about 10- 12 minutes on a stone. I'm really not a temperature guy. I've cooked the bread at temps between 350F and 550F, as hot as my kitchen oven will go. I usually set the timer for 8 minutes then look through the window at the color, adding more time as needed until I get a nice color. Drives my wife nuts the way I cook.
Ray Thanks this will be a true test of how to screw up another loaf of bread 
laugh1.gif
I am sure I will figure it out and will post it when I do Thanks again

Richie
 
 
Ray Thanks this will be a true test of how to screw up another loaf of bread 
laugh1.gif
I am sure I will figure it out and will post it when I do Thanks again

Richie
Since I wasn't sure on the temps for the ciabatta rolls I ran the oven at 350°, normally I would run the oven around 425°-450° for making ciabatta rolls. So these took a bit longer than normal, like twice as long! Still turned out great though! Wow, here it is the first of the week and I already need to start thinking about making biga for the weekend!
 
Last edited:
Richie, you're probably not going to like my answer. The above bread was baked at 500F for about 10- 12 minutes on a stone. I'm really not a temperature guy. I've cooked the bread at temps between 350F and 550F, as hot as my kitchen oven will go. I usually set the timer for 8 minutes then look through the window at the color, adding more time as needed until I get a nice color. Drives my wife nuts the way I cook.
Okay so now Ray and Case: I had to split the time and temp,I did it will post up in the AM letting it cool.

Super big Thanks guys

Richie
 
SmokingMeatForums.com is reader supported and as an Amazon Associate, we may earn commissions from qualifying purchases.

Hot Threads

Clicky