75Dually's first smoker build

  • Some of the links on this forum allow SMF, at no cost to you, to earn a small commission when you click through and make a purchase. Let me know if you have any questions about this.
SMF is reader-supported. When you buy through links on our site, we may earn an affiliate commission.

75dually

Newbie
Original poster
Sep 23, 2015
12
10
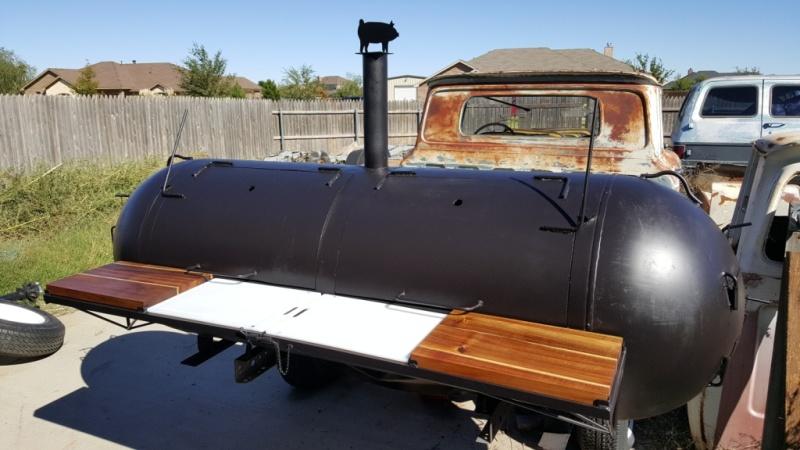
I wanted to share my first smoker build. This is how far I have gotten so far.


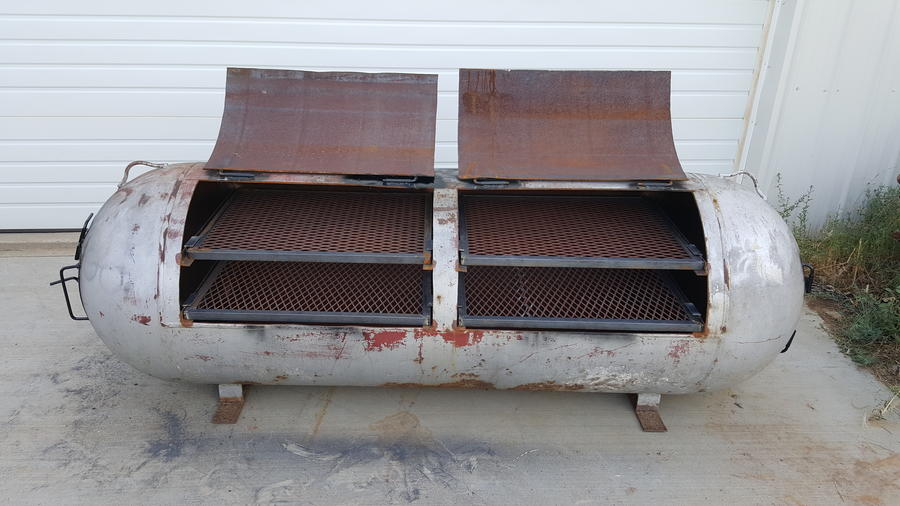
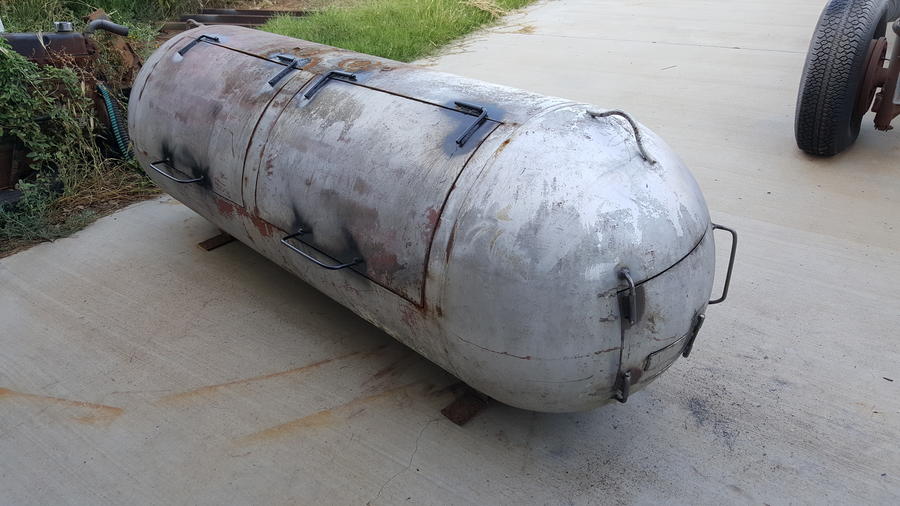
It started out as a standard propane tank.


We filled the tank with TSG and a soapy solution to remove all the air. We did the first cuts with a saws all, and the rest of the cuts once the first door was removed with a plasma cutter.


The plasma makes short work of the cuts!


We then started adding the shelves. 4 in all. The shelves ride on angle iron running the full length for good support.


Then we added the hinges for one of the doors.
 
Then it was on to figuring out how to do the doors and the damper. This is what I came up with.


Here is how the door and the damper works. The damper is fairly simple, but the door hinges are fairly complex because of the complex curves of the end bell.


This smoker will have two internal fire boxes, one on either end, and a central smoke stack. The issue I wanted to avoid is that most smokers are hot on one end and cold on the opposite end away from the fire box. From what I understand it makes the smoking process more inconsistant. This type of smoker should help with the heat issue, and hopefully be more consistant across the entire smoker.


Door number 2 is now installed.
 
Last edited:
Both doors have now been installed.


This is where we are at as of today. Both doors, the trays, and the fire doors on both ends have been completed.


I have added pins to hold the door and the damper in place during transport. Sorry the black paint does not show them that well in this pic, but it was needed to prevent rust. This will all look a ton better once the finished smoker is painted.


I have added hold down angle iron on the ends so that the trays will be able to slide out and be held in place and not fall when pulled out to service the meat. I still have to make the handles for the trays, but that is an easy job.

I have started on the internal fire pits, but I do not have pictures of them yet. Basically I have welded a piece of angle iron inside as the main structural part of the fire pit, and have cut a piece of expanded metal to fit the bell on the bottom so that we have a level place to put our wood/charcoal. I should have pictures of it in a couple of days.

I still have a lot of small items to finish up. Things like; door latches, smoke stack, bottom clean out door, and several other small items...

This smoker is going to have a customer trailer. I will be building that next. It will have a stainless drawer cook station on the backside of the cooker, and a wood storage area as well. I have to have this build completed in the next couple of weeks because it is going to be used for my daughters wedding, that date is set in stone, and so Dad has to get this completed ASAP!

Stay tuned I will have a lot more pictures of this build coming up very soon.
 
Last edited:
just so everyone knows this is what I do in my spare time. I enjoy building hot rods and custom trucks. Here is a couple pics of my current project.


Slowly but surely this custom dually project is coming together.

I also recently finished my welding and fabrication table. This is used everyday in my shop.


I have a passion for building things and I enjoy working with my hands. The above smoker has been a blast so far. I can't wait to have it completed and start to learn how to smoke with it.

Stay tuned!
 

 Finished up the fire pits on both ends today.


Got the door stops installed. Also got the tray handles done for all 4 trays bent up and welded in.


Did a pig for the smoke stack damper.


Coming along fairly well. Should be nice when it all gets done!

Stay tuned!
 

I got the inner door seals done tonight on both of the doors. Instead of doing them on the outside I have been told by some friends who have done several cookers that they would put the seal strips on the inside, so that is what I did. It looks like it will work just fine.

My wife and I stopped at a restaurant supply this week and picked up 2 aluminum trays to place below the racks. These will catch all the drippings and keep the bottom of the smoker much cleaner.

I will fire it up for the first time this weekend. Then I will do a second burn at a lower temp and season the inside with peanut oil. After all that I will paint the exterior.
 
Tonight I got a little time to work on the smoker so I got the drip pans figured out. Basically I added four pieces of angle iron under each pan to stabilize it and to level it. Simple but effective. The pans are aluminum huge cookie sheets used in the restaurant industry. We got them at a restaurant supply house in town. Should help keep some of the mess off the bottom during cooking.

I am starting to work on the swing out work trays on the front of the cooker. More on that tomorrow!

Stay tuned!


For the most part I played all day today. Went to the store, went shooting, and then got my tail in gear in the shop this evening and got the shelves completed. As you can see they swivel out of the way. Each of these shelves has a plastic cutting board and a wooden chopping block. The chopping blocks I chose are Acacia wood. I think they look great. They are going to be removable for easy cleaning.

All I have left before paint is to make a bottom door for easy clean out.

What a great project this has been! I am so ready to get back to my dually though...

Stay tuned!


Nice build this far!  I may have to use it as inspiration for our build that is just starting to take shape.....

I have seen a build thread for that truck somewhere I think, but I just cant remember where.....
 
OK we did a ton of work on the smoker this past weekend! We did the first burn and it was so hot (which is exactly what we wanted, to cook out all the old tank junk) it flaked all the old paint off. I just took a wire brush and cleaned all the remaining paint off after that.

After it cooled down I finished putting all the small items on the tank. Things like chains for the pins so we would not lose them in transit, the front swing out tables latch pins, and pins and tabs for the cutting boards. Just a ton of small work, but it all takes time... Then I shot two coats of Rustoleum high temp fire pit paint (you can get it now at Home Depot in quarts) on it. Allowed it to dry over night.

I put the smoker on the frame of one of my donor trucks for the time being. I have all the parts to make a new trailer for it, but just ran out of time before the wedding. The last thing we have to do is bring it up to temp one more time and coat the inside with peanut oil which will season it just like a cast iron frying pan.

I hope you enjoyed this build. I also hope it inspired you to go out and build one for yourself. They are not that hard to build, but with time and patience you can do this yourself.


This looks super

I am building a double barrel smoker now which requires no welding, maybe I will go with a one similar to yours when I acquire welding machine or something. 
 
SmokingMeatForums.com is reader supported and as an Amazon Associate, we may earn commissions from qualifying purchases.

Hot Threads

Clicky