New 80 Gallon Reverse Flow Build

  • Some of the links on this forum allow SMF, at no cost to you, to earn a small commission when you click through and make a purchase. Let me know if you have any questions about this.
SMF is reader-supported. When you buy through links on our site, we may earn an affiliate commission.

don - smokie

Newbie
Original poster
Sep 3, 2015
9
10
VT
Hi,

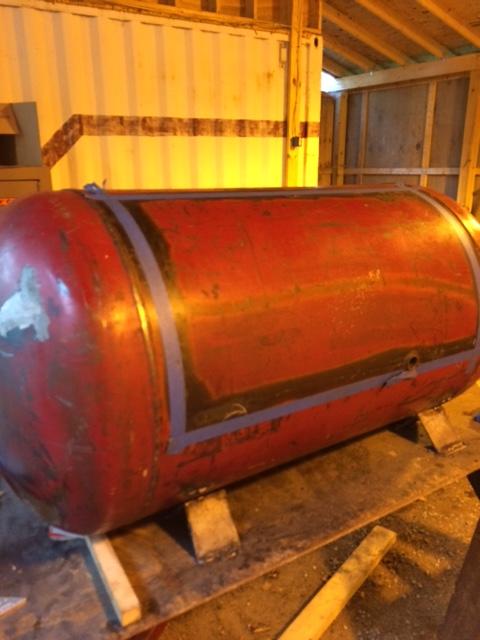
I am about to get started on my first Reverse Flow Smoker build and have gotten some great ideas and lots of valuable information on this forum so far. Its a used air compressor tank that I picked up from Craigslist and is 24x48. I have put some calculations together  based on what I've learned here and would like to get some indication that I am on the right track. I used Dave Omak's formulas and the circle calculator to get  to this point.  I sure I will have lots of other questions and I am looking forward to sharing my build over the next few month with you. Thank you  Don Smokie
80 Gallon Compressor Tank- Labeled  24x48                
Assume Wall Thickness0.1875In Inside Diameter23.625in          
Radius11.8125In                 
Check DxDx.7854xL18411.27Cu in ( Used 42" as L ) 37" Cylinder Lg + 5" more for Domes- Checked with TankCalc also.  
80*23118480.00Cu in CC Volume              
1/3 Volume6098.40Cu in FB Volume21" Wx20"Hx18"D7560Cu in19.3%Ovesized- It his ok- ??  
               20" High for 2" ash tray  
18480*.022406.56Cu in Stack Volume              
Initial Stack Calc20.71In Stack Lengthd=5            
Use 33in Stack Height4.00In Stack Pipe DiameterCheck on ID - Not 4"?          
18480*.00118.48Sq in Firebox Inlets3"x2" @ FB /CC Opening  3x3"x2" @ Fire Grate - Total 24 Sq in
18480*.00473.92Sq in FB / CC Opening**DODIS Calculator gives 54.43Cu in??    
18480*.00473.92Sq in Volume Under RF Plate              
From Circle Calc19.73In RF Plafe ( A-B)              
From Circle Calc5.32in Segement Height (E-D)               
                     
 
Dave, 

thanks for looking over the #'s

I checked the numbers a few times. One thing that I'm confused about is the DODIS calculator gave a result of 54.34 Cu in for the FB / CC opening vs 73.92 cu in. Why would that be so far apart? With the firebox oversized 20% do you see any issue. As I will be using this smoker in Vermont, which can get a bit chilly in winter I was planning to insulate the firebox and use  1/4" plate for inside walls and  1/8" outside. I'm still pulling the parts together but hopefully can get started for real next week. 
 
Please read the entire link below... I think it will answer all of your questions...


Well, it took me awhile to figure out what the DODIS calculator is.... It is the calculator Alien and friends put together for building a Side Fire Box smoker.... measurements of "in use" smokers were tabulated and based on the smokers performance, a formula for construction was put together....
Smokers in operation by members on this forum had noticed some flaws in the operation of their Reverse Flow smokers using "Feldon's" or "Aliens" or "DODIS" as you call it, calculator and tutorial...

Below is the link to the calculator put together on this forum to overcome the shortcomings of the above mentioned calculators.....
http://www.smokingmeatforums.com/t/...others-ready-to-use-rev5-6-19-15#post_1264161


There are a few notations in the above link explaining changes to Alien's calculator..... below are some that I copied from that link....

Here's to "Alien BBQ" and the folks that first put the calculator together and "1728 Software Systems" for this great "Circle Calculator" and all the folks at "SmokingMeatForums", with a special shout out to Ribwizzard, that contributed their ideas and feedback while this thing was coming together..


Smoker Calculator reasoning
The concept for the changes is below.... Alien and his associates, did an amazing job putting the original calculator together... 100% of my numbers are based on his original numbers... small changes were made for the improvements due to design changes in smokers.....
The original measurements were taken from SFB smokers with tuning plates I do believe.... The advent of the RF smoker did not make any changes to the calculator... Now the exhaust has to travel twice as far as before, and the original FB/CC opening restricted the air flow from the FB, causing the FB to over heat... Some would get up to 450 deg and higher while the CC wouldn't get over 250.... And then there is the increased friction from the steel.... When using natural draft, any restriction/friction is very detrimental to the flow....
So, on a whim, the FB/CC opening was enlarged, the area under the RF plate was increased and the area at the end of the RF plate was increased... all by 50%.... That solved ALL the problems.... fuel consumption was reduced.... folks were happy....
I personally experienced members improvements and fuel usage by the letters/PMs they wrote me on their improvements...... One additional modification was suggested.... members here, tested a second air inlet to the FB.... directly across from the FB/CC opening... That was a significant improvement of some/most smokers.... If the FB was too hot, it could be cooled by opening the upper air inlet.... Also, the fire had a separate air inlet to adjust it's heat output.... It should be installed at or below the wood fire grate....
All of this has been tested and proven by members building smoker on this forum.... The only place you will find using these numbers... or it used to be... I'm sure many builders are now using these ideas for their builds.... this process has been going for at least 2 years....
 
I got started and got the legs and top off along with some of the plugs. Two are welded on there, but one I will use as the drain. I decided to run some water and TSP through the tank ( did about 15 gallons) and discovered there is quite a bit of sludge in the bottom. Some flushed out but there still seems to be quite a bit still in there. I left it to drain for the next day or so. Should I be concerned about starting to cut into the tank with some of this remaining?. It smells a bit oily and is thick as you can see from the photo. I plan  to start the cut with a cutting wheel on a grinder and may then go with a sawzall or which ever is easier, quicker and straighter. Any idea which is better? 

Thanks

Don Smokie

Grinding off Legs


Top and legs removed and ground


Sludge from inside tank.

 
Don,

A grinder with straight cut off wheel (.045") works great. But a fresh bimetal blade in a saw all works great too. Your choice. Some advice on compressor tanks, plan your cuts to eliminate rust problems with the bottom. I used an air tank on my build...still not done. It was a horizontal tank so the bottom was badly rusted. I flipped my tank to put the good metal at the bottom and the thinner stuff on top. You may want to use your "bottom" as the side for the FB cut out. Hope that makes sense. Looking forward to your build.

RG
 
RG,

Thanks- that's a good idea putting the FB on the "sludge side". Nice job on your smoker, looks like your almost there, I like the custom firedoor hinges you made. Where did you get the wheels. I am over and back about deciding whether to put it on an axle or not. I don't really plan to tow it - but maybe may want to bring it to a friends house or on a camping weekend, but seeing your setup this may be what I need for just at home. Decisions - decisions.
 
I'm working on sketching up the firebox and was wondering if the bottom should be insulated in addition to the sides and top. It will have a ash tray in the bottom.  What about the door, does it help to insulate that also. I am planning to use 1/4" material for the inside and 1/8" for the outside. Any advise  is appreciated. 
 
Personally, I would not insulate the bottom or the door end where the inlets are... a lot of work for little gain... If I was to insulate the Cook Chamber, I would also skip the door and areas that were affected by the door opening and closing...

If you are thinking of insulating the exhaust stack, that would help with condensate.. A double pipe, open at the bottom will work....

.... click on pic to enlarge....
 
Dave is right about insulating, most bang for the added effort is on the firebox.  I got my wheels from Global Industrial, about $32 each.

I wanted something stiff and able to hold the weight but also be heat resistant, these are full roller bearing rated at 1000lbs each.  I am thinking

about changing those out though, they are pretty narrow and do not roll very well on the lawn or gravel drive.  I put some balloon tires on it temporarily

to move it around during the build.  I did end up making a small hitch for it, CAT 0 to fit my (wifes) lawn tractor as it was getting too heavy. I'll see,

my plans are to have it under a covered porch when not in use, move it out for cooks.  The hitch set up is for moving it from one side of the property

to the other, or put it on my trailer to cook elsewhere. 

The rust thing my tank, the bottom was not too bad but I did have some places where there were pinholes.  I just put those up top and filled it

with mig wire.  You really won't know until you open it up. 

One other recommendation (from Ribwizard) I did not do this and got lucky because my tank is pretty thick 3/16".  Is not cut your door opening first,

built your firebox, cut FB opening in tank and weld the FB to the tank before you cut the other openings.  Doing this will help control warpage on

your tank...especially if it is thin. 

I really do need to finish my smoker or at least update my build thread. 

Life has just put that project on hold for now.  Good Luck!

RG
 
Thanks for the advise Dave and RG. Not insulating the door and bottom will save me  a bit of time and $$. As I'm in a cold climate ( VT) the double vent pipe will definitely help  with condensate.

I might have got ahead of your message RG on cutting in the FB first. Tonight I laid out the cut for it on the CC and cut the door on the CC out. I guess I was too eager to see what thickness I had and what condition the inside of tank was. Anyway spilt milk now.. I used a sawzall with Milwaukee metal cutting blade, and burned through three of them. The tank is in good condition I would say, nothing that a sandblast can't get rid of. The wall thickness is 3/16"

I did get a pop on the top when I cut it and still had a few finish cuts to make on the side and bottom. You can see it in the photo below. You got me thinking now, before I cut in the firebox opening I should weld in some temporary brace in that area to keep the tank in its configuration. I think I will get the CC door fitted up and squared up first, then brace near the FB opening, then cut the firebox in. Luckily I work with some Iron workers ( I'm not one) and we've had to do some heat straightening on some beams, so I confident I can get the door to line up with a bit of pulling and pushing with a jack or two. 

Before Cutting


Firebox End cut line 


Here's the spring in the top before everything was cut all around ( Just a few inches on the bottom and sides was left to cut when it sprung) 


Door cut out.


Inside of tank- on old drain end

 
Progress was slow the last few weeks but I got a good burnout done and the chamber sandblasted. I also   got the hinges and firewool delivered along with a nice Thermometer. Photos attached. I lightly coated the inside with high heat paint to stop it from rusting in the meantime. This week I will order some misc steel angles and plates and plan to get started with the outer firebox plate. I'll be  cutting it out of a scrap 4x8 sheet of 1/4" steel.

                     Nice Red Color                                                                No longer


Cleaned up good with a sandblast


1" Thick "Super Wool",  3" Hinge ( Seems a bit small but door opening isn't that big) 

and Tel Tru Thermometer


This is a sketch for the front of the Firebox. I plan to put in a 2" ash tray and will make it 5" to the underside of grate so that the air inlets on both sides ( 2x2" tubes ) can feed the fire.


SmokingMeatForums.com is reader supported and as an Amazon Associate, we may earn commissions from qualifying purchases.
Clicky