novasbc's 250 gallon propane tank build

  • Some of the links on this forum allow SMF, at no cost to you, to earn a small commission when you click through and make a purchase. Let me know if you have any questions about this.
SMF is reader-supported. When you buy through links on our site, we may earn an affiliate commission.

novasbc

Smoke Blower
Original poster
Nov 13, 2014
79
11
Austin, TX
So, I have my 250 gallon propane tank, it's had it's valves removed for 2-3 years.  I haven't calculated the firebox size yet, but am working on it.

I'm just looking to have a very consistent smoker, that I can put things in, and know that hotspots are reduced.  Based on my research here, it seems best to either build a good smoker, or a good pit.  I'm more interested in the smoker portion.  I like the idea of having a warming rack over the firebox, that I've seen a couple of times (made easier by my propane tank not having the super rounded sides like most new tanks).

I plan to have my first steps be to cut the doors, and then mount it in a trailer configuration, to make moving it around easier, since I don't have great tools to lift it without help.

From that point, I'd like to start working on the firebox, reverse flow plate, and cooking grates.  I'd like to be able to use it to smoke the gamut of meats (chicken, brisket, ribs, you name it).  Today, I do this on my small vertical water smoker.  Does a decent job, but has a hard time maintaining temperatures in the winter, and in the summer can get too hot.

I'm looking at my options for building the trailer portion.  My brother in law found a decent axle for his smoker/pit, but thus far I haven't come across anything that the seller doesn't want too much money for.

Here in Austin, we have a Northern Tools, so I can get things shipped to the store for free.  I looked into building the axle up from parts, but the kits seemed a better deal.  I have looked at the following kits:
  • Reliable 2,000-Lb. Capacity Complete Axle Kit — 67in. Hubface, 55in. Spring Center, 5-Bolt Pattern
    • $200
  • Reliable Axle Kit — 3500-Lb. Capacity
    • $270
Based on other posts, it seems as if I would be making a mistake going with the 2,000 lb axle setup, as by the time you add everything on, you are pushing its limits.  Assuming that is true, is the 3,500 lb kit worth it?  I would still need to buy tires, of which I'm looking at their "5-Hole High Speed Spoked Rim Design Trailer Tire Assembly — ST205/75D-15" tires, at $140/pair.  I would be seeing highway miles with the trailer for sure.

Does this seem a good route to go, assuming I can't find a good deal on an existing axle setup?

I have seen posts talking about buying a full trailer for $450, but it seems anything in that range has small 12" tires, and not the same weight range.

Thanks!
 
Last edited:
Not an expert, but my FIL uses trailers a lot to move heavy equiptment and other items. He and I were talking about building a similar build as you. I asked the same question you are. His reply was pretty simple, the stronger the better. Even though the weight limit is 2000 lbs and you only have 1500 lbs on the total weight. Sitting still you are ok, but what if you hit a bump. Then the whole load weight will increase, even if just for a split second. Do you really want to chance breaking the trailer over a couple hundred bucks? I know the diffrence is only $70 for the axel kit, but you will need a higher ply tire as well, and they are not cheap.

Empty weight of a 250 gallon tank is approx 670 lbs +/-
1/4" plate weighs 10.2 lbs per square foot

So if you look at your design and start to do the math, you will see that you will be very close to maxing out the 2000 lb axels. So I would either run duel axel or run at least the 3500 lb set.

Hope that helps
 
For $70 more you're going to get allot better axle and probably a lot more 5 lug hub/ tire options (14 or 15" tires).  Also, consider the springs can be selected to match the load. Springs are rated each, so if you select 1750lb springs, that will in theory support the 3500lb your axle is rated for.  I bought mine from agri-supply.com.  Good luck.  measure thrice, cut and grind;)
 
So, I have my 250 gallon propane tank, it's had it's valves removed for 2-3 years.  I haven't calculated the firebox size yet, but am working on it.

I'm just looking to have a very consistent smoker, that I can put things in, and know that hotspots are reduced.  Based on my research here, it seems best to either build a good smoker, or a good pit.  I'm more interested in the smoker portion.  I like the idea of having a warming rack over the firebox, that I've seen a couple of times (made easier by my propane tank not having the super rounded sides like most new tanks).

I plan to have my first steps be to cut the doors, and then mount it in a trailer configuration, to make moving it around easier, since I don't have great tools to lift it without help.

From that point, I'd like to start working on the firebox, reverse flow plate, and cooking grates.  I'd like to be able to use it to smoke the gamut of meats (chicken, brisket, ribs, you name it).  Today, I do this on my small vertical water smoker.  Does a decent job, but has a hard time maintaining temperatures in the winter, and in the summer can get too hot.

I'm looking at my options for building the trailer portion.  My brother in law found a decent axle for his smoker/pit, but thus far I haven't come across anything that the seller doesn't want too much money for.

Here in Austin, we have a Northern Tools, so I can get things shipped to the store for free.  I looked into building the axle up from parts, but the kits seemed a better deal.  I have looked at the following kits:

  • Reliable 2,000-Lb. Capacity Complete Axle Kit — 67in. Hubface, 55in. Spring Center, 5-Bolt Pattern
    • $200
  • Reliable Axle Kit — 3500-Lb. Capacity
    • $270

Based on other posts, it seems as if I would be making a mistake going with the 2,000 lb axle setup, as by the time you add everything on, you are pushing its limits.  Assuming that is true, is the 3,500 lb kit worth it?  I would still need to buy tires, of which I'm looking at their "5-Hole High Speed Spoked Rim Design Trailer Tire Assembly — ST205/75D-15" tires, at $140/pair.  I would be seeing highway miles with the trailer for sure.

Does this seem a good route to go, assuming I can't find a good deal on an existing axle setup?

I have seen posts talking about buying a full trailer for $450, but it seems anything in that range has small 12" tires, and not the same weight range.

Thanks!


nova, evening..... may I suggest you start with the calculator... the first thing I would account for is the placement of the Fire Box and the Reverse Flow plate... from there the door will follow... and the exhaust.... and the warming oven....

Here is a calculator I put together.... try it..... get back to me if you have any questions...

http://www.smokingmeatforums.com/t/...and-others-test-calculator-rev-3#post_1264161
 
  • Like
Reactions: novasbc
Evening nova. I'll add my 4 cents. I found an old tandem axle camp trailer on Craigslist. I had to look for a while but I just purchased another for $300. It was already stripped down to the floor frame. The reason I suggest this is they will come with electric brakes on both axles and you'll have more than enough  tonnage to support any outlandish thing you build on it as well as a ready made frame to build on. The build I just finished was on a tandem axle I paid $150 for. Sometimes you get lucky.

My first build was on Harbour Freights largest kit trailer and I had too buy another when I got close to finish because of that 2000 pound weight limit thing which doubled my trailer costs. I have over $500 just in little HF trailers for 1 build. This was a 250 gal tank and I would never do that again!

Jarjarchef is right about the tires too. They have to be trailer rated with a higher ply wall, but it's possible you'll get good tires on a used trailer. The tread is usually good but sometimes the sidewalls will be cracked from sun damage.

Gary brought up an issue with the calculator that I believe is true. When your smoke stack diameter reaches 6" or more the frictional restriction on the smoke (air) becomes negligible. Which means that it will have more draft than anticipated. But draft is good. It can be controlled.

And last I would suggest a fire box larger than the calculator calls for. What this does is allows you to put more fuel for a longer smoke without refueling. Use the Jim Minion method and your smoker can almost become a set it and forget it. An oven that smokes!

That trailer I just bought has me looking for a 500 gal tank. They're mighty scarce around here.

Dave
 
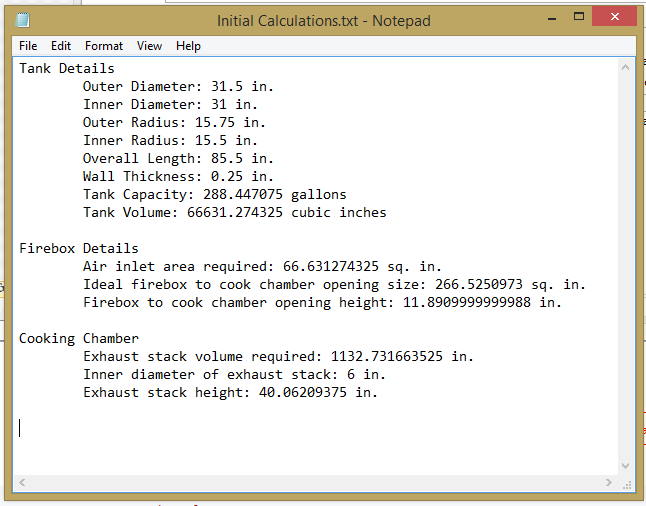
I wrote a calculator based on DaveOmak's linked thread, and got the following for my 250 gallon tank:


Interestingly, my measurements ended up with it showing 288 gallons instead of 250.


With these numbers, I can at least plan the firebox size.  I still need to add the calculations for the firebox volume and dimensions, but my wife will kill me if I stay at the computer any longer today..
 
Your trailer looks familiar. And yes a propane tank is a little bigger than the rated capacity. This is because you can't fill it completely with propane. Mine is stamped 250 gal cap. on the ASME plate with 272 stamped as total.

Dave
 
I remeber reading somewhere on SMF of someone using a Harbor Freight trailer and having issues with the electrical system. Their lights would flicker and not work consistently. They ended up having to tack weld the joints to fix the issue.

I know the cart before the horse, but I just had a squirrel moment....... sorry..
 
Just to clarify, I just used that trailer to pick up the tank :).

I ended up getting a 3500lb axle from Magnum trailers in Austin for a good price.

Havent had problems with the lights so far, knock on wood.
I remeber reading somewhere on SMF of someone using a Harbor Freight trailer and having issues with the electrical system. Their lights would flicker and not work consistently. They ended up having to tack weld the joints to fix the issue.

I know the cart before the horse, but I just had a squirrel moment....... sorry..
 
Okay, so I have my calculations:, the reverse flow plate / firebox opening height needs to be 11.89 in.  From this, I can figure out how tall to make the firebox, and cut the doors.

I've been trying to search, but haven't found the exact answers to my questions.  I plan on starting a guide for building RF smokers to help newbies in the future :).

Doors
  • I like the look of the flanges, and have read Ribwizzards post multiple times.
    • I have an angle grinder with a 0.040 metal cut-off disc that I was thinking of using.  It seems this method tends to generate the least amount of heat and warping.
    • It seems folks generally weld the hinges on before removing the doors, how do you do this, and then later weld the flanges on?  Or do you just not have a flange on the top?  Seems like that would be the place you'd most likely lose smoke and heat.
  • Firebox opening
    • How far in do you cut the opening?  Far enough to make it a 90 degree angle?
    • Assuming that is the case, what does the firebox side look like?  I'm having a hard time imagining that, I have seen pictures of the tank side, the finished product, but not what has been done to prepare the firebox for mating to the tank.
Thanks!
 
I'll take a stab, but there are several ways to skin these cats.

Re; cutting the door, you cut everything but the very corners, weld on the hinges, then cut out the tips you left in the corners. You can then open the doors and clamp on the flanges to the doors and weld them on. Rib also has a thread on how to weld them on by notching the door with a grinder and welding the flanges on where you ground out the notches from the back side. Very neat trick, others will drill holes in the flanges and weld the holes closed to the door. Some weld the flanges all the way around but it seems to me that would be more warp prone than Rib's method.

For the firebox fit, once you cut the smile shaped hole in the tank, viewed from the tank end, you butt the box to the tank, then mark a smile shaped cut on the firebox and take it off and cut it out. You want the tank cut to extend in far enough to get past the arc of the dome end, that depends on your tank geometry. Make a block and mount a pen @ 11.9 inches above the floor, mark around the dome until it gets back to the cylindrical section and pull a line the same distance from the weld on both sides and cut back up to your mark you made with the block and pen. You should end up with a 90 degree cut when viewed from the side that your firebox will fit in close enough to weld up. Remember these are not structural, just get it sealed up, you could pick up a smoker by the firebox if it has only 6" of weld holding it to the cook chamber.

Leave a little extra in case you want to add a baffle so you may want to cut it at 12.25 unless you already allowed for one in your measurements.

Len
 
I plan on including a storage area for wood, and a lockbox for various barbecue tools and miscellaneous junk I decide to bring.

I'm thinking of taking two pieces of metal (perhaps channel, maybe square tubing), and notching them, bending them to come together at the hitch, then reinforcing the bend with a weld.  I think I've read posts on here about folks doing that.

Any recommendations on what metal would be good for this, and what sizes?

Thanks!
 
Got the initial work done on the frame this weekend.

I was a newbie to using a welder (I even have had my Lincoln 180 mig welder from Home Depot since March of this year), and a cutting torch.  Fortunately, I decided to do the work to get the tank mobile (on the frame and axle) at his place so he could help me and supervise (he's a great welder).  Also, he has a backhoe that makes it easier to lift the tank into place when we get to that point.

I bought the material for the frame and tongue Saturday morning.  I decided to build it out of 3" channel iron.  I did not realize that it came in different thicknesses, and so as to avoid underbuilding it, I bought the 6 pound per foot variety.  Fairly heavy stuff, in retrospect, I could probably have gone with less.  I may only use it for the outer frame, tongue, and supports for the tank, due to weight, and where I want supports for other things, jump to some angle iron.

I'm debating putting down some expanded metal on the frame, to make it easier to throw things on it, like wood, a cooler, etc.  I also may put a propane burner onboard to be able to cook a pot of chili, a toolbox for my barbecue supplies, and a spot to secure my ice chest.  Seems like they would be handy additions.

Instead of bending the channel iron, I ended up just making a box, as I didn't get the pieces cut to the right length by the metal supplier.  So, I think I'll bring the angles for the tongue to below the frame.  My car hauler does something similar.

I'll get a chance to work on it again around Christmas, where my goal is to get the tongue and hitch on, and get it on the axle.  It's possible I'll get to drop the tank on it as well.

I've been trying to learn how to use some 3d modeling tools to do something better than pencil and paper for the design, but I'm not very proficient at it, and haven't made much progress, oh well.

One major decision I still have to make is the position of the 3500lb axle with matching springs.  I'm thinking I'll have to put the hangers back as far as I can on the frame as possible.  I just don't have a good feel for how much the firebox + warming cabinet are going to weigh versus the things I put in front of the axle (including part of the tank itself).  Perhaps we will have to mount the hangers once, get everything fully together, and then move the axle forward when I have a better idea of the tongue weight.  I'd not like it to be overly tongue heavy.


We didn't notice initially, but one of the pieces we cut for the frame lengths was bowed inward.  Made it tough to get it fully square, we put the angle iron in the middle temporarily to help, and used the help of some tow straps to get it square to finish welding it up.
Originally Posted by LenDecaturAL  
 
Leave a little extra in case you want to add a baffle so you may want to cut it at 12.25 unless you already allowed for one in your measurements.
I'll have to look into what I get by running a baffle.  It wasn't something I had considered, thanks for that, and the description of cutting the firebox opening!

All in all, even though I haven't really done that much, I feel like a lot has been accomplished, especially since I am infinitely more comfortable with the welder than before.

Once I get it rolling, I'll take it back to my house, so I can work on it after I get home each day, rather than having to make a trip out of town on the weekends.  I'll make the cuts for the doors and the firebox then.  I also have to figure out how to get the reverse flow plate installed, assuming I am doing a double door setup.  I guess I'll have to put the plate inside in sections, and then weld them together once inside the tank.
 
Slide your plate in before welding firebox on.

Here is how i recomend performing the build.
1-Fabricate firebox completely, its alot easier to get all detail work on firebox done while you can still flip it over by hand. Do not weld the two plate at the seam that will be the corner that will insert into the notch in the cooking chamber.

2- while tank is still sitting level on legs, notch the top of the tank for your firebox as in you are installing it upside down. It is much easier while tank still has feet and its easier to mount firebox to tank rather than tank to firebox, this also allows you to weld the bottom seam before flipping it over, and you only have to flip over once.

3- now than firebox is welded on, flip it over and now the firebox will hold tank level. Weld top seam of firebox and cut legs off of tank and cut doors. Now that tank is level, it will be easier to know where to mark doors.

4- once doors are cut, reach inside tank with torch or plasma and using the bottom of cc as a guide, cut opening into firebox. That is why you dont weld top cornet of firebox,
 
  • Like
Reactions: daveomak
Thanks, I have a bit to process here, but one question pops out at me.

I was planning on using the legs and welding them to the frame of the trailer. They seem very stout and are in good shape.

Is there a reason you specifically mention cutting the legs off?

Slide your plate in before welding firebox on.

Here is how i recomend performing the build.
1-Fabricate firebox completely, its alot easier to get all detail work on firebox done while you can still flip it over by hand. Do not weld the two plate at the seam that will be the corner that will insert into the notch in the cooking chamber.

2- while tank is still sitting level on legs, notch the top of the tank for your firebox as in you are installing it upside down. It is much easier while tank still has feet and its easier to mount firebox to tank rather than tank to firebox, this also allows you to weld the bottom seam before flipping it over, and you only have to flip over once.

3- now than firebox is welded on, flip it over and now the firebox will hold tank level. Weld top seam of firebox and cut legs off of tank and cut doors. Now that tank is level, it will be easier to know where to mark doors.

4- once doors are cut, reach inside tank with torch or plasma and using the bottom of cc as a guide, cut opening into firebox. That is why you dont weld top cornet of firebox,
 
To be specific, when I measured things out, with the height of the axle, tires, springs, and frame, it didnt seem like I'd want to raise it any higher than the existing legs. So, I figured just to use the existing ones.

 
I've given up the idea of putting this into some sort of CAD program for now.  Here is what I am tentatively planning to do:


Just recently on another thread here, I realized that I have a "wide/fat short CC", because of my tank design (previously I didn't connect the dots).  I may have to alter my calculator to change values based on that, but I haven't figured that out yet.

I don't have the tank open, so I can't really do anything but run numbers.

The idea of flipping it over to avoid having the plugs on the bottom sound interesting, but unless I'm missing something, it's primarily aesthetic.  If I decide to build another, maybe I'll do that, especially if the legs aren't in good shape.  It just seems a shame to mess with such perfectly good legs, and not use them to attach to the frame.  It's not even legs, but metal that goes all the way across, in a cut-off triangle fashion.

Since my numbers are probably off because the original calculator assumed a "standard", modern propane tank, I guess I'll need to be sure of the 11.89" height of the plate/firebox opening, cut the opening, and then physically measure the width the RF plate will need to be.  Otherwise, it seems I could be completely off.  I'm basing the width of the firebox on the width of the RF plate, which I calculated at 30.15", but of course, that assumes the numbers are right for my tank.

Other than that, I think I'm going to use 1/4" for the plate and firebox walls.

My original plan was to get the tank mounted to the trailer frame, cut the doors, start a fire in it to burn whatever crap might be left in it, cut the opening for the FB, get the RF plate installed, and then mount the firebox.  It doesn't require me having to flip the tank over.  But, if I have some real benefits from doing so, I could figure out a way to flip it over, but other than aesthetics, it doesn't seem to be that important...

Based on my calculations, it seemed that the reverse flow plate needed to be 30.15" wide by 76.66 (tank length of 85.5" minus 8.84", which * the RF plate width of 30.15" gives me 266.53 square inches).
 
Last edited:
SmokingMeatForums.com is reader supported and as an Amazon Associate, we may earn commissions from qualifying purchases.

Latest posts

Hot Threads

Clicky