I really don't even know where to start with turning this proofer into a smoker......

  • Some of the links on this forum allow SMF, at no cost to you, to earn a small commission when you click through and make a purchase. Let me know if you have any questions about this.
SMF is reader-supported. When you buy through links on our site, we may earn an affiliate commission.

fatfarmlady

Newbie
Original poster
May 10, 2014
19
10
Spotsylvania, VA
I welcome any and all advice... I have never smoked before but it is something I have wanted to do for a long time....

I was originally going to turn this into a huge incubator but decided a smoker would be better use for it...

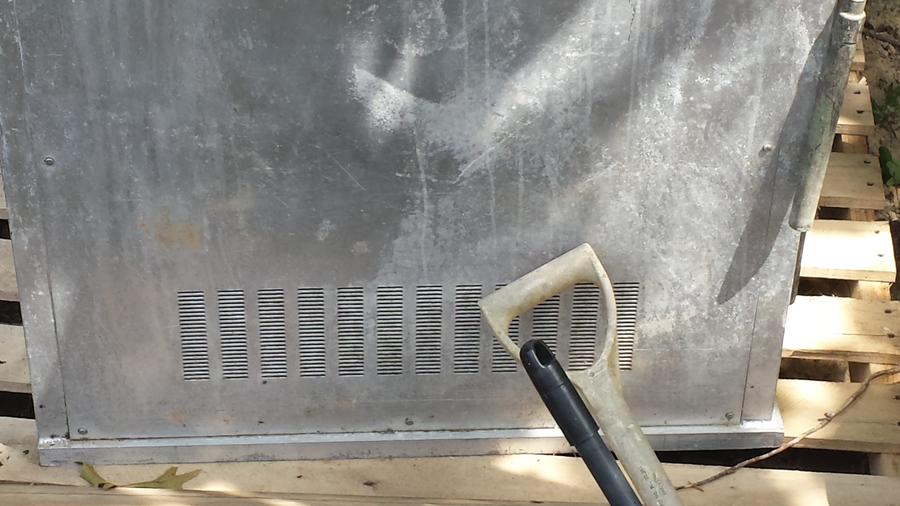
I have 30" x 70" clear inside... I have an aluminum rack that goes inside of it as well as the shelves that go into the rack...

My first thought is to make it a permanent placement on a concrete pad...

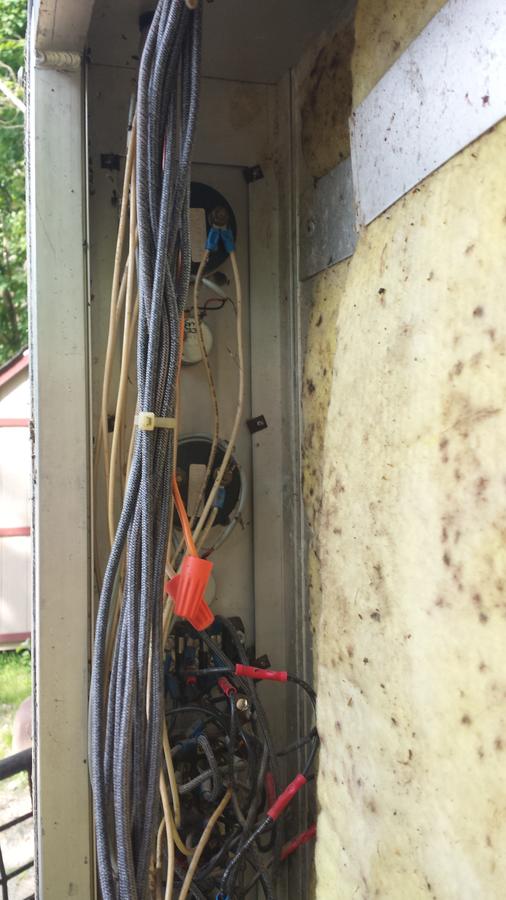
Now to get heat in smoke in it...  I have the coil out of an stove we took out of the house which I understand can be used for heat... I just have to find out how to install it and the temp control from the stove...

Now where do I put my water pan and my wood pan? 

I am a total newbie starting from scratch with a big aluminum box, trying to figure out where to put what inside of it...

Will I need to insulate this thing?

I have been reading on here and looking at pictures but still don't understand how it all works.... I don't have anyone close that has a smoker or can help me set this up so I am all on my own here....  We gotta start somewhere, right?

Ok, here is what I have to work with, speak up, what is my first step?  I do have a full door that goes on the front of it... I thought about cutting the door but someone suggested the mailbox mod?????  Is it possible to have the heat and smoke all inside of this unit or do I need to build a wood box on the outside of it and pipe the smoke into it?  It still has all the propane hook ups on it but since it has been sitting outside for the last 5 years, I won't even pretend they still work....  It has a thermostat on the front as well as a moisture gadget, but again, I doubt they still work...  This came from a bakery that went out of business....  I know I will need to take off all the stuff on the top of the cabinet and cut a hole for the smoke to escape, but that is about all I know I need to do at this point..

 
Hello.  Looks like you needed more help than I offered last time.  Ok!  If it sounds like I am talking down to you I am very sorry but we need to understand what you do and do not understand.  Do you understand how an electric oven works?  If we start talking about thermostats and such are you with us?  Do you have the complete stove you took out of the house, or just the coil ( heating element )?  You also have propane/gas controls in the unit and are talking about trying to use electric for heat, the 2 don't go together.  Now I mean no disrespect ma'am but if you are lost already we need to scrap some ideas and start again.  You can buy and put a propane burner in that unit fairly simply or you can convert it to a charcoal burner.  Do you have any DIY skills?  If not; I don't know where to start.  Hopefully some others might have different ideas.

Danny
 
I don't feel as though you are talking down at all.... Being that I have never used a smoker and trying to turn this unit into one is a big challenge that I am very willing to take on, but I want to be sure I do it right the first time...

I do understand how an electric oven works and I do have the entire unit to scavenge from...

The unit I want to turn into a smoker does have the propane hookups but in the event they don't work, which I am thinking they don't, I need to have a back up plan, hence using the coil out of the stove..

I guess where I am a bit confused is where to put the wood chips... can they go inside the unit, which would mean either leaving the door whole or cutting it, which is where you mentioned the mailbox mod.....  I am trying to figure out how the set up would then work...

Would I then put the element inside the unit and the chips in the mailbox mod?

See,  I told you I would be asking questions and I apologize now if I seem rather ignorant in this but starting out as a total newbie, I am ignorant as to which steps I need to take to do this the correct way....

I do have a lot of DIY skills (been in construction since I was 16) and what I can't do, I have 2 wonderful men, my hubby and my brother, who can do anything with metal or wood, but they have never built a smoker either, so I get to do all the research and find out how to do what...

I just want to make sure I put the correct items in the smoker so that it works correctly and I then become a happy smoker...

I appreciate the time and welcome any and all advice on which direction to head with this....

Kim
 
Danny,

Do I put the element (coil) in the mailbox or does it go into the smoker?  If I put it into the smoker, then how do I get my chips to smoke other than installing something to burn them, correct?

See, I tell you, I am a total newbie.  I know I have to cut a hole in the bottom and top for air flow and make those holes adjustable (kinda like a woodstove)....  Again, trying to figure out what goes where...  
 

Insulation would depend on how well it is already insulated, I'm assuming is has 'some' insulation in the walls because it was used to proof bread.

Assuming you scrap the aluminum controls and go with an electric burner of some sort, you can use the space where the old controls are (purple) to install your new PID controller (look for PID on ebay, you should find kits.)

Blue line would be your drip pan, you don't want to completely block flow from bottom to top, but you don't want juices to get on your electric controls.

Brown box would be for an AMPS or other smoke device, basically a mesh container for chips/pellets that you can start and let smolder for your smoke, some can smoke for several hours.

Red would be your burner.

I wouldn't put it on a concrete base, I would weld in a bottom with some metal, and maybe even put the unit on casters so it can be moved.

You will have to have a 'lower' vent for air to come into the unit, but you could do that on the thin side wall or on the thick side wall and possibly put a small slow speed fan like what is used in computer cases to bring air into the device, since you would have room for wiring there.

You also need some sort of 'upper' vent or chimney for the smoke and hot air to move out, so that the smoker can function.

Is the door you have glass? or is it metal? and does it seal well? if it doesn't seal very good you will need to locate some type of seal to put around it, you don't want smoke leaving where you don't want it to.

At a glance those are the things that I see, hope it helps, I'm not an expert by any means, there are several well experienced builders here that will help I'm sure.
 
CC = Cooking Chamber

FB = Fire Box/Heat Element/Burner - Basically the area where the heat comes from, some are inside, some are external, some are even separate and only connected with ducting.

Mailbox = This usually means an actual mailbox or similar device for that AMNS smoke tray or tube holding the chips/pellets and it has a duct leading to the CC so that you can add smoke material without opening up the smoker.

Water Pan = Some people use them, some just add some water to their drip pans, and allow the meat to add juices to it, some people don't use water at all. Its a personal preference, and one that you can add later after you see how well your smoker works, in VA its fairly humid, at least it was when we lived in Portsmouth, so you may get enough humidity through the air coming into the smoker and not need a water pan.

And something else I thought about, if your door is metal, you could possibly cut it, so that you can open the lower portion to the FB and not lose your heat/smoke from the CC, you would have to add some extra hinges though, because it looks like it only has 2 on the right side atm.

Hope that helps.
 
Hello Kim.  I just look over and you have some good folks looking at this thread.  I think you are going to be getting some ideas.

OK.  Let's forget the wood chips for a second ( we will come back ).  Let's just get this thing up and running.  There is a controller you can build/buy and add closer to the end to help control temps but that is also later.  I would say the first thing is to take out all the propane controls and copper pipe.  The next step is remove all the electric controls and wiring.  NOW you need to see what sort of insulation is between the inner and outer wall of the proofer.  SOME way you need to see between the wallsand the insulation in the door.  Remove a cover plate, or separate the inner box from the outer box.  You will probably then find wires and copper pipe you need to remove.  Next you need to identify the insulation used in this proofer.  If it is styrofoam it has to come out.  If it isn't you need to determine if it will burn ( hold a piece in a gas flame, use a cigarette lighter, whatever ).  IF it burns or melts, gotta come out.  If needed replace all the insulation with rockwool and then reassemble.  Next you need an insulated floor in the proofer.  Well, that should get ya started.  Now to answer a few questions:  The oven element will go in the bottom of the smoker.  The mailbox mod uses a smoke generator to produce smoke.  What you do is to add "chip pan" such as an AMNPS ( Jeff, the owner of the website sells them ).  You start chips, sawdust, or pellets smoldering in the smoke generator and then place the generator in the "mail box" or other suitable container.  The heat from the electric coil causes a suction as it goes out the top exhaust which in turn draws the smoke from the external smoke generator into the smoker.  Works the same way as a wood burner.  Heat + draft = smoke out the stack.  As you mentioned a wood burning stove, you understand.  Heat + draft, and then you close the damper = house full of smoke!  Can we just start with that as I don't type well and might have to stay up all night at this rate?  Please remember to post pictures when you get started.  It REALLY helps to see what you are doing when offering advice.  I hope this helps, if not please feel free to PM me if you have further questions.  I think you are going to receive many suggestions now.  Keep Smokin!

Danny
 
Ok,

I went outside and took more pictures.....  There is no insulation in the door, just aluminum and it will need a new seal to insulate for the smoke... there is a nice square channel around the frame of the door, so it would allow for adding insulation to it if needed....  There is no insulation on the left side of the unit, it is like the door..  same with the back of the unit... I will have to unbolt everything on the right side to see what is in that cavity....   It has electric already going to it (well, it is all wired up), so I will have to see where all that goes... may be able to use that for supplying my heat... There is also a vent in the top as well as on the right side bottom (outside), which you can see in the picture....

I pulled my tractor beside it and climbed on top of the back tires to get a picture of the top of it where all the hookups/electrical stuff is... 

Ok, so is it better to put your smoke tray or source outside of the unit and duct it in?  I am thinking that may be the best idea but I am looking for experienced advice on this one...

5oaks, I thought about welding a plate into the bottom and putting it on casters but because it is a pretty big unit I thought permanent unit would be better..... on casters out here in the country.... well I would have to dodge an awful lot of horse/cow/goat/chicken/turkey/dog landmines to move it.... no pavement here but I do have forks for my tractor so I could move it around.... maybe I will think more about the caster idea but then if it is a moveable unit I can hear my little brother now begging me to bring it over to his house so he can use it... at least when it is here he HAS to come to the farm to visit his favorite sister and not just to target shoot!!

It is humid here in VA, I promise you that has NOT changed and I LOVE IT!  I will still add a water pan for it (rather have it and not need it than need it and not have it)....

Danny, you have now got me all worked up about taking the guts out, so as soon as I am done with this post I am taking the cordless drill out there and tearing it apart to see what the innards look like on that right side.....

Ok, here are some more pics for your enjoyment....  I am really excited about getting this thing up and running... I can smell the chickens and ribs cooking now!!!!  :D

Here is a full shot of the door.... 


Here you can see the vent on the top left as well as where I need to take out the right side....


Close up of what will be unbolted from the right side...


Here is the cord for electric already installed in the unit...hoping I can still use this somehow.... we will see....


More hoses on the back of the unit that will come out....


Here are all the controls on the right side where I will put my PID unit (thanks for that suggestion!!!)


Here is a side view of the door so you can see it is really nothing but some aluminum... will have to replace the door latch as well... a simple hasp should be just fine for me....  I really am simple...


Here is all the stuff on top of it (taken while precariously standing on top of rear tractor tires, not a good place for a fat farm lady.....and no, the tires didn't pop under my weight! )... I also noticed there is a vented area up here that I didn't notice before....


Vent on top left inside of the unit.....


And here is the vent that is on the bottom right side of the unit (on the outside).... hope there are not too many vents in this thing but they will be easy enough to cover if need be.

 
Just went outside and took the right side panel off.... I thought it was riveted in by looking at the heads on the "bolts" holding it in..... since Old Bucket of Fun put my needle nose pliers in the truck, which is with him at the moment, I had to get creative.... I grabbed my goat hoof trimming pliers... Thought I could cut them off or pull them out... LOW AND BEHOLD, THEY UNSCREW!!!  If that didn't work, I had the grinder at hand to do the job....

So there is insulation in there which I will remove all of that.... and I looked to see how high the temp control goes to see if it could still be used..... it only goes to 120 degrees F..... so that will be coming out...

Also, hubby and brother looked at this when it was laying on its side in storage and told me it was propane!!!  BOY WERE THEY WRONG!!!  The hoses coming out of the back are for WATER!!!  That would explain the RH dial..... (relative humidity?), after all, it is a proofer from a bakery...

So here is what is inside of the "thick" area behind all the controls....

Here are the round bolts..... wonder if there is an actual tool for removing these....


And the innards... yes, I am going to remove the insulation from here.....


This is some sort of contraption that one of the water lines is hooked to...the other water line goes into the top of the unit....


And here is all the controls from the backside.... this will all come out and I will create a new face for my controls....

 
I just had the funny thought of putting pins on the side, and a bracket half way up the back, so you could back your tractor up and pick it up and move it with the 3pt hitch lol.

The door looks like you could use the rock wool insulation and then just welt or screw down a sheet of metal to cover it on the inside.

If you are doing electric heat I would put it in the bottom of the unit, if you are doing wood/gas you might build a side fire box for it, but you don't have too, the drawing I posted would be basically a super-sized version of my brinkmann vertical charcoal smoker.

Definitely want a metal bottom on it for bracing/stability even if you do put it on a concrete base, just in case you ever have to move it.

It does look like a good candidate to build a smoker, lots of room for controls, you could probably even run vent tubing out the right side of the CC and up through that control area and out the top or back having them hidden.

That control area on the right would be good for a PID, you could mount your temperature probes there, you could make a box for your AMNPS smoke generator tube there, like a built in mailbox mod.

There are so many possibilities, hehe I might have to look for an old bread proofer now....
 
Hello Fatfarmlady.  Well it looks like you are well under way.  My main concern was that you had not received any replies. You are getting some great advice now ( like that 3 point hitch idea, gets ya to thinkin ) so I'll back out and wish you all the luck in the world.  If you get stuck and aren't getting replies ( which will not happen ) feel free to send me a PM and I'll do what I can to help.  That is gonna make you one FINE smoker!  Keep Smokin!

Danny 
 
I have MORE PICTURES after removing everything....

Why is it that when I start doing something, Old Bucket of Fun feels the need to come in and take over???!!!!????  Seriously dude, DO NOT TAKE A TOOL OUT OF MY HAND OR YOU MAY FIND IT IN YOUR BACKSIDE!!  ;)

There looks to be flour up top around the element and the...........are you ready for this???   THE FANS!!!

Everything is unhooked except the fans... it is wired for 220 so I am going to hook it up via the camper plug to see if the fans still work.....


Tis raining now so I will wait until it quits to plug and play....

Can I leave the fans up top (if they work) or should I move them to the bottom?
 
OHHHH...... 3 point hitch hook up........WHAT A GREAT IDEA!!!  Makes it a whole lot easier to move around that way!!!!  Why didn't I think of that??? 
PDT_Armataz_01_37.gif
 
th_HaHAAHaa.gif
  
duel.gif
  I gotta say; you are a HOOT girl!  I'll bet life with you isn't boring; IT'S AN ADVENTURE!   Keep your hands and feet inside the vehicle AT ALL TIMES and hang on!  
icon_lol.gif
  I wouldn't want to cross you on a good day back in the day when I was in my prime!!  
ROTF.gif
  You GO girl.  I am certain with your determination you will have a great smoker in no time.  Keep Smokin!


Danny
 
Hello.  Sorry.  Yes I would leave those fans if possible JUST IN CASE, but on top they will need some sort of rain guard and although they probably are make sure the are exhaust fans.

Danny
 
Yeah Danny, I can be quite the handful!!!  Someone just told Old Bucket of Fun the other day that life with me must NEVER be boring!!  He agreed wholeheartedly!  I have yet found a man who can keep up with me on a daily basis, but I keep on keeping on! ;)

There is a cover that goes over all those relays up top.... I still have the cover but it is currently sitting inside of the box.... thinking of cutting a bigger hole in the top for venting although the hole that is currently there (not sure if I will put the cover back on it or not) seems plenty big enough, just hope there is enough venting in the cover to allow it all to escape....

Here you can see the cover over the top vent.....


And here I have removed the cover...this goes up right behind the fans...

 
Ok, I found this today and since it has never been used by us and I don't ever see it being used since we have a very expensive wheelbarrow type air compressor, I wondered if this would work for making into my smoking part? 


Now I did look at the AMNPS but it used dust in it?  I have cherry and hickory trees I have removed and saved for my smoker and would like to use chips.  Can I use chips with the AMNPS?
 
Hello all,
I hope I'm not interupting, but I have a few questions.
Maybe I missed it in conversation but are you dead set on electic heating element? The reason I ask is because I see the set up and wonder not not set it up as a wood fired smoker...but the question with that is can you do open flame in aluminum?
 
SmokingMeatForums.com is reader supported and as an Amazon Associate, we may earn commissions from qualifying purchases.

Latest posts

Clicky