
Well, I have done just about everything to make my MES 30 do everything I want. Of course, the #1 problem is that no one wants to feed wood chips all night long in the tiny little opening on the side of my MES 30 especially if you have a long smoke. BORING!!
Fix Step 1: It was suggested to get the A-MAZE-N AMNPS 5x8 smoker and man that was a perfect Idea. I proceeded to use it as others have, however, I ran into issues keeping the pellets lit. Fighting that battle caused me to have to continue opening the front door and making my temperatures drop way down. I read many articles about microwaving the pellets but in the end, nothing helped truly keep enough Oxygen in there to keep the pellets lit.
Fix Step 2: I read up on it and of course, decided to mail my own version of the mailbox modification to put the A-MAZE-N smoker on the outside of my smoker. I started off with a plane jane mailbox from Lowes and it was time to make some changes. To speed things up, I will give credit to DaveOmak at http://www.smokingmeatforums.com/t/...0-new-pictures-for-attaching-elbow-to-mailbox as this is where I came up with the idea of how to attach the dryer vent hose to my mailbox. He has the main details on what he did. See below for a few pictures of the inside and outside. This method works perfectly! I made one minor modification. See below.
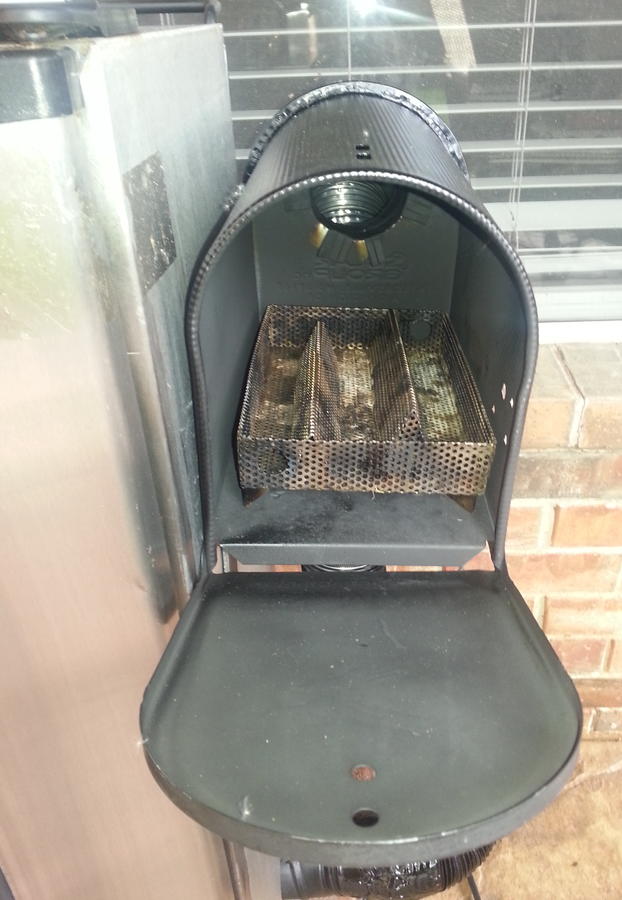
Look of the Inside of Mailbox after Cut (Thanks Dave)
Outside after cut (Thanks Dave)
Now, after originally attaching the above pictured 3" vent adapter to the mailbox, I tried just using Duct tape to seal off any gaps but soon found out that the smoke puts off just enough heat at the exhaust port pictured above that it actually melts the tape into a goop. In my latest version, I simply bought some Fire Block Caulk which basically is a heat resistant putty that you can apply like caulk and let it dry hard. Its usually right next to the caulk in the paint department at least it was at Lowes. I applied plenty of the fire block caulking and closed off all the holes in the rear where the adapter was attached and let it dry hard. Since I then had to attach the vent hose to the 3" vent adapter above, I also bought the silver dryer vent tape as it's also somewhat heat resistant. I used that to wrap around where the vent hose and adapter attached. The challenge that I had attaching the 4" vent hose to the 3" vent adapter was that host clamps just didn't keep it on there nicely by itself. In the end I had to slightly cut the vent hose about 4 inches to allow the dry hose to collapse nicely over the adapter and used the hose clamp to at least hold it before using the vent tape as mentioned above. Of course, I then followed back up with more of the fire block caulk I mentioned above just to make a nice solid joint, especially since I won't be moving it.
Step 3: The next step was to mount it to the side of my smoker. The problem I had was that the mailbox was simply too dang long to fit on the side of my smoker easily. Now, if I had thought of this sooner (******SUBLIMINAL MESSAGE HERE, think about finding a smaller mailbox when you buy it if you plan on mounting it on the side. Think of how deep the smoker is and get one smaller than that depth or you end up cutting it like I did. ******) I would not have had to cut the mailbox like I did. This was time consuming and I cut myself several times on the sharp sheet metal but in the end I made it work. I don't have a welder or rivet gun so I simply carefully pried open the joint that holds the back of the mailbox onto the body, removed the back, cut the mailbox down shorter, then bent the metal a little so I could reattach the back that I pried off earlier. Again, this will take a little patience but worth it unless you want to just be smart UP FRONT and by a shorter mailbox. :-)
After it was cut down, I bought 2 - 5"x5" L brackets. I bolted the 2 L brackets to the bottom of the mailbox. **** TIP: Use short bolts that you can start from inside the mailbox so the nuts are on the bottom of the mailbox. This keeps the flat head of the bolt on the inside and doesn't really take up any room where your Amaz-N smoker will go. *****
Now after the L brackets were mounted to the bottom, its time to mount them to the side of the smoker. I suggest using very short but wider sheet metal screws. I think mine were 5/8" long. You don't want to puncture the inside cavity of the smoker but if you do, use some of that fire blocker caulk to make a nice solid seal!!!!
Last Step: Paint to your liking and GET YO SMOKE ON!!! Here are a few final pictures of the final product.
Here are a few more quick picks of the inside of the smoker after I removed the original Wood Chip box. As an FYI, its a very simple process to do this and just a few screws here and there. I think there were about 6-8 total screws to completely remove the wood chip box and the bottom brackets. I just have the exposed element left.
Hopefully this helps one ore two of you out there. Its nothing more than a combination of several of the great SMOKE HEADS on this forum and hopefully my additions excite you to come up with your own modifications to make the perfect smoker for you and your family.
Happy Memorial Day and now its time to prep my 2nd attempt at a Brisket!! Wish me luck and HAPPY SMOKING!

Fix Step 1: It was suggested to get the A-MAZE-N AMNPS 5x8 smoker and man that was a perfect Idea. I proceeded to use it as others have, however, I ran into issues keeping the pellets lit. Fighting that battle caused me to have to continue opening the front door and making my temperatures drop way down. I read many articles about microwaving the pellets but in the end, nothing helped truly keep enough Oxygen in there to keep the pellets lit.
Fix Step 2: I read up on it and of course, decided to mail my own version of the mailbox modification to put the A-MAZE-N smoker on the outside of my smoker. I started off with a plane jane mailbox from Lowes and it was time to make some changes. To speed things up, I will give credit to DaveOmak at http://www.smokingmeatforums.com/t/...0-new-pictures-for-attaching-elbow-to-mailbox as this is where I came up with the idea of how to attach the dryer vent hose to my mailbox. He has the main details on what he did. See below for a few pictures of the inside and outside. This method works perfectly! I made one minor modification. See below.
Look of the Inside of Mailbox after Cut (Thanks Dave)

Outside after cut (Thanks Dave)

Now, after originally attaching the above pictured 3" vent adapter to the mailbox, I tried just using Duct tape to seal off any gaps but soon found out that the smoke puts off just enough heat at the exhaust port pictured above that it actually melts the tape into a goop. In my latest version, I simply bought some Fire Block Caulk which basically is a heat resistant putty that you can apply like caulk and let it dry hard. Its usually right next to the caulk in the paint department at least it was at Lowes. I applied plenty of the fire block caulking and closed off all the holes in the rear where the adapter was attached and let it dry hard. Since I then had to attach the vent hose to the 3" vent adapter above, I also bought the silver dryer vent tape as it's also somewhat heat resistant. I used that to wrap around where the vent hose and adapter attached. The challenge that I had attaching the 4" vent hose to the 3" vent adapter was that host clamps just didn't keep it on there nicely by itself. In the end I had to slightly cut the vent hose about 4 inches to allow the dry hose to collapse nicely over the adapter and used the hose clamp to at least hold it before using the vent tape as mentioned above. Of course, I then followed back up with more of the fire block caulk I mentioned above just to make a nice solid joint, especially since I won't be moving it.
Step 3: The next step was to mount it to the side of my smoker. The problem I had was that the mailbox was simply too dang long to fit on the side of my smoker easily. Now, if I had thought of this sooner (******SUBLIMINAL MESSAGE HERE, think about finding a smaller mailbox when you buy it if you plan on mounting it on the side. Think of how deep the smoker is and get one smaller than that depth or you end up cutting it like I did. ******) I would not have had to cut the mailbox like I did. This was time consuming and I cut myself several times on the sharp sheet metal but in the end I made it work. I don't have a welder or rivet gun so I simply carefully pried open the joint that holds the back of the mailbox onto the body, removed the back, cut the mailbox down shorter, then bent the metal a little so I could reattach the back that I pried off earlier. Again, this will take a little patience but worth it unless you want to just be smart UP FRONT and by a shorter mailbox. :-)
After it was cut down, I bought 2 - 5"x5" L brackets. I bolted the 2 L brackets to the bottom of the mailbox. **** TIP: Use short bolts that you can start from inside the mailbox so the nuts are on the bottom of the mailbox. This keeps the flat head of the bolt on the inside and doesn't really take up any room where your Amaz-N smoker will go. *****
Now after the L brackets were mounted to the bottom, its time to mount them to the side of the smoker. I suggest using very short but wider sheet metal screws. I think mine were 5/8" long. You don't want to puncture the inside cavity of the smoker but if you do, use some of that fire blocker caulk to make a nice solid seal!!!!
Last Step: Paint to your liking and GET YO SMOKE ON!!! Here are a few final pictures of the final product.


Here are a few more quick picks of the inside of the smoker after I removed the original Wood Chip box. As an FYI, its a very simple process to do this and just a few screws here and there. I think there were about 6-8 total screws to completely remove the wood chip box and the bottom brackets. I just have the exposed element left.


Hopefully this helps one ore two of you out there. Its nothing more than a combination of several of the great SMOKE HEADS on this forum and hopefully my additions excite you to come up with your own modifications to make the perfect smoker for you and your family.
Happy Memorial Day and now its time to prep my 2nd attempt at a Brisket!! Wish me luck and HAPPY SMOKING!

