Please help me build my smoker in time for deer season

  • Some of the links on this forum allow SMF, at no cost to you, to earn a small commission when you click through and make a purchase. Let me know if you have any questions about this.
SMF is reader-supported. When you buy through links on our site, we may earn an affiliate commission.
Hey DDS,

Sorry I haven't been paying attention to the Fridge builds section for a while. Your fridge looks a lot like mine (
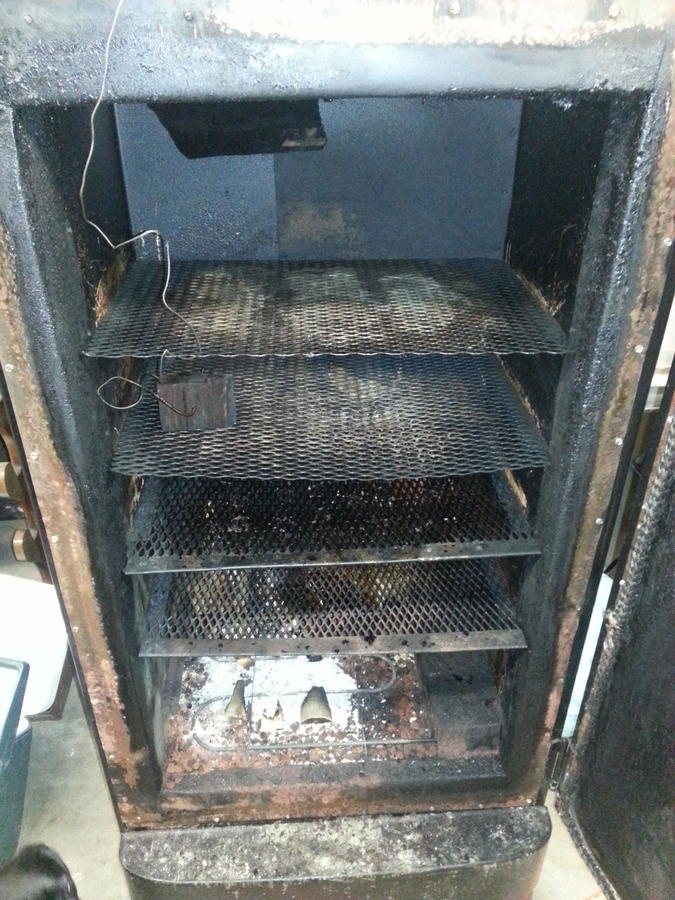
http://www.smokingmeatforums.com/t/105764/heres-my-fridge-build-mid-build) I opted to go the super cheap route and use scavenged oven parts to produce/control the heat. I use chunks of wood on the element, like ECB, to produce smoke. But I do use an AMPS for cold smoking bacon and cheese.

Some of the pics from my post might help you but a couple of things I know now. closest shelf needs to be minimum 12"-18" away from element. I have a shelf bracket that is only like 3 inches from the element and I intended to use a water pan to help even heat, provide moisture, and catch drippings. Three inches is way too close and it basically zapped all my heat before it can heat the rest of the chamber.

I used the same 24ga steel I used for the door to cover that back hole. People tell you that you need to use stainless so it doesn't rust, well that's hogwash. If you season your smoker with some oil you'll never see rust. As for my shelves, I used angle iron brackets and expanded metal. I apparently have a pretty good hook up on steel tho, so it might be more difficult for you to find (cheap).

Note my smoke stack; straight piece of dryer vent $1.99 at the farm store. Cut 6 inches off the non-tapered end and inserted that into the hole I cut (hole saw) then cut 1" slits and folded back the egdges and screwed it down on both the inside and outside. Then the tapered end inserts into that snug as a glove. I did seal the inside then to keep it sealed up. I kept the piece of steel I cut out of fridge exterior and made a in-tube dampener.

One thing that Dave mentioned and I learned; condensation (especially us northerners) will form in the stack and drip back into smoker. I've since build a deflector that catches the condensation and sends it down the back of the smoker.

Airflow was an issue for my smoker but I solved it by installing a muffin fan ducted into the smoke chamber. I've got this setup on a separate switch and when I add wood I flip the switch on and get plenty of air moving then shut it off and it takes over on its own. When I'm cold smoking with the AMPS the fan is on the whole time, element is never on (obviously).

As you can see I used lava rock as a barrier between my element and the bottom of my fridge. Stole that from ECB as well.

I'm subscribed now so any other questions you have ask away and I'll try to get back to you ASAP. PID is a super nice setup, I just went the cheap route cause I had all the parts. I haven't taken any pictures lately so let me know if you would like some additional pics and I can snap a few.

Enjoy!!

-Josh
 
Oh one other thing. I noticed your platform and wheels setup. I did a similar thing and found with the door open the fridge is very top heavy and wants to fall forward so be cautious of this. I had my whole smoker blow over one time on a gusty day. I was done smoking just letting it cool down, came out to find it on its side paint all scuffed up. Wasn't happy. \

Guess that's proof on how well it works though. I can smoke in negative degrees with wind, no problem. Actually performs better. The hot weather doesn't keep the element on enough to produce the smoke I want. I go to the AMPS then.
 
Thanks so much Josh!  We do have very similar fridges.  I hope mine is as nice as yours when I'm done.  If you could take a picture of your intake and muffin fan it would really help me out, I'm struggling with how/where to put the holes.  I'm also curious about your shelves, what material is that?  I wish I could use the factory shelves from GE.
 
I'll see about getting some photos taken this evening.

As for the shelves I used angle iron for the brackets and cut expanded metal to fit. I used the "flat" expanded metal for the most of my shelves, easier to wire brush. Pay attention to the strength of the stuff prior to cutting and be sure you cut the right direction. I couple of my shelves ended up being pretty weak so I bent some sheet metal over the end to help strengthen it. Works great!
 
So I got those pictures taken, I realize now I didn't snap one from the inside of the cabinet where the air comes in. Sorry I can get that if needed.

What I did was use some of my left over 24ga sheet metal and bent a box and mounted the fan on the outside of the box. The box covers the 2 vent holes that were drilled (hole saw) in to the fridge cabinet. In these holes I inserted a 1" or 1.5" black iron nipple to seal the holes from the insulation. Used the retainer nuts from romex clamps for a metal electrical to secure the pipes in place. Sealed off the cabinet with some of that high temp silicone stuff. As you can see from the picture all this was done after I painted.

Also, that is an ice cream bucket lid attached around the fan. I was smoking one day and a huge rain storm blew up so I had to find some way to protect the fan (quickly). Cut square hole for fan, screwed the lid to the smoker drilled holes in the underside of the bucket then put the bucket on. Quick fix, never took it off.


Finally a shot of the shelves in my smoker. I used toggle bolt to secure the shelves because I did not want to bolt through the entire cabinet and also I did not remove the internal shell. Next time around I think I would remove the shell and bolt the angle iron to the internal shell. It was too hard to seal up the large hole I had to drill for the toggle bolt. you can also see my smoke stack condensation deflector I mentioned in a previous post.


If you get a chance DDS snap some new pics of your progress.

Thanks and happy smoking!

-Josh
 
Thanks so much for the pics and explanation!  Pics coming in a day or two (I know people say that all the time, but I will follow through), I made some major progress today!  Finally got a 2" hole saw through the enamel/steel to get my element in place.  I also drilled and cut through the back of the fridge for the power cord for it.  It took me a lot longer than expected and learned to buy good quality hole saws as I burned through two cheap ones first.

I'm now considering a newer tube style smoker from AMAZN I read that the pellet and sawdust smokers are meant for under 200F or something, and I want to be able to go hotter.  I'm interested in thoughts and/or knowledge on this.  I'm also wondering if I can use the racks that came with the fridge in any capacity (I wouldn't put food directly on the rack but rather use it as a base for a heat shield and what holds my smoker above the element.  Is there a resource that explains why it's such a no-no to use the factory shelves?

I bought a 3" dryer vent and have it semi-installed for my smokestack, running right out the back.

I also bought some aluminum angle that I plan to install as shelf brackets.  I bought self tapping screws, but they aren't even touching the enamel.  Are there any tips to drilling into that stuff?  I considered using a center punch to get a start, is that an okay idea?

I'm thinking of putting my intake in the front door right below the level of my AMAZN smoker with a 2" hole saw and getting a small computer fan to add to ventilation when required.  Any problems with that idea?

I'm also working on my PID and have been running into issues with the cheaper chinese controller I bought (mypin).  It might be the first thing I've ever returned to Amazon.

Thanks!
 
Go to a tile store and get a drill bit for tile. That should get a starter hole then you can use your bits to enlarge the hole
 
Yep drilling through the enamel is a pain. I just used a standard bit but I'm pretty sure I destroyed it by the time I was done. Tile or mansonary bit might work out.

Only issue with putting the vent in the door is if you do the fan idea then you will have to route the wires through the door then into the cabinet somehow (think the the wires in your car door) If you have a big enough vent you probably wont need the fan. My problem was my vents were to small so I added the fan.

As for the original shelves, I was told or read somewhere that the chrome plating used back then was known to have some substance that when heated can release toxic fumes. I've got no facts to back that up but I didn't want to even mess with it so I scrapped them and used the expanded metal for everything.

I did a nice long 17hr smoke this weekend and a buddy made a very solid suggestion to me, why didn't I place another piece of angle iron just above my shelf bracket so I could slide the shelves out without them falling out. Might be something to think about on your build. Basically creating a sandwich that the shelf slides into. Cool idea, not sure if I'll implement though.

Center punch would probably help. It will crack the enamel and allow the bit to stay in one place. Worth a shot, but I bet you'll still chew up a bit by the end of the project.
 
I knew there was something else I was going to comment on. I have a pipe pellet smoker like the AMPS. Use it primarily for cold smoking but it can be used with your element on. Had no issues with it. Just need to be sure it little bit above the heat.
 
Last edited:
A few googles have told me that chromium poisoning is a thing that happens to factory workers, I couldn't find anything about cooking with it.  Don't they make chrome plated BBQ grills?  What about galvanized, or zinc, or aluminum?  Are they dangerous when used in cooking?  I'm using all three in this project.  I hope someone can provide something substantive on this.  Thanks!
 
Using galvanized metals in your smoker is a hot topic on here. Basic direction is don't do it.

A quick search I found these 2 topics:

http://www.smokingmeatforums.com/t/52524/no-galvanized-in-your-smoker-its-toxic

http://www.smokingmeatforums.com/t/84994/will-galvanized-metal-sheets-be-bad-for-smoker

I used standard sheet metal screws which I think are zinc coated (not 100% sure) I've had no issues and I'm still alive.

Aluminum is not a problem as long as you don 't get it to hot but I don't think a smoker should be capable of getting aluminum too hot. It has to be really hot I believe. Even then I don't think its toxic I think you just run into structural issues.

Now that you mention it chromium sounds right. I know we aren't allowed to use that stuff at work. I think the chrome used in the grill grates is something different. I know my shelves did not look shiny like chrome grill or oven racks.

Also in your one photo I noticed the inside door frame like where the latch is attached appears to be the original material. Double check that this is not the same material as the inside door skin. Mine was the same crappy fiberglass like plastic stuff, that metal work was probably the toughest part of the build bending all that to fit nice and snug.

You'll definitely want to use something to seal up those holes. The problem isn't sealing them to keep the heat in its sealing them to keep the moisture out of the insulation. You might be able to use some type of pipe dope that is heat rated. I don't know if they make such a creature but I see the large gaps you have around you smoke stack and I don't know if high temp silicone will be enough.
 
Thanks!

Yeah, the material on the sides around the door is the same fiber-plastic stuff.  I'm opting to leave it be and put the gasket material really close to the edge so it won't be in the "oven" side of the heat.  I hope the dryer vent I bought isn't galvanized.  It seems stronger than aluminum.  Thanks again for all of the awesome information/ideas!
 
SmokingMeatForums.com is reader supported and as an Amazon Associate, we may earn commissions from qualifying purchases.

Latest posts

Hot Threads

Clicky