My insulation and door seals (thermal camera pic)

  • Some of the links on this forum allow SMF, at no cost to you, to earn a small commission when you click through and make a purchase. Let me know if you have any questions about this.
SMF is reader-supported. When you buy through links on our site, we may earn an affiliate commission.

mavrik

Newbie
Original poster
Jun 7, 2013
29
12
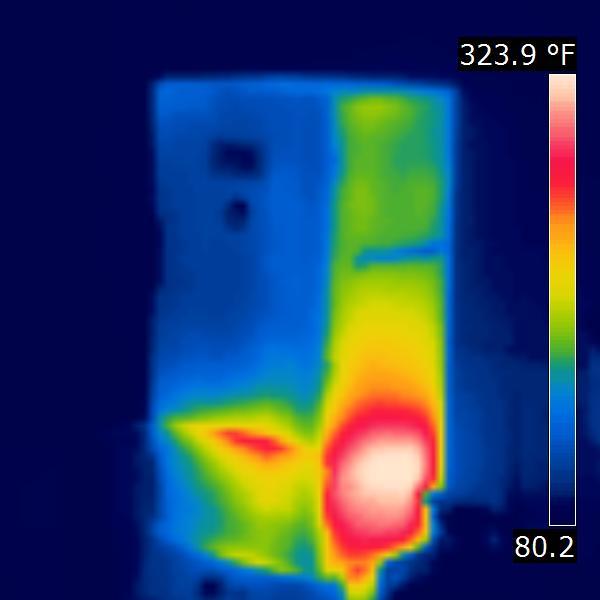
This is a thermal camera shot of my masterbuilt two door smoker, 250° inside going by the door thermometer and 80° ambient. These smokers come with a double wall on the doors, what I did do is seal the second wall with silicone to make an air insulated door. As you can see, the sealed second wall makes a good insulator. What I will use on the other sides is drip flashing that comes in 14 inch wide (and other widths) rolls at Home Depot.

On the two sides and top of the upper door (ran out of materiel) I put a copper seal from an old wood window. You can see it doesn't leak, you can see it's leaking badly between the upper and lower doors where there are no seals.

Did you guys know that regular silicone is rated for 400°? (service rating printed on package)  Also food grade silicone only means if food comes in contact with the food.

 
It appears your water pan or heat deflector is blocking the heat from rising and overheating the bottom section of the smoker ....

Dave
 
One needs to keep in mind the burner flame is about 3600°F. Your seeing how badly the heat penetrates a single wall. Basically, if the doors only had a single wall, the whole bottom would be red/white like the right side.

Here is a regular photo of the same angle of the thermal shot. The doors on the left are sealed double walls, the right side is a single wall.


Appears a heat shield, on the inside, would do wonders....  single layer 14 - 20 Ga about 1/2" air gap would be good...  Of course, you would have higher temps to deal with in the smoker....  

Dave
 
One of the important aspects to this double wall is being air tight.

As you can see, right next to the burner the steel is 324°F. The air temp in the smoker is 250°F.
 
I'm in the process of doing the mods now, here is what I have so far... (sorry for the large pictures [if you click on them], I'm on a backup computer right now and don't have a program to make smaller)

Here is the copper door seal, it's incomplete, ran out of material. Here I'm degreasing the cabinet to put the side panels in (burner, etc removed).

I put a bead of silicone on the inside for the wall panels to make it air tight. I didn't do the back wall, there is no room for a panel inside with the food racks. I'll just mount a piece of plywood outside on the back to insulate. Also ran silicone around the outside bottom lip for rain/wind.

Here is the first wall (hinge side), make sure there is a good solid bead of silicone on the inside of the rack holes. Mark the rack holes before putting the panel on so one can easily find them to drill them out. The 2x4 are just to hold it in place while the silicone cures.

This is a good time to add blocks of wood for future mounting of door clasps (I used oak). Just silicone and clamp. These doors are flimsily, I already plan on adding two more clasps. It's much easier to add the blocks now even if you don't plan on adding clasps. Otherwise you will have to screw into thin sheet metal to mount or tear off the panel.

The top I'll add spacers on both ends, then sheet it from inside.

I'll add some sheet right to the legs for a burner wind guard, leave a small gap in the back legs for burner air supply.
 

Almost done, both sides and top are double walled and air tight, plywood on the back.

You can see the burner wind guard.

Found some more copper for the seals. For others that want to do these seals, Ace hardware sells rolls of 1" (?) brass strips that is in the window seal section. Bend it into a V, you can get a nice crease with sandwich between two pieces of wood clamped to a table and use a 2x4 to bend to 90°, then finish the bend when it's not sandwiched with the 2x4.

The white strip on the door is a grease drip lip, so grease doesn't drip all over the lower door and control panel. I mainly do chicken, so there will be allot of grease dripping.

All that is left is adding two more latches and modify the racks so I can hang leg quarters from them. Below is how I'm going to do this. I cut slots into a pipe to hold the bars steady and while this pipe is in a vise, use another pipe to bend out a small section so the leg joint can fit thought, then slide chicken to both sides of the hole. Should look pretty clean. I need to get some leg quarters to lay out where the bends should go and how close I can get. It seems like 16 pieces per rack.

 
popcorn.gif
Looks good so far......  Dave
 
This is is looking awesome. For ascetic purposes you need to turn your exhaust into a cone at the top of smoker. A nice chrome paint job and you got one hell of a smoking rocket.

Is the wind guard removable? 

I have sealed my gaps with silicone and installed a gasket. I also made the tin foil modification to the chip pan. The wind guard is next on my list. Currently it is a ghetto piece of wood on one side that is also my stabilizer for the one food that is too short.

Can't wait to see the thermal images once this is finished.
 
The rack mod came out pretty good, I ended up using channel locks to start it and a pipe to finish it off.

I can hang 48 leg quarters and it has air space around them. I moved one rack to the top for hanging.

That is a Korean BBQ in the bottom for a drip pan, heat/smoke flows right though these but catches all the grease.


The wind guard is removable in the back to access the drip collector.

I don't see a point to a thermal shot after, one can see more on the first one for a comparison of with and without the sealed double walls in the same photo.

The nice thing with the copper seal is it's always compressing and stays sealed while the smoker expands/contracts.
 
  • Like
Reactions: daveomak and bj77
Holey Key Rap.....  That is awesome......  Better get a manufacturer to make them and sell um.....   I gotta try that on my smoker.....

You get the GENIUS award today.....

Dave

Don't tell me you copied that....  I will be devastated.....  
 
Thanks, my mod will last the lifetime of the smoker, it cost me under $20 to do.

Thanks, I find leg racks too expensive and don't utilize space well. I posted this here for all to use.
 
Well, that was a disaster, about an hour in, I had a big grease fire. These smokers are not designed to handle 50 pounds of chicken. Everything just drips to the burner. In the past cooking with other methods I get aprox 6 litters of liquid from 50 pounds, so I designed a liquid remover system.

I used the water pan rack and welded some rails in to hold 2" drip flashing, this allows heat/smoke to pass right thought but catches all the liquid. This also removes like the meat racks for cleaning, adjusting, etc.

Its at an angle so it all drips to that white bar thing, which is an U channel. There is a hole in the center so it passes down to the OEM grease hole. I'll use the water pan under the hole to catch the oil. Also will add drip lip (like the front door) to both walls.

I assume that the liquid channels will be very hot just under the burner so I will add a small steel plate or maybe a 6" cast iron pan to produce radiant heat instead of direct flame heat so the channels don't get so hot they will flare up when any liquids hit them.

I also found that if the thermometers gets wet they give a false reading (become a wet bulb reading which is lower), so I'll add drip guards over them.
 
Why not just use a aluminum foil pan to catch any grease or juices?  I use one all the time and never have had any issues with grease fires.  I do keep water in the pan so the grease/juices do not burn up.

So your door installed thermometer is accurate?

Is your wind guard only on the sides and front?
 
A pan won't work for several reasons, liquid drips from every square inch, no way to put a pan in to provide full coverage that won't block heat/smoke and catch all the liquid. As well with a pan I would have to open the door and empty multiple times (approx 6 litters), with this system I empty the pan from the outside. I do 50 pounds at a time, not one 3-4 pound bird.

Like I said, the probe gets wet, with this full of a smoker, liquid drips from everywhere.

Wind guard is all the way around, it's adjustable in the back for desired air flow.

One nice thing, it looks like I can cook 50 pounds of chicken in just over an hour. That is faster than any other method.
 
I just re read your post and I see you are suing drip flashing.  Is this the type used on houses?  Is that safe to be in the smoker?
 
Yup, that is plain old house drip flashing. There is only paint on it, that may or may not burn/smoke, I'll do an empty test run first. If it burns/smokes, I'll torch it to burn the rest of the paint off. There is some drip flashing that is galvanized or is painted over galvanized, I wouldn't use that. Of course stainless would be best, but very expensive or you can use raw angle iron. The house flashing cost me $4, I don't foresee it getting too hot with a flame diffuser.
 
Mavrik you are my hero the thought you put into this smoker is great my smoker is getting here this weekend (vertical offset charcoal ) You can bet I am going tomorrow to get some Flashing and yes I will be doing a mod to the racks....thanks for posting
 
SmokingMeatForums.com is reader supported and as an Amazon Associate, we may earn commissions from qualifying purchases.
Clicky