1960ish Rich Plan Freezer Build

  • Some of the links on this forum allow SMF, at no cost to you, to earn a small commission when you click through and make a purchase. Let me know if you have any questions about this.
SMF is reader-supported. When you buy through links on our site, we may earn an affiliate commission.

fish killer

Smoke Blower
Original poster
Nov 18, 2012
101
12
Central Virginia

A while back I responded to a Craigslist add for an upright working freezer for 40$. I needed a freezer because I was really getting into meat smoking. Had a Brinkman vertical gasser, and just bought an MES 40. So I thought a freezer was needed to take advantage of sales. Well when I got to see the freezer it was this old nasty looking thing. Nothing I would feel comfortable using in my house of storing meat in. But I also realized the potential that this item had if it were to be used as a smoker. Unfortuneatly I didn't think of taking a picture of it before I began working on it but trust me when I say it was "nasty".


It has an aluminum interior shell. That has been scrubbed clean. Pulled all the old wet and nasty insulation out. Scrapped the black rubbery adhesive that held the refrigerant coils to the inside of the cabinet (a real pita). Here it is already in my garage, painted and with new insulation (R13 fiberglass). I did alot of reading on this website and others, some say its ok others say it isn't. My cooking chamber is totally sealed. I havent had any problems as of yet.


I am pretty mechanically inclined and had a vision in my head of how things would look but the only thing that concern me was finishing the door. A couple of issue were getting a something large enough to line the inside. The dimensions are 52" by 27". I knew I couldn't  use galvanized eventually I went to metal fabricating place and lucked out and got a scrap piece of stainless for 40 bucks. All I had to do was cut a 1/2 inch off with my air tool. I also replace the plastic roller on the door latch with a steel one.


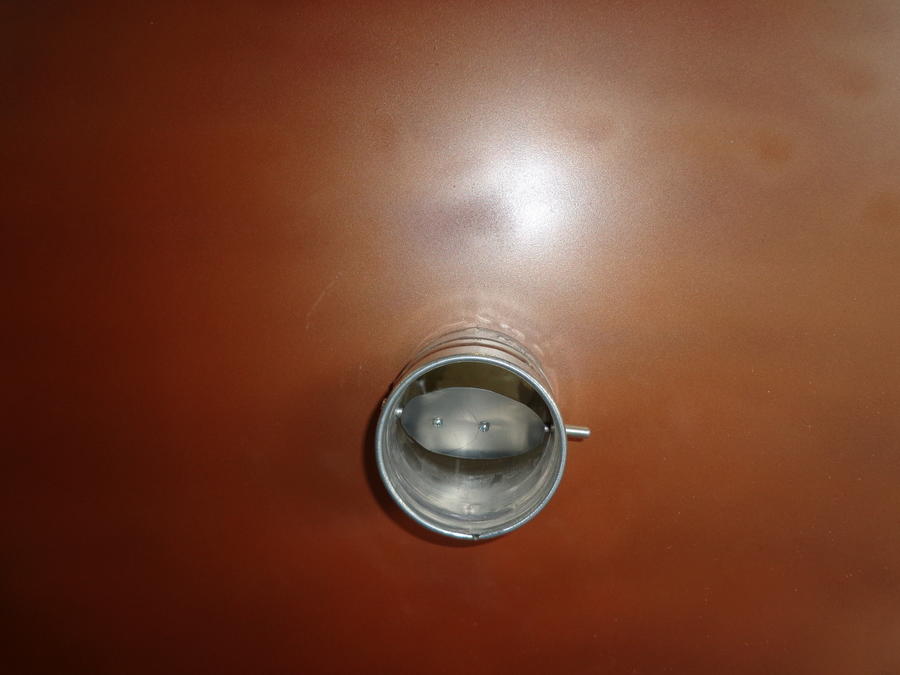
I made my own air baffle from a piece of aluminum flashing. The pin is an old aluminum nail. The tube itself is aluminum but the outer portion is galvanized. No temp concerns on the outside so it not an issue.


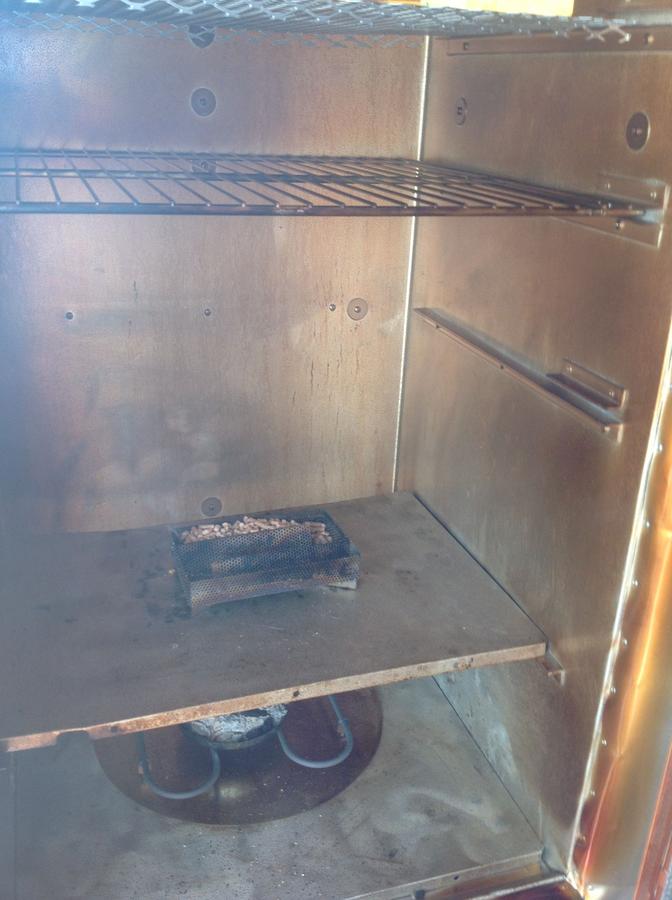
Here is the inside of the chamber. The metal chamber was all on piece which made it easy to pull out when I replaced the insulation. I added the aluminum brackets. I added the small pieces on top of the bottom bracket to prevent a rack for tipping over

if it pulled out to far (got that idea from someone else on this forum).

I knew that some fridge and freezer rack have dangerous coatings and I  was worried about the racks and thought I was going to need to get different ones but I wire brushed them with my wheel and spot ground them in a few places. They isn't any type of coating on them.   I also put a torch to them and wait for a reaction, smoke or flaking of some sort but nothing. So I feel pretty safe using them. 

I am using a 1500 watt electric element I ordered from Cabelas. It designed to change a grill into a smoker. It came with a steel bottom plate and also a chip holder. You can see it in the picture. I have the amnz smoker which I love but I put a few chunks of hardwood charcoal in the chip pan for added flavor.


Another idea I got from this forum was install an air diffuser in the top of the cabinet to even out the air flow . The idea is that a central hole will create hot and cold spots due to unequal airflow.  I used an aluminum pizza pan I ordered for 8$ from Amazon. I used some of the extra stainless steel from the door to make brackets.  Aluminum rivets hold the pan and the brackets to the cabinet. Ialso used aluminum flashing to seal the cooking chamber to the outer cabinet. It worked out great the flexibility of the flashing created a nice rounded curve that gives a nice finished look. Secured everything with aluminum rivets.


I used 1 inch stove rope to create a good seal the only place smoke comes out is where is should through the chimney. Which is an aluminum chimney I found at Lowes. Both inflow and outflow are 3inch. 


I orginally had the 3.5 inch River Country thermometer that I install in the door. But when the smoker gets up to temp the stainless steel door interior bulges about an inch and the tip of the thermometer would actually be inside the door. So I got the 5 inch model so that is no longer a probem.


Here is the latest mod. I wanted a removeable shelf to place my Auberins pid so it wasn't just sitting on the ground. The bracket and the chain is easily removed when I roll the smoker back under the deck after a smoking session.

I am very happy with the way it came out and I can't imagine ever getting rid of it or needing anything else, I sold both of my other smokers and do all my smoking with this.

Thanks for looking.
 
Very impressive work.

How do you like that thermometer? Is it accurate?

How thick is your door, and how much of the probe extends into the cooking chamber?

Again, that's a fine lookin' fridge!
 
Very impressive work.
How do you like that thermometer? Is it accurate?
How thick is your door, and how much of the probe extends into the cooking


thanks ,
It turned out much better than I had hoped.

I'm happy with the thermometer. It's pretty accurate since it adjustable I calibrated it with my Maverick digital therm. now the I got the pid I don't seem to rely on it much since the digital read out is there as well, but it looks good. there is about an inch and half that sticks through he door. the door itself is between 3-4 inches thick where the therm goes thought. the therm is the 5 inch model so it has a 5 inch dial and a 5 inch stem.
 
Nice smoker, I am looking to build something similar and have a few questions.  Whats the cubic feet of the cooking chamber?  What kind of temps can you reach with that element?  How long does it take to get the smoker up to temp?  How do you like that PID from Auber?  Just curious cause that PID and element are the same ones I was looking at using in my fridge build.  Thanks
 
Nice smoker, I am looking to build something similar and have a few questions.  Whats the cubic feet of the cooking chamber?  What kind of temps can you reach with that element?  How long does it take to get the smoker up to temp?  How do you like that PID from Auber?  Just curious cause that PID and element are the same ones I was looking at using in my fridge build.  Thanks
The cooking chamber has a volume of 16 cubic feet which is fairly large but because of how well insulated it is the heating element does a good job of bringing it to temp fairly quickly. In about 30 minutes it up to 225 or so. I never had a need to go higher than that but I'm confident I could easily reach 300.  I think the temps are due more to the insulation versus high heat output.  It's a 1500 watt element and once it is up to temp I can watch the PID cycle on and off about once every 15 seconds to keep the temp as programmed.  I was worried when I first put everything together that the heating element was going to be enough to heat the chamber but I think everything works great together. I certainly don't need a hotter element.

The Auberins PID is expensive but totally worth it if you got the cash. Just run the auto tune and it will keep you temp within 1 degree.  It's so nice to be able to sleep at night when you got a butt in the smoker instead of babysitting it all night. Let me know if you have anymore questions and good luck with your build.

FK
 
Thanks for all the info!  I really appreciate it.  You made it much easier for me when it comes to selecting my element and PID.  I am on the hunt for a fridge right now, cant wait to find one and get building.   Once again thank you very much for the info!
 
WOW ...... gonna be twins, except mine has a porcelain coated tub inside, not aluminum. will be a bit tuffer to drill but no big deal.

did you plug all the extra screw holes inside with silicone ? in mine i have a few extra spots to close up because i had refrigerant tubes running inside and to each shelf. was thinking of some high temp silicone and pop rivet some metal over the bigger holes.

your rack safeties will definitely be going in. beautiful job with the flashing, again i must ask.... did you use silicone to seal it all up ? i have a buddy with a fabricating shop and visited him today. he is gonna bend up some metal for my transition from inner to outer like you used the flashing. i am going to use some aluminum for the door i think, a decent gage. you have 3" in and 3" out, does you smoke stack have the same kind of baffle for control?

your heat diffuser is awesome idea. i think i also read on here but never saw a pic.


was thinking of doing something like this for my burner set up, and using some baking sheets for drip pans to catch grease or drippings. any suggestions.

do you hang sausage in yours and if yes... (next question) do you use wood dowel or metal bars ?

i guess ive picked your brain enough for now ...  LOL
WHEN YA HAVE A FREE HOUR OR 3 MAYBE YA CAN ANSWER MY TALLY OF QUESTIONS.

THANKS FISH KILLER

YOU HAVE BEEN AN AWESOME HELP ON MY BUILD
 
 
I'll try to answer all your questions.

I used stainless,steel screws with stainless pan washer to seal up small holes in the smoke chamber. I thought it would look neater then caulk. Just put a pan washer on both sides with bolt nut and lock washer.

If you have bigger holes , aluminum sheeting with rivets is a good idea like you said.

I don't have a baffle on the exhaust, just a rain shield.

I like your burner idea, I would go for it.

I do hang sausage and I just use wooden dowels.
If you have any other questions I will be happy to answer them.
 
I  saved all the stainless screws so i like your idea to replace them. there are a few spots  where i will have to use silicone, where the tubes came from the corners, and i will have to use a bit of aluminum plate.

 if there is no baffle in the exhaust do you just control all the smoke and draft from the lower port?? i just want to make sure the smoke hangs around for a bit and that it fills the smoker.

i may just cut some hard wood up into square dowel, or triangle shape on my table saw..... dowel costs more than gold in the supply shop up here, about $ a foot .  LOL

looking at building a smoke generator now like the SMOKEDADDY .... the Masterbuilt smoke generator i have smokes out of the top and if i run this puppy in my shop in winter i could just hang the bacon in my shop ...... i want to vent my exhaust right out the shop door, just bore a big hole that i can plug when not in use, so this new generator might be my answer. it seems there is a never ending amount of options when building a project like this. it is like my friend says about a boat....

he was getting a river boat made for here and wanted it to run on the ocean a bit too.. he said there is no perfect boat ... they all have compromises !!!!!!

i think the smoker business is the same ...... but as long as it fits your needs then its close to perfect

thanks again
 
I'm not an expert on this but from what I understand you want the smoke to keep moving, whatever you have as smoke generator will constantly put out smoke so it needs a steady outflow. There are a lot of posts that talk about people who complain of bitter taste because of not enough air movement. Just something to think about.
 
I'm not an expert on this but from what I understand you want the smoke to keep moving, whatever you have as smoke generator will constantly put out smoke so it needs a steady outflow. There are a lot of posts that talk about people who complain of bitter taste because of not enough air movement. Just something to think about.
That's correct. You want to keep the exhast open wide, and control the airflow with the intake vent(s). I have a baffle of sorts on mine, but I only close it when I'm warming up the smoker.

I'd sure like to have a hole in my garage wall to vent smoke, but I'd have to cut through layers of wood and hardiplank, and I don't think it would positively effect the resale value of my house.
 
Last edited:
i see the problem ....
i am never moving so resale isnt an issue. also i have 10' wooden sliding doors so a hole with a  flap on either side is no problem. i live up in northern western BC.....

better referred to as HILLBILLY HEAVEN ...  HA HA HA

us , bears  and Indians  :)  and of course a lot of fish !!!!!
 
 
hello again Fish Killer

by looking closer at the pics of your build ... i am guessing that you did use silicone to seal the flashing to the main fridge tub. i will also follow your lead.

thanks for you

r help !!!!!
 
Actually I drilled holes and used pop rivets, but I am sure silicone will work fine,I am sure your finished product will look and work great.
 
well im ready to hook up my Auberins PID and find the instructions a little hard to understand. do you have an easier explanation you could send me. i dont wanna go to night school to figure this out. as our builds are quite similar i figure if i could mooch some set up info from you i could sleep better knowing im not gonna kill my new $200 controller.

the beast is together and ready to cure the inside. only hitch was the bugger was not quite square from when they thru it off the truck at the dump ...   LOL. so i had to put a couple of healthy snap cam latches to hold the top end of the door shut. everything else is top drawer....

I have searched the site but cant find waht im looking for, there are over 1000 pages when i put in pid help !!!!!

THANKS
 
SmokingMeatForums.com is reader supported and as an Amazon Associate, we may earn commissions from qualifying purchases.

Latest posts

Hot Threads

Clicky