
Earlier this year (March) I completed my first build, a 150 gallon RF rig on a trailer. My 2 purposes for building it were to start cooking in some competitions and give me more Qpacity. It has done both admirably and the smoker itself doesn't need any upgrades, but the trailer she sits on did. First off it was an old boat trailer that I picked up for $100, it needed new tires(another $200 later), but still not too bad. The biggest problem with the boat trailer was the extended tongue, especially after I started hauling water and loaded ice chests near the front of it, started flexing alot. Here is a pic of where I started at 2 weeks ago:
The first thing we did was take about 3 1/2" feet out of the tongue, welded a new hitch just prior to the A frame of the trailer, added an A frame jack, then removed the cooler deck that was mounted over the A frame portion of the trailer. It was a nice idea, but the weight of the coolers on the long span between axle and hitch really made the trailer flex a good bit. It worked great hauling coolers to comps, but other than that, was never used while cooking or after I got setup at a comp. I salvaged all the angle iron from the deck for later use on my upgrades. In the place of the deck, I bought a tongue box from Tractor Supply for $99. It is huge! This should eliminate 1 storage box needed when I head out to cook. I can store my lights, tools, extension cords, fire extinguisher, straps, etc., on hand at all times and not have to load and unload every time out.
Next upgrade was taking the steel (1/4 x 1 1/2 x 1 1/2 angle) from the cooler deck and extending my countertop area around to the door side of the pit. I already had countertop space on the opposite side where my sink is, but really had no place to take the food out of the pit and onto anything without having to travel a few feet with it. Plus, as we all know in our inside kitchens, you can never have enough counter space, well the same goes for our outside kitchens.
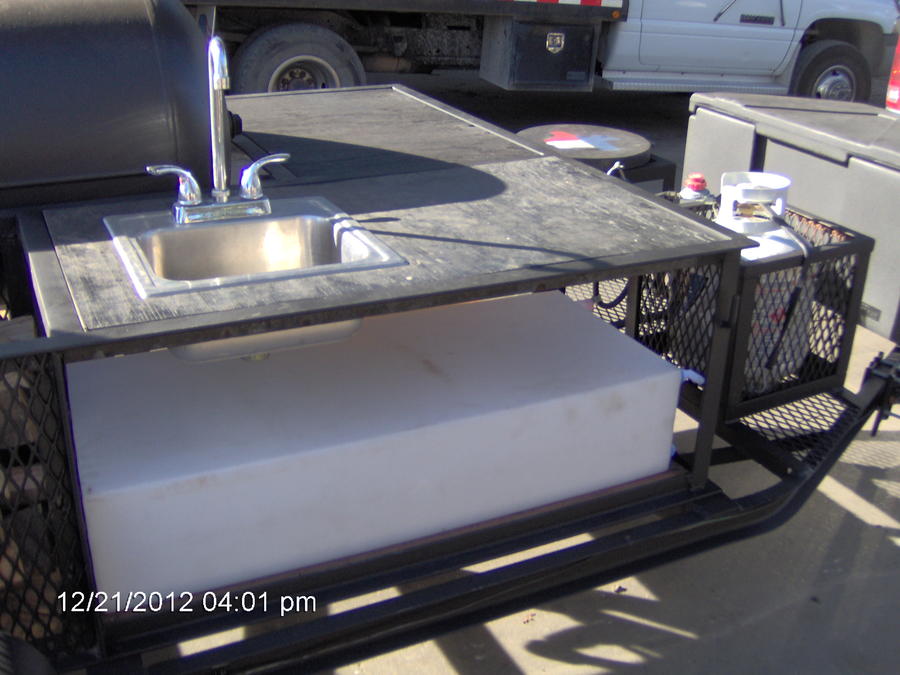
Fired it up last Friday at work and cooked all my supervisors ribs and sausage for lunch. The shelf worked out superbly. It was nice to be able to take the meat out, slap it on a countertop right there and slice 'em up! Under the countertop, you will see my other additions to the rig, RV fresh water tanks. Instead of using the old bladder type water tank for fresh water and an old spot sprayer tank for grey water, I ordered a 16 gallon tank ($45 on ebay) for my fresh water and a 21 gallon tank ($59 on ebay) for the grey water. I have yet to finish plumbing these in, but it should be done by Christmas. I am using a 2.9 GPM SureFlo water pump to move fresh water to the sink. Also note in the above picture, on the upright directly in front of the water tank, a hook, I welded one on either side for a trash bag holder. It always seems no matter what side of the trailer I'm on, I need a trash bag. Here is a shot of the 21 gallon tank under the sink area:
With the addition of the extra countertop space, my propane burner was going to be really close to that area, so I cut the tank holder and burner rack off and moved them away about 7". It gives a good amount of clearance between the burner and countertop as well as being far enough away from the tongue box as not to melt the plastic.
I still want to get the countertops (just plywood right now) wrapped in stainless or some other high quality, nonporous, long lasting surface, but that might have to wait for a bit. I am not sure that tile will hold up to the traveling and formica probably won't last long since I store it outside in the elements. I'm thinking pieces of 3/4" treated plywood wrapped with some decent gauge stainless sheet metal will work out great. Durable and easy cleanup.
I will post more pics as I make upgrades and other changes over the long holiday weekend. Hopefully I'll get the tanks plumbed, a new shelf under the door mounted and some running lights and decorative LED's installed over the long weekend.

The first thing we did was take about 3 1/2" feet out of the tongue, welded a new hitch just prior to the A frame of the trailer, added an A frame jack, then removed the cooler deck that was mounted over the A frame portion of the trailer. It was a nice idea, but the weight of the coolers on the long span between axle and hitch really made the trailer flex a good bit. It worked great hauling coolers to comps, but other than that, was never used while cooking or after I got setup at a comp. I salvaged all the angle iron from the deck for later use on my upgrades. In the place of the deck, I bought a tongue box from Tractor Supply for $99. It is huge! This should eliminate 1 storage box needed when I head out to cook. I can store my lights, tools, extension cords, fire extinguisher, straps, etc., on hand at all times and not have to load and unload every time out.

Next upgrade was taking the steel (1/4 x 1 1/2 x 1 1/2 angle) from the cooler deck and extending my countertop area around to the door side of the pit. I already had countertop space on the opposite side where my sink is, but really had no place to take the food out of the pit and onto anything without having to travel a few feet with it. Plus, as we all know in our inside kitchens, you can never have enough counter space, well the same goes for our outside kitchens.

Fired it up last Friday at work and cooked all my supervisors ribs and sausage for lunch. The shelf worked out superbly. It was nice to be able to take the meat out, slap it on a countertop right there and slice 'em up! Under the countertop, you will see my other additions to the rig, RV fresh water tanks. Instead of using the old bladder type water tank for fresh water and an old spot sprayer tank for grey water, I ordered a 16 gallon tank ($45 on ebay) for my fresh water and a 21 gallon tank ($59 on ebay) for the grey water. I have yet to finish plumbing these in, but it should be done by Christmas. I am using a 2.9 GPM SureFlo water pump to move fresh water to the sink. Also note in the above picture, on the upright directly in front of the water tank, a hook, I welded one on either side for a trash bag holder. It always seems no matter what side of the trailer I'm on, I need a trash bag. Here is a shot of the 21 gallon tank under the sink area:
With the addition of the extra countertop space, my propane burner was going to be really close to that area, so I cut the tank holder and burner rack off and moved them away about 7". It gives a good amount of clearance between the burner and countertop as well as being far enough away from the tongue box as not to melt the plastic.

I still want to get the countertops (just plywood right now) wrapped in stainless or some other high quality, nonporous, long lasting surface, but that might have to wait for a bit. I am not sure that tile will hold up to the traveling and formica probably won't last long since I store it outside in the elements. I'm thinking pieces of 3/4" treated plywood wrapped with some decent gauge stainless sheet metal will work out great. Durable and easy cleanup.
I will post more pics as I make upgrades and other changes over the long holiday weekend. Hopefully I'll get the tanks plumbed, a new shelf under the door mounted and some running lights and decorative LED's installed over the long weekend.
Last edited:


