My First Reverse Flow Build - 125-Gallon Propane Tank (Plenty of Pics)

  • Some of the links on this forum allow SMF, at no cost to you, to earn a small commission when you click through and make a purchase. Let me know if you have any questions about this.
SMF is reader-supported. When you buy through links on our site, we may earn an affiliate commission.
I had a hard time with mig , learned with stick, but once I switched to .045 wire instead of .035 , it helped. You can feel the welding wire better, and can create more of that stick weld puddle I was used to. Can push it into that purdy V shaped bead better. I only buy .023 and .045 now.

What are you useing?
 
I am using .035 flux core now. I got a couple of 10# rolls at one great deal.. When I'm done with these rolls, I'll get a bottle of gas...
 
Last edited:
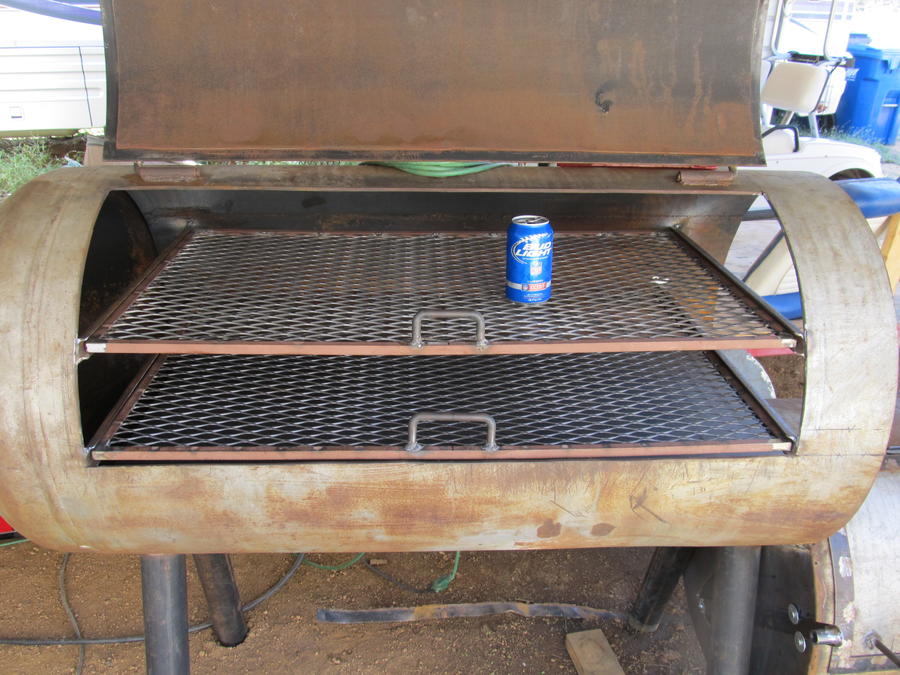
The rails and the main grate is complete...

The rails are 1 X 1/2" channel. Solves the grate tipping issue.


The main grate rail is flush with the bottom of the cook chamber opening. The grate drags a bit. I put 30# on it and it didn't get any worse. If it does, I will raise the lower rail another 1/2". If I had it to do over again, I'd have used 3/4" angle on the grates. The 1/2" stuff ain't quite heavy enough. That's an easy fix.

On to the upper grate... 
 
Last edited:
The upper grate is done. I didn't get near as much sag in the expanded metal as I did on the main grate. It is 20" deep and the main grate is 23 1/2" deep.


It turned out about how I expected it would. I could have raised the upper grate another inch, but we will see what happens when I start smoking. That will tell me what needs to be done/redone/tweaked.

I ran out of material for the dam on the RF Plate. So I will wait on the drain and valve as well. 

Next step is close up the end of the cook chamber, and drop in the stack...
 
I ended up with 4 1/2" between the grates. I would have liked 5 1/2", BUT I didn't catch it until I had one rail completely welded in place without enough material to cut it loose and move it. I figured I would try it and if it's an issue, I'll cut it out and rebuild later. We will see how it goes...  I am out of flat bar, channel, angle, round bar. I don't know if it was good or bad planning. 
 
Bluffton Smoker,
Wow!!! I really like that design!!!


Cheers, peace and bacon grease,
~Martin

Uq8f9.jpg
 
I could have opened it up more, but I work primarily with brisket, ribs & yard bird. I don't really do anything too big.. No butts...

If I find it too short, I will take a victor wrench to it and open this dude up.
 
I reason I decide on this design is that I thought it would be cheaper to NOT build a fire box and just cut 1/4 of the tank and drop it down and make the fire box out of this part of the tank. It saved me 2/3 of a sheet of 1/4" plate. I kinda made everything work around that.

I have the end of the cook chamber welded up in place. I will grind everything down tomorrow, and if I have time (or inclination), I'll add the stack and fire box grate.

then it's a short hop to season the grates and do a test run with biscuits to see whats happening. I'll add pics later. 
 
I think the design turned out looking good.   Have you thought about capping the firebox with a piece of plate that will allow you to set a pot of beans or something on there? Horizon smokers use a round firebox like that but they put a cap on it to make a pot shelf.
 
I thought about that, I have another old smoker with the hot-plate on it, and we never used it. Kinda like the side burner on a propane grill. My wife (boss) is the bean chef and she said no.

Need I say more?

Been kinda busy putting out fires (so to speak) and haven't started on the build yet today.

Also on my to-do list is 'build' an Ash Scoop from scratch to match the smoker. It is gonna need to be rounded to follow the radius of the fire box. Should be easy enough. It is on my short list right behind stack dampener... 
 
Last edited:
Got the stack in place. I planned to center it between the end of the chamber and the door for a balanced look, but I mounted it up along side the end plate. This way I could weld it to the plate on the inside of the cook chamber. Much stronger than relying on the top weld only. It IS solid...

Would have been nice to have a little foresight BEFORE I welded the plate up solid. 


I have the rest of the day of grinding ahead of me. I plan to do a season burn tonight. Tomorrow AM I will give it the old biscuit test. If all is still good to go, I will throw on 3-4 yard birds tomorrow afternoon.

After 3 weeks build time, I am hoping this thing performs 1/2 as well as it should. Wish me luck... 
 
Looks great, the only thing I'm worried about is your exhaust.  Just different, not that it won't work.  What are the dimensions on your exhaust?
 
Last edited:
The stack is 2" X 6" @ 34" above my chamber. 2X6=12 square inches a 4" stack is 4 X 3.14 (pie or cornbread, I forget) =  12.56 square inches... They are close enough, but I extended it to get the extra cubic inches I needed to draft... Or that's my way of thinking...
 
The season burn went.

I ain't saying it went good and I ain't saying it went bad. It just went.

I coaled up with Kingsford Blue. I began with 12# Minot style. I quickly learned that my Maverick ET73 dual probe thermometer has an issue. I was reading up to 90-degrees differential between sides of my cook chamber while a cheap dial oven thermometer read even hotter than the digitals. After swapping sides with the digital probes, they were way off in different directions (even taking into account that one or both were incorrect). I placed both probes within 1/2 inch of one another along with the analog thermometer, The digital probes were up to 65-degrees off from one another. I relied on my analog thermometer to be closest to the truth as I triple checked with an infrared thermometer.

I ran the temps up to 350-degrees easily enough and closed the dampener and saw the temps drop off as expected. I tossed the remainder 4# in on top of the existing coals just to see how everything would react. The dampener controlled the heat quite well. When it was pumping white smoke big time, I saw I had an issue with my cook chamber door not sealing up tight. I didn't see a big loss with the firebox door seal. It looked okay. I got distracted and left the smoker to season without me at 300-325-degrees as indicated by the analog on the firebox side. After about 4 1/2 hours the temps dropped to around 175-degrees.

All in all, I believe my main issue was bad instruments.

I'm gonna pick up a tube of high heat sealant and a couple of analogs and mount them in the door @ main grate level , then run the biscuit test tomorrow morning.

Here's pics of 'Big Smoke' running...

I started with the probes on the upper grate, but I soon moved them to the main grate and began trouble shooting. 


SmokingMeatForums.com is reader supported and as an Amazon Associate, we may earn commissions from qualifying purchases.
Clicky