WearEver Proofer smoker build

  • Some of the links on this forum allow SMF, at no cost to you, to earn a small commission when you click through and make a purchase. Let me know if you have any questions about this.
SMF is reader-supported. When you buy through links on our site, we may earn an affiliate commission.

bbde

Newbie
Original poster
May 30, 2014
17
12
SFBay Area
Hey There!

I've been thinking of ways to cook for large groups of people in a relatively low-maintenance way that's not tied to the grid.  Of course adding smoke to foods makes them even better : )  

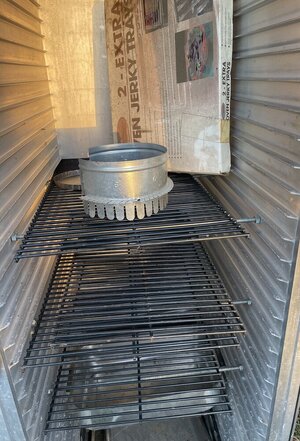
After craigslist searching and brainstorming various ideas... I found a baker's proofing cabinet!  It seems to be an ideal platform - so I picked it up.


Now, I'm looking to modify this into a vertical oven / smoker.  After poking around on the forums, I found several others who have done this.  In fact, figuring on this idea, and searching for others who may have done it is what led me to discover SMF.

I want to move forward with the "measure twice, cut once" consideration - so any input you all would like to send on over would be greatly appreciated!
 
I bought one of the northern tool propane burners - it arrived in the mail the other day.  I got the 5' standard hose & regulator assembly they recommend on the website too.


I'd like to be able to hot-smoke, and cold-smoke in this thing.  With higher temps, I'm a little concerned about the vinyl / rubber hose melting or something.  Anyone have experience with that?
 
Can you not use copper line to feed the gas in the cabinet and use rubber from a port outside the cabinet to the tank?  That would take temp concerns off the table.
 
Venting questions:

Smoke stack vs side vents?  What do ya'll think?  

I've seen some people use steel floor registers - for intake and exhaust - but it would be nice to keep this all aluminum.  One idea I had was to use the side vents from a stepvan.  Those may be too large though.  I was thinking it could act as a damper.

I've heard the condensation from a chimney is something to be aware of - any thoughts for or against?  Is this why some builds have vents on the side?

Also, does anyone have any Idea how much air throughput is needed for something of this scale for both hot and cold smoking?

dward51 - Thanks for the reply - I will look into that.
 
Hey guys,

So I picked up a couple parts, and sketched up some configurations.  Been weighing the options, and reading around the forums here and there.  I've been really busy lately, so haven't made much progress yet.  Plus the box is stashed at a buddy's house so I can just show up with it finished one day to keep my landlord happy... 

(Click on the image to see it larger)


Burner Soot

I've been using the northern tool burner for some camping events - and it puts out quite a lot of soot.  My pots and pans are black on the base with soot after cooking for not all that long.  I obviously don't want that in my food.  Has anyone found a solution to this?  It seems like it may be an in-efficient burn and maybe wasted propane?

Cast Iron

At first I was going to use a cast-iron skillet as a heat diffuser and maybe something to hold wood chunks - but I picked up a cracked cast-iron griddle from a friend.  I figured this would be perfect as a heat-sink to help with even heat distribution.  It has the added benefit of probably absorbing most of that soot off the burner as well.  It's around 17x24".

Venting

I've been reading and looking around the forums.  I know there will be creosote buildup, but it seems that those with less ventilation have more buildup, and those with more ventilation have more of a challenge controlling the temperature from top to bottom.  So, my guess at a good venting solution is roughly 4" hole in the top and bottom.  I picked up the 4" chimney cap pictured above because I don't want any downdrafts blowing out the flame... It gets pretty windy here even in protected backyards.  Also, planning on making a damper out of the material from the hole cut out of the proofer box.

For the air intake - figured I'd put a hole in the floor directly below the burner - inserting the mesh cap in the through-hole, then just placing the 5" butterfly vent over that.  I'm thinking it is enough ventilation, but who knows.  Thanks for the comment michael ark - I think this is what you were mentioning instead of using a large floor-register style vent.

Condensation

How big of an issue is it?  I guess the air cooling down when it goes up the chimney creates condensation - it collects soot and then drips back onto the food making it bitter?  

Racks

I found some of these doughnut glazing screens at a local restaurant supply store.  They're all stainless, and seem pretty awesome.  However if I cut it down to size, the mesh may fray over time with cleaning... and I think the wire is too small to weld new finished edges on it.  It would be ideal to build a smoker around these things without modifying them, but I already have this box, and don't really see the need to hack it apart.  (keep it simple)  I've seen some of the racks made out of angle iron and expanded steel, (like what Woodcutter uses in his) so I may go with something like that - just need to find a welder.


Smoke

I picked up the 5x8" AMPS with a variety of wood pellets.

Insulation

I would love to insulate this thing - but I may just get it up and running first.  Also, I've been looking around for good ways to finish it and haven't come up with anything that I'm happy with at this point.

Its getting closer... Just need to make some decisions on where to put that chimney.  Thanks for all your feedback!
 
You will want your exhaust near the top, or on the top. My GOSM has the exhaust right on the top. I have threatened to move it to the back of the smoker near the top. Condensation hasn't really been a problem, but rain has been. I leave my exhaust vents wide open when smoking. My air intakes are on the sides, there are two. These can be affected by the wind quite a bit and I often have to use a shied of some sorts to keep the wind out. I also use a cast iron griddle as a heat shield. You may want to consider getting the AMNTS 12" or 18" as they perform better in propane smokers. Your AMNPS will need to be outside the smoke chamber if you want it to burn properly. The tubes will smoke good inside the smoke chamber until you reach temps of 285° and higher. Then the pellets will start to burn and not smoke.
 
You have sent me a PM with most of these, but figured maybe someone else may want some input.

For cold smoking I would go with the tube. For hot smoking I would just do chunks on a cast iron skillet on your burner.

Vent top center for me. 4" intake and stack should be fine. Mine is almost 1.5 times the size of your proofer and I do fine with 4".

I agree with using the copper pipe on the inside if your temps run high and over time your gas line could get compromised and leak. If I keep mine, I will be doing a copper pipe swap.

For your shelves. Look at a restaurant supply store for racks that will fit. Your proofer should have standard shelving. You could find roasting racks that fit or you could use the racks on the sheet trays with the centers cut out.

I know when I first started using my burner I had the wrong regulator. Make sure you have a low pressure regulator. Lots of soot tells me you have a bad air and gas mixture. Under the adjustmet levers there are screws to adjust the air mixture. With only one on at a time adjust the air to get blue flames. The more orange/yellow the more soot you will have.

Looking forward to seeing your come to life.
 
This is an awesome project you have going here along with a great thread.  I have nothing constructive to add.  I just found this so interested and wanted you send a compliment.  LOL

good luck and keep the pictures coming.
 
Thank you to all for great feedback and generosity with sharing your knowledge - it has been a great help!

 - Progress update -

Re: suggestions with the amps - I had already purchased the 5x8 version - so I'll play with that for now, and maybe get one of the tubes in the future depending on how it goes.

First of all I ordered a bunch of parts.  Here's a breakdown for anyone who is interested.  

Special thanks to my buddy Mike who has allowed me to store and work on this thing at his house and for allowing me to use some of his tools and teflon tape!

note:  I used the low pressure regulator and hose recommended by northern tool when I picked up the burner.  However - when working out the fittings for the needle valve - it worked out better to have a 1/4" hose fitting - so I replaced the rubber hose for a stainless braided one.  I think it looks better anyways.


Then I rented a heavy duty drill - Special thanks to my buddy Tom for letting me use the 4" hole saw drill bit!


Working out the burner connection and air vent directly below.

note:  one thought I had for placing the vent below - is that propane is heavier than air - so if the flame goes out for some reason - the propane would just empty out of the smoker.  Also, I'll probably place some sort of aluminum sheet over the vent to control airflow as needed.


Installed chimney (exterior)


Installed chimney (interior)  

Notice the 4" mesh vent over the cap - this worked out to be a perfect fit to keep out bugs etc.  I placed a 1/2 size sheet pan below the chimney for condensation.


Finished burner location

Notice the 4" mesh vent through the floor to keep out the bugs.


Here's the propane connection side.  I installed the needle valve as well.


Here's an overall view.


Here's one with the door open.  

I picked up (4) 18x10" stainless food grates that are perfect food racks for this from a restaurant supply store.  They're a good size for cleaning in the sink as well.


Now it's time to tinker and play with cooking, working out temperatures, and especially the options and suggestions with the AMPS and wood chips.  I may insulate this once I figure out how best to use it and if it needs any other mods.  I'll see what I can come up with.  

For the time being - I think I'll be running it the way jarjarchef recommended; wood chips for hot smoking, and amps for cold smoke.

Thanks everyone - this thing is up and running!
 
Looks good.

One thing with the AMNPS and location. Make sure no drippings fall into it and it has plenty of O2, or it will go out. Ran into that issue with mine.
 
Nice set up .
icon14.gif
 
Looks great! If you have problems keeping the AMNPS going get the AMNTS. The AMNTS works better with propane. Once you get above 275 though the pellets combust, so then you'll need something like a mailbox mod. Either way like JarJar said protect them from the drippings.
 
Thank you to all for great feedback and generosity with sharing your knowledge - it has been a great help!

- Progress update -

Re: suggestions with the amps - I had already purchased the 5x8 version - so I'll play with that for now, and maybe get one of the tubes in the future depending on how it goes.

First of all I ordered a bunch of parts. Here's a breakdown for anyone who is interested.

Special thanks to my buddy Mike who has allowed me to store and work on this thing at his house and for allowing me to use some of his tools and teflon tape!

note: I used the low pressure regulator and hose recommended by northern tool when I picked up the burner. However - when working out the fittings for the needle valve - it worked out better to have a 1/4" hose fitting - so I replaced the rubber hose for a stainless braided one. I think it looks better anyways.


Then I rented a heavy duty drill - Special thanks to my buddy Tom for letting me use the 4" hole saw drill bit!


Working out the burner connection and air vent directly below.

note: one thought I had for placing the vent below - is that propane is heavier than air - so if the flame goes out for some reason - the propane would just empty out of the smoker. Also, I'll probably place some sort of aluminum sheet over the vent to control airflow as needed.


Installed chimney (exterior)


Installed chimney (interior)

Notice the 4" mesh vent over the cap - this worked out to be a perfect fit to keep out bugs etc. I placed a 1/2 size sheet pan below the chimney for condensation.


Finished burner location

Notice the 4" mesh vent through the floor to keep out the bugs.


Here's the propane connection side. I installed the needle valve as well.


Here's an overall view.


Here's one with the door open.

I picked up (4) 18x10" stainless food grates that are perfect food racks for this from a restaurant supply store. They're a good size for cleaning in the sink as well.


Now it's time to tinker and play with cooking, working out temperatures, and especially the options and suggestions with the AMPS and wood chips. I may insulate this once I figure out how best to use it and if it needs any other mods. I'll see what I can come up with.

For the time being - I think I'll be running it the way jarjarchef recommended; wood chips for hot smoking, and amps for cold smoke.

Thanks everyone - this thing is up and running!
Hi. I just bought the same proofing cabinet. I wanted to see if you would have done anything differently and what your thoughts are on the way this setup works? I love your setup. Thanks.
 
Last edited:
  • Like
Reactions: bbde
The smoker works great - I use the amps for cold-smoking large quantities. The hole I put in the bottom doesn't seem to provide enough air-flow for the burner, so I get a lot of soot. Picked up an old wood-stove and piped it into the back, so I use the heat from the burner, and smoke from the woodstove for low/slow cooks. I'm considering some additional mods which would be a different propane burner - something with a dedicated external air-supply, and/or one of those automatic pellet hopper / burners.
 
Chiming in as I’m getting a proofer for a built since my other unit failed.
Have you been able to control the temp? Any issues with the holdings with it not being insulated? I have a little different burner setup that I would be running however, pretty close to the same.
 
Chiming in as I’m getting a proofer for a built since my other unit failed.
Have you been able to control the temp? Any issues with the holdings with it not being insulated? I have a little different burner setup that I would be running however, pretty close to the same.
It's holding up great. I can hold temps pretty well - but I usually work around nice weather when it's un-insulated. Being a giant heatsink helps when cold smoking. I did insulate it for some time with some reflectix (bubble wrap) and that kept temperatures more even, and used a lot less propane, but I was storing it outside so the UV destroyed that stuff in a couple years. I'm planning to do a semi-permanent install under a carport once I sort out a new burner, and I'll insulate much better at that point - maybe with rockwool. As far as a platform, it is great - easy to clean, durable, lightweight to move around.

I'm interested in your burner setup, what you're using, and how it's going. Thanks for checking it out.
 
Looks great! If you have problems keeping the AMNPS going get the AMNTS. The AMNTS works better with propane. Once you get above 275 though the pellets combust, so then you'll need something like a mailbox mod. Either way like JarJar said protect them from the drippings.
Yes indeed - I found that over 250-275, the pellets do burn up really fast. Thanks for the tip, I did add the mailbox mod, but still feel like I need more airflow to keep the pellets burning. Sometimes it's great, other times it goes out pretty frequently.
 
I have a WearEver commercial size bread poofer that was going to be converter into smoker but cousin passed away and it never was converted … I would like to sell it if anyone is interested
 

Attachments

  • 7048425D-35D1-4123-B483-5274EC2E7B82.jpeg
    7048425D-35D1-4123-B483-5274EC2E7B82.jpeg
    173.7 KB · Views: 8
  • 1E8AF629-CB20-43B9-A2A5-B039272F0415.jpeg
    1E8AF629-CB20-43B9-A2A5-B039272F0415.jpeg
    99.5 KB · Views: 8
  • 2202FAD9-074A-41D6-9645-40F1CC7DC6AC.jpeg
    2202FAD9-074A-41D6-9645-40F1CC7DC6AC.jpeg
    56.2 KB · Views: 8
  • F3BA20AA-A2A8-49CA-B96D-CAB1DF5EAE1D.jpeg
    F3BA20AA-A2A8-49CA-B96D-CAB1DF5EAE1D.jpeg
    36.9 KB · Views: 8
SmokingMeatForums.com is reader supported and as an Amazon Associate, we may earn commissions from qualifying purchases.
Clicky