From Hog Leg to Easter Ham!

  • Some of the links on this forum allow SMF, at no cost to you, to earn a small commission when you click through and make a purchase. Let me know if you have any questions about this.
SMF is reader-supported. When you buy through links on our site, we may earn an affiliate commission.
Great Looking Ham!

Awesome that you have your family involved!

Thanks for the tour!!!


Todd
 
Pops that is going to be one great tasting ham I'm sure I can't wait to see the final sliced Qview and the rest of the process to get it there
 
Absolutely amazing Pops.
Looks great and nice to see the boys getting in on the fun
PDT_Armataz_01_37.gif
 
Ham looks great Pops but you guys can't kid me, Bubba was the one that did all the work, didn't he...
PDT_Armataz_01_37.gif
 
Yep, got to raise 'em right, lol!

Time to put the lard to use! My gorgeous wife helped me out and did all the work making the pie! 2 cups flour, 1 tsp salt, 5 tbsp ice water and 2/3 cup lard; cut in with a pastry cutter, roll into balls, flatten and roll out onto pie plate, add cherry pie filling and top crust, bake 40 min @ 400° until it's light brown and bubbly! Here's the Qview:

ingredients and lard:


Wife cutting in the lard:


Rolling OUT the dough (not In it, lol!):


Into the oven:


And voila, Cherry Pie!


Tomorrow, the ham!
 
Last edited:
Thats a great looking pie and I'll bet its gonna taste even better
PDT_Armataz_01_37.gif
I like the way ya'll are using all of that piggie
 
**Before starting, let me expressly and emphatically reiterate: meat knives are sharp! These procedures involve cutting close to the other hand and it can be extremely dangerous and result in bad cuts if you are not careful! You can leave these bones in the ham and remove after baking and/or just cut around them. This is to make carving easier. But, don't attempt these cuts unless you're familiar with meat knives and always always take extreme caution!**

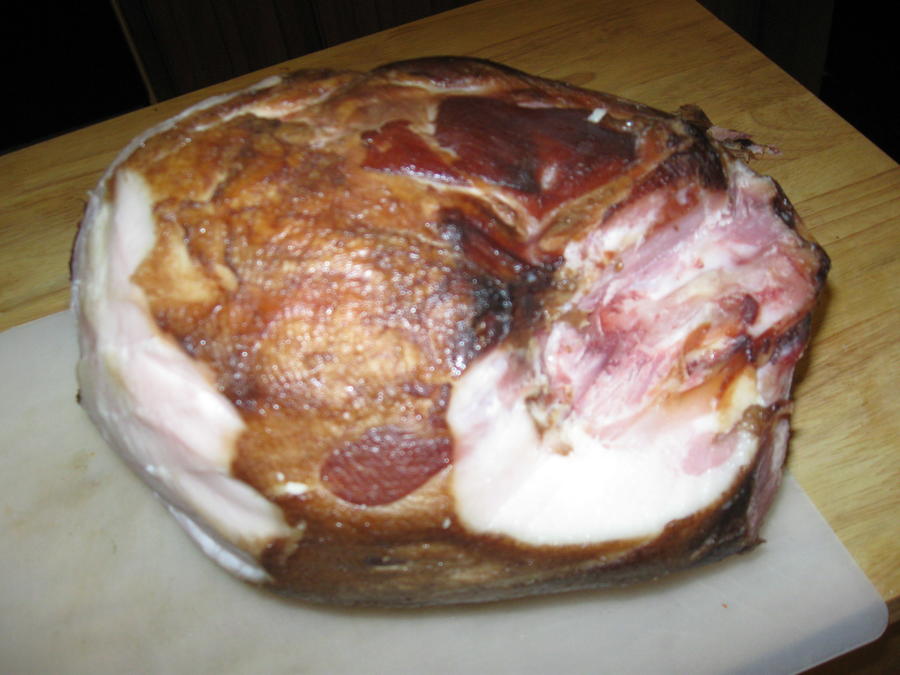
It's time to prep the ham. 1st, an overhead shot showing the ham whole:


(for reference)

Next, remove the skin:


Then clean out the top of the aitch bone:

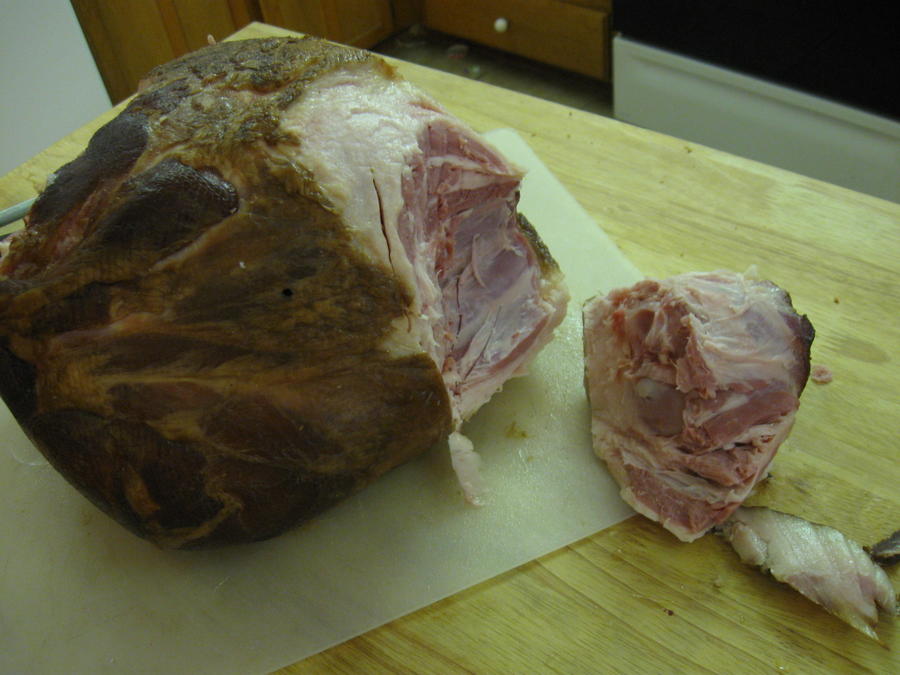
You have to find the hole in the aitch bone and cut the meat from it so you can get a finger in it to help pull on it as you remove it (or use a meat hook, which is safer!). Cut all around the aitch then start cutting a little deeper until you encounter the knuckle. You have to work your knife into the center of the knuckle joint to cut the cord connecting the two, then it's easier to loosen and remove the aitch:


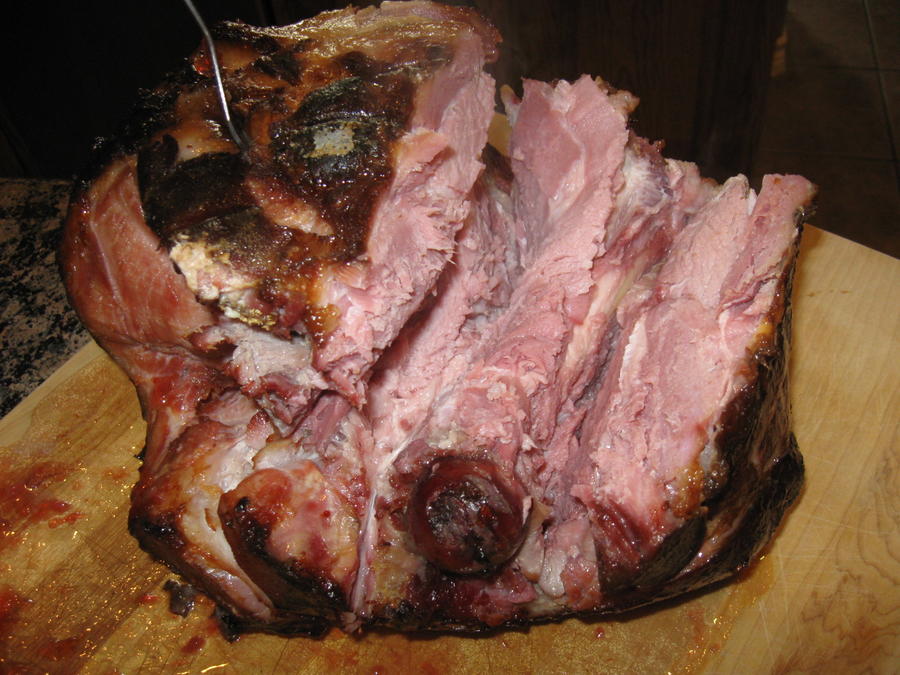
You can see the knuckle on the ham and the socket on the aitch bone in the pic above. Now, the bottom half of the femur has been exposed. (The rest of the pics I shot without the flash because they're so close up, removes some of the color from the pics, but you can tell from above that a nice pink color was obtained thru curing!) Now, for the top to remove the remaining piece of shank hock. You make a cut above the sirloin tip into the joint:


In the above picture, the sirloin tip portion is at the bottom of the pic and you can see a line going into the exposed fat on the right side of the ham. You must again use the tip of your knife to work into the top joint and cut the cord connecting the top femur knuckle to the hock shank, then remove it:


Closeups of the femur knuckles:

Bottom:

so the femur runs in this line on the ham (pump pic, pump is in aitch bone):


Removing the aitch and the shank hock when cold makes carving when it's hot out of the oven much much easier so you're not struggling with holding onto hot meat and bones!

I sectioned off the pic at the start to show the demarcations on it:


Hope this helps!

Next, the dinner! But, I wanted to post this early enough so if others needed to do this before starting their ham they'd see how.
 
Last edited:
Well, we got it up to temp and decorated it, here it is in and just out of the oven:

Glazed and scored:


decorated:


out of oven:


femur bone exposed (cut down line shown on ham graphic and around the bone:


femur bone (saved for PJ the Wonder Dog!)


Divided into it's three sub-primals: sirloin tip on bottom right, top round bottom left, and bottom round on top:


Slicing it up!


Showing off the slices! Dinner is served....


Did they like it? Well, here's what's left 10 min. later!


The ham was full flavored, but not too salty, even my wife (who is very salt sensitive) liked it immensely! The in-laws were all there too and loved it also, so it was a big hit and a good Easter ham. But, the one thing that everyone agreed on, it was tender. Melt-in-your-mouth tender, not rubbery or commercial. It was fully cured right to the bone, no brown uncured spots. The secret? Low nitrite, long soak time breaking down connective tissue. This was the 'claim to fame' of my dad's hams, they were balanced in flavor, salt and tenderness and this one was too! A commercially produced ham from start to finish can be done in 24 hours from kill floor to packaging. With that kind of rush you lose quality. But, the old-fashioned patient time-consuming way pays off every time! I have to declare this entire project 110% success!
I know I wax prolific and go to great lengths posting too many pics and I thank everyone for bearing with me, but I wanted to document this from start to finish, regardless of outcome. As I'd done thousands and thousands of hams, I kinda knew the outcome, but still there's always a slip from cup to lip, and every one is a unique processing experience! Thanks again for following my journey and enjoying the outcome!

Oh, the cherry pie? Yummmmmm.........


HAPPY EASTER TO ALL!
 
Last edited:
  • Like
Reactions: GaryHibbert
Pops, I have to say you did a tremedous job explaining and showing how to cure a ham. Thank you for sharing some of your knowledge with us. It is greatly appreciated.

Happy Easter.

Definate point for this one, the best thread in a while.
points.gif
 
Pops I hope ya'll had a great Easter I know ya'll ate well. I appreciate you taking the time and posting all the pics and drawings it allows a lot more understanding of how its done right and the results look awesome.
 
i can only agree with piney here... and dont ever think you overexplain or post too many pictures... that was a super great looking ham. hands down the best start to finish thread i have to see yet to date on this subject!!! thank you for sharing man!!!
points.gif
 
Pops, Excellent post! Points to you on for this. This something I will have to try someday for sure! thanks for the very informative post. I made some of the breakfast sausage from your posts from before using half deer and half pork, and it is very good!

Thanks,
Mark
 
Pops.. very impressive write-up and I agree with everyone else, the more pictures the better in my opinion
PDT_Armataz_01_34.gif
 
SmokingMeatForums.com is reader supported and as an Amazon Associate, we may earn commissions from qualifying purchases.

Latest posts

Hot Threads

Clicky