Couple pits

  • Some of the links on this forum allow SMF, at no cost to you, to earn a small commission when you click through and make a purchase. Let me know if you have any questions about this.
SMF is reader-supported. When you buy through links on our site, we may earn an affiliate commission.

05sprcrw

Smoking Fanatic
Original poster
Feb 7, 2012
324
18
Rural NE
Well I am new to posting here I have been lurking for about a year now and decided I should go ahead and get my feet wet. I have built a couple pits and will share a few pictures from the builds as well as the trailer I am building for my RF cooker I built.

So please bare with me I will get a few things posted up here for you. Also thanks for all of you who have posted up it has helped me a ton with my builds as I went I was able to figure out a lot of it from doing searches here.

Stumps Clone cooker

First test fire with some ribs


And a few samplings cooked on it:
Brisket rubbed and ready:

burnt ends ready to go back in the cooker

sliced up and ready to serve

Some bread to kill the time and help stay awake in the middle of the night cooking.

And the new summer sausage I made last night.
 
Last edited:
  • Like
Reactions: rabbithutch


Brisket rubbed up


Pit being fired up


The cooker with brisket in place being closed up for the long haul.


It throwing the TBS


Brisket pulled at 192°


Point separated from flat to make burnt ends


Burnt ends coming out of cooker and flat sliced after 1 1/2 hours


And some venison meatballs smoked for a while as well

 
  • Like
Reactions: rabbithutch
Thanks guys I am in Nebraska about 30 min north of Lincoln and 30 min west of Omaha.  I am currently in the middle of building a trailer for the RF pit just gotta buy the axle steel, hubs and do the lighting and it will be ready to go.
 
Nice builds and it looks like they cook well - congrats 
 
Welcome !!! It looks like you have done your homework well...Dang nice smokers...Nothing like making a grand intro...Nice job !
 
icon_cool.gif


Man oh Man you have some great looking land and some great looking Q and even better some fabulous looking smokers. Do you want to build me one? 
 
Thanks for the compliments guys, I learned a lot off of here and did a lot of research before building but it all went smooth and both cook very well. 

I have two other pits I need to build for other guys just waiting on them to bring me the materials. The trailer I am building for the r/f is 3/4 of the way done with actual fab work then I need to wire it up, paint it, and buy tires (that is the killer). I will say this though just like the cooker its all 1/4" thick corten steel (excpet for the tank on the cooker, the tread plate and the 2 4x10 frame rails). I put a tandem equalizing suspension under it with 3,500lbs axles, a 7,000lbs bulldog coupler and 4" led brake and running lights with 4" led back up lights angled towards the ground.
 
 
Last edited:
And I do have a complete list of parts and drawings on how I made the stumps style cooker if anyone is wanting to build one but doesn't know how to approach it. I am an engineer by day so it is all done professionally and no hack job should be simple to follow if you have a welder and some free time it doesn't take too long. I built my stumps start to finish in about a week of evenings and 1 whole weekends worth of work.
 
Last edited:
Well its been a long time since I have updated my own thread so I figured I better add a little more to it.

I have been slowly building a trailer when I have time. I recently bought my first place and have had my hands full so not a lot has been accomplished since then but I am now on my last big push to get the trailer done.
 

I am doing a few "extensive things" with the wiring that most people will never notice but you other trailer builders out there might appreciate it. Using some relays, capacitors, and diodes I was able to make a single pole led bulb work as running lights but also have a blinker priority circuit that will allow it to function as a mid turn bulb as well.  I wanted to use a trucklite 3/4" button light that we use at work on our semi trailers. I also am doing dual tail lights in the back the insides will strictly be brake lights only with the outer two will be brake lights with a blinker over ride so if that side has a blinker on it will have priority and blink like normal. When not blinking it will function as a break light as normal. I also have it so that my left turn, right turn and brake signals are separated so that I can get things to work exactly as I wanted. 

They took some thinking, but I had just enough electrical engineering theory in college that allowed me to figure it out. I am also proud to say that I tested it out this weekend after making a full blown wiring harness that I can just put in place after it is painted, and everything worked 100% and was timed right to exactly match the 1/4 sec on 1/4 sec off cycle that a thermal flasher (blinkers) have. I forgot to get a picture of it but I will take a picture of the wiring harness soon and update the thread.

Here are a few pics that I do have of the build. The build moved along quickly and I forgot to get any pictures before this point.

Rear of the trailer it looks like things may be cockeyed on the trailer but they are level and square except for the back up lights that are meant to be angled down to light up the ground better for backing purposes.


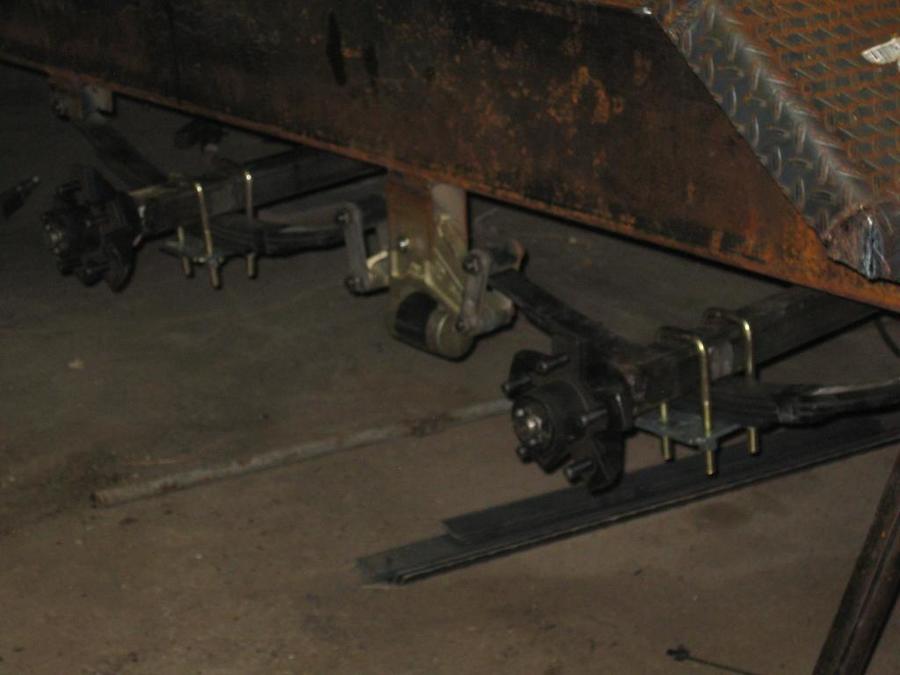
Custom axles all welded up and ready to go two 3500lb axles with a dexter ex flex equalizers in place as well as never fail bushings so I don't have to worry about the bushings failing.

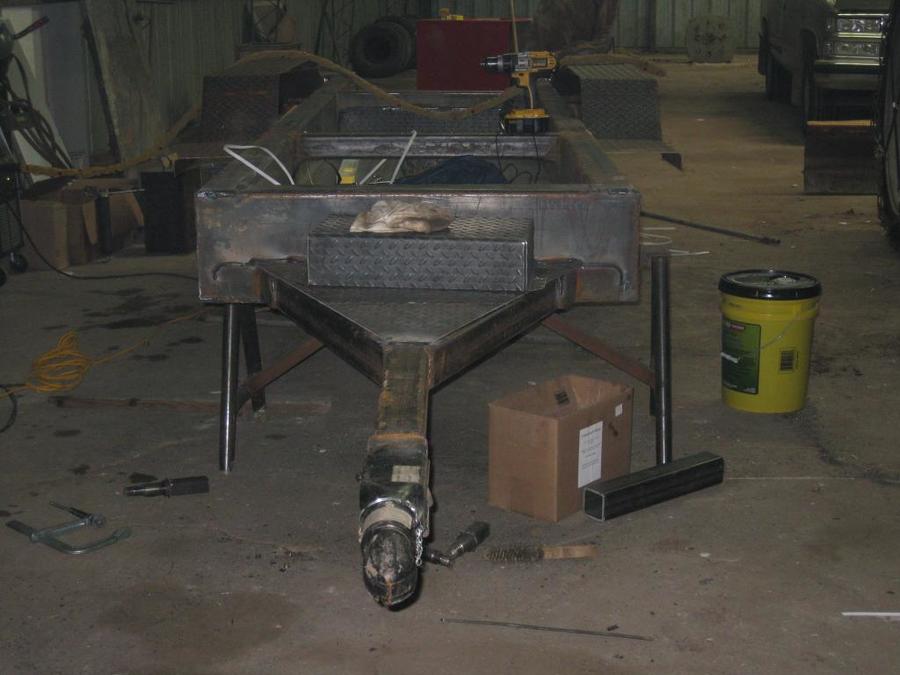
Front of trailer will the "extensive wiring" will end up so if I ever need to repair it, I will have easy access. Also shows the 7,000lb bulldog coupler.


A few action shots as well.


Set the trailer down on the ground for the first time to take it out for a  short tow to make sure it wanted to track straight and ride nice. I didn't have any issues so its back on the saw horses to get all the welding slag off before paint.


I am hoping here in the next couple weeks to get the trailer painted, wiring in and the cooker set on and ready to travel. Come hell or high water it will be road worthy come Memorial weekend for a big cook out I have planed.
 
Last edited:
Thanks it only took me 2 years to get it this far from when I first got the tank but its been a heck of a learning experience. There are a few things I am going to go back and fix on the cooker but they are very very minor things that I didn't learn about until being on here more.
 
Well guys I got a bit more done on the trailer, I have got the wiring harness done that was a pain in the butt. But now it will be a complete harness with no loose wires to get caught up and will allow for a nice quick install this weekend hopefully.

The octopus looking apparatus in the top left is the relay bank with diodes and capacitors to get certain lights to work as running lights and blink as mid turns with priority as well as give me brake lights and with blinker over ride priority.
http://s303.photobucket.com/user/05_sprcrw/media/IMG_2286_zps63b8bad4.jpg.html

Cleaning up the slag on the welds making sure to get it all with a wire wheel before I take it out to prep for paint.

http://s303.photobucket.com/user/05_sprcrw/media/IMG_2277_zps975f5188.jpg.html

http://s303.photobucket.com/user/05_sprcrw/media/IMG_2283_zps97b807c2.jpg.html


Just got done being De-greased and zinc phosphate treated ready to be moved back in and painted.
http://s303.photobucket.com/user/05_sprcrw/media/IMG_2318_zpsd0db651c.jpg.html

I got it painted this weekend, it was painted with por 15 (stuff is nasty to get off your hands, still on my hands now) and then I top coated the por 15 with chassis coat another por 15 product. This was my first time using por 15 but I have a feeling I will be using a whole lot more of it on future products I really really like this paint. I am not a painter by far but I thought it turned out pretty well considering I was in a very very poorly lit machine shed when spraying it.

It is just 5 hours after the paint so its still curing but I had to move the trailer so figured snap a few pics. That is why it looks streaky some of the spots I got a little close with the gun but it looks much more even already and its curing slow because of our cold weather.

http://s303.photobucket.com/user/05_sprcrw/media/IMG_2331_zps21459f3e.jpg.html

Yes many a beer were harmed in the making of this trailer and cooker but its soon to be done.
http://s303.photobucket.com/user/05_sprcrw/media/IMG_2342_zpse0df7f50.jpg.html

And the stable of welders that made this happen used both on the the trailer just depended what I was working on and the mood I was in for the day. From left to right Miller two-fifty twin ac/dc stick welder, Hobart Ironman 230, and then my oxy/acetylene setup with purox cw300 body and cw202 torch.
http://s303.photobucket.com/user/05_sprcrw/media/IMG_2341_zpsa152145a.jpg.html
 
SmokingMeatForums.com is reader supported and as an Amazon Associate, we may earn commissions from qualifying purchases.

Hot Threads

Clicky