
Hi all!
I'm new to this site but not to the activities. Recently I got a bug to start making salami and the holy grail, a dry cured pork leg. The pork leg will be down the line but this weekend is salami weekend! First I had to make a curing chamber. I decided to go with a custom designed system vs. the normal Johnson controls and humidifier with humidistat setup. This give me some more insight and control into what is happening inside.
I built the sensor system using an arduino mega, a DHT11 humidity and temperature sensor, outlets, a bunch of wire and solder, relay shield, ethernet shield, pair of netgear range extenders, and some general building supplies.
The system pictured below is version 1.x and needs a few more modifications before I consider it 'done' but it works as it is supposed to. Version 2 will probably be cleaner looking and not so diy in nature.
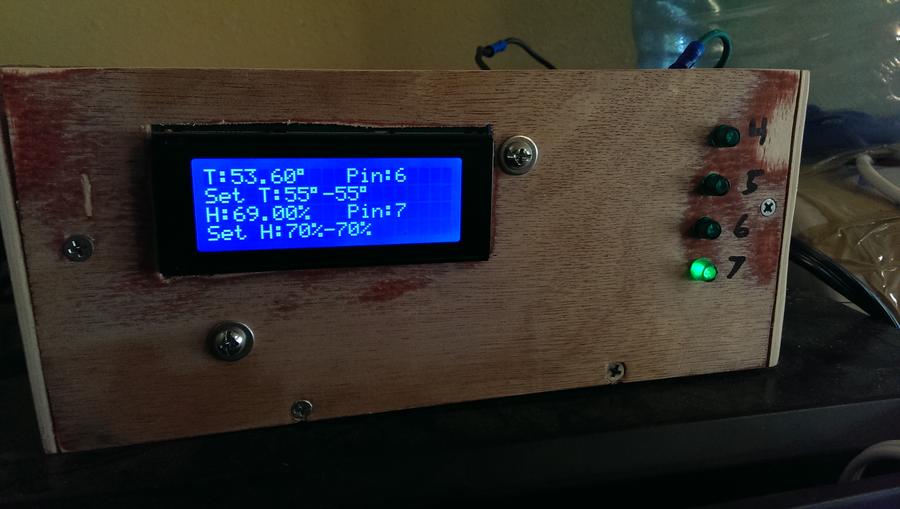
This picture is of the front of the unit. It displays the current temperature, current humidity, what the temp range is (I have the code set up so that the temp triggers the fridge 'on' once the warmer threshold is hit and turns off once the colder one is hit), and what the humidity range is.
There are also 4 leds there to show me what outlets currently have power going to them. Right now in the pic 'pin 7' is on and that is the humidifier, which you can see in the lcd output that the humidity is at 69% and it is set at 70%, so that is correct.
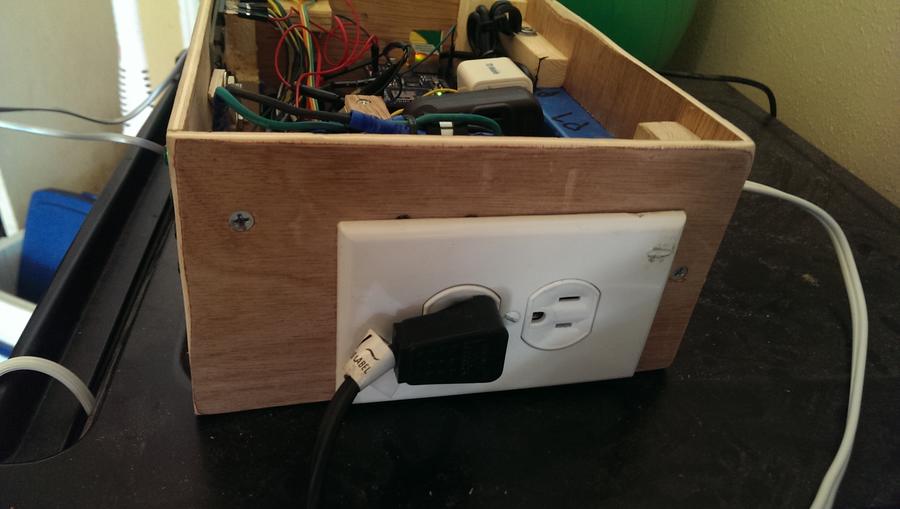
This pic is the side view where the outlet is (there is another outlet on the back, looks the same as the side)
This is the other side view, where all of the external wires come in.
The yellow is a network cable, that allows the device to connect to the internet
the black just below the yellow is the usb cable for providing power to the unit.
The three smaller wires on the top right are the three wires for the temp sensor, these run to the inside of the fridge
The big black square, carbon fiber looking thing is a safety switch that cuts the power to the whole thing. I put that safety on it becasue I had it lying around and it looked pretty cool. :)
and the bottom right is the power cable coming in.
Here is an inside pic. You can see the netgear wireless range extender (it is in my garage and the wifi card was quite a bit more, so I used a wired ethernet card with a pair of range extenders that weren't being used.
You can also see all of my awesome wiring! Like I said, it is a little rough looking but it all works. :)
And the inside of the fridge, with the temp sensor hanging down and the humidifier sitting in there.
Now for the real fun stuff. The main reason I wanted to do this was becasue I wanted to see the data behind what was going on in there.
Here is a link to my google spreadsheet. The device auto-uploads all of its sensor readings to a spreadsheet that I can see from anywhere.
the first sheet is the raw data, the second (called 'results') are a few graphs and whatnot of the data.
When I wrote this up it had been running pretty constantly for 42 hours and had an average temp of 53 degrees F (was set on 55) and an average humidity of 74% (was set on 70)
Future additions:
In the next few weeks I'm going to track the data changes and make changes in the code to make it more reliable.
I'm going to add weight sensors that will each hold a separate link of salami. I'm guessing I can fit 5-6 sensors in there. So that I can take a reading on the salami's weight every 5 minutes for a month. More to come but those are the ideas for now!
Anyone else think of anything I can track?
I also have a smoker and am thinking of building a similar system that tracks ambient temp from a few places in the smoker, the inside temp of the meat and outside ambient temp.
I'm new to this site but not to the activities. Recently I got a bug to start making salami and the holy grail, a dry cured pork leg. The pork leg will be down the line but this weekend is salami weekend! First I had to make a curing chamber. I decided to go with a custom designed system vs. the normal Johnson controls and humidifier with humidistat setup. This give me some more insight and control into what is happening inside.
I built the sensor system using an arduino mega, a DHT11 humidity and temperature sensor, outlets, a bunch of wire and solder, relay shield, ethernet shield, pair of netgear range extenders, and some general building supplies.
The system pictured below is version 1.x and needs a few more modifications before I consider it 'done' but it works as it is supposed to. Version 2 will probably be cleaner looking and not so diy in nature.
This picture is of the front of the unit. It displays the current temperature, current humidity, what the temp range is (I have the code set up so that the temp triggers the fridge 'on' once the warmer threshold is hit and turns off once the colder one is hit), and what the humidity range is.
There are also 4 leds there to show me what outlets currently have power going to them. Right now in the pic 'pin 7' is on and that is the humidifier, which you can see in the lcd output that the humidity is at 69% and it is set at 70%, so that is correct.
This pic is the side view where the outlet is (there is another outlet on the back, looks the same as the side)
This is the other side view, where all of the external wires come in.
The yellow is a network cable, that allows the device to connect to the internet
the black just below the yellow is the usb cable for providing power to the unit.
The three smaller wires on the top right are the three wires for the temp sensor, these run to the inside of the fridge
The big black square, carbon fiber looking thing is a safety switch that cuts the power to the whole thing. I put that safety on it becasue I had it lying around and it looked pretty cool. :)
and the bottom right is the power cable coming in.

Here is an inside pic. You can see the netgear wireless range extender (it is in my garage and the wifi card was quite a bit more, so I used a wired ethernet card with a pair of range extenders that weren't being used.
You can also see all of my awesome wiring! Like I said, it is a little rough looking but it all works. :)

And the inside of the fridge, with the temp sensor hanging down and the humidifier sitting in there.

Now for the real fun stuff. The main reason I wanted to do this was becasue I wanted to see the data behind what was going on in there.
Here is a link to my google spreadsheet. The device auto-uploads all of its sensor readings to a spreadsheet that I can see from anywhere.
the first sheet is the raw data, the second (called 'results') are a few graphs and whatnot of the data.
When I wrote this up it had been running pretty constantly for 42 hours and had an average temp of 53 degrees F (was set on 55) and an average humidity of 74% (was set on 70)
Future additions:
In the next few weeks I'm going to track the data changes and make changes in the code to make it more reliable.
I'm going to add weight sensors that will each hold a separate link of salami. I'm guessing I can fit 5-6 sensors in there. So that I can take a reading on the salami's weight every 5 minutes for a month. More to come but those are the ideas for now!
Anyone else think of anything I can track?
I also have a smoker and am thinking of building a similar system that tracks ambient temp from a few places in the smoker, the inside temp of the meat and outside ambient temp.


