- Feb 24, 2011
- 116
- 11
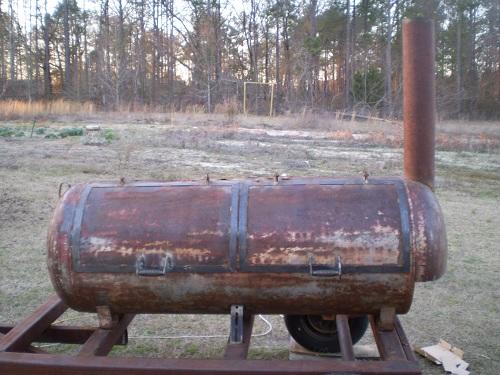
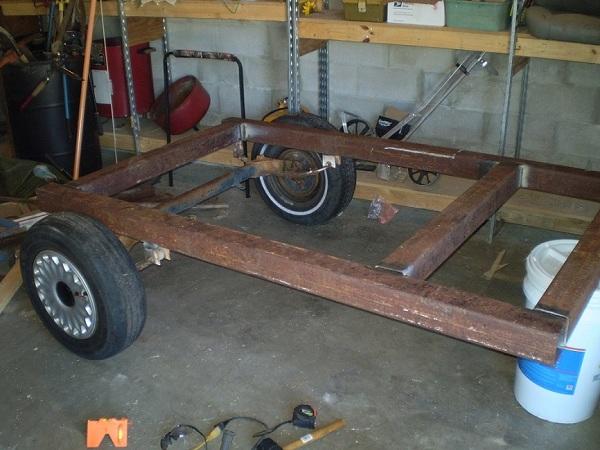
Let me first say how great i think this forum is and how friendly and informative everyone on here is. Information i have gathered here has given me alot of the inspiration for me to tackle my first smoker build and first time EVER welding. I began searching for materials over a year and a half ago.A year ago I jumped the gun on a unfinished smoker i found on craigslist. Bought a tank on a boat trailer. It was out of town and had a buddy of mine pick it up for me. Got it home and after doing alot of research i quickly realized the tank nor the trailer would fit my needs. The tank was 1/8" and the trailer was an old jet ski trailer. Luckily i was able to sell the unfished rig and get my money out of it. Not long there after i found a 250 gal tank for 40 bucks. The next week i found a guy an hour away selling 2 cut off pieces of 1/4" plate. The dimensions of one of the plates was 31" x 86" which would be perfect for my RF plate once it was scaled down some. There was also a piece included that was 19"x 86 which is going to be my firebox on a 35 gal RF i plan on starting once this one is completed. I got both plates for $50 dollars total. I then started looking for some material for the firebox. I found a scrap yard an hour away and went there one saturday morning. They had a cut off piece of 3/8" plate that would give me (6) 27" square pieces and still have 4 or so square feet of plate left over. I picked this up for $150 bucks. Next i had to find a trailer. All trailers were out of my price range. Luckily a good friend of mine offered me 33 feet of 4"x4"x 1/4" tubing. Slight over kill but i knew it would make one stout trailer. Best part about it was it was free! Next i located an axle and wheels off of a minivan from a fellow across town for $40 bucks. I had the bulk of my materials to start the build so off i went,
Through all of my reading on this forum i have seen alot of awesome builds and awesome tools. Unfortunately i do not have any tools such as hoists, jacks, plasma cutters, torches, etc. I have a welder and a angle grinder. Its a good thing i am patient and dont mind working.
The 4x4 tubing was just enough for me to make the exact size trailer frame i wanted. I wanted to cut the tubing at angles to join it but i did not trust myself to make those precise cuts and waste any materials so i squared my cuts off. I have (2) 4x4 supports for the middle of the frame. I added the 2nd one after the pictures were taken. This is once i got the basic frame tack welded together and the stylish minivan wheels attached to the frame!
After i was pleased with the basic outer frame i added the inside supports. Next i had to find some material to make the tongue with and supports to tie into that under the trailer frame. Once again i had a really awesome friend help me out. He lives out of town and comes hunting with me a good bit during deer and turkey season. He had access to a 10 ft piece of 2x4x1/4" tubing and picked it up for me i guess as a thank you! I knew the 10ft wouldnt be quite long enough but it would give me a great starting point. I wanted my tongue to be 4ft from the end of the frame and tie in under the last support in the middle of the trailer frame. Once i did that i was left with roughly 4ft of tubing. I decided to use that to use it for a side angled support for the tongue and tie it into the same middle support as the tongue. Right now i dont have the other support but i am keeping my eyes open for one. If it comes to it i can use some material i have in the shop but i would like for it to match.
As you can tell from my welds i am definitely a beginner. I have a 220 v Hobart Handler 180. I dont plan on this cooker ever leaving my house. Even so when i am done with the build i am going to have someone with more welding experience examine my structural welds and beef them up if they are not adequate.
This next part was really fun. I had been dreading it since before i started the build. How was i going to get the tank on the trailer with no equipment. When i loaded the tank when i bought it i had several friends along with an electric winch. I didnt have any of that so i waited until my brother could come over and we grabbed a T post out of the garden, fed it through the handles on the side of the tank and lifted the front end on the trailer, then the back it. It was pretty tough and you can see what it did to the t post. Im not sure it could have handle much more weight.
From where i had the back end of the trailer frame positioned to support the tank feet, there was a voided area from where i wanted to put the firebox. I had a piece of 2"x2"x1/4" tubing laying around. i decided to tie it in to the back of the frame and tie in the back of the firebox to the other side of it. It worked out really good because i was planning on putting the firebox on the back of the tank seam anyways.
I had a couple spare pieces of steel laying around so i decided to put some angled supports and tie in the tank to the middle supports. I figured i would need more support than the feet of the tank welded to the frame for the next step.
The next step was to cut into the tank. I was very nervous about this. I had filled the tank with dish soap and water the day i brought it home and let it sit for at least a week and emptied it. Then a few months later i decided to do it again, Fast forward many months when i knew i was about to start the build i filled it again and emptied. I kept thinking to myself how would i safely check to see if there was still gas in the tank, even though there "shouldnt" be after all valves being open for a year and being submerged 3 different times. I drove the tank across the street to some of my property in the woods, Got the trailer off the truck and put a long piece of straw bailing twine into the valve and lit it and sped off several hundred yards down the road, pulled out the binos and watched the flame disappear into the tank,...no explosion. Im good, so i brought the tank home and started the very long and tedious process of cutting with my grinder. I was absolutely going through a ton of disk, much more than i have up to this point. WHen i got the piece cut out i saw why. I was cutting through the tank and a piece of 1/4" flat bar of some sort that was overlapping the seam by 1/2" on both sides. Good news is the tank walls are 1/4".
This is as far as i have gotten with the build. Yesterday i went by a local steel stop and picked up a 5x10 piece of #9 expanded metal, 1" sq tubin, 1/8" x 1 1/2" flat bar, and 1 1/2" angle iron. I was also going to get them to cut out the inlet holes in my fire box and cut out the firebox to cook chamber opening, along with 8 hinges i had traced out, but they wanted to charge me $220 dollars. They said the plate had rust on it and they would not be able to use their laser? I think i know someone with a torch. I may see if i can pay them to do it. We have a local bbq competition March 1st and 2nd for St Patricks day . I was hoping to have this done to enter but i do not think i will make it this year! As usual all input is welcome!
Through all of my reading on this forum i have seen alot of awesome builds and awesome tools. Unfortunately i do not have any tools such as hoists, jacks, plasma cutters, torches, etc. I have a welder and a angle grinder. Its a good thing i am patient and dont mind working.
The 4x4 tubing was just enough for me to make the exact size trailer frame i wanted. I wanted to cut the tubing at angles to join it but i did not trust myself to make those precise cuts and waste any materials so i squared my cuts off. I have (2) 4x4 supports for the middle of the frame. I added the 2nd one after the pictures were taken. This is once i got the basic frame tack welded together and the stylish minivan wheels attached to the frame!
After i was pleased with the basic outer frame i added the inside supports. Next i had to find some material to make the tongue with and supports to tie into that under the trailer frame. Once again i had a really awesome friend help me out. He lives out of town and comes hunting with me a good bit during deer and turkey season. He had access to a 10 ft piece of 2x4x1/4" tubing and picked it up for me i guess as a thank you! I knew the 10ft wouldnt be quite long enough but it would give me a great starting point. I wanted my tongue to be 4ft from the end of the frame and tie in under the last support in the middle of the trailer frame. Once i did that i was left with roughly 4ft of tubing. I decided to use that to use it for a side angled support for the tongue and tie it into the same middle support as the tongue. Right now i dont have the other support but i am keeping my eyes open for one. If it comes to it i can use some material i have in the shop but i would like for it to match.

As you can tell from my welds i am definitely a beginner. I have a 220 v Hobart Handler 180. I dont plan on this cooker ever leaving my house. Even so when i am done with the build i am going to have someone with more welding experience examine my structural welds and beef them up if they are not adequate.

This next part was really fun. I had been dreading it since before i started the build. How was i going to get the tank on the trailer with no equipment. When i loaded the tank when i bought it i had several friends along with an electric winch. I didnt have any of that so i waited until my brother could come over and we grabbed a T post out of the garden, fed it through the handles on the side of the tank and lifted the front end on the trailer, then the back it. It was pretty tough and you can see what it did to the t post. Im not sure it could have handle much more weight.


From where i had the back end of the trailer frame positioned to support the tank feet, there was a voided area from where i wanted to put the firebox. I had a piece of 2"x2"x1/4" tubing laying around. i decided to tie it in to the back of the frame and tie in the back of the firebox to the other side of it. It worked out really good because i was planning on putting the firebox on the back of the tank seam anyways.

I had a couple spare pieces of steel laying around so i decided to put some angled supports and tie in the tank to the middle supports. I figured i would need more support than the feet of the tank welded to the frame for the next step.

The next step was to cut into the tank. I was very nervous about this. I had filled the tank with dish soap and water the day i brought it home and let it sit for at least a week and emptied it. Then a few months later i decided to do it again, Fast forward many months when i knew i was about to start the build i filled it again and emptied. I kept thinking to myself how would i safely check to see if there was still gas in the tank, even though there "shouldnt" be after all valves being open for a year and being submerged 3 different times. I drove the tank across the street to some of my property in the woods, Got the trailer off the truck and put a long piece of straw bailing twine into the valve and lit it and sped off several hundred yards down the road, pulled out the binos and watched the flame disappear into the tank,...no explosion. Im good, so i brought the tank home and started the very long and tedious process of cutting with my grinder. I was absolutely going through a ton of disk, much more than i have up to this point. WHen i got the piece cut out i saw why. I was cutting through the tank and a piece of 1/4" flat bar of some sort that was overlapping the seam by 1/2" on both sides. Good news is the tank walls are 1/4".


This is as far as i have gotten with the build. Yesterday i went by a local steel stop and picked up a 5x10 piece of #9 expanded metal, 1" sq tubin, 1/8" x 1 1/2" flat bar, and 1 1/2" angle iron. I was also going to get them to cut out the inlet holes in my fire box and cut out the firebox to cook chamber opening, along with 8 hinges i had traced out, but they wanted to charge me $220 dollars. They said the plate had rust on it and they would not be able to use their laser? I think i know someone with a torch. I may see if i can pay them to do it. We have a local bbq competition March 1st and 2nd for St Patricks day . I was hoping to have this done to enter but i do not think i will make it this year! As usual all input is welcome!
Last edited: