My Brick Smoker

  • Some of the links on this forum allow SMF, at no cost to you, to earn a small commission when you click through and make a purchase. Let me know if you have any questions about this.
SMF is reader-supported. When you buy through links on our site, we may earn an affiliate commission.

jaez

Fire Starter
Original poster
Sep 3, 2014
38
15
Reno, Nevada
So, I have been plotting how to get this thing going and have stalled out on the firebox door because I don't want to spend a small fortune on something that seems to me to be a simple thing...

The plan started out as a recycle of bricks that I took off my fireplace surround.  I quickly decided that cinder blocks would be easier to use and still cheap since I only needed like 18 of em =)  I am planning on building the firebox out of cinder blocks, pour a cap on top (with a hole to allow heat/smoke up to the smoke chamber), and then build a wood smoke chamber on top of that out of cedar fence boards.

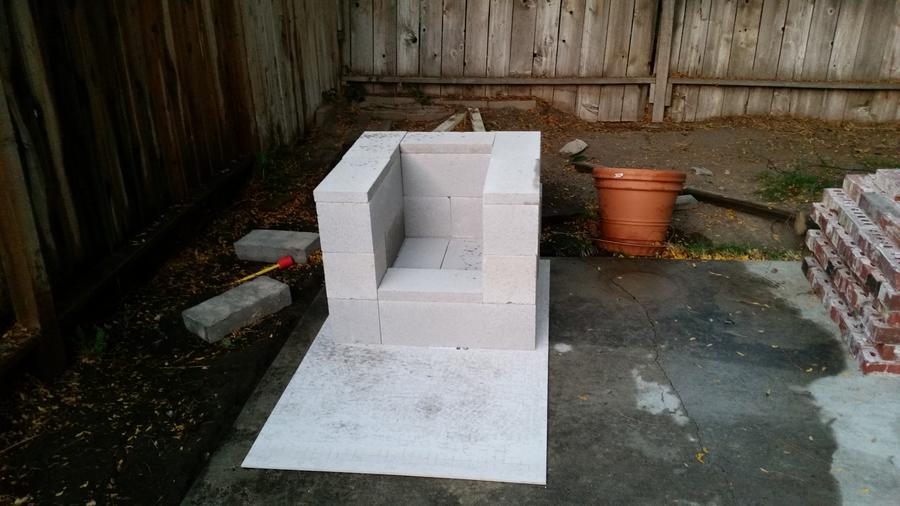
Here is the dry fit to get an idea of the dimensions...


On the first day of mortaring I found out how much I sucked at getting everything plumb and level with even gaps between bricks...  I thought one 60-lb bag of mortar would be plenty... hah!

Here is what I had after the first day of laying brick...


I goofed around with my air idea and decided that it will probably work out fine.  There are three 3/4 inch black pipes with a homemade sliding baffle to control the air intake.  I keep thinking that this will not be enough, but then on my charbroil offset I have the baffle almost totally closed when smoking.  This is the first build and I should be able to dismantle and rebuild fairly easy if needed.  I have an air hammer to bust out the mortar =)

Here it is after getting everything mortared in place... I probably should have put in a lintel, but I figure the door frame will do that job =)


Here is a closeup of my masterful git-r-dun air intake and baffle... hah


That's just a square sheet of flashing that I bent and drilled holes in.  The slider is just a strip that I cut off and bent to fit.  Works pretty well for only costing a buck =)  The pipes extend in to the firebox where I will have a raised basket on some rebar so that the air is under the basket.  I should have made some sort of ash cleanout because reaching in to the middle to scoop it out when it gets full is going to get old..

Top down look into the box..


Next is framing out the cap that I will be pouring.  I'm going to prop up some plywood in the center and 2x4s around the top so that I can get a good 3 inch cap.  I'm going to place an old chimney starter in the middle to allow heat and smoke up into the chamber above.  It's 6.5 inches in diameter with holes in the bottom.  

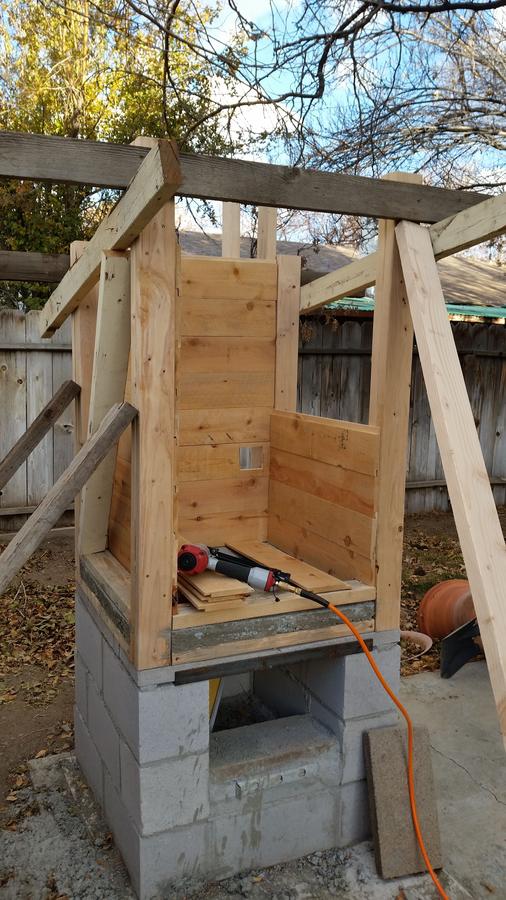
The wood chamber on top will be made out of cedar fence boards that I will probably try and cut shiplap so that they fit better.  I'll put a chimney out the back and extend it up above the roof, which should be around 6 feet high when I get done.  Inner dimensions should work out to be close to 2' by 2' and I'm going to have 2 shelves spaced 8" apart.  I'll easily have a 2' vertical smoke chamber (almost 4' for cold smokin) in case I want to hang anything at a later point.

I think that about covers it for now.. I'll post more as I go =)
 
Last edited:
  • Like
Reactions: crazymoon
I'm with David.  It looks good.  

Mortar doesn't go as far as you might think.  If you lack air coming in you can always put a vent in the door.  Just a thought.

popcorn.gif
 
That was the original plan, but the fab guys tend to think that is a "complicated" addition to a simple rectangular door.. complicated means an extra $200-300... heh
 
In other words he didn't want to put the hour of labor into doing it.     It doesn't take a lot of air to feed a small fire.   Once I'm up to temp mine levels out with just a small crack in one side.   Every so often the fire will get to low on me.  I simply open the vents and crack the door till it gets going again.  
 
I got to spend some quality time on the build this weekend, but unfortunately I was battling my crappy off-set at the same time and didn't get any play by play pics of either.  It will be pretty dark out tonight when I get home so pics will have to wait until tomorrow morning.  

In the mean time I will let you all know what was accomplished.  I cut some angle iron and made a lintel for the firebox door, cut the corner posts for the smoke box and made a rough fit on top of the firebox.  Then I made the form to pour the firebox cap and mixed up a few bags of cement.  Homer-de-pots didn't have any of the higher hear ceramic clay infused cement mix so I went with just a high strength mix.  I started to mix the cement right as the sun was disappearing and as luck would have it, right as the pork loin was reaching temp.  

I rushed to get the first bag mixed... it was too dry when I shoveled it in place, but I thought the next batch would moisten it up and fill any gaps.  Wrong... but more on that later..  The second bag was waaaaay too wet and I had to thicken it up with part of the third bag to get a decent consistency.  Slopped that in place and then mixed up the last bag (after taking the loin off and wrapping it in foil) in total darkness.  This was worse than the second bag and I poured off the excess water since I didn't need or have any more dry mix.  Went on like soup and I used a spare chunk of 2x4 as a float to remove air pockets (in the top).  Got the excess screed off and thought it should work seeing as I couldnt see anything and was going by feel at this point.

The next day I removed the outer form to see what the condition of the cement was through to the bottom.  The bottom layer is like coarse gravel... I doubt that it will hold up to the first fire I put under it... will probably be shoveling out quite a bit of cement with the ashes..  Oh well, if it works, it works.. if not I can make due without

Will post pics when I can =)
I totally understand.  Some days you feel like the bug, some days you feel like the windshield. 

It should be fine.  I look forward to seeing your pictures.  
 
I'm not sure why they are sideways.. I saved them vertical.. 

First pic is just after removing the outer form.  Second is a close up before I removed the inner form.  Have to mix up a little more to fill in some gaps that I noticed, but I should be good to start slappin on the boards.  Going to spend some time cutting a shiplap into the cedar fence boards that I will use to skin the top so that if they shrink I don't have huge gaps anywhere.

I'm thinking about incorporating the chimney in the back wall and having the exhaust pickup below the rack level.. hopefully that will even out the temps from top to bottom.


I made some progress on the top of the smoker over the weekend.  Even though my stupid nail gun decided to stop retracting the firing hammer and I had to physically cock it using a pointy object after every nail...  On top of that my extension cord dropped the amp load too low to turn over my air compressor..  I was a little annoyed and drank a lot, partly to keep the cold at bay while working (40ish F for the high) and partly because I was annoyed.


I decided to cut a ship lap into the edges so that there are no gaps from shrinkage =)  Made a huge saw dust pile... too bad cedar dust is no good for smoking grub =(


Back view of the smoker with the exhaust hole and chimney after nailing in the first set of boards on the inside.  The exhaust is about a 3.5" square hole.  I figure incorporating the chimney in the wall will help keep in the heat and keep things on the cheap..   


Putting the sides on the inside.  Holy braces... nothing wanted to stay put while I was working, so I had to get creative =)  This was also after more than a few beers, so that might have had something to do with it =)


I got the outside done and just have the tricky ceiling cuts to do before figuring out how big I want to make the door... and how many racks I want to put in it... Oh, and I need to figure out how to put a baffle of some sort on the chimney too.


Front view.  Exhaust down low to hopefully regulate even temps from top to bottom..

I'm thinking about taking out the bottom cinder block and using some of those block caps to make the firebox taller.  Getting charcoal in and out of the box is going to be a challenge as it is now... only a 10" clearance right now..  
 
 
It looks good. I am concerned that the exhaust is to low. You may end up with stale smoke.

Keep the pics coming.

Happy smoken.

David
I was planning on drilling a smallish 1/2" to 1" hole into the chimney at the top of the chamber to give the smoke somewhere to go without letting out too much of the heat.  Just haven't got that far yet.. Still trying to decide how many racks to put in there and how far apart to put them..
Looks awesome Jaez!   My smoker is straight up out the top.   I close the upper damper just enough I don't have smoke coming out the doors.   No stale smoke, but plenty to do its thing. 

I like your idea of making more room in the firebox.   You might even think about going up a full block.   Fire can get things hot in a hurry!   You will need a good  baffle to keep the heat down.   Looks really good.  

Lol!    Cheers!   We have two sons who are Marines.    My rule of thumb has always been to wait till 12 pm before drinking.   One day our middle son a Marine Vet told me.  "Dude, its 12 oclock somewhere"   I'm pretty bad to get an early start nowa days when not going to work.  
Beer.gif
 
Thanks Wes.  I can only cut out the bottom of the firebox for more room.  That cap was three 80 pound bags of cement... No way I'm moving it without breaking it up.  With how it looks though it might break up on its own.  The bottom has a real gravel like consistency so the heat may cause the air pockets to expand and break it up on the first run... I dont think that I want any more height on top anyways.  It's already sticking up over the fence as it is.  I

I think that I'm going to go with sam1amm's lava rock idea to cover the opening from the firebox.  That will act as a natural baffle and probably keep flare ups to a minimum.  I might put in another heat sink if temps go up too fast and high but that could probably be solved better with fire size control.  

I use that same rule of thumb.  Usually I cant get my butt in gear until after that anyways, so it all works out.  With all the stuff going wrong that I mentioned above plus smacking my head on the braces a couple times while taking measurements, I increased the consumption rate.  My beer usually gets warm too fast and that slows me down.  Working out in the cold (same temp as the fridge), the beer stayed nice and cold.  For a while I thought someone was drinking them while I was working... had an open beer in the garage and another open in the back yard at all times.  I figured that way I didn't have to carry it back and forth with me...

Going to have to bust it all out this weekend though because I want to fire it up for a test run before smokin the turkey next week... 
 
LOL!   

You'll want to put a couple really small fires in it to start with.  It will help cure out the masonry before you fire it up to temp.

Can't wait to see some tbs coming out of it.     Cheers!
 
Got some more work done on the smoker this weekend.  Finished the majority of it.  All that's left is a few trim pieces here and there and the firebox door...

I cut 4 racks and made a new charcoal box out of a sheet of 3/4 inch expanded metal.  That stuff is a pain in the butt to cut with a jig saw =)

I think that my charcoal box might be a bit too big.  It's about 12 inches by 8 inches and about 8 or 9 inches tall.  I fired up a half chimney and dumped it in tonight to see how the temps would do and the half chimney spread out into a thin layer on the bottom with lots of room between each charcoal..  Think maybe an 8 inch by 8 inch box might do me better..  I blocked the firebox door with some bricks, but left a good 1/4 inch gap on all sides...

With just the half chimney in there and the outside temp at 30*F, it made it up to 120 and held for about an hour before starting to drop.  I think tomorrow I will try the new sized basket with another half chimney, then load it up on Tuesday for a full test.  


Jaez cut your stretch metal with a grinder if you have one.   Its like cutting butter.

Love your smokehouse.   Can't wait to  see your first smoke!
 
SmokingMeatForums.com is reader supported and as an Amazon Associate, we may earn commissions from qualifying purchases.

Hot Threads

Clicky